


博客初衷:Android新人,初步零碎学习Android,在Java的基础上,Android的开发已经变得比较简单,无论是学习资源还是学习工具都让Android变得容易学习。但是越是容易的东西越是让人难以学深,学透。因此在一段时间学习后窃以为通过博客可以跟他人分享学习经验、讨论学习问题、借鉴别人良言,又可以为自己总结学习知识、积累学习成果、记录学习笔记。同时以此方式,说一声:Hello,World!
Android的布局管理器可以大致归为如下几类:
LinearLayout : 线性布局
TableLayout: : 表格布局
FrameLayout : 帧布局
RelativeLayout : 相对布局
GridLayout : 网格布局
AbsoluteLayout:绝对布局
1、LinearLayout(线性布局)
这种布局方式,顾名思义就是以线性排列的方式布局各个组件,横向布局horizontal,纵向布局Vertical。在android:orientation属性中进行选择纵向或者横向。
举例:
<?xml version="1.0" encoding="utf-8"?>
<LinearLayout   xmlns:android="http://schemas.android.com/apk/res/android"
    android:layout_width="match_parent"
    android:layout_height="match_parent"
    android:orientation="horizontal">

    <Button
        android:layout_width="wrap_content"
        android:layout_height="wrap_content"
        android:text="横向按钮1"/>

    <Button
        android:layout_width="wrap_content"
        android:layout_height="wrap_content"
        android:text="横向按钮2"/>

    <Button
        android:layout_width="wrap_content"
        android:layout_height="wrap_content"
        android:text="横向按钮3"/>

    <Button
        android:layout_width="wrap_content"
        android:layout_height="wrap_content"
        android:text="横向按钮4"/>
</LinearLayout>
很显然这种布局势必存在一种问题:当组件大小超过屏幕大小时怎么办呢?答案是组件超出屏幕的部分会无法看见
举例:
<?xml version="1.0" encoding="utf-8"?>
<LinearLayout   xmlns:android="http://schemas.android.com/apk/res/android"
    android:layout_width="match_parent"
    android:layout_height="match_parent"
    android:orientation="horizontal">

    <Button
        android:layout_width="wrap_content"
        android:layout_height="wrap_content"
        android:text="横向按钮1"/>

    <Button
        android:layout_width="wrap_content"
        android:layout_height="wrap_content"
        android:text="横向按钮2"/>

    <Button
        android:layout_width="wrap_content"
        android:layout_height="wrap_content"
        android:text="横向按钮3"/>

    <Button
        android:layout_width="wrap_content"
        android:layout_height="wrap_content"
        android:text="横向按钮4"/>

    <Button
        android:layout_width="wrap_content"
        android:layout_height="wrap_content"
        android:text="横向按钮5"/>

    <Button
        android:layout_width="wrap_content"
        android:layout_height="wrap_content"
        android:text="横向按钮6"/>

    <Button
        android:layout_width="wrap_content"
        android:layout_height="wrap_content"
        android:text="横向按钮7"/>
</LinearLayout>
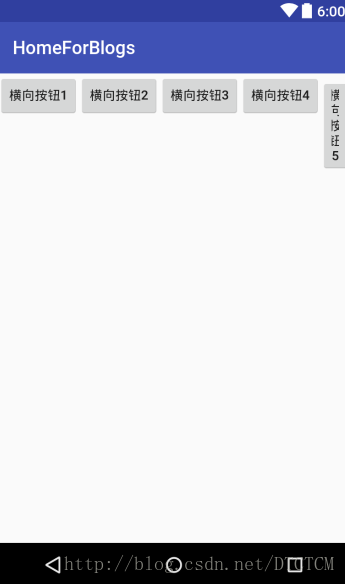
结构图:

可见除了前面的四个Button正常显示,而第五个则出现了异常,第6、7个按钮则根本没有显示,在布局结构中可看见没有任何空间存放这两个按钮了因此使用线性布局的横向布局时,就要注意这个问题,组件是否超出了屏幕的范围
接下来就是Vertical垂直布局,这个布局就好比一条竖线排列下来,与上一个横向布局比较来看就相当容易理解。下面仅修改android:orientation为vertical
<?xml version="1.0" encoding="utf-8"?>
<LinearLayout   xmlns:android="http://schemas.android.com/apk/res/android"
    android:layout_width="match_parent"
    android:layout_height="match_parent"
    android:orientation="vertical">

    <Button
        android:layout_width="wrap_content"
        android:layout_height="wrap_content"
        android:text="横向按钮1"/>

    <Button
        android:layout_width="wrap_content"
        android:layout_height="wrap_content"
        android:text="横向按钮2"/>

    <Button
        android:layout_width="wrap_content"
        android:layout_height="wrap_content"
        android:text="横向按钮3"/>

    <Button
        android:layout_width="wrap_content"
        android:layout_height="wrap_content"
        android:text="横向按钮4"/>

    <Button
        android:layout_width="wrap_content"
        android:layout_height="wrap_content"
        android:text="横向按钮5"/>

    <Button
        android:layout_width="wrap_content"
        android:layout_height="wrap_content"
        android:text="横向按钮6"/>

    <Button
        android:layout_width="wrap_content"
        android:layout_height="wrap_content"
        android:text="横向按钮7"/>
</LinearLayout>
效果如下:

显然这些按钮这一下都有足够的空间来显示了,但是倘若组件更多情况下也同样会遇到相应的问题,但这个问题只需要添加垂直下拉便可以得到解决。
2、TableLayout(表格布局)
表格布局事实上继承了LinearLayout类,这就意味着表格布局本质上是线性布局,只是在线性布局的基础上加了一些表格布局所特有的内容。当然这也比较好理解,表格本身就是整齐线性排列,不过嫁了行、列等限制。
在表格布局中事先不必先明确包含多少行、多少列,而是通过添加标签TableRow来增加表格的行,至于表格的列则是按照组件个数来确定,每一个组件占据一列,倘若不添加TableRow,而是直接加入组件则该组件默认占据一行,当然这是不规范的,实际应用中不应当这么做。
举例:
<?xml version="1.0" encoding="utf-8"?>
<TableLayout    xmlns:android="http://schemas.android.com/apk/res/android"
    android:layout_width="match_parent"
    android:layout_height="match_parent">

    <Button
        android:layout_width="wrap_content"
        android:layout_height="wrap_content"
        android:text="单独占据一行"/>

    <TableRow>
        <Button
            android:layout_width="wrap_content"
            android:layout_height="wrap_content"
            android:text="本行唯一(不占据整行)"/>
    </TableRow>
    <TableRow>
        <Button
            android:layout_width="wrap_content"
            android:layout_height="wrap_content"
            android:text="按钮1"/>

        <Button
            android:layout_width="wrap_content"
            android:layout_height="wrap_content"
            android:text="按钮2"/>

        <Button
            android:layout_width="wrap_content"
            android:layout_height="wrap_content"
            android:text="按钮3"/>
    </TableRow>

</TableLayout>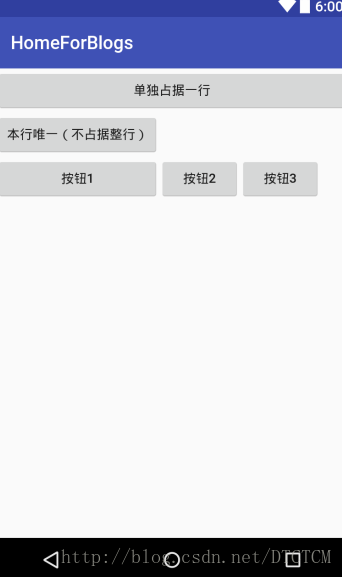
可以看出表格布局中:
第一行没有设置TableRow标签,这使得按钮独自占据一行,尽管选择了wrap_content,但是该按钮却仍然被拉长使铺满整行,因此此处按钮独占一行显然是不规范的。
第二行与第一行相对比,也是一个按钮独占一行,但该按钮由于在TableRow中,这就使得它只占据该行的某一列,而不去侵犯其他列的空间。
第三行则是中规中矩的一行,但是也可以从第三行中看出在本行中的三个按钮,第一个大小显然比其他按钮大,这似乎不符合wrap_content的要求,但是却很符合表格的要求,某一列的单元格大小总是与该列中最大单元格一致,这使得表格整齐而又美观。
Tips:表格布局可以看做是LinearLayout的嵌套布局,每一行单独是一个LinearLayout,这个LinearLayout是水平布局的,而在这所有行外包裹着一个LinearLayout,这个则是垂直布局,这就使得每一行内水平布局,行本身垂直布局,这样的LinearLayout能够满足一些情况下的表格布局,当然这都不如直接使用表格布局来得简单,而且表格布局还有一些特有的属性,如拉伸某个单元格直至填满整行,以及让某些列被隐藏等等,因此表格布局势必有其独特的作用。
3、帧布局(FrameLayout)
帧布局也是一种比较简单好用的布局方式,能实现一些特定情况的特定要求。帧布局每个组件占据一帧,把一个个组件像帧一样叠放在一起,上面的组件自然覆盖了下面的组件,因此使用该布局就要考虑清楚,谁在上,谁在下。在下的组件先定义,后定义的组件逐个覆盖,向播放图片一样,下一张图覆盖上一张图。
举例:
<?xml version="1.0" encoding="utf-8" ?>
<FrameLayout    xmlns:android="http://schemas.android.com/apk/res/android"
    android:layout_width="match_parent"
    android:layout_height="match_parent">

    <TextView
        android:layout_width="350dp"
        android:layout_height="350dp"
        android:background="#000"
        android:layout_gravity="center"/>

    <TextView
        android:layout_width="320dp"
        android:layout_height="320dp"
        android:background="#fff"
        android:layout_gravity="center"/>

    <TextView
        android:layout_width="290dp"
        android:layout_height="290dp"
        android:background="#000"
        android:layout_gravity="center"/>

    <TextView
        android:layout_width="260dp"
        android:layout_height="260dp"
        android:background="#fff"
        android:layout_gravity="center"/>

    <TextView
        android:layout_width="230dp"
        android:layout_height="230dp"
        android:background="#000"
        android:layout_gravity="center"/>

    <TextView
        android:layout_width="200dp"
        android:layout_height="200dp"
        android:background="#fff"
        android:layout_gravity="center"/>

    <TextView
        android:layout_width="170dp"
        android:layout_height="170dp"
        android:background="#000"
        android:layout_gravity="center"/>

    <TextView
        android:layout_width="140dp"
        android:layout_height="140dp"
        android:background="#fff"
        android:layout_gravity="center"/>

</FrameLayout>
4、相对布局(RelativeLayout)
相对布局不难理解,就是相对某一组件来安排它的位置,这个组件可以是父组件也可以是兄弟组件,相对布局有一个特殊的属性android:ignoreGravity即可以定义不受gravity(对齐方式)的影响。这样的布局方式十分灵活,也十分常用,很多情况下相对布局是非常好的选择。
此外相对布局中还可以控制组件左对齐,右对齐,顶端对齐,底部对齐,当然也有水平居中、垂直居中、置于中央位置等等。为了相对布局的功能得以实现,在XML中相对布局需要为各个组件定义一个唯一的ID,布局过程中就依据ID号来进行排列布局。
举例:
<?xml version="1.0" encoding="utf-8"?>
<RelativeLayout xmlns:android="http://schemas.android.com/apk/res/android"
    android:layout_width="match_parent"
    android:layout_height="match_parent">

    <Button
        android:layout_width="wrap_content"
        android:layout_height="wrap_content"
        android:id="@+id/top"
        android:layout_centerInParent="true"
        android:text="Top"/>

    <Button
        android:layout_width="wrap_content"
        android:layout_height="wrap_content"
        android:id="@+id/left"
        android:text="left"
        android:layout_toLeftOf="@id/center"
        android:layout_alignBottom="@id/center"/>

    <Button
        android:layout_width="wrap_content"
        android:layout_height="wrap_content"
        android:id="@+id/center"
        android:text="center"
        android:layout_below="@+id/top"
        android:layout_alignRight="@+id/top"/>

    <Button
        android:layout_width="wrap_content"
        android:layout_height="wrap_content"
        android:id="@+id/right"
        android:text="right"
        android:layout_toRightOf="@id/center"
        android:layout_alignBottom="@id/center"/>

    <Button
        android:layout_width="wrap_content"
        android:layout_height="wrap_content"
        android:id="@+id/bottom"
        android:text="bottom"
        android:layout_below="@+id/center"
        android:layout_alignRight="@+id/center"/>

</RelativeLayout>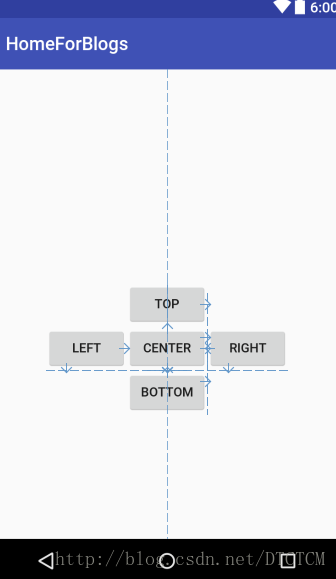
4、网格布局(GridLayout)
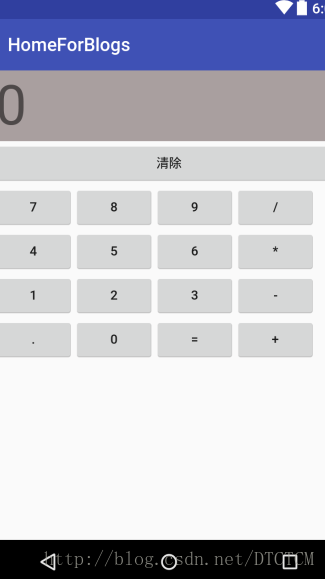
网格布局在Android4.0(APILevel 14)后才有的内容,事实上非常类似表格布局,不同的是网格布局更加类似HTML中的table标签,它将空间划分为 行X列 的网格,在每个网格放置一个组件,而此外还可以将某些网格合并,就类似于合并单元格。这样一来就似乎更加可以看成一个真真正正的表格,但android中以GridLayout与TableLayout来区分。
举例:
<?xml version="1.0" encoding="utf-8"?>
<GridLayout xmlns:android="http://schemas.android.com/apk/res/android"
    android:layout_width="match_parent"
    android:layout_height="match_parent"
    android:rowCount="6"
    android:columnCount="4">

    <TextView
        android:layout_width="match_parent"
        android:layout_height="wrap_content"
        android:layout_columnSpan="4"
        android:textSize="60dp"
        android:text="0"
        android:padding="3dp"
        android:layout_gravity="right"
        android:background="#a99f9f" />
    <Button
        android:layout_width="match_parent"
        android:layout_height="wrap_content"
        android:layout_columnSpan="4"
        android:text="清除"/>

    <Button
        android:layout_width="wrap_content"
        android:layout_height="wrap_content"
        android:text="7"/>
    <Button
        android:layout_width="wrap_content"
        android:layout_height="wrap_content"
        android:text="8"/>
    <Button
        android:layout_width="wrap_content"
        android:layout_height="wrap_content"
        android:text="9"/>
    <Button
        android:layout_width="wrap_content"
        android:layout_height="wrap_content"
        android:text="/"/>
    <Button
        android:layout_width="wrap_content"
        android:layout_height="wrap_content"
        android:text="4"/>
    <Button
        android:layout_width="wrap_content"
        android:layout_height="wrap_content"
        android:text="5"/>
    <Button
        android:layout_width="wrap_content"
        android:layout_height="wrap_content"
        android:text="6"/>
    <Button
        android:layout_width="wrap_content"
        android:layout_height="wrap_content"
        android:text="*"/>
    <Button
        android:layout_width="wrap_content"
        android:layout_height="wrap_content"
        android:text="1"/>
    <Button
        android:layout_width="wrap_content"
        android:layout_height="wrap_content"
        android:text="2"/>
    <Button
        android:layout_width="wrap_content"
        android:layout_height="wrap_content"
        android:text="3"/>
    <Button
        android:layout_width="wrap_content"
        android:layout_height="wrap_content"
        android:text="-"/>
    <Button
        android:layout_width="wrap_content"
        android:layout_height="wrap_content"
        android:text="."/>
    <Button
        android:layout_width="wrap_content"
        android:layout_height="wrap_content"
        android:text="0"/>
    <Button
        android:layout_width="wrap_content"
        android:layout_height="wrap_content"
        android:text="="/>
    <Button
        android:layout_width="wrap_content"
        android:layout_height="wrap_content"
        android:text="+"/>


</GridLayout>
效果:
5、绝对布局(AbsoluteLayout)
绝对布局这一方式在Android中处于可使用但不建议使用(弃用),毕竟对于android手机各个型号千差万别,绝对定位这一方式显然不是很好的方式,因此这里将不再举例,谨以此对这一布局方式做一个标志。


 146
146


 被折叠的 条评论
为什么被折叠?
被折叠的 条评论
为什么被折叠?
 到【灌水乐园】发言


