


- 搭建PXC集群,可参考 https://blog.csdn.net/du18020126395/article/details/115289632步骤1~9
- 环境规划
| hostname | 系统版本 | 备注 | |
| 10.45.7.128 | rac3 | redhat7.4 | PXC节点1(node1) |
| 10.45.7.129 | rac4 | redhat7.4 | PXC节点2(node2) |
| 10.45.53.31 | rac2 | redhat7.4 | PXC节点3(node3) |
| 10.45.53.30 | rac1 | redhat7.4 | HAproxy节点 |
- 在HAproxy节点安装配置haproxy
rpm -qa|grep haproxy
yum search haproxy
yum install -y haproxy
vi /etc/haproxy/haproxy.cfg
#---------------------------------------------------------------------
# Example configuration for a possible web application. See the
# full configuration options online.
#
# http://haproxy.1wt.eu/download/1.4/doc/configuration.txt
#
#---------------------------------------------------------------------
#---------------------------------------------------------------------
# Global settings
#---------------------------------------------------------------------
global
# to have these messages end up in /var/log/haproxy.log you will
# need to:
#
# 1) configure syslog to accept network log events. This is done
# by adding the '-r' option to the SYSLOGD_OPTIONS in
# /etc/sysconfig/syslog
#
# 2) configure local2 events to go to the /var/log/haproxy.log
# file. A line like the following can be added to
# /etc/sysconfig/syslog
#
# local2.* /var/log/haproxy.log
#
log 127.0.0.1 local2
chroot /var/lib/haproxy
pidfile /var/run/haproxy.pid
maxconn 4000
user haproxy
group haproxy
daemon
# turn on stats unix socket
stats socket /var/lib/haproxy/stats
#---------------------------------------------------------------------
# common defaults that all the 'listen' and 'backend' sections will
# use if not designated in their block
#---------------------------------------------------------------------
defaults
mode http
log global
option httplog
option dontlognull
option http-server-close
option forwardfor except 127.0.0.0/8
option redispatch
retries 3
timeout http-request 10s
timeout queue 1m
timeout connect 10s
timeout client 1m
timeout server 1m
timeout http-keep-alive 10s
timeout check 10s
maxconn 3000
#---------------------------------------------------------------------
# main frontend which proxys to the backends
#---------------------------------------------------------------------
frontend pxc-front
bind *:3306
mode tcp
default_backend pxc-back
frontend statas-front
bind *:8088
mode http
default_backend stats-back
#---------------------------------------------------------------------
# static backend for serving up images, stylesheets and such
#---------------------------------------------------------------------
backend pxc-back
mode tcp
balance leastconn
option httpchk
server rac3 10.45.7.128:3306 check port 9200 inter 12000 rise 3 fall 3
server rac4 10.45.7.129:3306 check port 9200 inter 12000 rise 3 fall 3
server rac2 10.45.53.31:3306 check port 9200 inter 12000 rise 3 fall 3
#---------------------------------------------------------------------
# round robin balancing between the various backends
#---------------------------------------------------------------------
backend stats-back
mode http
balance roundrobin
stats uri /haproxy/stats
stats auth clustercheckuser:clustercheckpassword!
##若不想用默认用户名密码,需要同时编辑更新/usr/bin/clustercheck
![]()
- PXC任一节点创建用户
GRANT PROCESS ON *.* TO 'clustercheckuser'@'localhost' IDENTIFIED BY 'clustercheckpassword!';
flush privileges;
- 检查集群状态 clustercheck

- PXC所有节点安装xinetd
yum -y install xinetd
vi /etc/xinetd.d/mysqlchk
# default: on
# description: mysqlchk
service mysqlchk
{
# this is a config for xinetd, place it in /etc/xinetd.d/
disable = no
flags = REUSE
socket_type = stream
type = UNLISTED
port = 9200
wait = no
user = nobody
server = /usr/bin/clustercheck
log_on_failure += USERID
only_from = 0.0.0.0/0
#
# Passing arguments to clustercheck
# <user> <pass> <available_when_donor=0|1> <log_file> <available_when_readonly=0|1> <defaults_extra_file>"
# Recommended: server_args = user pass 1 /var/log/log-file 0 /etc/my.cnf.local"
# Compatibility: server_args = user pass 1 /var/log/log-file 1 /etc/my.cnf.local"
# 55-to-56 upgrade: server_args = user pass 1 /var/log/log-file 0 /etc/my.cnf.extra"
#
# recommended to put the IPs that need
# to connect exclusively (security purposes)
per_source = UNLIMITED
}
在/etc/services添加mysqlchk的服务端口号
mysqlchk 9200/tcp #mysqlchk
service xinetd restart
- HAproxy节点启动haproxy并检查
systemctl start haproxy
登录前端:
http://10.45.53.30:8088/haproxy/stats
用户名:clustercheckuser
密码:clustercheckpassword!
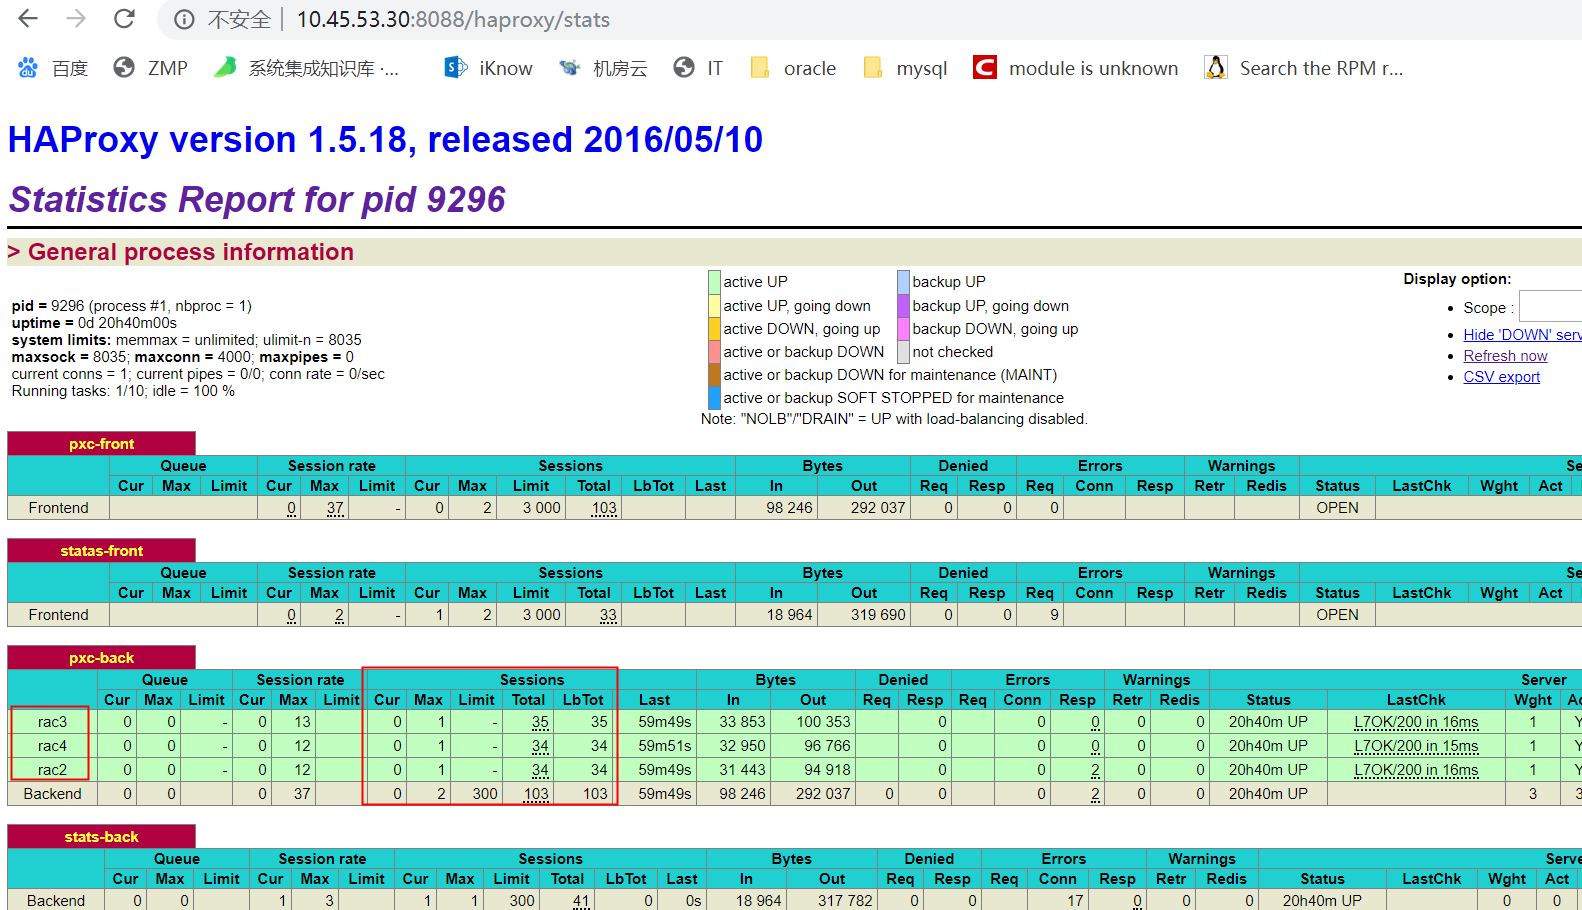
- 测试负载均衡
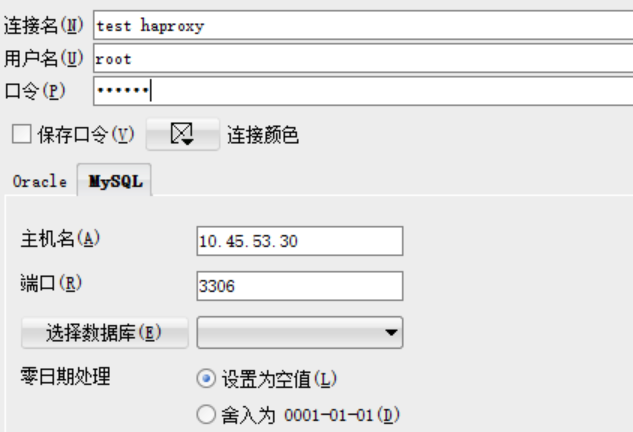
通过mysql workbench或者sqldeveloper(通过mysql-connector-java包配置),连接HAproxy节点
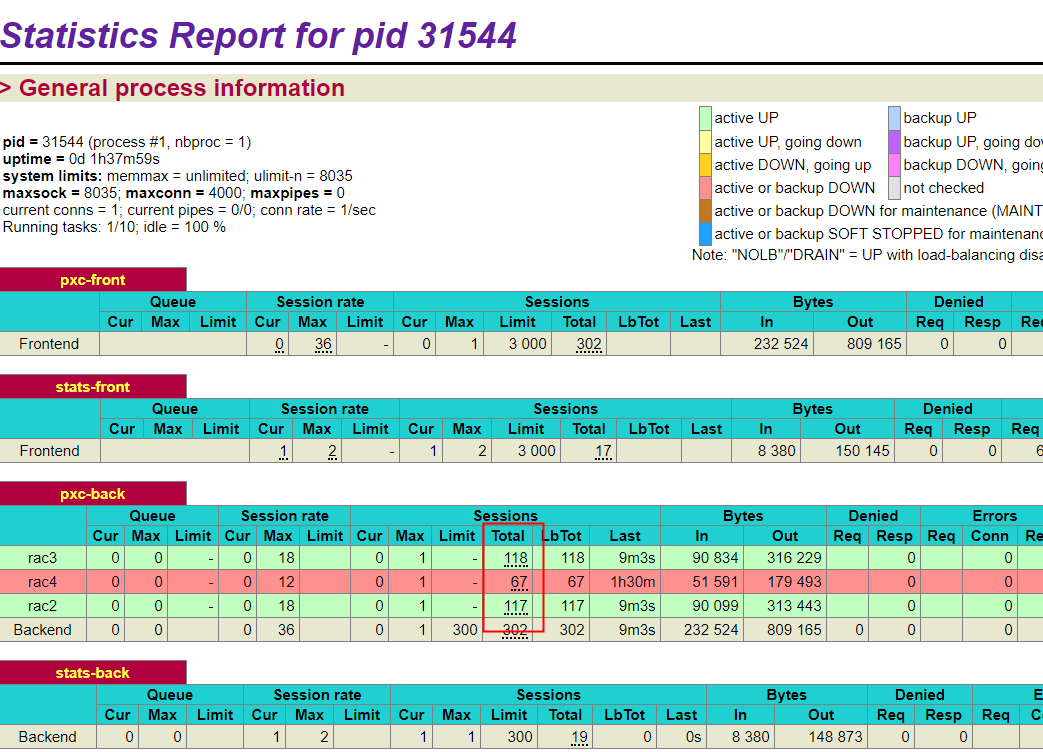
检查前端,发现负载均衡生效
或者在PXC任一节点检查HAproxy的负载均衡
for i in `seq 1 1000`; do mysql -h 10.45.53.30 -P3306 -uroot -p123456 -e "select @@hostname;"; done
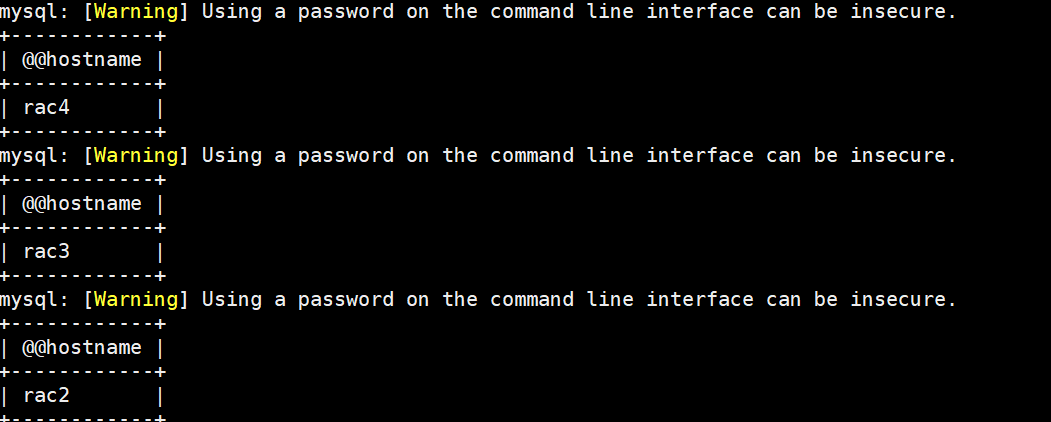
查看前端管理器,负载均衡生效

- 由于此时对于PXC的访问只能依赖HAproxy端,若想实现高可用,可以再配置另一台新服务器,安装HAproxy
在两台HAproxy节点安装keepalived,实现高可用,即常见的PXC+keepalived+HAproxy高可用集群
由于测试环境资源有限,故利用PXC一台节点作为另一台HAproxy节点
| hostname | 系统版本 | 备注 | |
| 10.45.7.128 | rac3 | redhat7.4 | PXC节点1(node1) |
| 10.45.7.129 | rac4 | redhat7.4 | PXC节点2(node2) |
| 10.45.53.31 | rac2 | redhat7.4 | PXC节点3(node3) |
| 10.45.53.30 | rac1 | redhat7.4 | HAproxy节点1 |
| 10.45.53.31 | rac2 | redhat7.4 | HAproxy节点2 |
| 10.45.53.32 |
|
| keepalived的vip(必须与两台haproxy节点网卡所在网段相同,否则vip无法ping通) |
由于HAproxy节点2是PXC集群的某节点,3306端口已被mysql进程占用,所以HAproxy监听PXC不能再使用3306端口,可使用3307端口
HAproxy节点1配置HAproxy:
root@rac1[/etc/haproxy]#cat haproxy.cfg
#---------------------------------------------------------------------
# Example configuration for a possible web application. See the
# full configuration options online.
#
# http://haproxy.1wt.eu/download/1.4/doc/configuration.txt
#
#---------------------------------------------------------------------
#---------------------------------------------------------------------
# Global settings
#---------------------------------------------------------------------
global
# to have these messages end up in /var/log/haproxy.log you will
# need to:
#
# 1) configure syslog to accept network log events. This is done
# by adding the '-r' option to the SYSLOGD_OPTIONS in
# /etc/sysconfig/syslog
#
# 2) configure local2 events to go to the /var/log/haproxy.log
# file. A line like the following can be added to
# /etc/sysconfig/syslog
#
# local2.* /var/log/haproxy.log
#
log 127.0.0.1 local2
chroot /var/lib/haproxy
pidfile /var/run/haproxy.pid
maxconn 4000
user haproxy
group haproxy
daemon
# turn on stats unix socket
stats socket /var/lib/haproxy/stats
#---------------------------------------------------------------------
# common defaults that all the 'listen' and 'backend' sections will
# use if not designated in their block
#---------------------------------------------------------------------
defaults
mode http
log global
option httplog
option dontlognull
option http-server-close
option forwardfor except 127.0.0.0/8
option redispatch
retries 3
timeout http-request 10s
timeout queue 1m
timeout connect 10s
timeout client 1m
timeout server 1m
timeout http-keep-alive 10s
timeout check 10s
maxconn 3000
#---------------------------------------------------------------------
# main frontend which proxys to the backends
#---------------------------------------------------------------------
frontend pxc-front
bind *:3307
mode tcp
default_backend pxc-back
frontend stats-front
bind *:8088
mode http
default_backend stats-back
#---------------------------------------------------------------------
# static backend for serving up images, stylesheets and such
#---------------------------------------------------------------------
backend pxc-back
mode tcp
balance leastconn
option httpchk
server rac3 10.45.7.128:3306 check port 9200 inter 12000 rise 3 fall 3
server rac4 10.45.7.129:3306 check port 9200 inter 12000 rise 3 fall 3
server rac2 10.45.53.31:3306 check port 9200 inter 12000 rise 3 fall 3
#---------------------------------------------------------------------
# round robin balancing between the various backends
#---------------------------------------------------------------------
backend stats-back
mode http
balance roundrobin
stats uri /haproxy/stats
stats auth clustercheckuser:clustercheckpassword!
HAproxy节点2配置HAproxy:
yum install -y haproxy
root@rac2[/etc/haproxy]#cat haproxy.cfg
#---------------------------------------------------------------------
# Example configuration for a possible web application. See the
# full configuration options online.
#
# http://haproxy.1wt.eu/download/1.4/doc/configuration.txt
#
#---------------------------------------------------------------------
#---------------------------------------------------------------------
# Global settings
#---------------------------------------------------------------------
global
# to have these messages end up in /var/log/haproxy.log you will
# need to:
#
# 1) configure syslog to accept network log events. This is done
# by adding the '-r' option to the SYSLOGD_OPTIONS in
# /etc/sysconfig/syslog
#
# 2) configure local2 events to go to the /var/log/haproxy.log
# file. A line like the following can be added to
# /etc/sysconfig/syslog
#
# local2.* /var/log/haproxy.log
#
log 127.0.0.1 local2
chroot /var/lib/haproxy
pidfile /var/run/haproxy.pid
maxconn 4000
user haproxy
group haproxy
daemon
# turn on stats unix socket
stats socket /var/lib/haproxy/stats
#---------------------------------------------------------------------
# common defaults that all the 'listen' and 'backend' sections will
# use if not designated in their block
#---------------------------------------------------------------------
defaults
mode http
log global
option httplog
option dontlognull
option http-server-close
option forwardfor except 127.0.0.0/8
option redispatch
retries 3
timeout http-request 10s
timeout queue 1m
timeout connect 10s
timeout client 1m
timeout server 1m
timeout http-keep-alive 10s
timeout check 10s
maxconn 3000
#---------------------------------------------------------------------
# main frontend which proxys to the backends
#---------------------------------------------------------------------
frontend pxc-front
bind *:3307
mode tcp
default_backend pxc-back
frontend statas-front
bind *:8088
mode http
default_backend stats-back
#---------------------------------------------------------------------
# static backend for serving up images, stylesheets and such
#---------------------------------------------------------------------
backend pxc-back
mode tcp
balance leastconn
option httpchk
server rac3 10.45.7.128:3306 check port 9200 inter 12000 rise 3 fall 3
server rac4 10.45.7.129:3306 check port 9200 inter 12000 rise 3 fall 3
server rac2 10.45.53.31:3306 check port 9200 inter 12000 rise 3 fall 3
#---------------------------------------------------------------------
# round robin balancing between the various backends
#---------------------------------------------------------------------
backend stats-back
mode http
balance roundrobin
stats uri /haproxy/stats
stats auth clustercheckuser:clustercheckpassword!
HAproxy节点1配置keepalived:
yum install -y keepalived
root@rac1[/etc/keepalived]#cat keepalived.conf
! Configuration File for keepalived
global_defs {
notification_email {
acassen@firewall.loc
failover@firewall.loc
sysadmin@firewall.loc
}
notification_email_from Alexandre.Cassen@firewall.loc
smtp_server 192.168.200.1
smtp_connect_timeout 30
router_id rac1
}
vrrp_script check_apps {
script "/etc/keepalived/haproxy_check.sh"
interval 3
}
vrrp_instance vip1 {
state MASTER
interface ens192
virtual_router_id 51
priority 100
advert_int 1
authentication {
auth_type PASS
auth_pass 1111
}
virtual_ipaddress {
10.45.53.32/24 dev ens192 scope global label ens192:3
}
track_script {
check_apps
}
nopreempt
}
root@rac1[/etc/keepalived]#cat haproxy_check.sh
#!/bin/bash
counter=$(ps -C haproxy --no-heading|wc -l)
if [ $counter -eq 0 ]; then
systemctl start haproxy
echo `date`,automatically start haproxy>>/var/log/haproxy.log
if [ `ps -C haproxy --no-heading |wc -l` -eq 0 ]; then
systemctl stop keepalived
echo `date`,keepalived killed>>/var/log/keepalived.log
fi
fi
HAproxy节点2配置keepalived:
yum install -y keepalived
root@rac2[/etc/keepalived]#cat keepalived.conf
! Configuration File for keepalived
global_defs {
notification_email {
acassen@firewall.loc
failover@firewall.loc
sysadmin@firewall.loc
}
notification_email_from Alexandre.Cassen@firewall.loc
smtp_server 192.168.200.1
smtp_connect_timeout 30
router_id rac1
}
vrrp_script check_apps {
script "/etc/keepalived/haproxy_check.sh"
interval 3
}
vrrp_instance vip1 {
state BACKUP
interface ens192
virtual_router_id 51
priority 90
advert_int 1
authentication {
auth_type PASS
auth_pass 1111
}
virtual_ipaddress {
10.45.53.32/24 dev ens192 scope global label ens192:3
}
track_script {
check_apps
}
nopreempt
}
root@rac2[/etc/keepalived]#cat haproxy_check.sh
#!/bin/bash
counter=$(ps -C haproxy --no-heading|wc -l)
if [ $counter -eq 0 ]; then
systemctl start haproxy
echo `date`,automatically start haproxy>>/var/log/haproxy.log
if [ `ps -C haproxy --no-heading |wc -l` -eq 0 ]; then
systemctl stop keepalived
echo `date`,keepalived killed>>/var/log/keepalived.log
fi
fi
- HAproxy节点1和2启动haproxy和keepalived服务,此时vip起在HAproxy节点1,即master节点
systemctl start haproxy
systemctl start keepalived
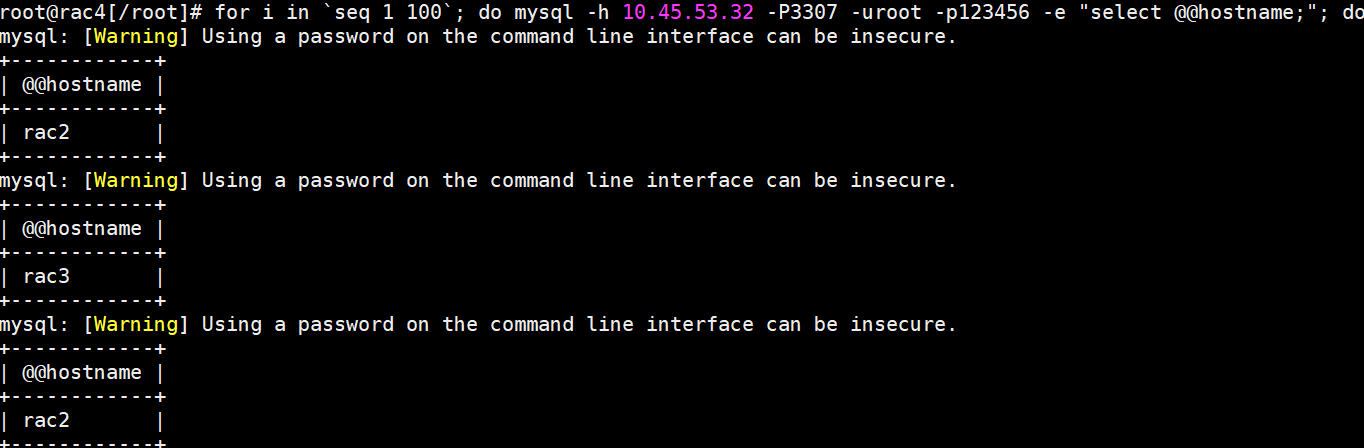
- 在PXC某节点测试HAproxy节点1和2负载均衡
for i in `seq 1 100`; do mysql -h 10.45.53.30 -P3307 -uroot -p123456 -e "select @@hostname;"; done
for i in `seq 1 100`; do mysql -h 10.45.53.31 -P3307 -uroot -p123456 -e "select @@hostname;"; done
- 测试keepalived切换vip
for i in `seq 1 100`; do mysql -h 10.45.53.32 -P3307 -uroot -p123456 -e "select @@hostname;"; done
HAproxy节点1停keepalived服务
systemctl stop keepalived
vip漂到HAproxy节点2上,测试连接
for i in `seq 1 100`; do mysql -h 10.45.53.32 -P3307 -uroot -p123456 -e "select @@hostname;"; done
HAproxy节点1启动keepalived服务,vip自动漂回来
- 将PXC节点2mysql服务停掉,测试PXC负载均衡
root@rac4[/root]#service mysql stop
Redirecting to /bin/systemctl stop mysql.service
for i in `seq 1 100`; do mysql -h 10.45.53.32 -P3307 -uroot -p123456 -e "select @@hostname;"; done
发现PXC节点2没有被访问
PXC+keepalived+HAproxy高可用集群搭建并测试成功


 638
638


 被折叠的 条评论
为什么被折叠?
被折叠的 条评论
为什么被折叠?
 到【灌水乐园】发言


