


rt-thread i2c 使用教程
rt-thread studio
1. 创建基础工程
使用芯片级的基础工程作为环境。
![[外链图片转存失败,源站可能有防盗链机制,建议将图片保存下来直接上传(img-eGeqJ6Zv-1657039855097)(images/markdown/rtthread_i2c使用教程/image-20220706004456178.png)]](https://i-blog.csdnimg.cn/blog_migrate/fd1b19efe73cade50fba7cdbf42c6c73.png)
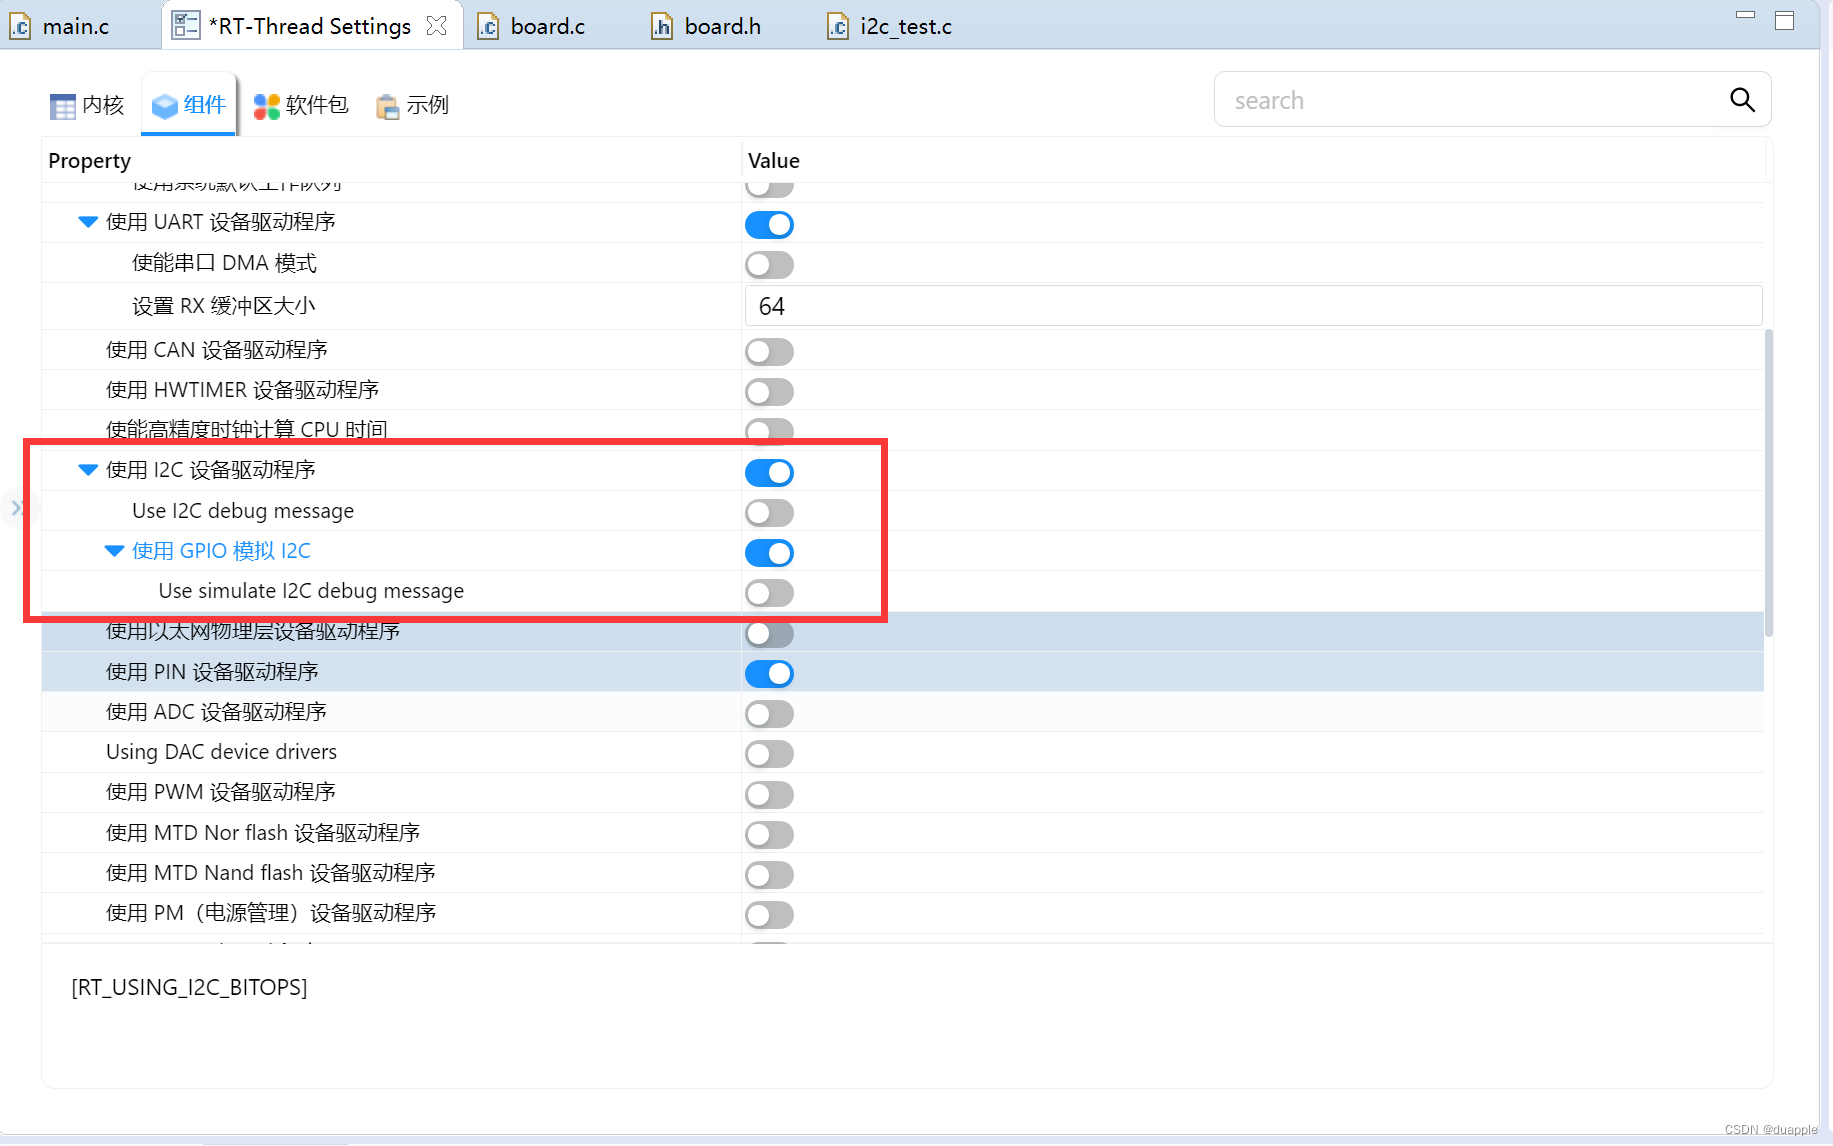
2. 配置i2c
打开i2c。
![[外链图片转存失败,源站可能有防盗链机制,建议将图片保存下来直接上传(img-r0pjOOJ3-1657039855097)(images/markdown/rtthread_i2c使用教程/image-20220706004526762.png)]](https://i-blog.csdnimg.cn/blog_migrate/579ccb0c29c2bdc1ddea70fb2e8b9941.png)
配置驱动。
CTRL+S保存配置后,会重新生成工程。
修改board.h文件。取消 BSP_USING_I2C1 的注释。
/** if you want to use i2c bus(soft simulate) you can use the following instructions.
 *
 * STEP 1, open i2c driver framework(soft simulate) support in the RT-Thread Settings file
 *
 * STEP 2, define macro related to the i2c bus
 *                 such as     #define BSP_USING_I2C1
 *
 * STEP 3, according to the corresponding pin of i2c port, modify the related i2c port and pin information
 *                 such as     #define BSP_I2C1_SCL_PIN    GET_PIN(port, pin)   ->   GET_PIN(C, 11)
 *                             #define BSP_I2C1_SDA_PIN    GET_PIN(port, pin)   ->   GET_PIN(C, 12)
 */

#define BSP_USING_I2C1
#ifdef BSP_USING_I2C1
#define BSP_I2C1_SCL_PIN    GET_PIN(B, 10)
#define BSP_I2C1_SDA_PIN    GET_PIN(B, 11)
#endif
3. 代码
使用i2c 读取BMP280温湿度计。使用rt_i2c_transfer来读取和写入数据到传感器芯片。这里的温湿度驱动是我自己实现的。
#include <rtthread.h>
#include <rtdevice.h>
#include <stdio.h>
#include "bme280_i2c.h"
#define BMP280_I2C_BUS_NAME "i2c1"
#define BME280_ADDR 0X76
static struct rt_i2c_bus_device *i2c_bus = RT_NULL;
static rt_bool_t initialized = RT_FALSE;
static int write_bytes(struct rt_i2c_bus_device *bus, uint8_t slave_addr, uint8_t reg_addr, uint8_t *data, uint8_t len)
{
uint8_t buffer[128] = { 0 };
buffer[0] = reg_addr;
memcpy(buffer + 1, data, len);
struct rt_i2c_msg msgs;
msgs.addr = BME280_ADDR;
msgs.flags = RT_I2C_WR;
msgs.buf = buffer;
msgs.len = len + 1;
if (rt_i2c_transfer(bus, &msgs, 1) == 1)
{
return RT_EOK;
}
else
return -RT_ERROR;
}
static int read_bytes(struct rt_i2c_bus_device *bus, uint8_t slave_addr, uint8_t reg_addr, uint8_t *data, uint8_t len)
{
struct rt_i2c_msg msgs[2];
msgs[0].addr = BME280_ADDR;
msgs[0].flags = RT_I2C_WR;
msgs[0].buf = ®_addr;
msgs[0].len = 1;
msgs[1].addr = BME280_ADDR;
msgs[1].flags = RT_I2C_RD;
msgs[1].buf = data;
msgs[1].len = len;
if (rt_i2c_transfer(bus, msgs, 2) == 2)
{
return RT_EOK;
}
else
return -RT_ERROR;
}
static int write(uint8_t slave_addr, uint8_t reg_addr, uint8_t *bytes, uint32_t len)
{
return write_bytes(i2c_bus, BME280_ADDR, reg_addr, bytes, len);
}
static int read(uint8_t slave_addr, uint8_t reg_addr, uint8_t *bytes, uint32_t len)
{
return read_bytes(i2c_bus, BME280_ADDR, reg_addr, bytes, len);
}
static void delay_us(uint32_t us)
{
rt_thread_mdelay(us / 1000);
}
static int i2c_test(void)
{
i2c_bus = (struct rt_i2c_bus_device *) rt_device_find(BMP280_I2C_BUS_NAME);
if (i2c_bus == RT_NULL)
{
rt_kprintf("can't find %s device!\n", BMP280_I2C_BUS_NAME);
return RT_ERROR;
}
bme280_init(write, read, delay_us, NULL, 0);
int32_t temperature = 0;
bme280_read_temperature(&temperature);
rt_kprintf("temp: %d\n", temperature);
return RT_EOK;
}
MSH_CMD_EXPORT(i2c_test, i2c test);
4. 测试
使用i2c_test 进行demo测试,读取温度为27.28℃。
![[外链图片转存失败,源站可能有防盗链机制,建议将图片保存下来直接上传(img-a2PYPUyI-1657039855098)(images/markdown/rtthread_i2c使用教程/image-20220706004857734.png)]](https://i-blog.csdnimg.cn/blog_migrate/25a2ab9090f2c8a84e5f59c27c90f854.png)
KEIL
暂时无。


 1551
1551

 被折叠的 条评论
为什么被折叠?
被折叠的 条评论
为什么被折叠?
 到【灌水乐园】发言


