


1. 容器接口
- BeanFactory能做哪些事
- ApplicationContext有哪些扩展功能
- 事件解耦
1.1 BeanFactory和ApplicationContext
BeanFactory是ApplicationContext的父接口,它才是Spring的核心容器,提供getBean的能力
主要的子类ApplicationContext是组合了BeanFactory的功能。它扩展了 BeanFactory 接口的功能,如:
- 国际化
- 通配符方式获取一组 Resource 资源
- 整合 Environment 环境(能通过它获取各种来源的配置信息)
- 事件发布与监听,实现组件之间的解耦
1.2 BeanFactory能做什么
表面上只有 getBean
实际上控制反转、基本的依额注入、直至 Bean 的生命周期的各种功能,都由它的实现类提供
可以查看类org.springframework.beans.factory.support.DefaultListableBeanFactory

可以看到BeanFactory只是DefaultListableBeanFactory实现的一个很小的类,提供getBean的功能。
| 父类 | 作用 |
|---|---|
| SingletonBeanRegistry | 注册单例 |
| HierarchicalBeanFactory | 父子容器 |
| ListableBeanFactory | 列出容器中所有Bean |
| BeanDefinitionRegistry | 注册新的Bean |
| DefaultSingletonBeanRegistry | 管理单例对象,容器三级缓存就在这个类里面 |
1.3 ApplicationContext多了什么功能
ApplicationContext的实现类可以查看org.springframework.context.ConfigurableApplicationContext
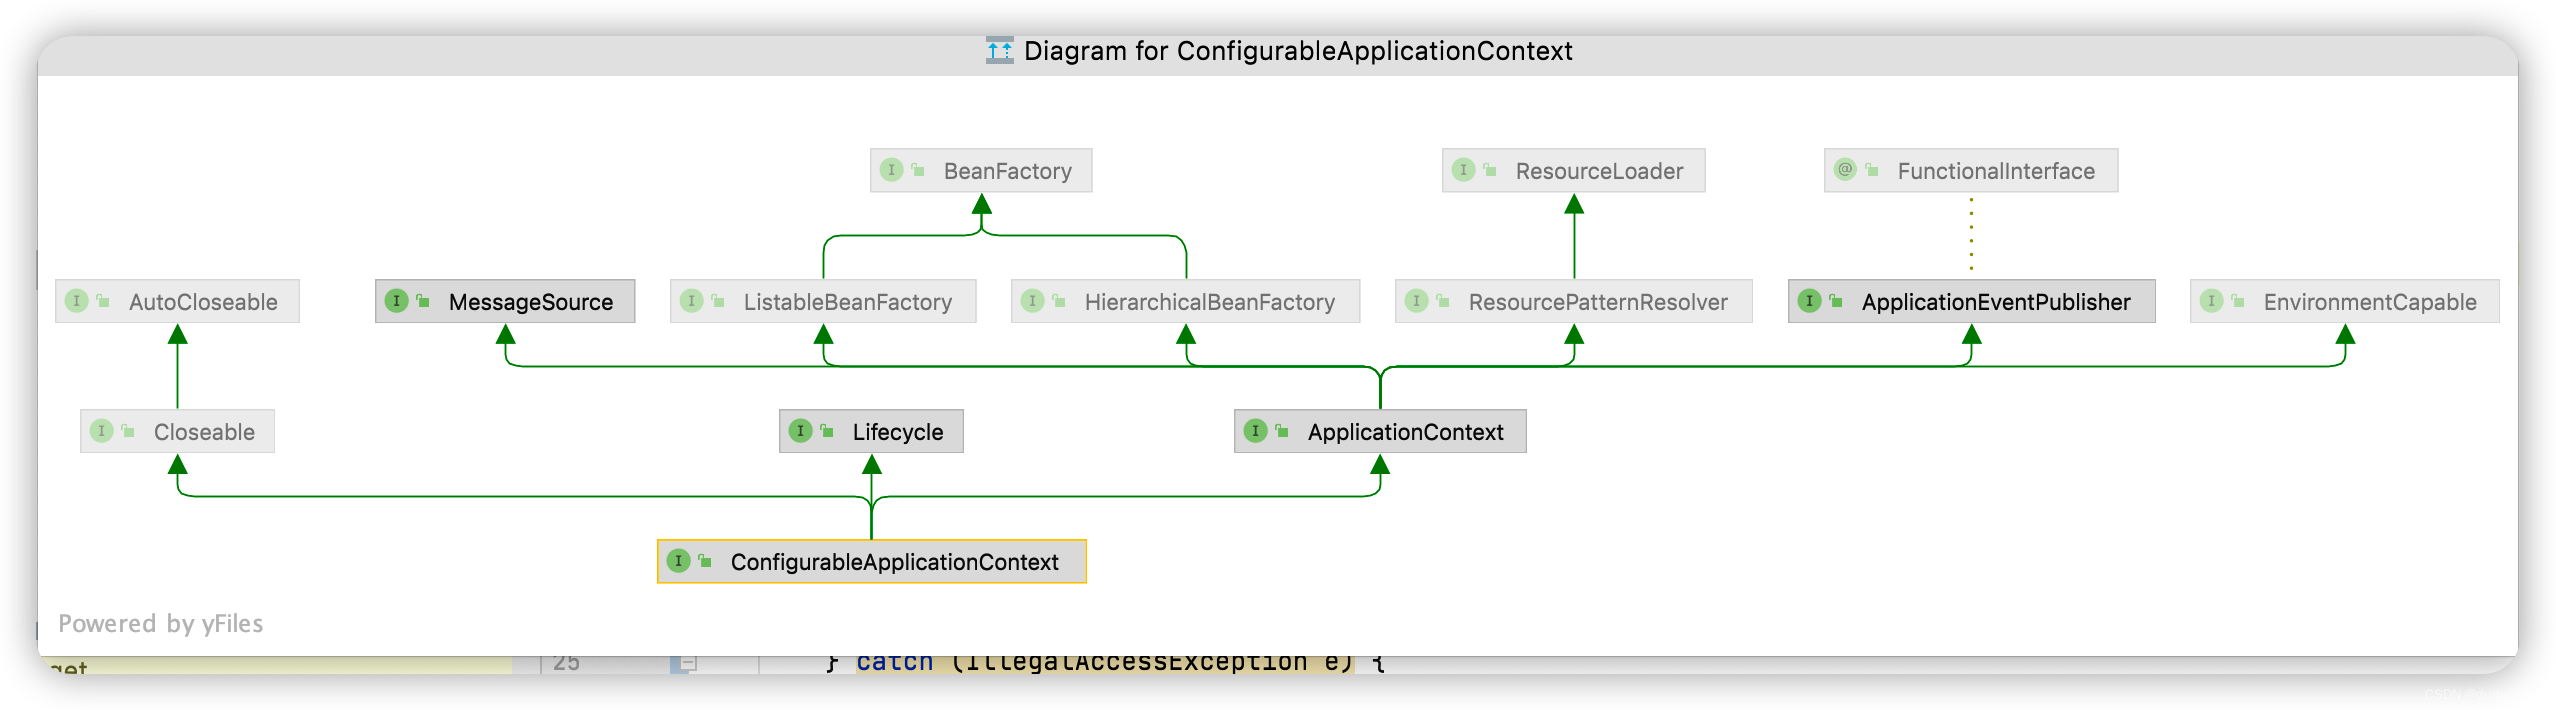
| 父类 | 功能 |
|---|---|
| MessageSource | 资源国际化 |
| ResourcePatternResolver | 通配符匹配资源(类路径、磁盘路径) |
| ApplicationEventPublisher | 事件发布器,发布事件监听事件的能力 |
| EnvironmentCapable | 读取环境变量的能力,在yaml、properties文件中读取 |
1.4 国际化
- ApplicationContext 中 MessageSource bean 的名字固定为 messageSource
- 使用 SpringBoot 时,国际化文件名固定为 messages
- 空的 messages.properties 也必须存在
public static void main(String[] args) {
        GenericApplicationContext context = new GenericApplicationContext();

        context.registerBean("messageSource", MessageSource.class, () -> {
            ResourceBundleMessageSource ms = new ResourceBundleMessageSource();
            ms.setDefaultEncoding("utf-8");
            ms.setBasename("messages");
            return ms;
        });

        context.refresh();

        System.out.println(context.getMessage("hi", null, Locale.ENGLISH));
        System.out.println(context.getMessage("hi", null, Locale.CHINESE));
    }
IDEA需要修复File Encoding为UTF-8编码格式,Locale.CHINA的信息可以从游览器的请求头带过来
1.5 事件发布器
定义事件
@Slf4j
public class UserRegisteredEvent extends ApplicationEvent {

    public UserRegisteredEvent(Object source) {
        super(source);
        log.info("用户注册事件:{}", source);
    }
}
发布事件
@Autowired
    private ApplicationEventPublisher context;

    public void register() {
        log.debug("用户注册");
        context.publishEvent(new UserRegisteredEvent(this));
    }
消费事件
@EventListener
public void aaa(UserRegisteredEvent event) {
    log.debug("{}", event);
    log.debug("发送短信");
}
2. 容器实现
- BeanFactory实现的特点
- ApplicationContext的常见实现和用法
- 内嵌容器、注册DispatcherServlet
常见的容器实现类
| 类 | 功能 |
|---|---|
| DefaultListableBeanFactory | 是 BeanFactory 最重要的实现,像控制反转和依赖注入功能,都是它来实现 |
| ClassPathXmlApplicationContext | 从类路径查找 XML 配置文件,创建容器(旧) |
| FileSystemXmlApplicationContext | 从磁盘路径查找 XML 配置文件,创建容器(旧) |
| XmlWebApplicationContext | 传统 SSM 整合时,基于 XML 配置文件的容器(旧) |
| AnnotationConfigWebApplicationContext | 传统 SSM 整合时,基于 java 配置类的容器(旧) |
| AnnotationConfigApplicationContext | Spring boot 中非 web 环境容器(新) |
| AnnotationConfigServletWebServerApplicationContext | Spring boot 中 servlet web 环境容器(新) |
| AnnotationConfigReactiveWebServerApplicationContext | Spring boot 中 reactive web 环境容器(新) |
另外要注意的是,后面这些带有 ApplicationContext 的类都是 ApplicationContext 接口的实现,但它们是组合了 DefaultListableBeanFactory 的功能,并非继承而来
2.1 BeanFactory实现
手动创建Bean
Bean的定义
@Configuration
static class Config {
   @Bean
   public Bean1 bean1() {
       return new Bean1();
   }

   @Bean
   public Bean2 bean2() {
       return new Bean2();
   }


}

static class Bean1 {
   private static final Logger log = LoggerFactory.getLogger(Bean1.class);

   public Bean1() {
       log.debug("构造 Bean1()");
   }
   @Autowired
   private Bean2 bean2;

   public Bean2 getBean2(){
       return bean2;
   }

}

static class Bean2 {
   private static final Logger log = LoggerFactory.getLogger(Bean2.class);

   public Bean2() {
       log.debug("构造 Bean2()");
   }
}
创建和注册Bean
DefaultListableBeanFactory beanFactory = new DefaultListableBeanFactory();
// bean 的定义(class, scope, 初始化, 销毁)
AbstractBeanDefinition beanDefinition =
        BeanDefinitionBuilder.genericBeanDefinition(Config.class).setScope("singleton").getBeanDefinition();
//注册Bean
beanFactory.registerBeanDefinition("config", beanDefinition);
for (String beanDefinitionName : beanFactory.getBeanDefinitionNames()) {
    System.out.println(beanDefinitionName);
}
打印结果:config。
为什么Config中的Bean1、Bean2都没有注册上去呢?因为解析@Configuration、@Bean的功能需要添加额外的后置处理器
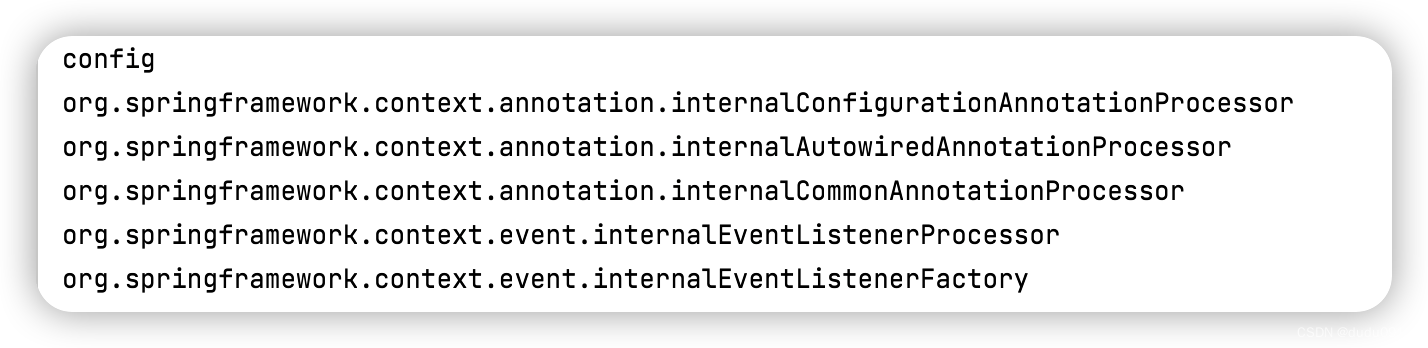
// 给 BeanFactory 添加一些常用的后处理器
AnnotationConfigUtils.registerAnnotationConfigProcessors(beanFactory);
打印结果:
为什么还是没有打印出Bean1、Bean2?
因为上面只是将解析注解的类加入到Bean工厂中,但是还没有生效
// BeanFactory 后处理器主要功能,补充了一些 bean 定义
beanFactory.getBeansOfType(BeanFactoryPostProcessor.class).values().forEach(beanFactoryPostProcessor -> {
    //执行Bean工厂后置处理器
    beanFactoryPostProcessor.postProcessBeanFactory(beanFactory);
});
System.out.println("========== 添加完后置处理器后 ===========");
for (String beanDefinitionName : beanFactory.getBeanDefinitionNames()) {
    System.out.println(beanDefinitionName);
}
System.out.println(beanFactory.getBean(Bean1.class).getBean2());
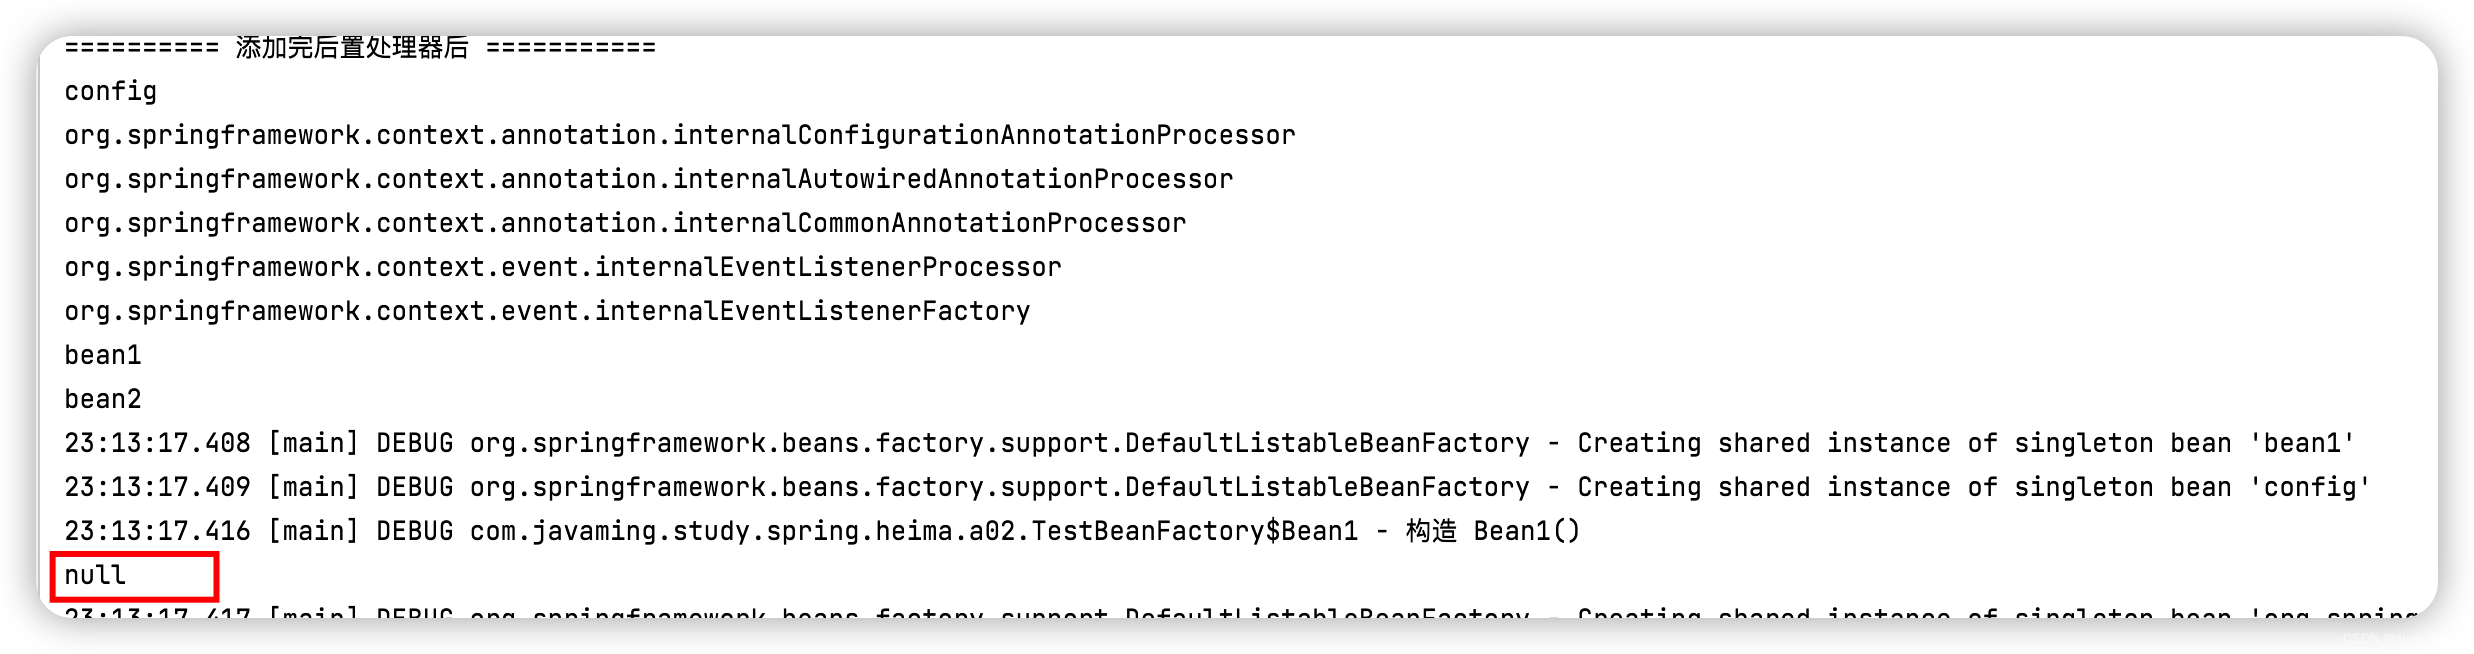
执行完BeanFactory的后置处理器后可以打印出Bean1、Bean2,但是通过Bean1获取Bean2为什么是null?
这是因为@Autowired、@Resource是Bean的后置处理器实现的功能,针对Bean的生命周期各个阶段提供扩展功能
添加Bean的后置处理器
// Bean 后处理器, 针对 bean 的生命周期的各个阶段提供扩展, 例如 @Autowired @Resource ...
beanFactory.getBeansOfType(BeanPostProcessor.class).values().forEach(beanFactory::addBeanPostProcessor);
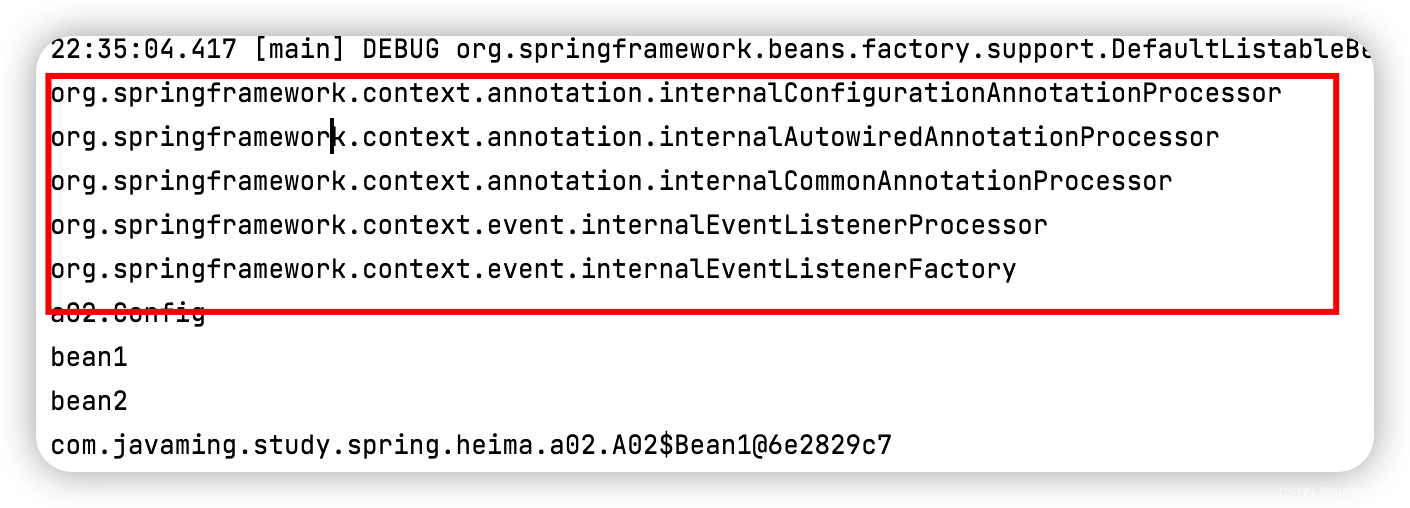
System.out.println("========== 添加完Bean后置处理器后 ===========");
for (String name : beanFactory.getBeanDefinitionNames()) {
System.out.println(name);
}
//提前准备好所有的单例对象
beanFactory.preInstantiateSingletons();
System.out.println(beanFactory.getBean(Bean1.class).getBean2());
2.2 @Autowired和@Resource顺序
@Autowired
@Resource(name = "bean4")
private Inter bean3;
@Autowired的优先级比@Resource的优先级高,会先注入Bean3对象。通过Order排序,数字小的排在前面。
- CommonAnnotationBeanPostProcessor(解析@Resource注解)order = Ordered.LOWEST_PRECEDENCE - 3
- AutowiredAnnotationBeanPostProcessor(解析@Autowired注解)= Ordered.LOWEST_PRECEDENCE - 2
2.3 ApplicationContext实现
ApplicationContext有4种较为经典的容器实现
- ClassPathXmlApplicationContext:基于 classpath 下 xml 格式的配置文件来创建
- FileSystemXmlApplicationContext:基于磁盘路径下 xml 格式的配置文件来创建
- AnnotationConfigApplicationContext:基于 java 配置类来创建
- AnnotationConfigServletWebServerApplicationContext:基于 java 配置类来创建, 用于 web 环境
2.3.1 ClassPathXmlApplicationContext
定义Bean
static class Bean1 {
    }

    static class Bean2 {

        private Bean1 bean1;

        public void setBean1(Bean1 bean1) {
            this.bean1 = bean1;
        }

        public Bean1 getBean1() {
            return bean1;
        }
    }
编写XML文件
<?xml version="1.0" encoding="UTF-8"?>
<beans xmlns="http://www.springframework.org/schema/beans"
       xmlns:xsi="http://www.w3.org/2001/XMLSchema-instance"
       xsi:schemaLocation="http://www.springframework.org/schema/beans http://www.springframework.org/schema/beans/spring-beans.xsd">

    <bean id="bean1" class="com.Bean1"/>
    <bean id="bean2" class="com.Bean2">
        <property name="bean1" ref="bean1">

        </property>
    </bean>

</beans>
测试
private static void testClassPathXmlApplicationContext() {
        ClassPathXmlApplicationContext context =
                new ClassPathXmlApplicationContext("b01.xml");

        for (String name : context.getBeanDefinitionNames()) {
            System.out.println(name);
        }

        System.out.println(context.getBean(Bean2.class).getBean1());
    }
2.3.2 FileSystemXmlApplicationContext
如果不使用全磁盘路径,而是src目录开始,IDEA的Working directory目录需要设置为本模块的项目。
private static void testFileSystemXmlApplicationContext() {
        FileSystemXmlApplicationContext context =
                new FileSystemXmlApplicationContext(
                        "src/main/resources/b01.xml");
        for (String name : context.getBeanDefinitionNames()) {
            System.out.println(name);
        }

        System.out.println(context.getBean(Bean2.class).getBean1());
    }
XML和磁盘路径读取成Bean的原理
其实XML读取和磁盘路径也是将文件解析为BeanDefinition
DefaultListableBeanFactory beanFactory = new DefaultListableBeanFactory();
        System.out.println("读取之前...");
        for (String name : beanFactory.getBeanDefinitionNames()) {
            System.out.println(name);
        }
        System.out.println("读取之后...");
        XmlBeanDefinitionReader reader = new reader.loadBeanDefinitions(new FileSystemResource("src/main/resources/b01.xml"));
        for (String name : beanFactory.getBeanDefinitionNames()) {
            System.out.println(name);
        }
2.3.3 AnnotationConfigApplicationContext
定义Bean
@Configuration
    static class Config {
        @Bean
        public Bean1 bean1() {
            return new Bean1();
        }

        @Bean
        public Bean2 bean2(Bean1 bean1) {
            Bean2 bean2 = new Bean2();
            bean2.setBean1(bean1);
            return bean2;
        }
    }
测试
private static void testAnnotationConfigApplicationContext() {
        AnnotationConfigApplicationContext context =
                new AnnotationConfigApplicationContext(Config.class);

        for (String name : context.getBeanDefinitionNames()) {
            System.out.println(name);
        }

        System.out.println(context.getBean(Bean2.class).getBean1());
    }
使用AnnotationConfigApplicationContext会帮我们加上BeanFactory和Bean的后置处理器。XML使用<context:annotation-config />配置来加上后置处理器。
2.3.4 AnnotationConfigServletWebServerApplicationContext
添加web环境
@Configuration
    static class WebConfig {
        /**
         * 创建servlet容器
         */
        @Bean
        public ServletWebServerFactory servletWebServerFactory(){
            return new TomcatServletWebServerFactory();
        }

        /**
         * 创建DispatcherServlet控制器
         */
        @Bean
        public DispatcherServlet dispatcherServlet() {
            return new DispatcherServlet();
        }

        /**
         * 将dispatcherServlet注册到servlet容器上
         * @param dispatcherServlet
         * @return
         */
        @Bean
        public DispatcherServletRegistrationBean registrationBean(DispatcherServlet dispatcherServlet) {
            return new DispatcherServletRegistrationBean(dispatcherServlet, "/");
        }

        /**
         * 添加测试路由
         * 使用org.springframework.web.servlet.mvc.Controller实现
         * @return
         */
        @Bean("/hello")
        public Controller controller1() {
            return (request, response) -> {
                response.getWriter().print("hello");
                return null;
            };
        }
    }
测试: 启动完访问 http://localhost:8080/hello
private static void testAnnotationConfigServletWebServerApplicationContext() {
        AnnotationConfigServletWebServerApplicationContext context =
                new AnnotationConfigServletWebServerApplicationContext(WebConfig.class);
        for (String name : context.getBeanDefinitionNames()) {
            System.out.println(name);
        }
    }


 534
534


 被折叠的 条评论
为什么被折叠?
被折叠的 条评论
为什么被折叠?
 到【灌水乐园】发言


