


最近在使用JFinal的框架,之前使用spring框架,直接在配置文件配置下就可以了。所以从网上找了相关例子,整理了一下
1.建一个配置文件job.properties,用作定时配置
job=com.demo.job.JobA
cron=* * 2 * * ?
enable=true
bjob=com.demo.job.JobB
bcron=* * 2 * * ?
benable=true
对应执行的任务类的包名配置好,定时时间配置好就行了,一定要把XXXenable设置成true(开启状态)
对于定时设置,参考:quartz 时间配置 就可以了
2.定时执行的类
比如刚才把com.demo.job.JobA弄好了,于是在该类下,代码如下:
public class JobA implements Job{
	private static Logger log = Logger.getLogger(JobA.class);

	/**
	 * 执行定时任务
	 */
	@Override
	public void execute(JobExecutionContext arg0) throws JobExecutionException {
		System.out.println("我被执行了");
	}

}3.定时类
需要读取刚才写好的job.properties,具体怎么读可以自己改写,我是这么做的(也是改的)
/**
 * 实现作业的调度
 *
 * @author jerri liu
 */
public class NewQuartzPlugin implements IPlugin {

	private Logger logger = LoggerFactory.getLogger(getClass());
	private SchedulerFactory sf = null;
	private Scheduler sched = null;
	private String config = "job.properties";
	private Properties properties;

	public NewQuartzPlugin(String config) {
		this.config = config;
	}
	public NewQuartzPlugin() {
	}

	@SuppressWarnings({ "rawtypes", "unchecked" })
	public boolean start() {
		sf = new StdSchedulerFactory();
		try {
			sched = sf.getScheduler();
		}
		catch (SchedulerException e) {
			new RuntimeException(e);
		}
		loadProperties();
		Enumeration enums = properties.keys();
		while (enums.hasMoreElements()) {
			String key = enums.nextElement() + "";
			if (!key.endsWith("job")) {
				continue;
			}
			String cronKey = key.substring(0, key.indexOf("job")) + "cron";
			String enable = key.substring(0, key.indexOf("job")) + "enable";
			if (isDisableJob(enable)) {
				continue;
			}
			String jobClassName = properties.get(key) + "";
			String jobCronExp = properties.getProperty(cronKey) + "";
			Class clazz;
			try {
				clazz = Class.forName(jobClassName);
			}
			catch (ClassNotFoundException e) {
				throw new RuntimeException(e);
			}
			JobDetail job = newJob(clazz).withIdentity(jobClassName, jobClassName).build();
			CronTrigger trigger = newTrigger().withIdentity(jobClassName, jobClassName).withSchedule(cronSchedule(jobCronExp)).build();
			Date ft = null;
			try {
				ft = sched.scheduleJob(job, trigger);
				sched.start();
			}
			catch (SchedulerException ee) {
				new RuntimeException(ee);
			}
			logger.info(job.getKey() + " has been scheduled to run at: " + ft + " and repeat based on expression: " + trigger.getCronExpression());
		}
		return true;
	}

	private boolean isDisableJob(String enable) {
		return Boolean.valueOf(properties.get(enable) + "") == false;
	}

	private void loadProperties() {
		properties = new Properties();
		InputStream is = NewQuartzPlugin.class.getClassLoader().getResourceAsStream(config);
		try {
			properties.load(is);
		}
		catch (Exception e) {
			throw new RuntimeException(e);
		}
	}

	public boolean stop() {
		try {
			sched.shutdown();
		}
		catch (SchedulerException e) {
			logger.error("shutdown error", e);
			return false;
		}
		return true;
	}

	public static void main(String[] args) {
		NewQuartzPlugin plugin = new NewQuartzPlugin();
		plugin.start();
		System.out.println("执行成功!!!");

	}
}
代码很好看懂,就是遍历读这三个配置(可能多个任务),然后根据启动状态分别去执行这几个任务
4.在插件中引入这个定时插件
// quartz插件
NewQuartzPlugin quartzPlugin =  new NewQuartzPlugin("job.properties");
me.add(quartzPlugin);
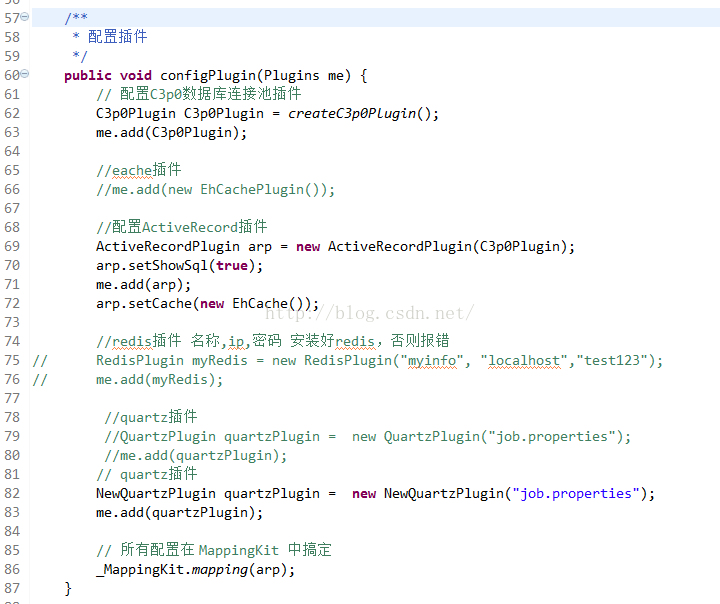
这样,定时器就配置好了,我设置的是每天早上2点执行该任务(当然公司需要,展示的空代码,需自己填充)


 5243
5243


 被折叠的 条评论
为什么被折叠?
被折叠的 条评论
为什么被折叠?
 到【灌水乐园】发言


