


AutoLayout自定义tableViewCell — Masonry + UITableView+FDTemplateLayoutCell 纯代码实现
欢迎大家关注我的技术博客,文章的demo的github链接:https://github.com/KintanTsia/KTAutolayoutDemo
欢迎转载,有兴趣可以加qq或者微信交流:414731152
在被frame虐的体无完肤的楼主,在新项目开始的时候毅然决定使用Autolayout来实现项目的绝大多界面,当然这个绝大多数的界面也包括tableView的Cell。本来在楼主看来,这个autolayout根本就是用在storyboard和xib的神器,但用在纯代码中是相当的鸡肋,食之无味,弃之可惜,担忧不舍器自动布局的优点,在网上找了很多关于aotoulayout的资料及开源库:
- Masonry
- UITableView+FDTemplateLayoutCell
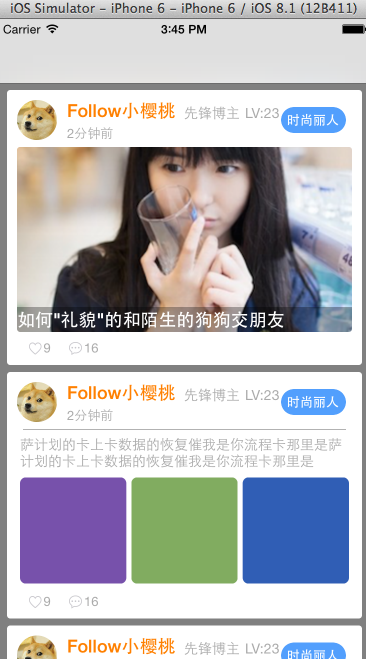
效果如下:
两个开源库足以
- Masonry
用来布局控件的位置关系 - UITableView+FDTemplateLayoutCell
计算各个cell之间的高度
了解并使用
Masonry 是一款轻量级的布局框架,上手简单。学习时间成本比较低,嫉妒推荐使用,具体可看以下这篇技术博客。 —— http://adad184.com/2014/09/28/use-masonry-to-quick-solve-autolayout/
Masonry的github链接:https://github.com/SnapKit/MasonryUITableView-FDTemplateLayoutCell:
https://github.com/forkingdog/UITableView-FDTemplateLayoutCell
这里面的都比较详细的demo介绍,而楼主的demo和这几位哥们的都有点不一样,楼主是自定义cell、自定义cell、自定义cell,呼……重要的事情都要书三遍。
废话就不多说,直接上代码
首先创建项目,楼主是个代码控,比较不喜欢项目里面有stroyboard,这里就不浪费大家的时间,自己创好一个没有空白的项目(也就是删了strayboard,改info.plish的事)哈。。。。
必须要有UITableViewController 、UITableViewCell、CellModel这三个类
UITableViewController控制器:
首先的有个装模型的数组:(楼主的情况是只有一组)
@interface TableViewController ()
@interface TableViewController ()
@property (nonatomic,strong) NSMutableArray *status; // 动态模型
@end
@implementation TableViewController:
@implementation TableViewController

- (NSMutableArray *)status
{  // 懒加载模型数组
    if (!_status) {
        _status = [NSMutableArray array];
    }
    return _status;
}

- (void)viewDidLoad {
    [super viewDidLoad];
    self.view.backgroundColor = [UIColor grayColor]; // 背景色
    self.tableView.separatorStyle = UITableViewCellSeparatorStyleNone; // 不显示分割线
    [self jsonData]; // 加载json
}

#pragma mark - 加载json数据
- (void)jsonData
{
    NSString *path = [[NSBundle mainBundle] pathForResource:@"data" ofType:@"json"]; // 解析json
    NSData *data = [NSData dataWithContentsOfFile:path];
    NSDictionary *dict = [NSJSONSerialization JSONObjectWithData:data options:NSJSONReadingAllowFragments error:nil];
    NSArray *jsonArray = dict[@"status"];

    NSMutableArray *arrM = [NSMutableArray array];

    [jsonArray enumerateObjectsUsingBlock:^(id obj, NSUInteger idx, BOOL *stop) {
        [arrM addObject:[XQFeedModel feedWithDictionary:obj]];
    }];

    self.status = arrM;

    [self.tableView registerClass:[StatusCell class] forCellReuseIdentifier:@"status"]; // 不要忘注册cell
    [self.tableView reloadData]; // 同时要刷新表格
}

- (NSInteger)tableView:(UITableView *)tableView numberOfRowsInSection:(NSInteger)section {

    return self.status.count;;
}


- (UITableViewCell *)tableView:(UITableView *)tableView cellForRowAtIndexPath:(NSIndexPath *)indexPath {

    StatusCell *cell = [StatusCell cellWithTableView:tableView];
    cell.status = self.status[indexPath.row];
    return cell;
}

- (CGFloat)tableView:(UITableView *)tableView heightForRowAtIndexPath:(NSIndexPath *)indexPath {

    return [self.tableView fd_heightForCellWithIdentifier:@"status" cacheByIndexPath:indexPath configuration:^(StatusCell *cell) {
        cell.status = self.status[indexPath.row];
    }];
}
@end
到这里控制器的戏份也就没有了
模型类:
模型类也即是把json里面的key一个一个写在模型的属性上,然后再赋一下值
@interface StatusModel : NSObject
@interface StatusModel : NSObject

@property (copy, nonatomic) NSString *username;
@property (copy, nonatomic) NSString *title;
@property (copy, nonatomic) NSString *content;
@property (copy, nonatomic) NSString *imageName;
@property (copy, nonatomic) NSString *time;
@property (copy, nonatomic) NSString *icon;
@property (copy, nonatomic) NSString *type;

+ (instancetype) feedWithDictionary:(NSDictionary *) dictionary;

- (instancetype) initWithDictionary:(NSDictionary *) dictionary;
@end
这些看个人习惯,有用自动转模型的也可以那个,这个demo就随便写写,哈…
@implementation StatusModel
@implementation StatusModel
+ (instancetype)feedWithDictionary:(NSDictionary *)dictionary {
    return [[self alloc] initWithDictionary:dictionary];
}

- (instancetype) initWithDictionary:(NSDictionary *) dictionary {
    if (self = [super init]) {
        self.title = dictionary[@"title"];
        self.content = dictionary[@"content"];
        self.username = dictionary[@"username"];
        self.time = dictionary[@"time"];
        self.imageName = dictionary[@"imageName"];
        self.icon = dictionary[@"icon"];
        self.type = dictionary[@"type"];
    }
    return self;
}
@end
视图控件类(说白了就是cell):
一般有这个情况,用自动布局,就不能用frame计算尺寸,否则会报错.会报错.会报错,楼主也是有故事的人……
#楼主有个这个返回工厂方法cell的习惯
@interface StatusCell : UITableViewCell
@class StatusModel;
@interface StatusCell : UITableViewCell
@property (strong, nonatomic) StatusModel *status;
+ (instancetype)cellWithTableView:(UITableView *)tableView;
@end
这里下面的TopView *topGroup,MidView *midGroup,BottomView *bottomGroup都是楼主自定义的控件,里面呢也全是masonry约束的控件,有兴趣的亲可以自己下demo来研究研究,这里就不详细列出了
@implementation StatusCell
@interface StatusCell ()

@property (nonatomic,strong) UIView *cellGroup; // 底板
@property (nonatomic,strong) TopView *topGroup; // 顶部组别
@property (nonatomic,strong) MidView *midGroup; // 中部组别
@property (nonatomic,strong) BottomView *bottomGroup; // 底部组别
@property (assign, nonatomic) BOOL didSetupConstraints; // 判断是否已加过约束

@end

@implementation StatusCell

+ (instancetype)cellWithTableView:(UITableView *)tableView
{
    static NSString *ID = @"status";
    StatusCell *cell = [tableView dequeueReusableCellWithIdentifier:ID];
    if (!cell) {
        cell = [[StatusCell alloc] initWithStyle:UITableViewCellStyleSubtitle reuseIdentifier:ID];
    }
    return cell;
}

- (instancetype)initWithStyle:(UITableViewCellStyle)style reuseIdentifier:(NSString *)reuseIdentifier {

    if (self = [super initWithStyle:style reuseIdentifier:reuseIdentifier]) {
        self.backgroundColor = [UIColor grayColor];
        [self createView];
        [self updateConstraints];
    }
    return self;
}

- (void)updateConstraints
{
    if (!self.didSetupConstraints) {
        [self setttingViewAtuoLayout];
        self.didSetupConstraints = YES;
    }
    [super updateConstraints];
}

#pragma make 创建子控件
- (void) createView
{
#pragma mark - 共有的
    self.cellGroup = [[UIView alloc] init];
    self.cellGroup.translatesAutoresizingMaskIntoConstraints = NO;
    self.cellGroup.layer.cornerRadius = 3;
    self.cellGroup.clipsToBounds = YES;
    self.cellGroup.backgroundColor = [UIColor whiteColor];
    [self.contentView addSubview:self.cellGroup];

#pragma mark - 头部
    self.topGroup = [[XQTopView alloc] init];
    self.topGroup.translatesAutoresizingMaskIntoConstraints = NO;
    self.topGroup.layer.cornerRadius = 3;
    self.topGroup.clipsToBounds = YES;
    self.topGroup.backgroundColor = [UIColor whiteColor];
    [self.cellGroup addSubview:self.topGroup];

#pragma mark - 公众号推送
    self.midGroup = [[XQMidView alloc] init];
    self.midGroup.translatesAutoresizingMaskIntoConstraints = NO;
    self.midGroup.layer.cornerRadius = 3;
    self.midGroup.clipsToBounds = YES;
    self.midGroup.backgroundColor = [UIColor whiteColor];
    [self.cellGroup addSubview:self.midGroup];

#pragma mark - 底部组别
    self.bottomGroup = [[XQBottomView alloc] init];
    self.bottomGroup.translatesAutoresizingMaskIntoConstraints = NO;
    self.bottomGroup.layer.cornerRadius = 3;
    self.bottomGroup.clipsToBounds = YES;
    self.bottomGroup.backgroundColor = [UIColor whiteColor];
    [self.cellGroup addSubview:self.bottomGroup];
}

#pragma mark - 在此方法内使用 Masonry 设置控件的约束
- (void) setttingViewAtuoLayout
{
    [self top];
    [self mid];
    [self bottom];
}

- (void)setStatus:(StatusModel *)status
{
    _status = status;
    self.topGroup.status = status;
    self.midGroup.status = status;
    self.bottomGroup.status = status;
}

- (void)top
{
    [self.cellGroup mas_makeConstraints:^(MASConstraintMaker *make) {
        make.top.mas_equalTo(self.contentView).offset(7);
        make.left.mas_equalTo(self.contentView).offset(10);
        make.bottom.mas_equalTo(self.contentView);
        make.right.mas_equalTo(self.contentView).offset(-10);
    }];

    [self.topGroup mas_makeConstraints:^(MASConstraintMaker *make) {
        make.top.mas_equalTo(self.cellGroup).offset(10);
        make.left.mas_equalTo(self.cellGroup).offset(10);
        make.right.mas_equalTo(self.cellGroup).offset(-10);
        make.height.mas_equalTo(40);
    }];
}

- (void)mid
{
    [self.midGroup mas_makeConstraints:^(MASConstraintMaker *make) {
        make.top.mas_equalTo(self.topGroup.mas_bottom);
        make.left.mas_equalTo(self.cellGroup).offset(10);
        make.right.mas_equalTo(self.cellGroup).offset(-10);
        make.bottom.mas_equalTo(self.bottomGroup.mas_top);
    }];
}

- (void)bottom
{
    [self.bottomGroup mas_makeConstraints:^(MASConstraintMaker *make) {
        make.left.mas_equalTo(self.cellGroup).offset(10);
        make.right.mas_equalTo(self.cellGroup).offset(-10);
        make.height.mas_equalTo(@33);
        make.bottom.mas_equalTo(self.contentView.mas_bottom);
    }];
}
可以显示两种不一样的cell,只是在不同条件下显示不同风格的cell,关键点在与控制约束的激活和不激活,和更新约束高度,另外楼主测试过,如果把不需显示的控件hidden变为yes的内存会比较少,系统免去话控件的任务肯定会优化性能一些,哈….
另外感谢@格式化油条 提供的技术贴,楼主的也是基于格式化油条大大的技术贴延伸开来的,鉴于网上的教程都是stroyboard和xib的,楼主等人也只能让代码版的也来个正名,autolayout不是可视化的专利,代码也是很好用很直观的…..哈…未完待续!! 另网路网路大神欢迎来喷,因为本人也需要多点不一样的观点来创新一下思维,大家多多指教!!!
欢迎大家关注我的技术博客,文章的demo的github链接:https://github.com/KintanTsia/KTAutolayoutDemo
欢迎转载,有兴趣可以加qq或者微信交流:414731152
* 喜欢九宫格的可以打开midView中的注释*
有错请注明,谢谢!!


 380
380

 被折叠的 条评论
为什么被折叠?
被折叠的 条评论
为什么被折叠?
 到【灌水乐园】发言


