


版本
apache FOP 2.9
JDK 1.8 (1.8以上就可以)
目录
中文资料不多,很多也没有说清楚,所以这里写一个文档来记录使用过程。
官网网址,内容是英文的,同时在w3school与菜鸟上都有一些文档,但是都不全面
官网上下载的压缩包有示例代码,但是其中包含的jar包内容不全,缺少大量的依赖,比如
MimeConstants.MIME_PDF
就缺失,会导致无法导出PDF。
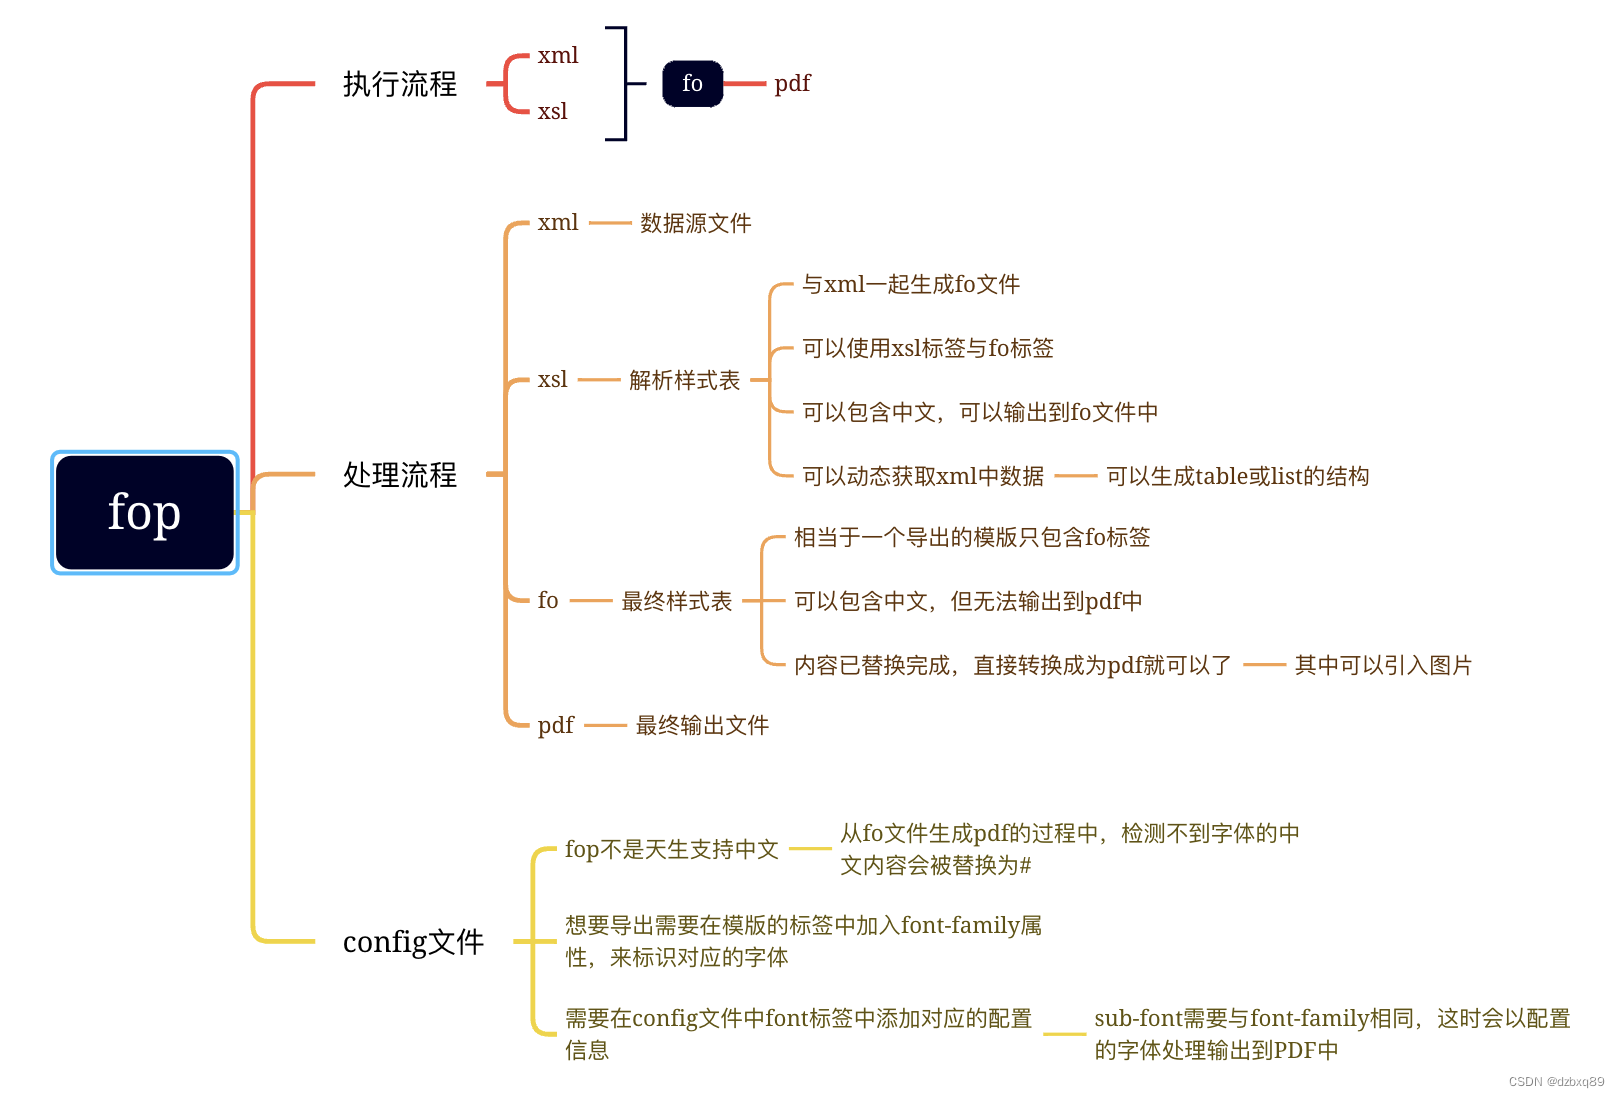
首先其中会有xsl/xslt,xml,fo,pdf的概念,如果使用Java开发流程应该是xsl/xslt+xml-> fo -> PDF(想要使用xsl/xslt导出PDF失败了,没有找到成功运行的代码),在cmd中可以直接xsl+xml生成PDF。
在xsl/xslt中,是一些结构化的标签,可以同时使用xsl与fo两种标签。生成fo文件后,内容已经固定了。xsl可以从xml或者外部数据源获取数据,可生成表格列表之类的数据结构,输出到fo文件后,就不能再动态的获取数据了,但是可以引用图片之类的信息。
1.xsl文件
生成结构类似于前端的div盒子模型,同样有margin, padding,border的数据,但是没找到让两个元素在水平层面上平级显示的方法,关于宽度等设置也遇到了很多问题,现在仍在解决中,图片说明了位置组成,但是实际使用中,通过background-color属性着色后,发现覆盖顺序与图片不同,(左右两侧是最高优先度,上下第二优先度)。推测可能跟声明顺序有关,并且几个区域体积碰撞也有问题,碰到过body内容被end覆盖,需要通过margin控制块的索引以保证不会互相覆盖,margin可以用百分比进行尺寸控制。

布局主要使用标签按顺序是
<xsl:stylesheet version="1.1" xmlns:xsl="http://www.w3.org/1999/XSL/Transform" xmlns:fo="http://www.w3.org/1999/XSL/Format" exclude-result-prefixes="fo">
<fo:root xmlns:fo="http://www.w3.org/1999/XSL/Format">
<fo:layout-master-set>
<fo:simple-page-master>
<fo:region-body>......
<fo:page-sequence>
<fo:static-content>
<fo:block>
<fo:flow>
<fo:block>
<fo:inline>
大概顺序就是这样的,其中我理解的是layout-master-set 声明的是页面与主体,page-sequence 声明的是会顺序拼接内容,根据name的名称将内容填装到body,start,end,before,after中,使用过程中同时存在多个会报错,不确定是否是写法有问题。
static-content 声明是静态块,应该无法在静态块中进行动态的数据提取。
block类似于html的div标签,是一种块状标签,width无法生效,没有找到将两个块平行布置的方法。
2.java xsl+xml-> fo方法
代码运行后会将xml+xsl生成of文件
//将 xml,xsl,fo文件路径都声明成file
public void convertXML2FO(File xml, File xslt, File fo)
                throws IOException, TransformerException {

        //Setup output
        OutputStream out = new java.io.FileOutputStream(fo);
        try {
            //Setup XSLT
            TransformerFactory factory = TransformerFactory.newInstance();
            Transformer transformer = factory.newTransformer(new StreamSource(xslt));

            //Setup input for XSLT transformation
            Source src = new StreamSource(xml);

            //Resulting SAX events (the generated FO) must be piped through to FOP
            Result res = new StreamResult(out);

            //Start XSLT transformation and FOP processing
            transformer.transform(src, res);
        } finally {
            out.close();
        }
    }
3.fo文件
fo文件于xsl文件相比,少了xsl相关的标签,以<fo:root>为根结点,内容就是动态拼接完成的内容。
4.java fo-> pdf
生成PDF,需要配置文件等信息,三个文件地址分别对应config,pdf,fo文件地址。
FopFactory fopFactory = FopFactory.newInstance(new File(""));

        // Step 2: Set up output stream.
        // Note: Using BufferedOutputStream for performance reasons (helpful with FileOutputStreams).
        OutputStream out = new BufferedOutputStream(new FileOutputStream(new File("")));
        FONode node ;
        try {
            // Step 3: Construct fop with desired output format
            Fop fop = fopFactory.newFop(MimeConstants.MIME_PDF, out);
            //MIME_PDF

            // Step 4: Setup JAXP using identity transformer
            TransformerFactory factory = TransformerFactory.newInstance();


            // Step 5: Setup input and output for XSLT transformation
            // Setup input stream
            Transformer transformer = factory.newTransformer(); // identity transformer
            Source src = new StreamSource(new File(""));

            // Resulting SAX events (the generated FO) must be piped through to FOP
            Result res = new SAXResult(fop.getDefaultHandler());

            // Step 6: Start XSLT transformation and FOP processing
            transformer.transform(src, res);

        } finally {
            //Clean-up
            out.close();
        }
5.config文件 中文导出
这部分放到4之前也可以,不需要有什么大的改动,但是fop不支持直接导出中文。所以需要一些设定,统一放在这里。
首先需要在xsl或者fo文件中声明字符集 font-family="SourceHanSansTC",一般是放在block或者其他直接包文字的标签上。
其次需要在config文件中<font>标签中,声明字符集文件(参考:https://www.cnblogs.com/hiyue95hyf/p/16799475.html),在2.9中不需要配置xml文件,在网上或者自己生成一个ttf文件即可,配置中的地址是与config文件平级,不平级,需要自行调整结构。
	<font embed-url="SourceHanSansTC-Normal.ttf" sub-font="SourceHanSansTC">
    	<font-triplet name="SourceHanSansTC" style="normal" weight="normal"/>
    	<font-triplet name="SourceHanSansTC" style="normal" weight="bold"/>
    	<font-triplet name="SourceHanSansTC" style="italic" weight="normal"/>
    	<font-triplet name="SourceHanSansTC" style="italic" weight="bold"/>
	</font>
其中sub-font后的参数要跟font-family后的数据相同。博客的说法是要将<auto-detect/> 注释掉,直接注释掉没测试过,推测无所谓,因为是顺序执行,只要之前的拦截住就可以。


 2100
2100


 被折叠的 条评论
为什么被折叠?
被折叠的 条评论
为什么被折叠?
 到【灌水乐园】发言


