


Spring Authorization Server 是什么
Spring Authorization Server 是一个框架,它提供了 OAuth 2.1 和 OpenID Connect 1.0
规范以及其他相关规范的实现。它建立在 Spring Security 之上,为构建 OpenID Connect 1.0 身份提供者和 OAuth2
授权服务器产品提供了一个安全、轻量级和可定制的基础。说白了,Spring Authorization Server 就是一个**认证(授权)**服务器。
为什么有 Spring Authorization Server
因为随着网络和设备的发展,原先的 OAuth 2.0 已经不能满足现今的需求了,OAuth 社区对 OAuth 2.0
中的几种授权模式进行了取舍和优化,并增加一些新的特性,于是推出了 OAuth 2.1,而原先的 Spring Security OAuth 2.0 使用的是
OAuth 2.0 协议,为满足新的变化,Spring Security 团队重新写了一套叫 Spring Authorization Server
的认证授权框架来替换原先的 Spring Security OAuth 2.0。从官网中可以看到,原先的 Spring Security OAuth 2.0
已从 Spring Security 目录下被移除,接着是多出 Spring Authorization Server 作为单独项目。
Springboot2.x Oauth2 实现:
- Spring Security Oauth2 支持搭建授权服务器和资源服务器
Springboot3.x Oauth2 实现:
- Spring Security6 自身提供资源和客户端类库支持
- Spring Authorization Server 支持授权服务器搭建
OAuth2.0 协议介绍
OAuth 2.0(Open
Authorization)是一种开放标准的授权协议,允许用户授权第三方应用访问其在某个服务提供者上的受保护资源,而无需将其实际的凭证(如用户名和密码)分享给第三方应用。这种方式可以增加安全性,同时允许用户更好地控制其数据的访问权限。
角色
- 客户端(client)
使用授权服务器作为认证渠道的平台,一般指的是第三方应用。例如,微信提供 OAuth 2.0 认证平台,我们的 APP 支持微信登录,那么我们的 APP
对于微信服务来说就是客户端。又例如,我们是政府某一平台的服务,我们平台维护的数据代表着足够高的权威,那么其他政府部门或合作方,需要从我们的平台中查询数据,或者利用我们平台的认证进行登录,那么其他部门或合作方的应用就是客户端。
- 资源服务器(resource server)
简单的说,就是提供接口给客户端访问的服务器,访问资源服务器上受保护的接口,则需要带上令牌(token)。例如分布式微服务中的用户服务、订单服务等部署的服务器都属于资源服务器。
- 资源所有者(resource owner)
拥有该资源的主体对象,一般指用户。客户端向资源服务器请求获取用户数据时,资源所有者参与确认授权或拒绝操作。
- 授权服务器(authorization server)
对客户端和用户进行身份认证、授权的服务器,认证授权成功,则颁发令牌(token)。
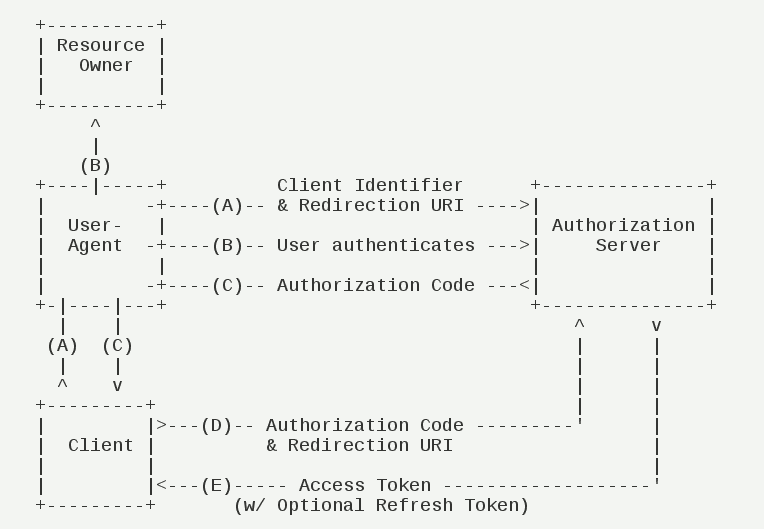
OAuth2.0 协议的运行流程
OAuth 2.0 的运行流程如下图,摘自 RFC 6749:
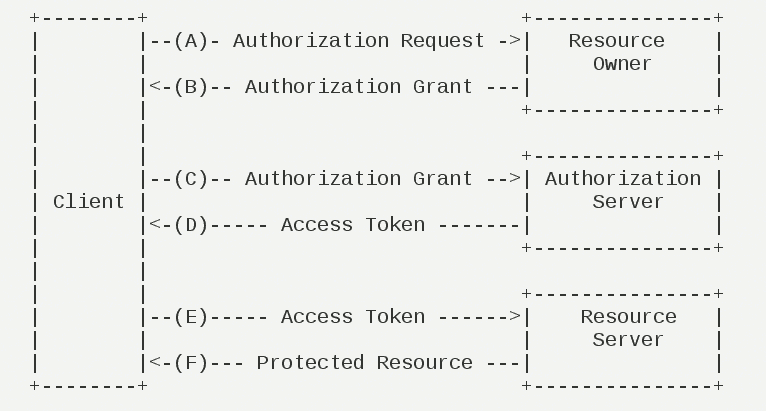
(A)用户打开客户端以后,客户端要求用户给予授权。
(B)用户同意给予客户端授权。
(C)客户端使用上一步获得的授权,向授权服务器申请令牌。
(D)授权服务器对客户端进行认证以后,确认无误,同意发放令牌。
(E)客户端使用令牌,向资源服务器申请获取资源。
(F)资源服务器确认令牌无误,同意向客户端开放资源。
令牌(token)与密码(password)的作用是一样的,都可以进入系统,但是有三点差异:
(1)令牌是短期的,到期会自动失效,用户自己无法修改。密码一般长期有效,用户不修改,就不会发生变化。
(2)令牌可以被数据所有者撤销,会立即失效。密码一般不允许被他人撤销。
(3)令牌有权限范围(scope)。对于网络服务来说,只读令牌就比读写令牌更安全。密码一般是完整权限。
上面这些设计,保证了令牌既可以让第三方应用获得权限,同时又随时可控,不会危及系统安全。这就是 OAuth 2.0 的优点。
应用场景
OAuth 2.0 在许多不同的应用场景中都能够发挥作用,尤其是那些涉及到第三方应用程序访问用户数据或资源的情况。以下是一些常见的 OAuth 2.0
应用场景:
- 社交媒体登录:许多网站和应用程序允许用户使用其社交媒体账户(如Facebook、Google、Twitter等)进行登录。OAuth 2.0 可以用于授权第三方应用访问用户的社交媒体数据,如好友列表、社交活动等。
- 第三方应用集成:用户可能使用多个不同的应用和服务,例如电子邮件、日历、云存储等。OAuth 2.0 可以用于实现单一的登录授权,使用户能够在多个应用之间共享数据,而无需在每个应用中都输入凭证。
- 移动应用访问 API:移动应用可能需要访问后端服务器上的受保护资源,例如用户数据或其他服务。OAuth 2.0 可以确保安全地进行授权和访问控制,同时减少对用户凭证的需求。
- 授权访问云服务:当用户需要将他们的数据存储在云服务(如Google Drive、Dropbox)中时,OAuth 2.0 可以确保这些服务只能以授权的方式访问用户的数据。
- API 访问控制:企业和开发者可以使用 OAuth 2.0 来实现对其 API 的访问控制。只有经过授权的应用程序才能访问和使用这些 API。
- 联合身份验证:在不同的身份提供者之间实现联合身份验证,使用户可以使用一个身份提供者的凭证来访问另一个身份提供者的资源。
- 医疗保健应用:在医疗保健领域,患者的健康数据可能由多个医疗应用和机构共享。OAuth 2.0 可以用于确保授权的数据访问,同时保护患者隐私。
- IoT 设备访问:物联网设备可能需要访问云服务或其他资源。OAuth 2.0 可以用于在 IoT 设备和云之间实现安全的授权流程。
这些只是 OAuth 2.0 可能应用的一些例子。基本上,任何需要实现安全的第三方应用程序访问用户数据或资源的情况下,OAuth 2.0
都可能是一个合适的解决方案。
授权模式详解
授权码模式:应用最广泛,适合web应用/app/前端;
资源所有者密码模式:官方应用;
客户端凭证模式:适合无用户参与的应用;
刷新令牌模式:适合令牌访问过期后刷新令牌;
客户端模式
客户端模式(Client Credentials
Grant)指客户端以自己的名义,而不是以用户的名义,向“服务提供商”进行授权。客户端模式是安全级别最低而且要求授权服务器对客户高度信任的模式,因为客户端向授权服务器请求认证授权的过程中,至始至终都没有用户的参与,未经过用户允许,客户端凭提供自己在授权服务器注册的信息即可在授权服务器完成认证授权,而客户端获得认证授权以后,则拥有从资源服务器操作用户数据的权限,这种模式一般应用于公司内部系统或者有着高度保密责任的合作伙伴之间的对接。
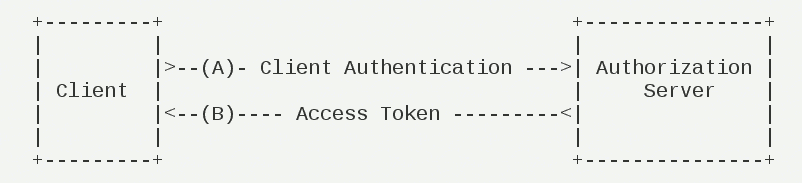
步骤如下:
(A)客户端向授权服务器进行身份认证,并要求一个访问令牌。
(B)授权服务器确认无误后,向客户端提供访问令牌。
客户端模式流程如下:
1、客户端首先在认证服务器注册好客户端信息,比如 client_id、client_secret 等。
2、认证服务器存储维护客户端信息。
3、客户端带上 client_id、client_secret、grant_type(写死client_credentials)等参数向认证服务器发起获取
token 请求。
4、认证服务器校验客户端信息,校验通过,则发放令牌(access_token),校验失败,则返回异常信息。
5、客户端成功获取到令牌(access_token)后,就可以带着令牌去访问资源服务器了。
实现:
A 应用在命令行向 B 发出请求。
> https://oauth.b.com/token?
>   grant_type=client_credentials&
>   client_id=CLIENT_ID&
>   client_secret=CLIENT_SECRET
B 网站验证通过以后,直接返回令牌。

密码模式
如果你高度信任某个应用,RFC 6749
也允许用户把用户名和密码,直接告诉该应用。该应用就使用你的密码,申请令牌,这种方式称为“密码模式”(password)。
密码模式是一种安全级别较低而且要求资源拥有者(用户)完全信任客户端的模式,该模式可以理解为在客户端模式的基础上增加了对用户的账号、密码在认证服务器进行校验的操作,是客户端代理用户的操作。在
OAuth 2.1 中,密码模式已经被废除,在第三方平台上,使用密码模式,对于用户来说是一种非常不安全的行为,假设某平台客户端支持 QQ 登录,用户使用自己
QQ 的账号、密码在该平台上输入进行登录,则该平台将拥有用户 QQ 的账号、密码,对于用户来说,将自己 QQ
的账号、密码提供给第三方平台,这种行为是非常不安全的。
密码模式一般适合应用在自己公司内部使用的系统和自己公司的 app 产品,例如一些 ERP、CRM、WMS
系统,因为都是自己公司的产品,这种情况下就不存在用户提供账号、密码给第三方客户端进行代理登录的情形了。
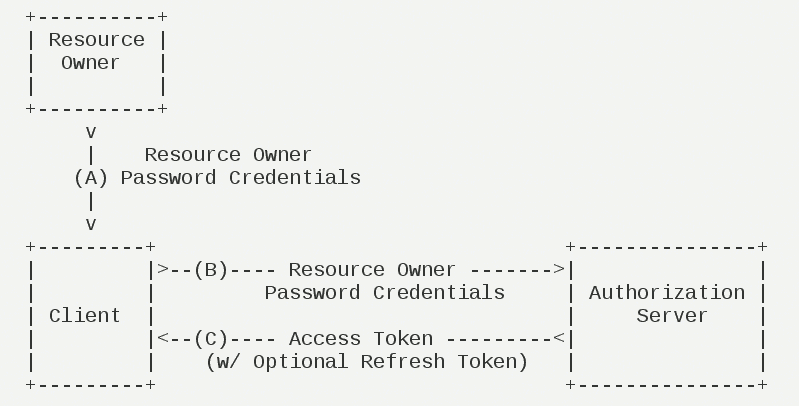
步骤如下:
(A)用户向客户端提供用户名和密码。
(B)客户端将用户名和密码发给授权服务器,向后者请求令牌。
(C)授权服务器确认无误后,向客户端提供访问令牌。
密码模式流程如下:
1、客户端首先在认证服务器注册好客户端信息。
2、认证服务器存储维护客户端信息。
3、用户提供认证平台的账号、密码给客户端(这里的客户端可以是浏览器、APP、第三方应用的服务器)。
4、客户端带上 client_id、client_secret、grant_type(写死password)、username、password
等参数向认证服务器发起获取 token 请求。
5、认证服务器校验客户端信息,校验失败,则返回异常信息,校验通过,则往下继续校验用户验账号、密码。
6、认证服务器校验用户账号、密码,校验通过,则发放令牌(access_token),校验失败,则返回异常信息。
7、客户端成功获取到令牌(access_token)后,就可以带着令牌去访问资源服务器了。
实现:
A 网站要求用户提供 B 网站的用户名和密码,拿到以后,A 就直接向 B 请求令牌。整个过程中,客户端不得保存用户的密码。
> https://oauth.b.com/token?
>   grant_type=password& # 授权方式是"密码模式"
>   username=USERNAME&
>   password=PASSWORD&
>   client_id=CLIENT_ID
>   client_secret=client_secret
B 网站验证身份通过后,直接给出令牌。注意,这时不需要跳转,而是把令牌放在 JSON 数据里面,作为 HTTP 回应,A 因此拿到令牌。

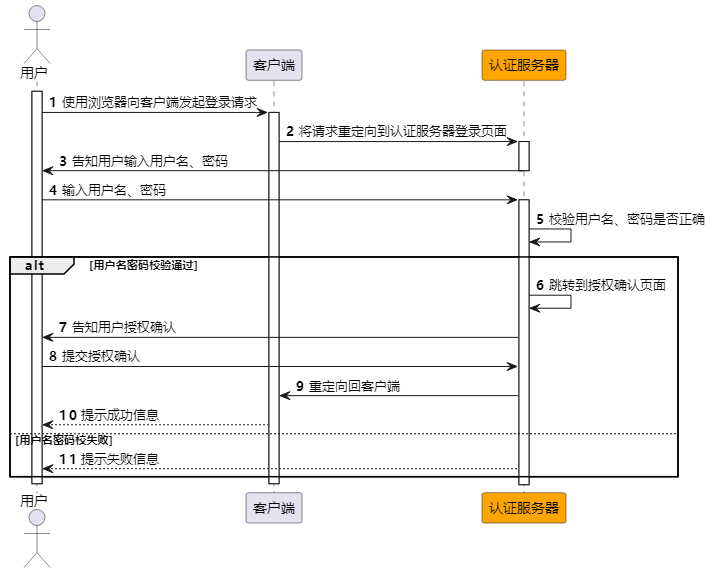
授权码模式
授权码(authorization code)方式,指的是第三方应用先申请一个授权码,然后再用该授权码获取令牌。
授权码模式是 OAuth 2.0
协议中安全级别最高的一种认证模式,他与密码模式一样,都需要使用到用户的账号信息在认证平台的登录操作,但有所不同的是,密码模式是要求用户直接将自己在认证平台的账号、密码提供给第三方应用(客户端),由第三方平台进行代理用户在认证平台的登录操作;而授权码模式则是用户在认证平台提供的界面进行登录,然后通过用户确认授权后才将一次性授权码提供给第三方应用,第三方应用拿到一次性授权码以后才去认证平台获取
token。
适用场景:目前市面上主流的第三方验证都是采用这种模式。
步骤如下:
(A)用户访问客户端,后者将前者导向授权服务器。
(B)用户选择是否给予客户端授权。
(C)假设用户给予授权,授权服务器将用户导向客户端事先指定的“重定向URI”(redirection URI),同时附上一个授权码。
(D)客户端收到授权码,附上早先的“重定向URI”,向授权服务器申请令牌。这一步是在客户端的后台的服务器上完成的,对用户不可见。
(E)授权服务器核对了授权码和重定向 URI,确认无误后,向客户端发送访问令牌(access token)和更新令牌(refresh token)。
授权码模式的时序图如下:
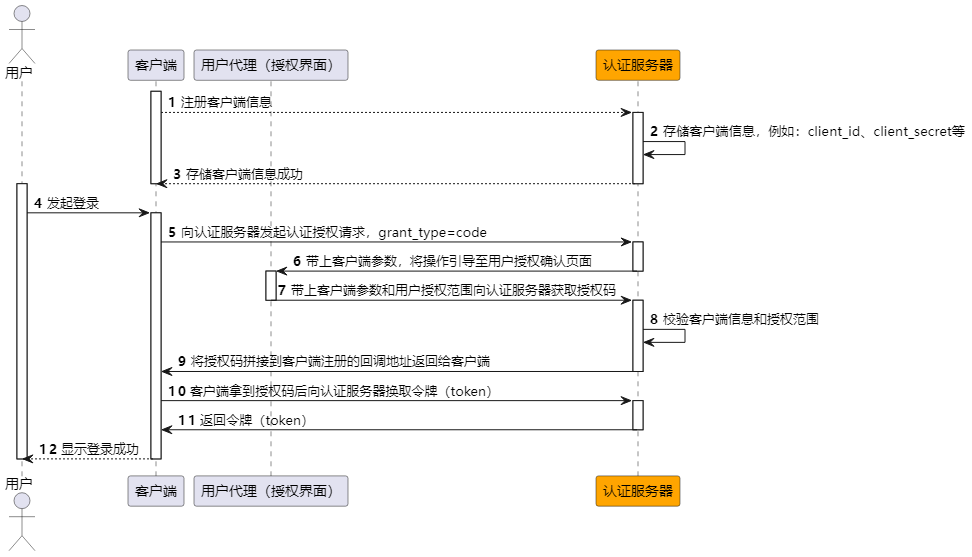
1、客户端首先在认证服务器注册好客户端信息。
2、认证服务器存储维护客户端信息。
3、用户在客户端上发起登录。
4、向认证服务器发起认证授权请求,例如[http://localhost:9000/auth/oauth/authorize?client_id=xxx&response_type=code&scope=message.read&redirect_uri=http://www.baidu.com](http://localhost:9000/auth/oauth/authorize?client_id=xxx&response_type=code&scope=message.read&redirect_uri=http://www.baidu.com),注意,此时参数不需要client_secret。
5、认证服务器带上客户端参数,将操作引导至用户授权确认页面,用户在该页面进行授权确认操作。
6、用户在授权页面选择授权范围,点击确认提交,则带上客户端参数和用户授权范围向认证服务器获取授权码。注意,此处操作已经脱离了客户端。
7、认证服务器校验客户端信息和授权范围(因为客户端在认证平台注册的时候,注册信息包含授权范围,如果用户选择的授权范围不在注册信息包含的范围内,则将因权限不足返回失败)。
8、校验通过,将授权码拼接到客户端注册的回调地址返回给客户端。
9、客户端拿到认证服务器返回的授权码后,带上客户端信息和授权码向认证服务器换取令牌(access_token)。
10、认证服务器校验授权码是否有效,如果有效,则返回令牌(access_token);如果无效,则返回异常信息。
11、客户端成功获取到令牌(access_token)后,就可以带着令牌去访问资源服务器了。
实现:
A 网站提供一个链接,用户点击后就会跳转到 B 网站,授权用户数据给 A 网站使用。下面就是 A 网站跳转 B 网站的一个示意链接。
> https://b.com/oauth/authorize?
>   response_type=code&            # 要求返回授权码(code)
>   client_id=CLIENT_ID&           # 让 B 知道是谁在请求
>   redirect_uri=CALLBACK_URL&     # B 接受或拒绝请求后的跳转网址
>   scope=read                     # 要求的授权范围(这里是只读)
>
客户端申请授权的 URI,包含以下参数:
response_type:表示授权类型,必选项,此处的值固定为“code”
client_id:表示客户端的 ID,必选项
redirect_uri:表示重定向 URI,可选项
scope:表示申请的权限范围,可选项
state:表示客户端的当前状态,可以指定任意值,授权服务器会原封不动地返回这个值
用户跳转后,B 网站会要求用户登录,然后询问是否同意给予 A 网站授权。用户表示同意,这时 B 网站就会跳回 redirect_uri
参数指定的网址。跳转时,会传回一个授权码,就像下面这样。
> https://a.com/callback?code=AUTHORIZATION_CODE # code参数就是授权码
>
A 网站拿到授权码以后,就可以在后端,向 B 网站请求令牌。 用户不可见,服务端行为。
> https://b.com/oauth/token?
>  client_id=CLIENT_ID&
>  client_secret=CLIENT_SECRET& # client_id和client_secret用来让 B 确认 A 的身份,client_secret参数是保密的,因此只能在后端发请求
>  grant_type=authorization_code&   # 采用的授权方式是授权码
>  code=AUTHORIZATION_CODE&          # 上一步拿到的授权码
>  redirect_uri=CALLBACK_URL        # 令牌颁发后的回调网址
>
B 网站收到请求以后,就会颁发令牌。具体做法是向 redirect_uri 指定的网址,发送一段 JSON 数据。
 {
   "access_token":"ACCESS_TOKEN",     # 令牌
   "token_type":"bearer",
   "expires_in":2592000,
   "refresh_token":"REFRESH_TOKEN",
   "scope":"read",
   "uid":100101,
   "info":{...}
 }
简化模式
简化模式(也叫隐式模式)是相对于授权码模式而言的,对授权码模式的交互做了一下简化,省去了客户端使用授权码去认证服务器换取令牌(access_token)的操作,即用户在代理页面选择授权范围提交授权确认后,认证服务器通过客户端注册的回调地址直接就给客户端返回令牌(access_token)了。
这种方式把令牌直接传给前端,是很不安全的。因此,只能用于一些安全要求不高的场景,并且令牌的有效期必须非常短,通常就是会话期间(session)有效,浏览器关掉,令牌就失效了。
步骤如下:
(A)客户端将用户导向授权服务器。
(B)用户决定是否给于客户端授权。
(C)假设用户给予授权,授权服务器将用户导向客户端指定的“重定向URI”,并在 URI 的 Hash 部分包含了访问令牌。
(D)浏览器向资源服务器发出请求,其中不包括上一步收到的 Hash 值。
(E)资源服务器返回一个网页,其中包含的代码可以获取 Hash 值中的令牌。
(F)浏览器执行上一步获得的脚本,提取出令牌。
(G)浏览器将令牌发给客户端。
简化模式时序图如下:
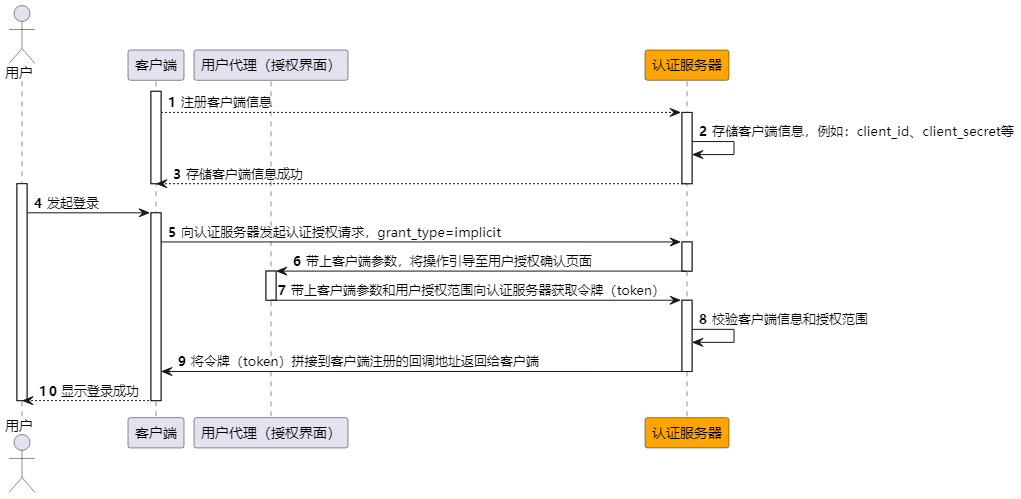
1、客户端首先在认证服务器注册好客户端信息。
2、认证服务器存储维护客户端信息。
3、用户在客户端上发起登录。
4、向认证服务器发起认证授权请求,例如[http://localhost:9000/auth/oauth/authorize?client_id=xxx&response_type=token&scope=message.read&redirect_uri=http://www.baidu.com](http://localhost:9000/auth/oauth/authorize?client_id=xxx&response_type=token&scope=message.read&redirect_uri=http://www.baidu.com),注意,此时参数不需要
client_secret。
5、认证服务器带上客户端参数,将操作引导至用户授权确认页面,用户在该页面进行授权确认操作。
6、用户在授权页面选择授权范围,点击确认提交,则带上客户端参数和用户授权范围向认证服务器获取令牌(access_token)。注意,此处操作已经脱离了客户端。
7、认证服务器校验代理页面提交的参数信息,校验通过,则将令牌(access_token)拼接到客户端注册的回调地址返回给客户端;校验失败,则返回异常信息。
8、客户端成功获取到令牌(access_token)后,就可以带着令牌去访问资源服务器了。
实现:
A 网站提供一个链接,要求用户跳转到 B 网站,授权用户数据给 A 网站使用。
> https://b.com/oauth/authorize?
>   response_type=token&          # response_type参数为token,表示要求直接返回令牌
>   client_id=CLIENT_ID&
>   redirect_uri=CALLBACK_URL&
>   scope=read
>
用户跳转到 B 网站,登录后同意给予 A 网站授权。这时,B 网站就会跳回 redirect_uri 参数指定的跳转网址,并且把令牌作为 URL 参数,传给
A 网站。
> https://a.com/callback#token=ACCESS_TOKEN # token参数就是令牌,A 网站直接在前端拿到令牌。
>
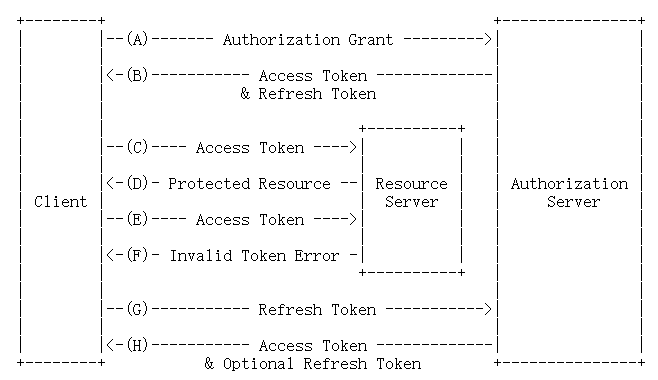
token刷新模式
令牌的有效期到了,如果让用户重新走一遍上面的流程,再申请一个新的令牌,很可能体验不好,而且也没有必要。OAuth 2.0 允许用户自动更新令牌。token
刷新模式是对 access_token 过期的一种补办操作,这种补办操作,减少了用户重新操作登录的流程。OAuth 2.0 在给客户端颁发
access_token 的时候,同时也给客户端发放了 refresh_token,而 refresh_token 的有效期要远大于
access_token 的有效期。当客户端带着已过期的 access_token 去访问资源服务器中受保护的资源时,将会访问失败,此时就需要客户端使用
refresh_token 去获取新的 access_token。客户端端获取到新的 access_token
后,就可以带上他去访问资源服务器中受保护的资源了。

token 刷新模式时序图如下:
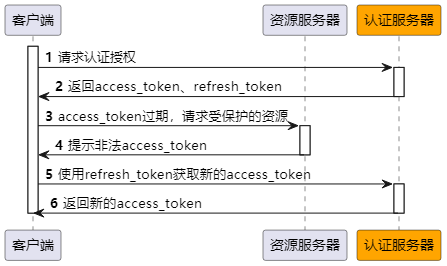
1、客户端向认证服务器请求认证授权。
2、认证服务器存返回 access_token、refresh_token、授权范围、过期时间。
3、access_token 过期后,客户端仍旧带着过期的 access_token 去请求资源服务器中受保护的资源。
4、资源服务器提示客户端,这是非法的 access_token。
5、客户端使用 refresh_token 向认证服务器获取新的 access_token。
6、认证服务器校验 refresh_token 的有效性,校验通过,则给客户端颁发新的 access_token;校验失败,则返回异常信息。
7、客户端成功获取到新的 access_token 后,就可以带着新的 access_token 去访问资源服务器了。
具体方法是,B 网站颁发令牌的时候,一次性颁发两个令牌,一个用于获取数据,另一个用于获取新的令牌(refresh token 字段)。令牌到期前,用户使用
refresh token 发一个请求,去更新令牌。
> https://b.com/oauth/token?
>   grant_type=refresh_token&    # grant_type参数为refresh_token表示要求更新令牌
>   client_id=CLIENT_ID&
>   client_secret=CLIENT_SECRET&
>   refresh_token=REFRESH_TOKEN    # 用于更新令牌的令牌
>

OAuth 2.1 协议介绍
OAuth 2.1 去掉了 OAuth 2.0 中的密码模式、简化模式,增加了设备授权码模式,同时也对授权码模式增加了 PKCE 扩展。
OAuth 2.1 协议:<https://datatracker.ietf.org/doc/html/draft-ietf-
oauth-v2-1-07>
OAuth 2.1 的变化: https://note.youdao.com/s/DRnLx34U
授权码模式+PKCE扩展
授权码模式交互过程,见之前 OAuth2.0 授权码模式的讲解。这里要说的是授权码模式如何拓展 PKCE( Proof Key for Code
Exchange 代码交换验证密钥)。
在授权码模式的交互工程中,有一个环节比较薄弱,这个环节就是用户在代理页面确认授权的时候,容易受到恶意程序的攻击,从而导致授权码被恶意程序窃取,进而通过授权码窃取令牌,当然这个前提也需要恶意程序已经植入到你的
PC 或手机当中。首先,来看一下官网中描述的恶意程序拦截攻击授权码的交互图:
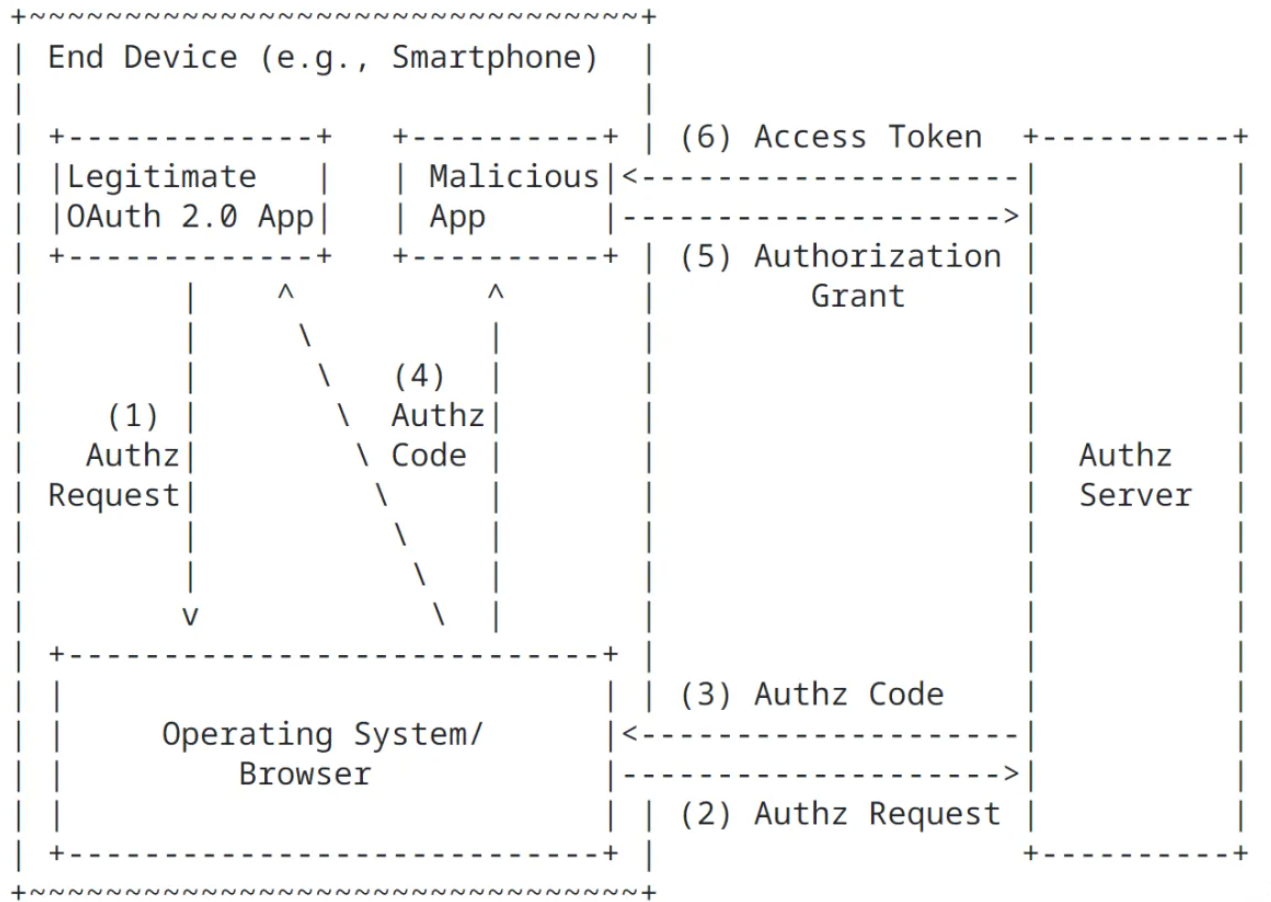
(1)客户端向认证服务器发起获取授权码请求时,跳转至授权确认页面,用户通过用浏览器在授权页面进行授权确认。
(2)授权页面向认证服务器提交客户端参数和授权范围。
(3)认证服务器将授权码拼接在客户端注册的回调地址中返回给客户端。
(4)在步骤 3 认证服务器返回授权码的过程中,如果恶意程序截取到授权码,那么他接下来就可以继续操作步骤 5 和步骤 6 了。
为了减轻这种攻击,官方增加 PKCE 扩展,先来看一下官方的交互图:
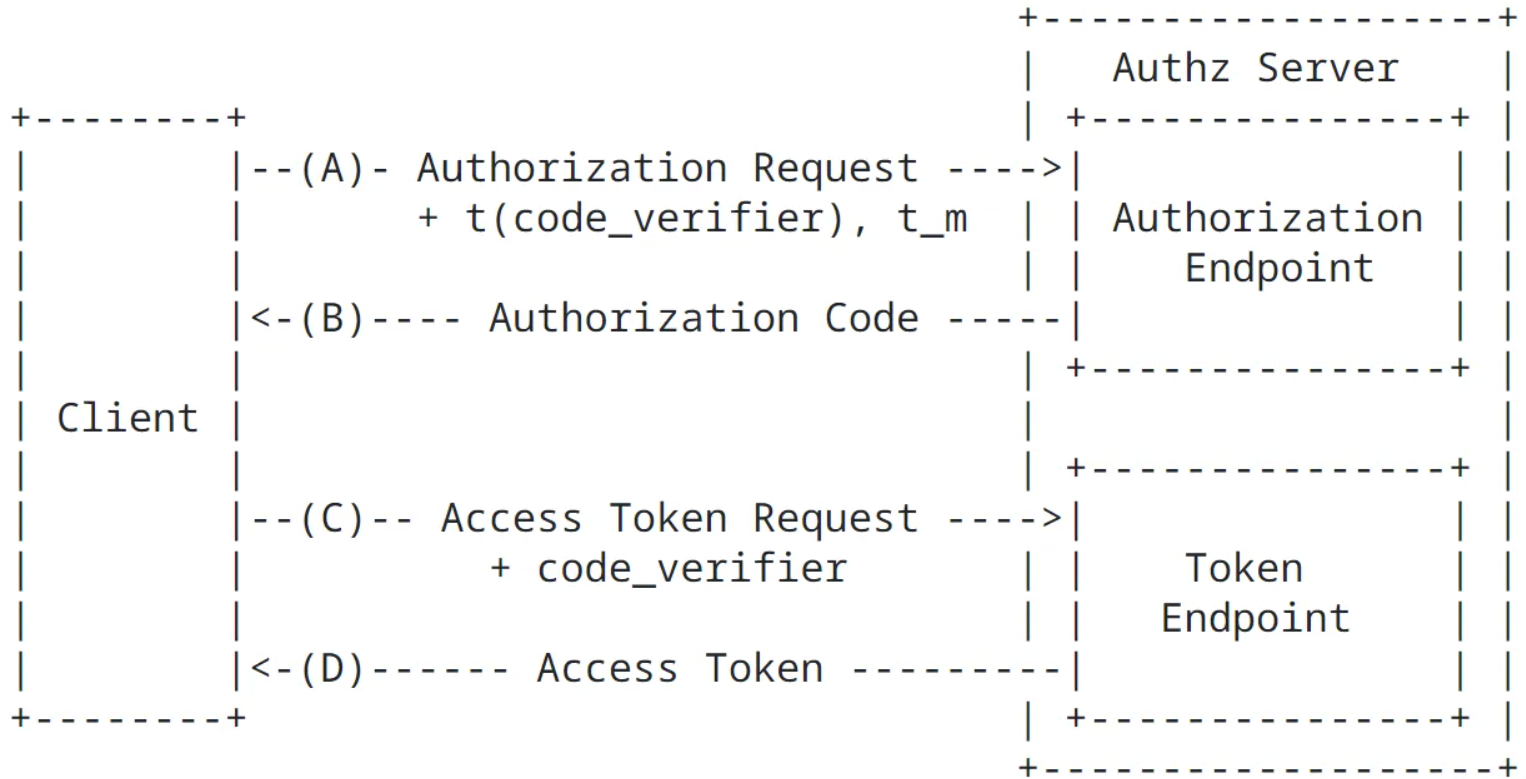
(A)客户端通过“/oauth2/authorize”地址向认证服务器发起获取授权码请求的时候增加两个参数,即 code_challenge 和
code_challenge_method,其中,code_challenge_method 是加密方法(例如:S256 或
plain),code_challenge 是使用 code_challenge_method 加密方法加密后的值。
(B)认证服务器给客户端返回授权码,同时记录下 code_challenge、code_challenge_method 的值。
(C)客户端使用 code 向认证服务器获取 Access Token 的时候,带上 code_verifier 参数,其值为步骤 A 加密前的初始值。
(D)认证服务器收到步骤 C 的请求时,将 code_verifier 的值使用 code_challenge_method
的方法进行加密,然后将加密后的值与步骤 A 中的 code_challenge 进行比较,看看是否一致。
上面交互过程中,恶意程序如果在 B 处截获授权码后,使用授权码向认证服务器换取 Access Token,但由于恶意程序没有 code_verifier
的值,因此在认证服务器无法校验通过,从而获取 Access Token 失败。
对于如何创建 code_challenge 的值,官网给出了下面两种对应的方法。
- plain code_challenge = code_verifier # 0.3.0被废弃了
- S256 code_challenge = BASE64URL-ENCODE(SHA256(ASCII(code_verifier)))
设备授权码模式
设备授权码模式,是一种为解决不便在当前设备上进行文本输入而提供的一种认证授权模式,例如:智能电视、媒体控制台、数字相框、打印机等。大家也可以脑补一下一些扫码登录的情形。使用设备授权码模式,有以下要求。
(1) 该设备已连接到互联网。
(2) 设备能够支持发出 HTTPS 请求。
(3) 设备能够显示或以其他通信方式将 URI 和 Code 发给用户。
(4) 用户有辅助设备(如个人电脑或智能手机),他们可以从中处理请求。
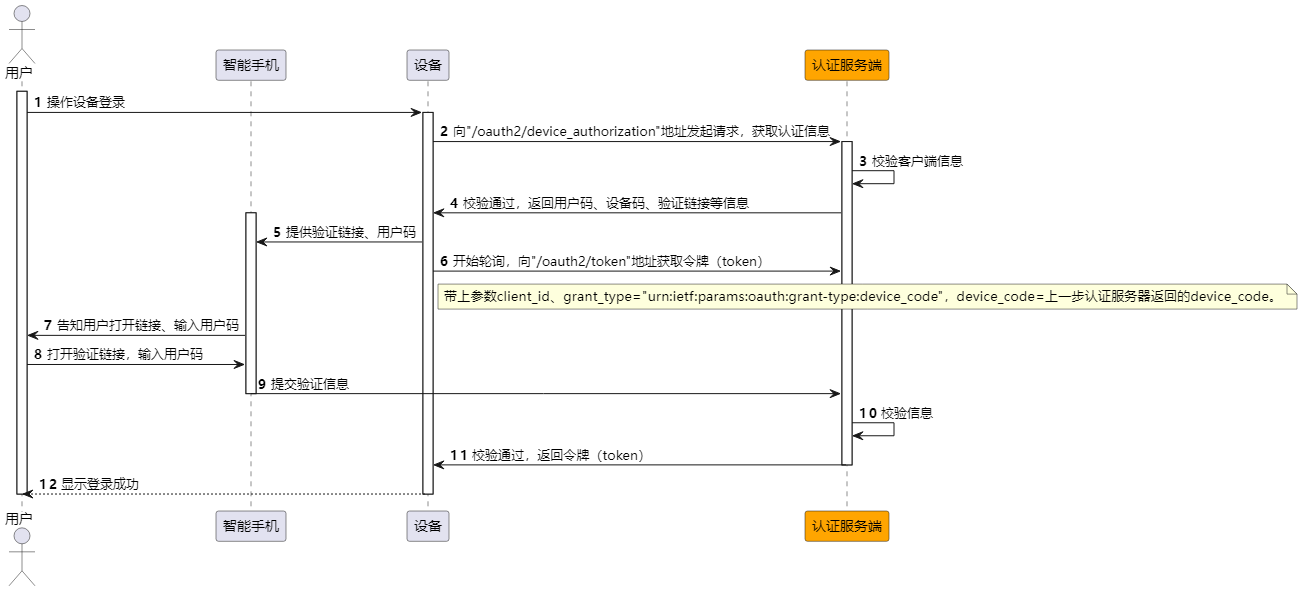
设备授权码登录官网交互图如下:
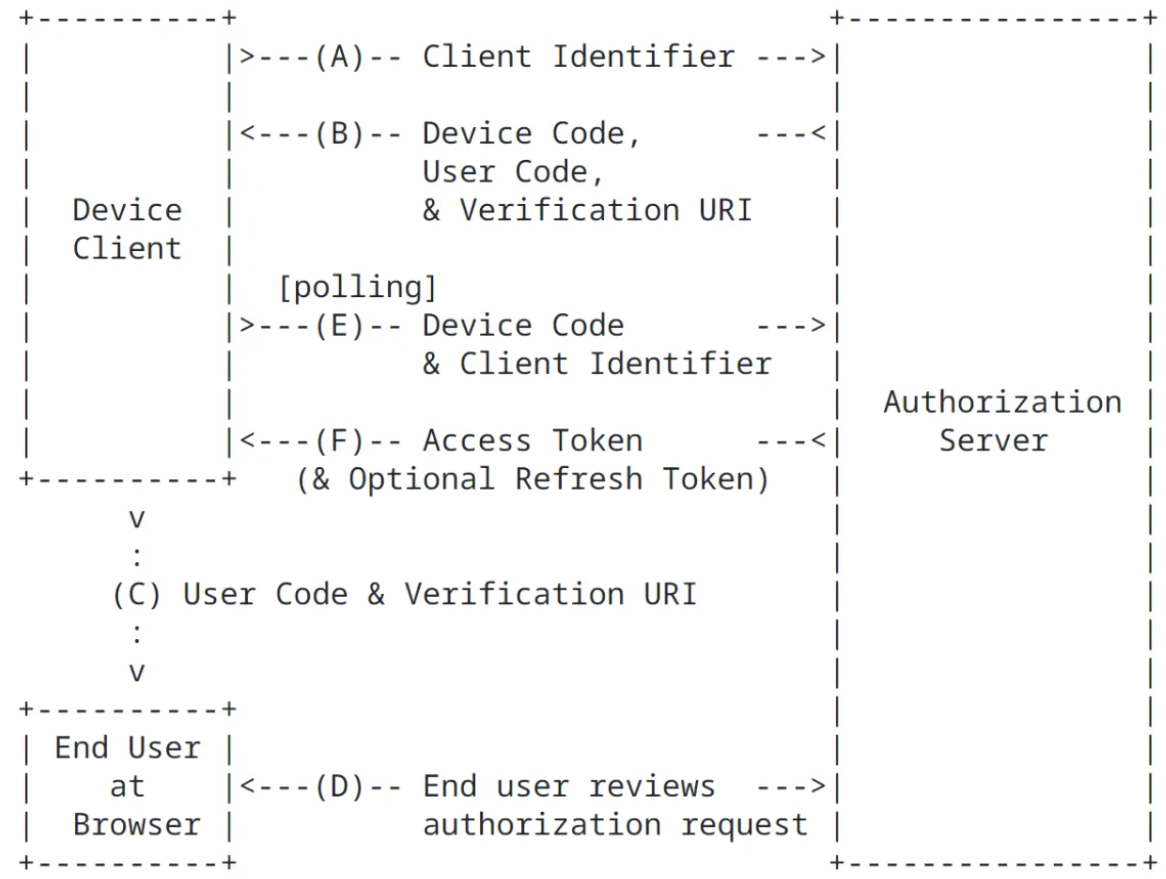
(A) 客户端带上包含客户端信息的参数向认证服务器(地址:/oauth2/device_authorization)发起授权访问。
(B) 认证服务器给客户端返回设备码、用户码及需要用户验证用户码的 URI。
© 客户端指示用户需要在另一设备进行访问授权的 URI 和用户码。
(D) 用户根据 URI 打开页面,输入用户码和确认授权,向认证服务器发起认证请求。
(E) 客户端在完成步骤(C)之后就开始带上客户端信息和设备码向认证服务器轮询获取令牌信息。
(F) 认证服务器收到客户端使用设备码获取令牌信息的请求后,检查用户是否已提交授权确认,如果用户已提交授权确认,则返回令牌信息。
时序图如下:
拓展授权模式
OAuth2.1 也提供拓展授权模式的操作实现。虽然 OAuth2.1
移除了密码模式(password),但是通过拓展授权模式可以实现密码模式。在实际应用中,客户端、授权服务器、资源服务器往往都是同一家公司的产品,那么这个时候,使用账号、密码进行登录的情形也比较常见,此时就需要通过拓展授权模式来实现账号、密码登录了。
官网文档: <https://docs.spring.io/spring-authorization-
server/docs/current/reference/html/guides/how-to-ext-grant-type.html>
OpenID Connect 1.0 协议
OpenID Connect 1.0:https://openid.net/specs/openid-connect-core-1_0.html
OpenID Connect 1.0 是 OAuth 2.0 协议之上的一个简单的身份层。其实就是客户端向认证服务器请求认证授权的时候,多返回一个
id_token,该 id_token 是一串使用 jwt 加密过的字符串,如下如所示:
OpenID Connect 协议在抽象上遵循以下步骤。
- RP(客户端)向 OpenID 提供程序(OP)发送请求。
- OP 对最终用户进行身份验证并获得授权。
- OP 响应 ID 令牌和通常的访问令牌。
- RP 可以发送带有访问令牌的请求到用户信息端点。
- 用户信息端点返回有关最终用户的声明。

Spring Authorization Server 实战
版本要求:
Spring Authorization Server 版本:1.1.2
JDK 版本:17
Spring Boot 版本:3.1.4
认证(授权)服务器搭建
Spring Authorization Server 重要组件:
- SecurityFilterChain -> authorizationServerSecurityFilterChain
Spring Security 的过滤器链,用于协议端点的。
- SecurityFilterChain -> defaultSecurityFilterChain
Spring Security 的过滤器链,用于 Spring Security 的身份认证。
- UserDetailsService
主要进行用户身份验证。
- RegisteredClientRepository
主要用于管理客户端。
- JWKSource
用于签名访问令牌。
- KeyPair
启动时生成的带有密钥的 KeyPair 实例,用于创建上面的 JWKSource。
- JwtDecoder
JwtDecoder 的一个实例,用于解码已签名的访问令牌。
- AuthorizationServerSettings
用于配置 Spring Authorization Server 的 AuthorizationServerSettings 实例。
1)引入依赖
<!--Spring Authorization Server-->
<dependency>
    <groupId>org.springframework.boot</groupId>
    <artifactId>spring-boot-starter-oauth2-authorization-server</artifactId>
</dependency>
2)配置授权服务器
直接从官网[https://docs.spring.io/spring-authorization- server/docs/current/reference/html/getting- started.html](https://docs.spring.io/spring-authorization- server/docs/current/reference/html/getting-started.html)将 SecurityConfig 拷贝放到
config 下
import com.nimbusds.jose.jwk.JWKSet;
import com.nimbusds.jose.jwk.RSAKey;
import com.nimbusds.jose.jwk.source.ImmutableJWKSet;
import com.nimbusds.jose.jwk.source.JWKSource;
import com.nimbusds.jose.proc.SecurityContext;
import org.springframework.context.annotation.Bean;
import org.springframework.context.annotation.Configuration;
import org.springframework.core.annotation.Order;
import org.springframework.http.MediaType;
import org.springframework.security.config.Customizer;
import org.springframework.security.config.annotation.web.builders.HttpSecurity;
import org.springframework.security.config.annotation.web.configuration.EnableWebSecurity;
import org.springframework.security.core.userdetails.User;
import org.springframework.security.core.userdetails.UserDetails;
import org.springframework.security.core.userdetails.UserDetailsService;
import org.springframework.security.oauth2.core.AuthorizationGrantType;
import org.springframework.security.oauth2.core.ClientAuthenticationMethod;
import org.springframework.security.oauth2.core.oidc.OidcScopes;
import org.springframework.security.oauth2.jwt.JwtDecoder;
import org.springframework.security.oauth2.server.authorization.client.InMemoryRegisteredClientRepository;
import org.springframework.security.oauth2.server.authorization.client.RegisteredClient;
import org.springframework.security.oauth2.server.authorization.client.RegisteredClientRepository;
import org.springframework.security.oauth2.server.authorization.config.annotation.web.configuration.OAuth2AuthorizationServerConfiguration;
import org.springframework.security.oauth2.server.authorization.config.annotation.web.configurers.OAuth2AuthorizationServerConfigurer;
import org.springframework.security.oauth2.server.authorization.settings.AuthorizationServerSettings;
import org.springframework.security.oauth2.server.authorization.settings.ClientSettings;
import org.springframework.security.provisioning.InMemoryUserDetailsManager;
import org.springframework.security.web.SecurityFilterChain;
import org.springframework.security.web.authentication.LoginUrlAuthenticationEntryPoint;
import org.springframework.security.web.util.matcher.MediaTypeRequestMatcher;

import java.security.KeyPair;
import java.security.KeyPairGenerator;
import java.security.interfaces.RSAPrivateKey;
import java.security.interfaces.RSAPublicKey;
import java.util.UUID;


/**
 * https://docs.spring.io/spring-authorization-server/docs/current/reference/html/getting-started.html
 */
@Configuration
@EnableWebSecurity
public class SecurityConfig {

    /**
    *  Spring Authorization Server 相关配置
    *  主要配置OAuth 2.1和OpenID Connect 1.0
    * @param http
    * @return
    * @throws Exception
    */
    @Bean
    @Order(1)
    public SecurityFilterChain authorizationServerSecurityFilterChain(HttpSecurity http)
    throws Exception {
        OAuth2AuthorizationServerConfiguration.applyDefaultSecurity(http);
        http.getConfigurer(OAuth2AuthorizationServerConfigurer.class)
        //开启OpenID Connect 1.0(其中oidc为OpenID Connect的缩写)
         .oidc(Customizer.withDefaults());  // Enable OpenID Connect 1.0
      http
         // Redirect to the login page when not authenticated from the
         // authorization endpoint
         //将需要认证的请求,重定向到login进行登录认证。
         .exceptionHandling((exceptions) -> exceptions
            .defaultAuthenticationEntryPointFor(
               new LoginUrlAuthenticationEntryPoint("/login"),
               new MediaTypeRequestMatcher(MediaType.TEXT_HTML)
            )
         )
         // Accept access tokens for User Info and/or Client Registration
         // 使用jwt处理接收到的access token
         .oauth2ResourceServer((resourceServer) -> resourceServer
            .jwt(Customizer.withDefaults()));

      return http.build();
   }

   /**
    *  Spring Security 过滤链配置(此处是纯Spring Security相关配置)
    */
   @Bean
   @Order(2)
   public SecurityFilterChain defaultSecurityFilterChain(HttpSecurity http)
         throws Exception {
      http
         .authorizeHttpRequests((authorize) -> authorize
            .anyRequest().authenticated()
         )
         // Form login handles the redirect to the login page from the
         // authorization server filter chain
         .formLogin(Customizer.withDefaults());

      return http.build();
   }

   /**
    * 设置用户信息,校验用户名、密码
    * @return
    */
   @Bean
   public UserDetailsService userDetailsService() {
      UserDetails userDetails = User.withDefaultPasswordEncoder()
            .username("jay")
            .password("123456")
            .roles("USER")
            .build();
      //基于内存的用户数据校验
      return new InMemoryUserDetailsManager(userDetails);
   }

   /**
    * 注册客户端信息
    *
    * 查询认证服务器信息
    * http://127.0.0.1:9000/.well-known/openid-configuration
    *
    * 获取授权码
    * http://localhost:9000/oauth2/authorize?response_type=code&client_id=oidc-client&scope=profile&redirect_uri=http://www.baidu.com
    *
    */
   @Bean
   public RegisteredClientRepository registeredClientRepository() {
      RegisteredClient oidcClient = RegisteredClient.withId(UUID.randomUUID().toString())
            .clientId("oidc-client")
            //{noop}开头,表示“secret”以明文存储
            .clientSecret("{noop}secret")
            .clientAuthenticationMethod(ClientAuthenticationMethod.CLIENT_SECRET_BASIC)
            .authorizationGrantType(AuthorizationGrantType.AUTHORIZATION_CODE)
            .authorizationGrantType(AuthorizationGrantType.REFRESH_TOKEN)
            .authorizationGrantType(AuthorizationGrantType.CLIENT_CREDENTIALS)
            //.redirectUri("http://spring-oauth-client:9001/login/oauth2/code/messaging-client-oidc")
            //我们暂时还没有客户端服务,以免重定向跳转错误导致接收不到授权码
            .redirectUri("http://www.baidu.com")
            .postLogoutRedirectUri("http://127.0.0.1:8080/")
            .scope(OidcScopes.OPENID)
            .scope(OidcScopes.PROFILE)
            .clientSettings(ClientSettings.builder().requireAuthorizationConsent(true).build())
            .build();

      //配置基于内存的客户端信息
      return new InMemoryRegisteredClientRepository(oidcClient);
   }

   /**
    * 配置 JWK,为JWT(id_token)提供加密密钥,用于加密/解密或签名/验签
    * JWK详细见:https://datatracker.ietf.org/doc/html/draft-ietf-jose-json-web-key-41
    */
   @Bean
   public JWKSource<SecurityContext> jwkSource() {
      KeyPair keyPair = generateRsaKey();
      RSAPublicKey publicKey = (RSAPublicKey) keyPair.getPublic();
      RSAPrivateKey privateKey = (RSAPrivateKey) keyPair.getPrivate();
      RSAKey rsaKey = new RSAKey.Builder(publicKey)
            .privateKey(privateKey)
            .keyID(UUID.randomUUID().toString())
            .build();
      JWKSet jwkSet = new JWKSet(rsaKey);
      return new ImmutableJWKSet<>(jwkSet);
   }

   /**
    *  生成RSA密钥对,给上面jwkSource() 方法的提供密钥对
    */
   private static KeyPair generateRsaKey() {
      KeyPair keyPair;
      try {
         KeyPairGenerator keyPairGenerator = KeyPairGenerator.getInstance("RSA");
         keyPairGenerator.initialize(2048);
         keyPair = keyPairGenerator.generateKeyPair();
      }
      catch (Exception ex) {
         throw new IllegalStateException(ex);
      }
      return keyPair;
   }

   /**
    * 配置jwt解析器
    */
   @Bean
   public JwtDecoder jwtDecoder(JWKSource<SecurityContext> jwkSource) {
      return OAuth2AuthorizationServerConfiguration.jwtDecoder(jwkSource);
   }

   /**
    * 配置认证服务器请求地址
    */
   @Bean
   public AuthorizationServerSettings authorizationServerSettings() {
      //什么都不配置,则使用默认地址
      return AuthorizationServerSettings.builder().build();
   }
}
在上面 SecurityConfig 代码中,我们已经开启了 OpenID Connect 1.0,于是我们就可以使用
[http://127.0.0.1:9000/.well-known/openid- configuration](http://127.0.0.1:9000/.well-known/openid-configuration)
地址请求查看授权服务器信息了。
可以参考源码:OidcProviderConfigurationEndpointFilter,该类是 Spring Security
过滤链中的一个过滤器,当发起“/.well-known/openid-configuration”请求时,会被
OidcProviderConfigurationEndpointFilter 拦截。
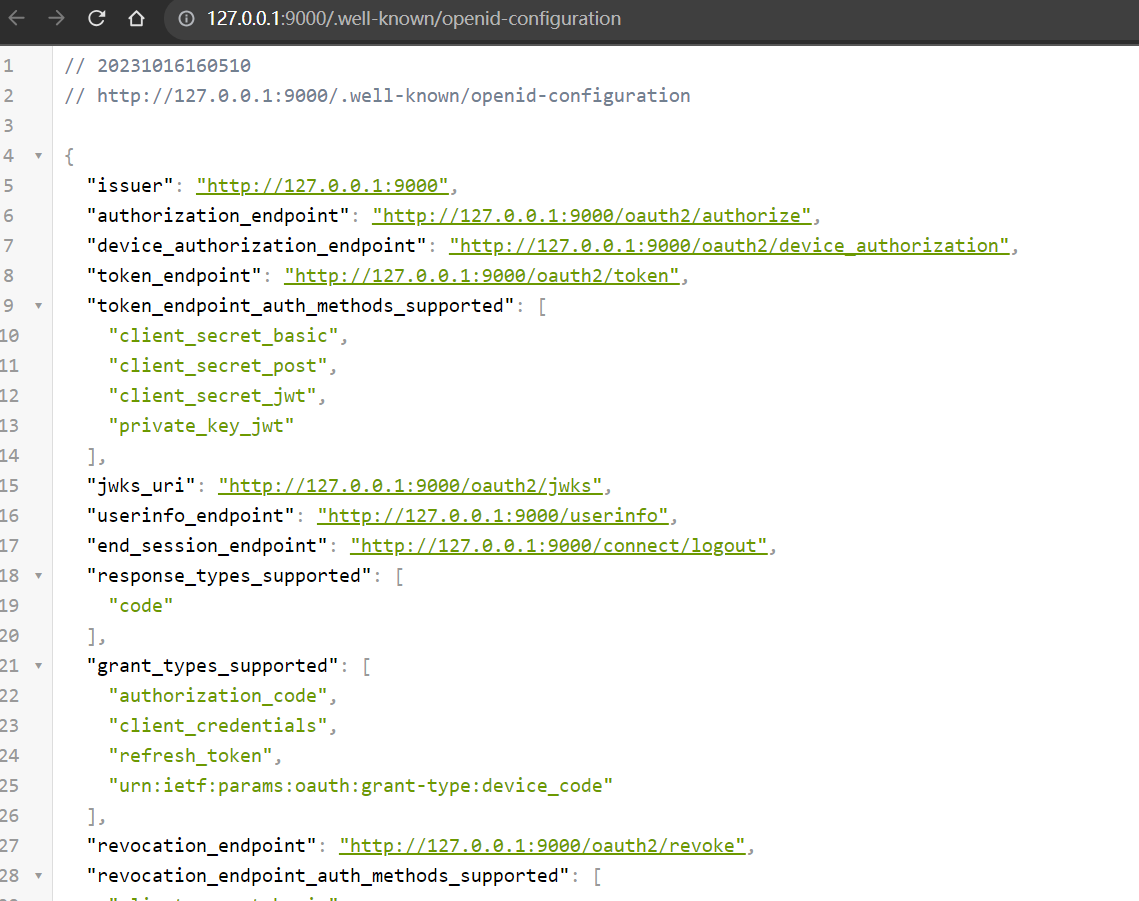
上面的配置信息中,其中 authorization_endpoint 为授权码的授权地址,device_authorization_endpoint
为设备授权码的授权地址,token_endpoint 为获取 token 的地址。
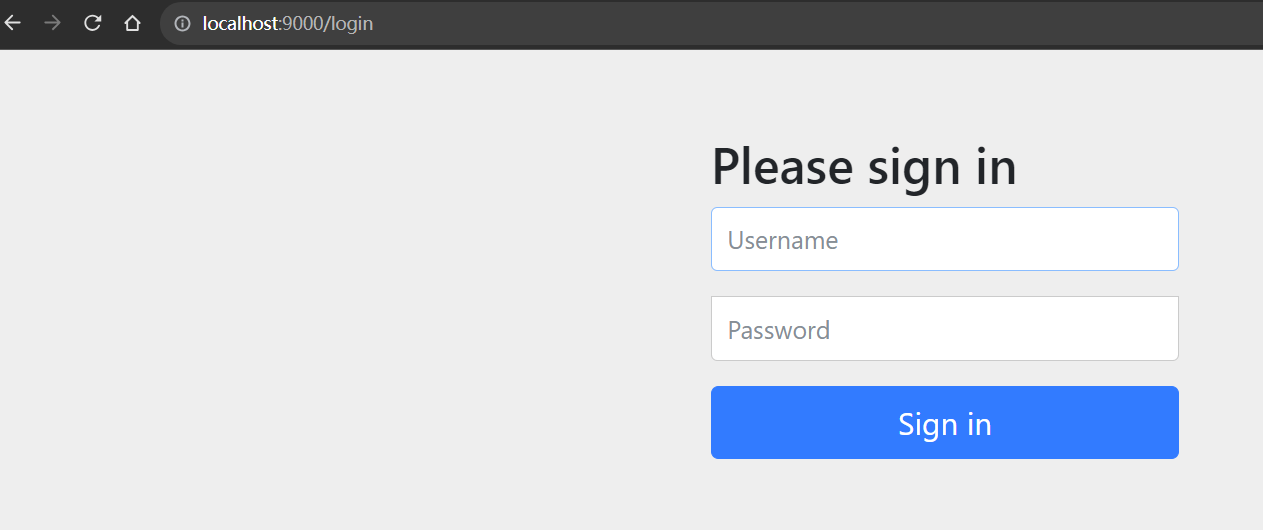
授权码模式测试
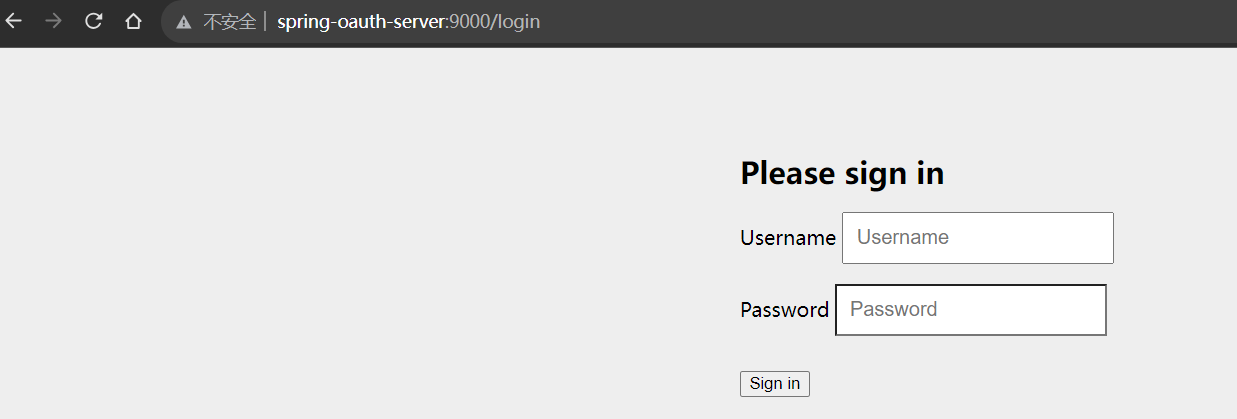
使用 [http://localhost:9000/oauth2/authorize?response_type=code&client_id=oidc- client&scope=profile](http://localhost:9000/oauth2/authorize?response_type=code&client_id=oidc- client&scope=profile) openid&redirect_uri=[http://www.baidu.com](http://www.baidu.com)
请求获取授权码,则跳转至下面登录页面。
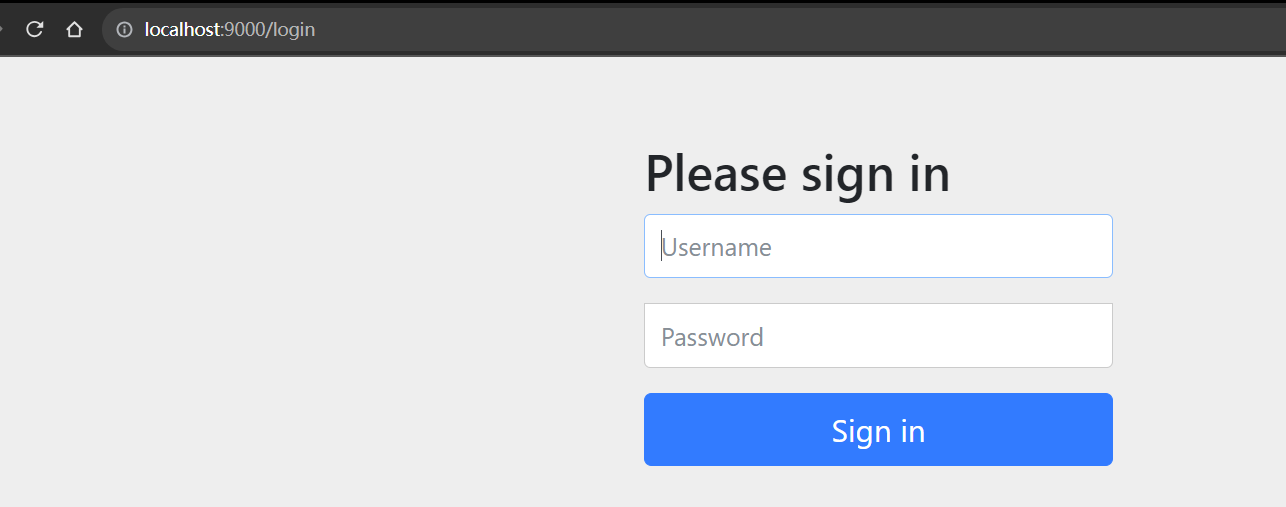
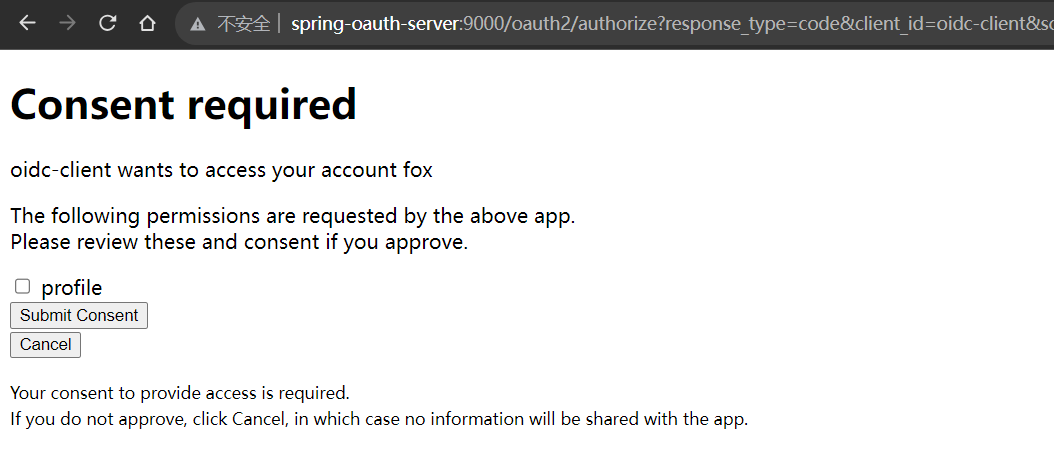
输入用户名:jay,密码:123456,则跳转至授权页面:
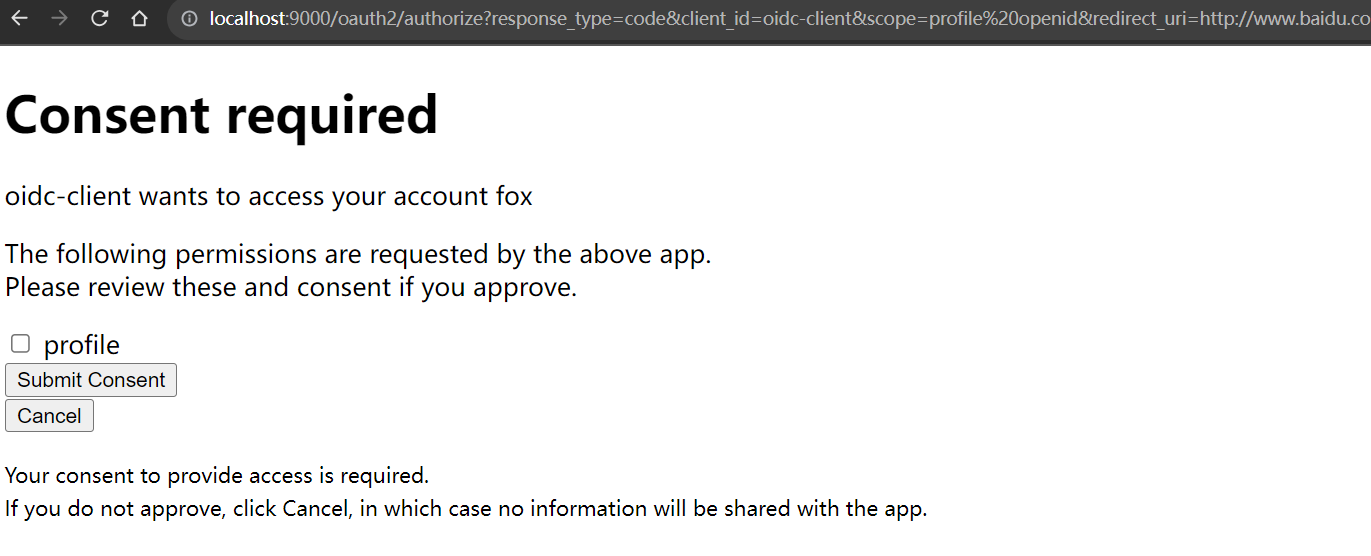
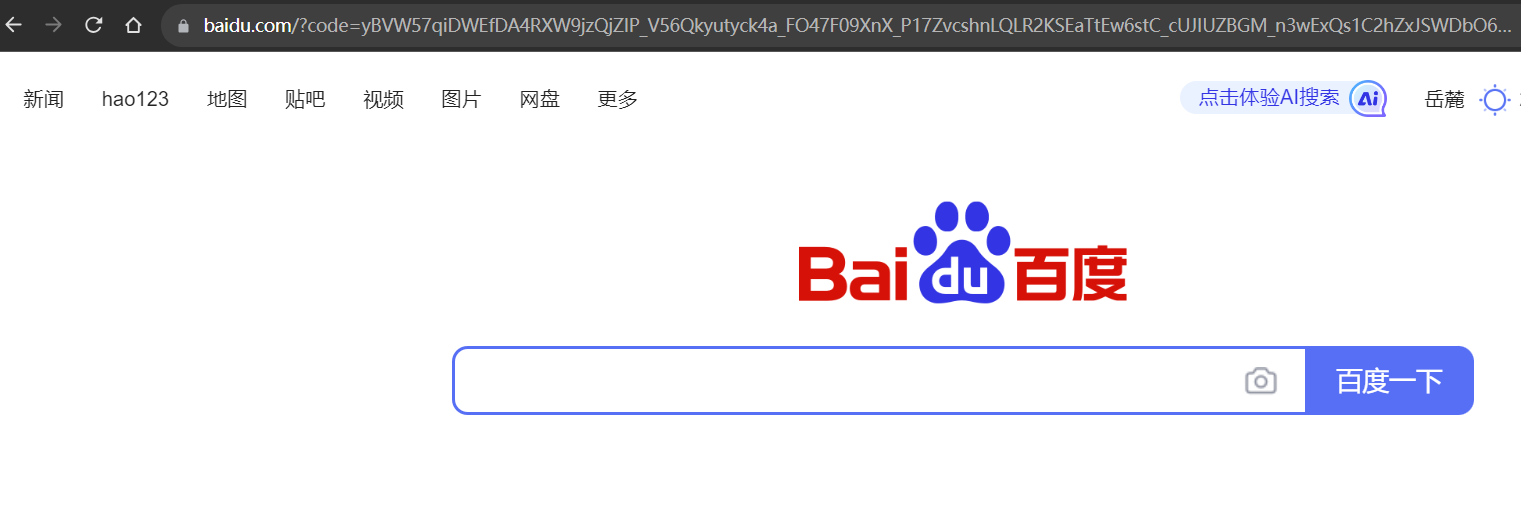
勾选授权信息 profile,点击提交按钮,则返回如下结果:
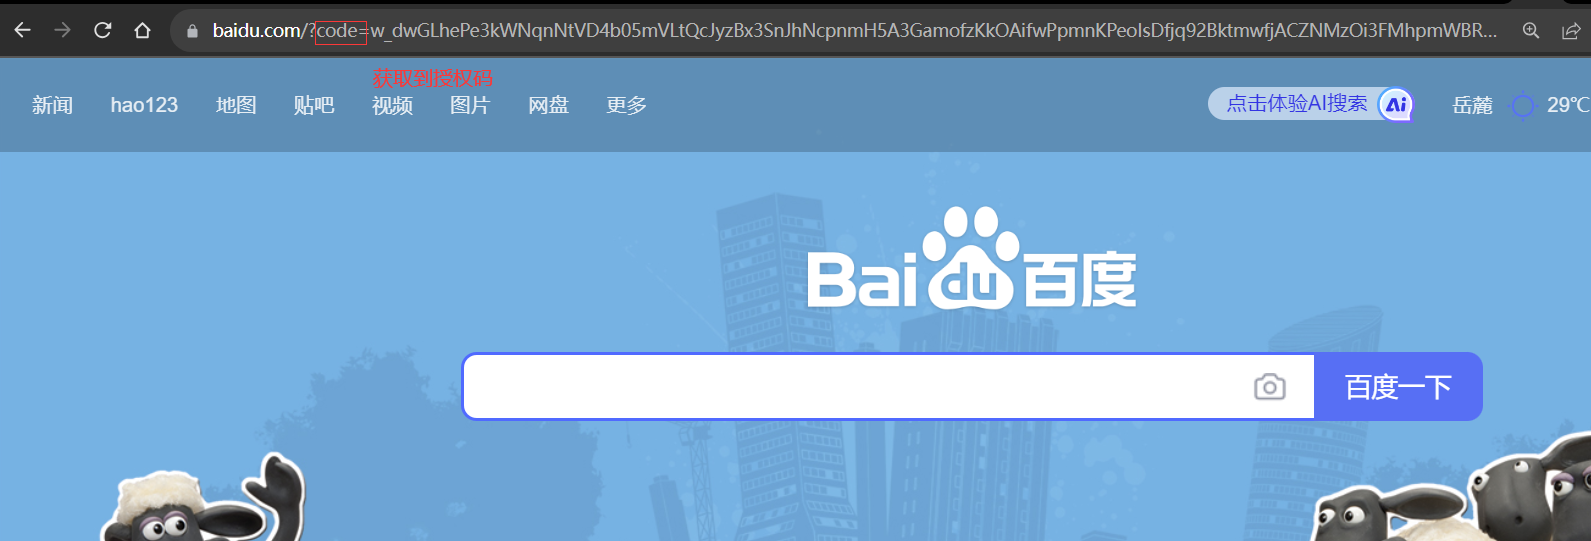
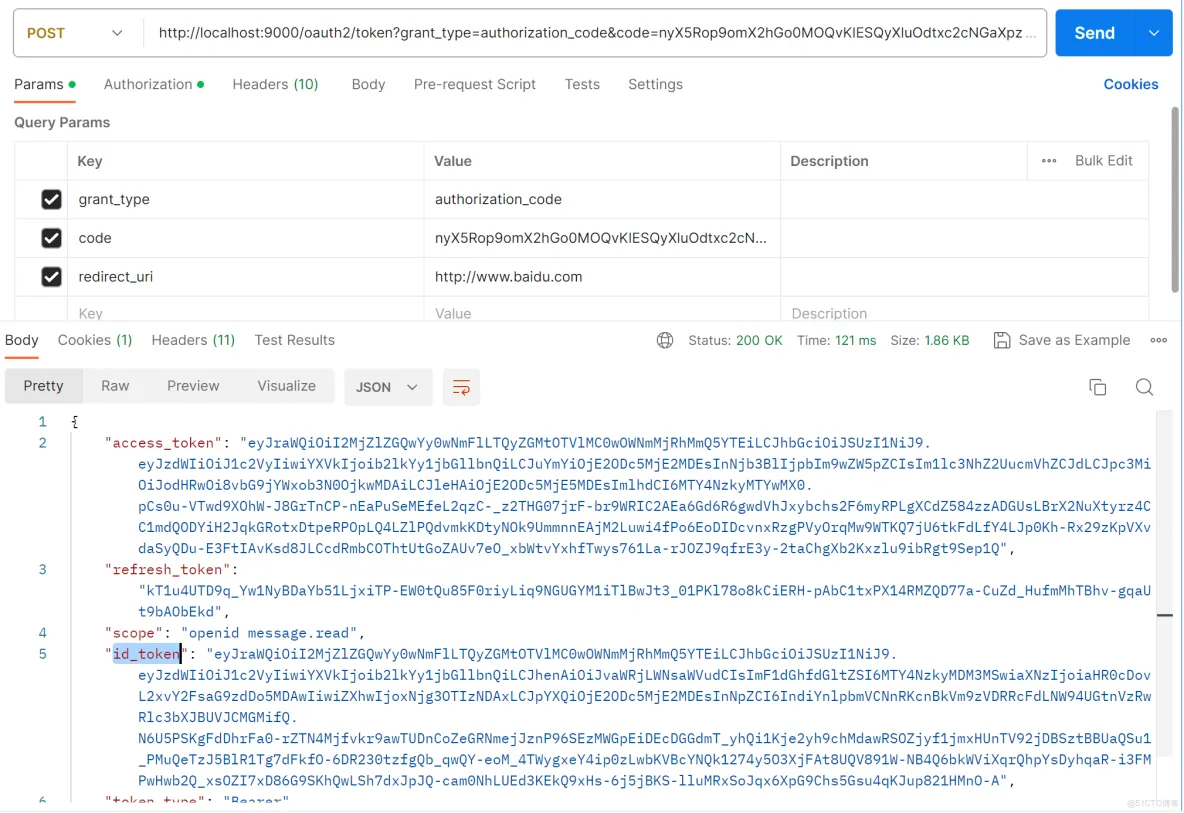
从浏览器地址栏中,我们看到授权服务器已经返回了授权码 code,接下来,我们使用授权 code
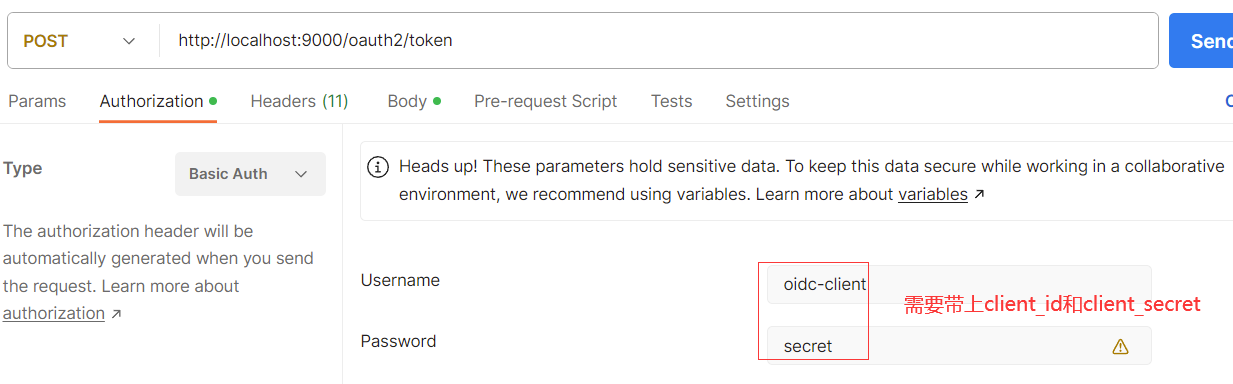
向[http://localhost:9000/oauth2/token](http://localhost:9000/oauth2/token)地址请求获取令牌。
postman 测试:
需要带上 client_id 和 client_secret

结果如下:
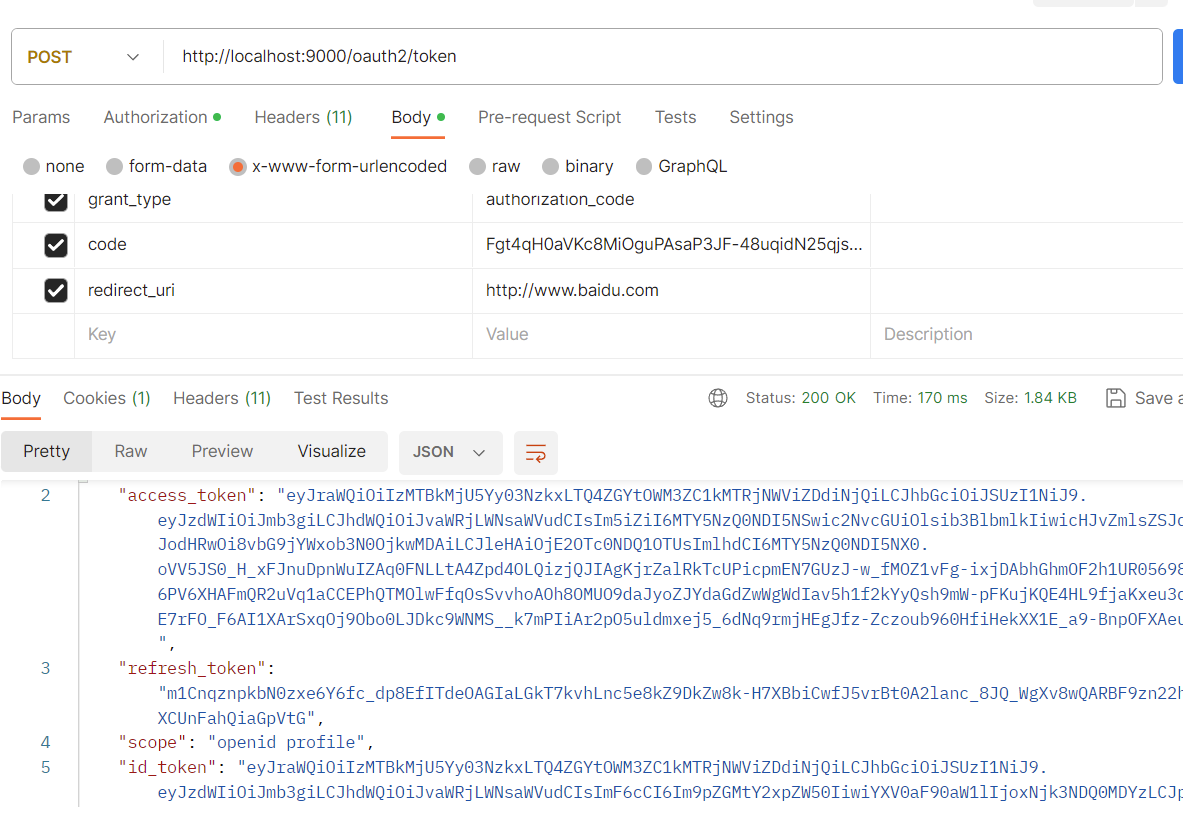
到此,授权码模式的流程就完成了。
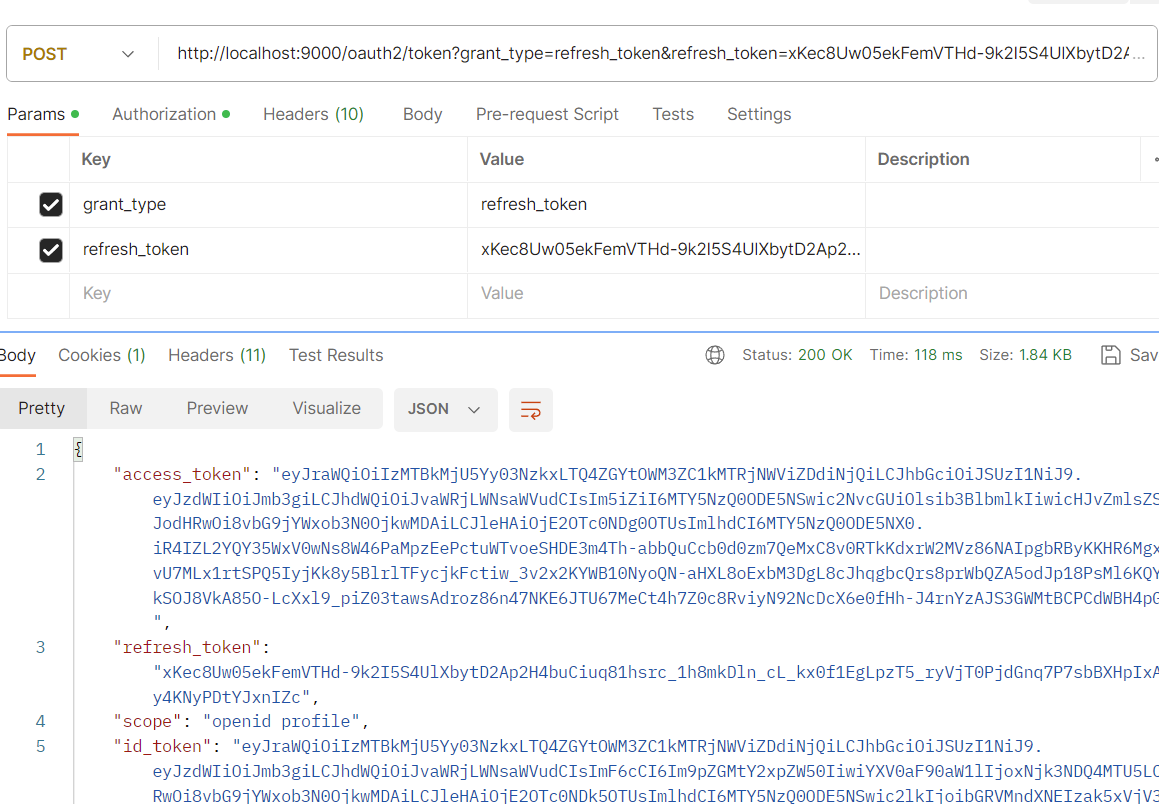
刷新令牌测试
测试[http://localhost:9000/oauth2/token](http://localhost:9000/oauth2/token)
地址,参数授权类型 grant_type 的值改为 refresh_token,传入授权码模式返回的 refresh_token
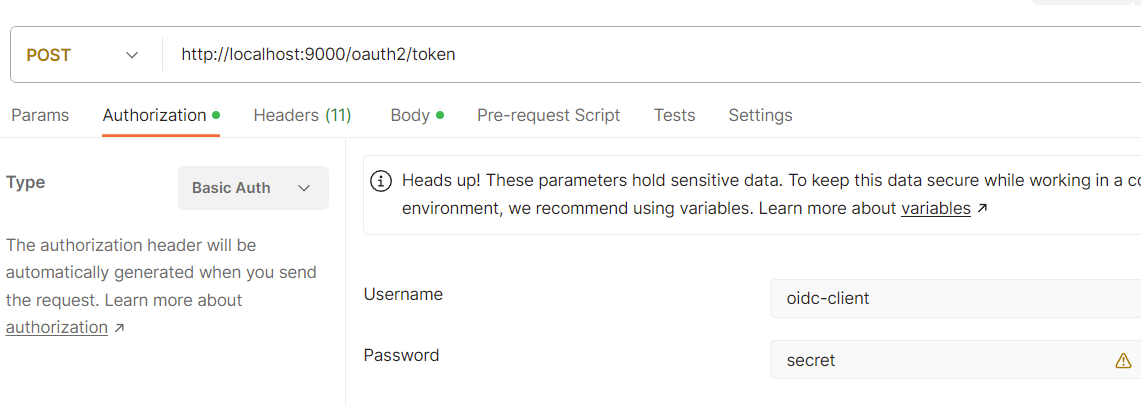
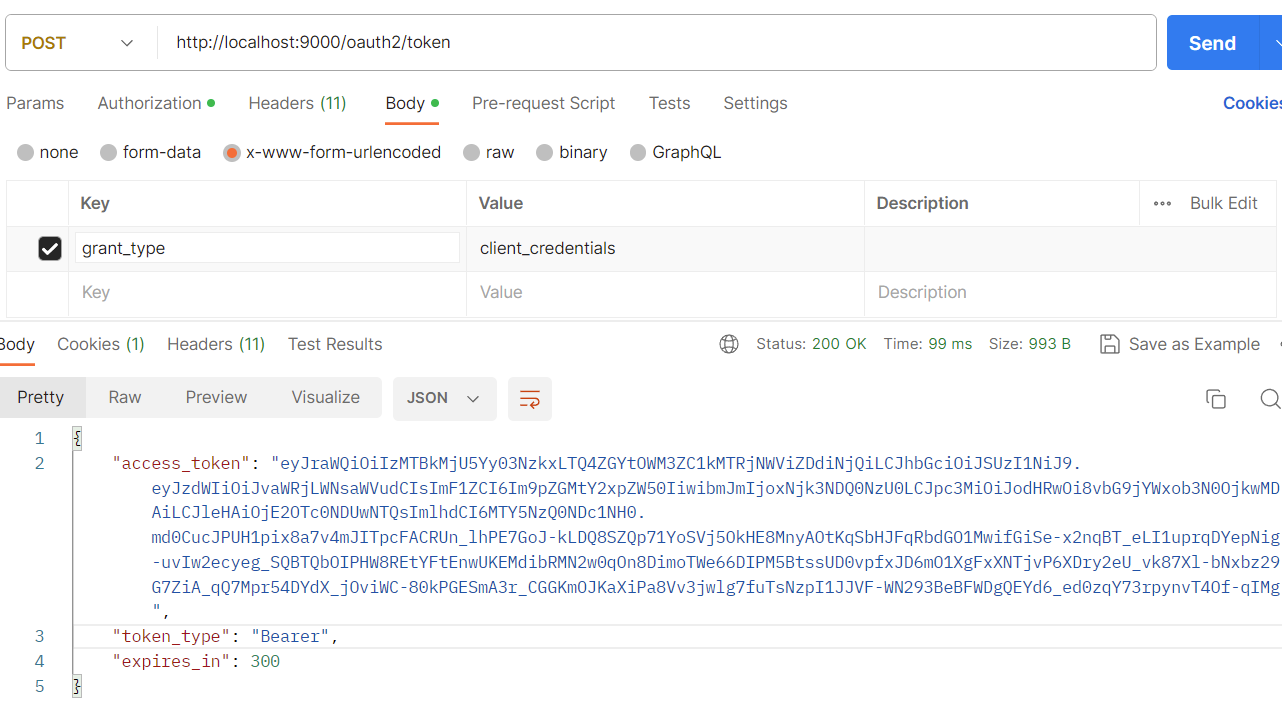
客户端模式测试
带上 client_id、client_secret,指定客户端模式 grant_type 为
client_credentials,访问[http://localhost:9000/oauth2/token](http://localhost:9000/oauth2/token)
客户端搭建
客户端的主要职责是识别用户操作是否有身份认证,已认证则放行,未认证则拒绝或引导到认证服务器进行认证。
前面我们介绍了授权服务器的搭建,由于我们没有自己的客户端回调地址,在测试过程中,我们是使用[http://www.baidu.com](http://www.baidu.com)作为回调地址,获取到授权码
code 后,再使用 postman 去获取令牌信息的。接下来,我们将搭建自己的客户端,实现连贯的令牌获取操作, 操作流程如下:
业务场景
假设我们公司的 web 平台产品支持微信登录,那么对于微信平台来说,我们的 web
平台就是客户端(第三方),那么,首先我们就得需要在微信开发者平台中注册客户端信息,例如:申请客户端id(client_id,微信平台叫
appId)、密钥(secret)、配置授权码回调地址等。前面我们搭建的授权服务器就类似微信平台的授权服务器,接下来要搭建的客户端 auth-client
就类似公司的 web 平台。
客户端接入 oauth2-client
Spring Security OAuth2 Client 组件介绍:
- ClientRegistration:注册的客户端
- ClientRegistrationRepository:ClientRegistration 的存储仓库
- OAuth2AuthorizedClient:已授权过的客户端
- OAuth2AuthorizedClientRepository:已授权过的客户端存储库持久化
- OAuth2AuthorizationRequestRedirectFilter:该过滤器处理 /oauth2/authorization 路径,转发给认证中心 对应的路径 /oauth2/authorize
- OAuth2AuthorizationCodeGrantFilter:负责处理认证中心的授权码回调请求,如地址重定向
- OAuth2LoginAuthenticationFilter:处理第三方认证的回调(该回调有授权码),拿着授权码到第三方认证服务器获取 access_token 和 refresh_token
- 引入依赖
<!--spring-boot-starter-oauth2-client-->
<dependency>
    <groupId>org.springframework.boot</groupId>
    <artifactId>spring-boot-starter-oauth2-client</artifactId>
</dependency>
<!--spring-boot-starter-web-->
<dependency>
    <groupId>org.springframework.boot</groupId>
    <artifactId>spring-boot-starter-web</artifactId>
</dependency>
2)配置 application.yml
server:
  port: 9001

logging:
  level:
    org.springframework.security: trace

spring:
  application:
    name: spring-oauth-client
  security:
    oauth2:
      client:
        provider:
          #认证服务器信息
          oauth-server:
            #授权地址
            issuer-uri: http://spring-oauth-server:9000
            authorizationUri: ${spring.security.oauth2.client.provider.oauth-server.issuer-uri}/oauth2/authorize
            #令牌获取地址
            tokenUri: ${spring.security.oauth2.client.provider.oauth-server.issuer-uri}/oauth2/token
        registration:
          messaging-client-oidc:
            #认证提供者,标识由哪个认证服务器进行认证,和上面的oauth-server进行关联
            provider: oauth-server
            #客户端名称
            client-name: web平台
            #客户端id,从认证平台申请的客户端id
            client-id: web-client-id
            #客户端秘钥
            client-secret: secret
            #客户端认证方式
            client-authentication-method: client_secret_basic
            #使用授权码模式获取令牌(token)
            authorization-grant-type: authorization_code
            #回调地址,接收认证服务器回传code的接口地址,之前我们是使用http://www.baidu.com代替
            # 注意:和认证服务器配置的回调地址要一致
            redirect-uri: http://spring-oauth-client:9001/login/oauth2/code/messaging-client-oidc
            scope:
              - profile
              - openid
注意:上面配置中出现两个域名,分别是 spring-oauth-client、spring-oauth-
server,因为我是在同一台机器上进行启动客户端和认证服务器的,ip 都是 127.0.0.1,在 ip 相同的情况下,会出现 cookie
覆盖的情形,这会导致认证服务器重定向到客户端地址时会出现[authorization_request_not_found]异常,为解决这个问题,可以在系统的
hosts 文件添加了一行 IP 域名映射,即 127.0.0.1 spring-oauth-client spring-oauth-server。
3)新建测试类
@RestController
public class AuthenticationController {

    @GetMapping("/token")
    @ResponseBody
    public OAuth2AuthorizedClient token(@RegisteredOAuth2AuthorizedClient OAuth2AuthorizedClient oAuth2AuthorizedClient) {
        // 通过OAuth2AuthorizedClient对象获取到客户端和令牌相关的信息,然后直接返回给前端页面
        return oAuth2AuthorizedClient;
    }
}
客户端测试
启动认证服务器和客户端服务,浏览器输入[http://spring-oauth-client:9001/token](http://spring- oauth-client:9001/token)地址发起接口访问。此时我们会看到,浏览器地址被重定向到认证服务器[http://spring- oauth-server:9000/login](http://spring-oauth-server:9000/login)中被要求进行登录:
输入用户在认证服务器的用户名:jay,密码:123456,则跳转到认证服务器授权页面:
勾选授权信息 profile,点击提交按钮,则返回如下结果:
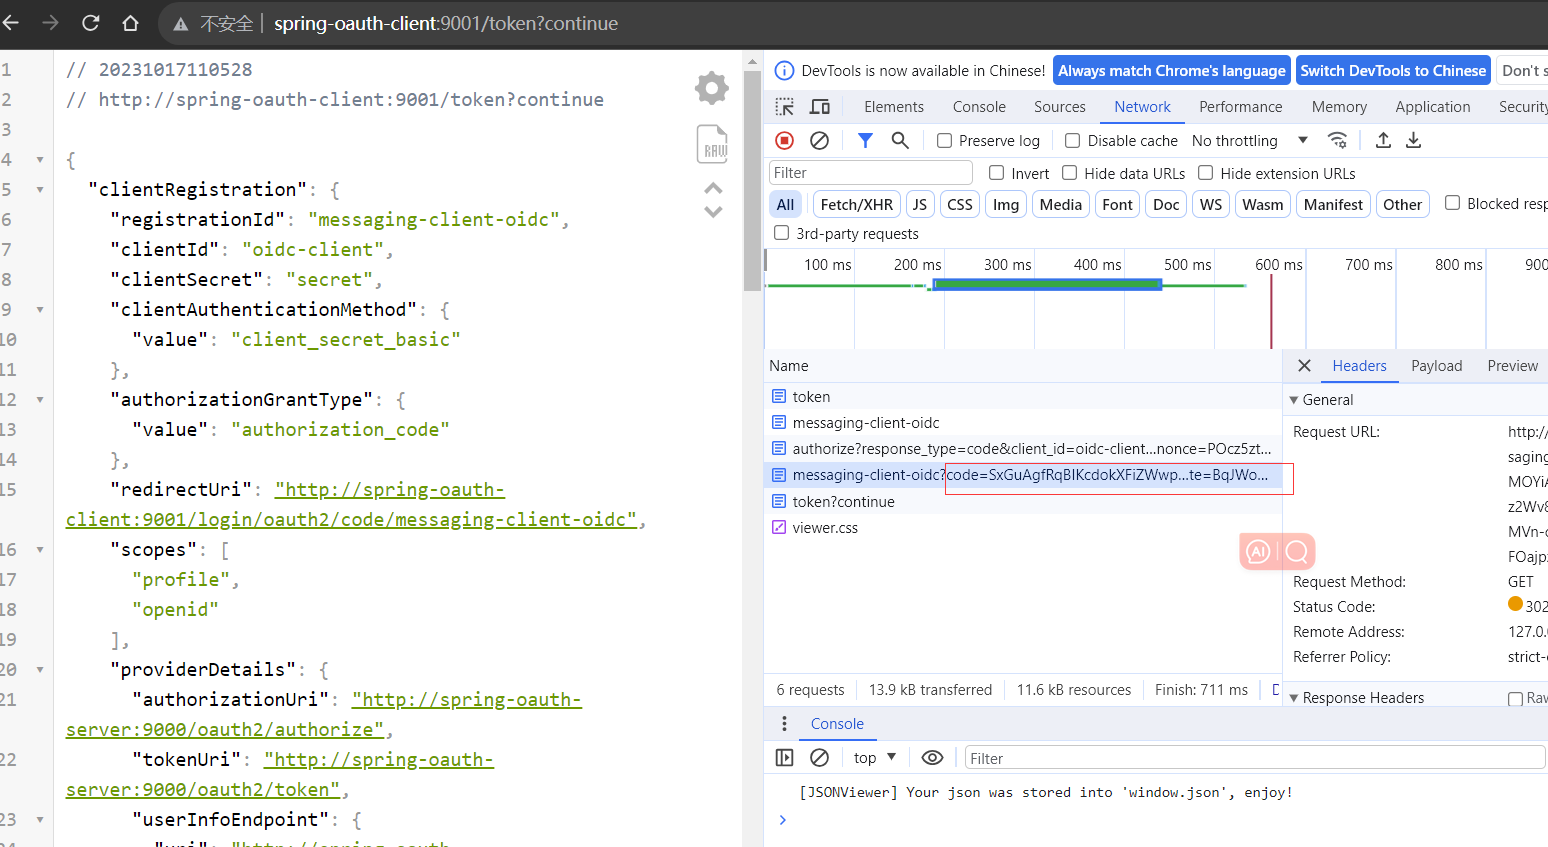
此时我们看到了浏览器中的地址为[http://spring-oauth- client:9001/token?continue](http://spring-oauth- client:9001/token?continue),且返回了客户端及token信息。也看到了认证服务器将授权码拼接到了回调地址[http://spring- oauth-client:9001/login/oauth2/code/messaging-client-oidc](http://spring- oauth-client:9001/login/oauth2/code/messaging-client-oidc)中传给客户端。
资源服务器搭建
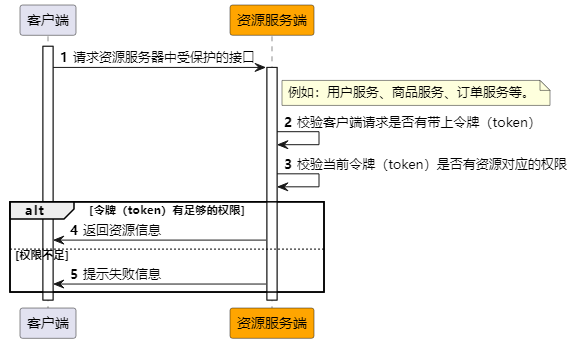
资源服务器在分布式服务中就是指用户服务、商品服务、订单服务那些了,访问资源服务器中受保护的资源,都需要带上令牌(token)进行访问。
资源服务器往往和客户端一起配合使用,客户端侧重于身份认证,资源服务器侧重于权限校验,如果在 Spring Cloud(Alibaba)
微服务架构中,可以将客户端框架 spring-boot-starter-oauth2-client 集成到网关服务上,将资源服务器框架 spring-
boot-starter-oauth2-resource-server 集成到用户服务、商品服务、订单服务等微服务上。
下面我们开始来搭建资源服务器。客户端、资源服务器交互时序图如下:
资源服务器搭建
1)引入依赖
<!--spring-boot-starter-oauth2-resource-server-->
<dependency>
    <groupId>org.springframework.boot</groupId>
    <artifactId>spring-boot-starter-oauth2-resource-server</artifactId>
</dependency>
<!--spring-boot-starter-web-->
<dependency>
    <groupId>org.springframework.boot</groupId>
    <artifactId>spring-boot-starter-web</artifactId>
</dependency>
2)配置 application.yml
server:
  port: 9002

logging:
  level:
    org.springframework.security: trace

spring:
  application:
    name: spring-oauth-resource
  security:
    oauth2:
      resource-server:
        jwt:
          issuer-uri: http://spring-oauth-server:9000
3)配置 Spring Security
@Configuration
@EnableWebSecurity
@EnableMethodSecurity(jsr250Enabled = true, securedEnabled = true)
public class ResourceServerConfig {

    @Bean
    SecurityFilterChain securityFilterChain(HttpSecurity http) throws Exception {

        http.authorizeHttpRequests((authorizeHttpRequests) -> authorizeHttpRequests
                                   // 所有的访问都需要通过身份认证
                                   .anyRequest().authenticated()
                                  )
        .oauth2ResourceServer((oauth2ResourceServer) -> oauth2ResourceServer
                              .jwt(Customizer.withDefaults())

                             );

        return http.build();
    }

}
资源服务器测试
1)添加测试接口类
@RestController
public class MessagesController {

    @GetMapping("/messages1")
    public String getMessages1() {
        return " hello Message 1";
    }

    @GetMapping("/messages2")
    @PreAuthorize("hasAuthority('SCOPE_profile')")
    public String getMessages2() {
        return " hello Message 2";
    }

    @GetMapping("/messages3")
    @PreAuthorize("hasAuthority('SCOPE_Message')")
    public String getMessages3() {
        return " hello Message 3";
    }

}
上面的 MessagesController 类中,有三个接口,分别是 messages1、messages2、messages3,由于接口资源地址没有在
Spring Security 配置中放开,因此三个接口访问都需要传入 accessToken。其中,messages1 接口的要求只需传入
accessToken,messages2 接口要求传入 accessToken 和拥有 profile 权限,messages3 接口要求传入
accessToken 和拥有 Message 权限。
2)测试
postman
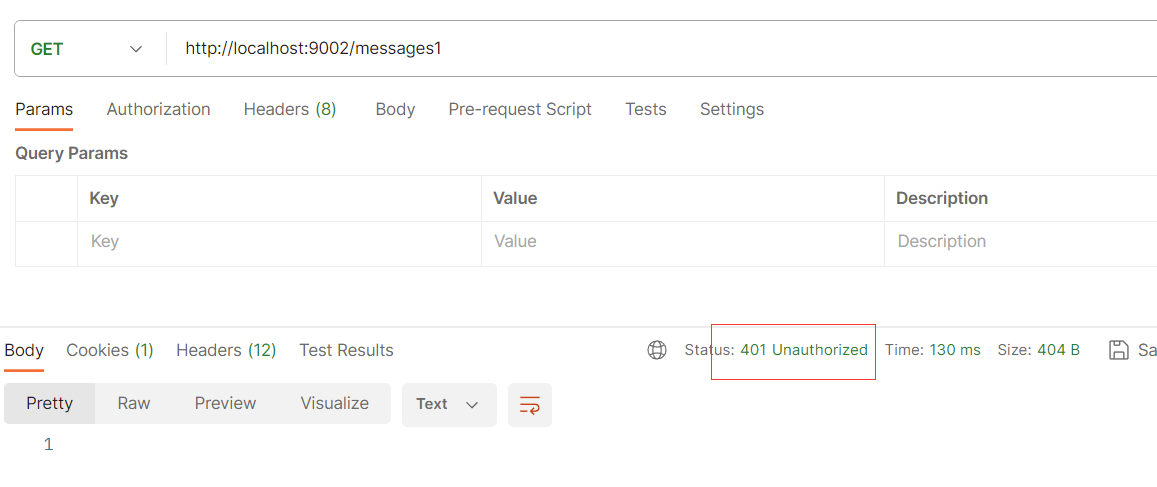
直接访问[http://localhost:9002/messages1](http://localhost:9002/messages1)地址,不带
token,则返回如下 401 结果:
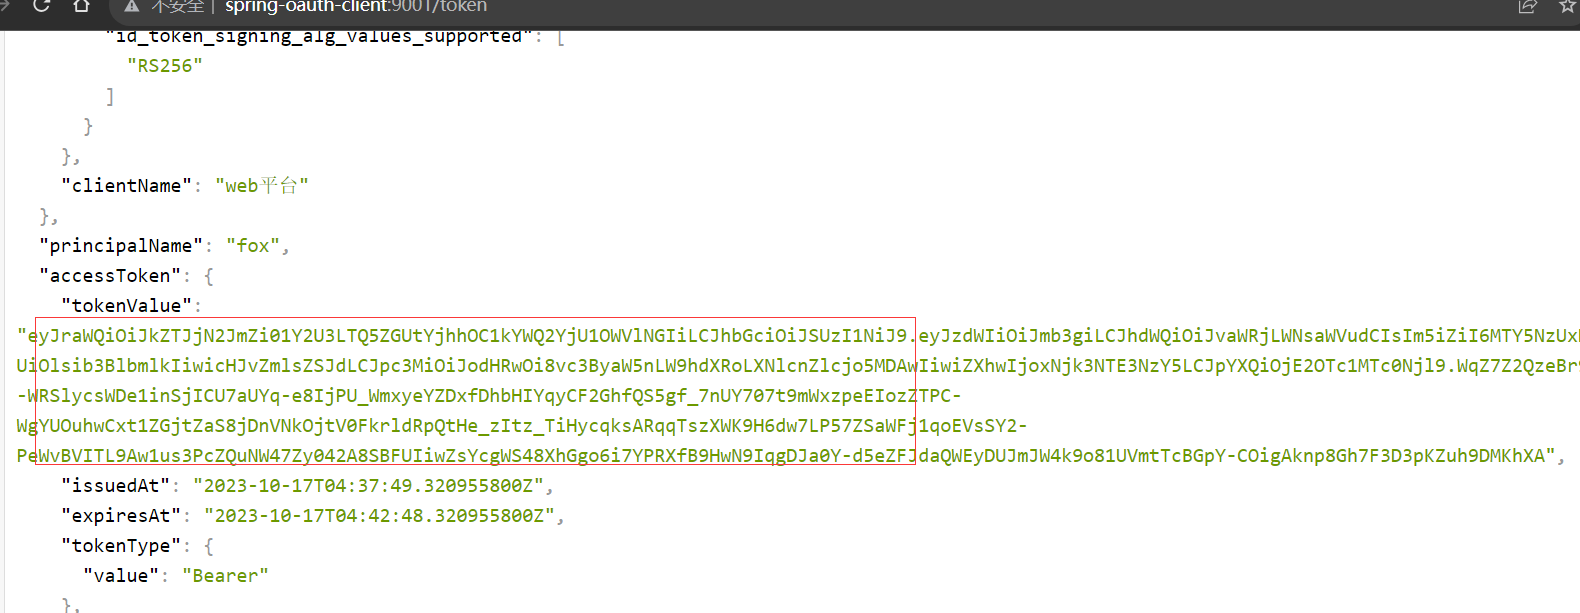
使用[http://spring-oauth-client:9001/token](http://spring-oauth- client:9001/token)地址,向客户端发起请求,获取token:
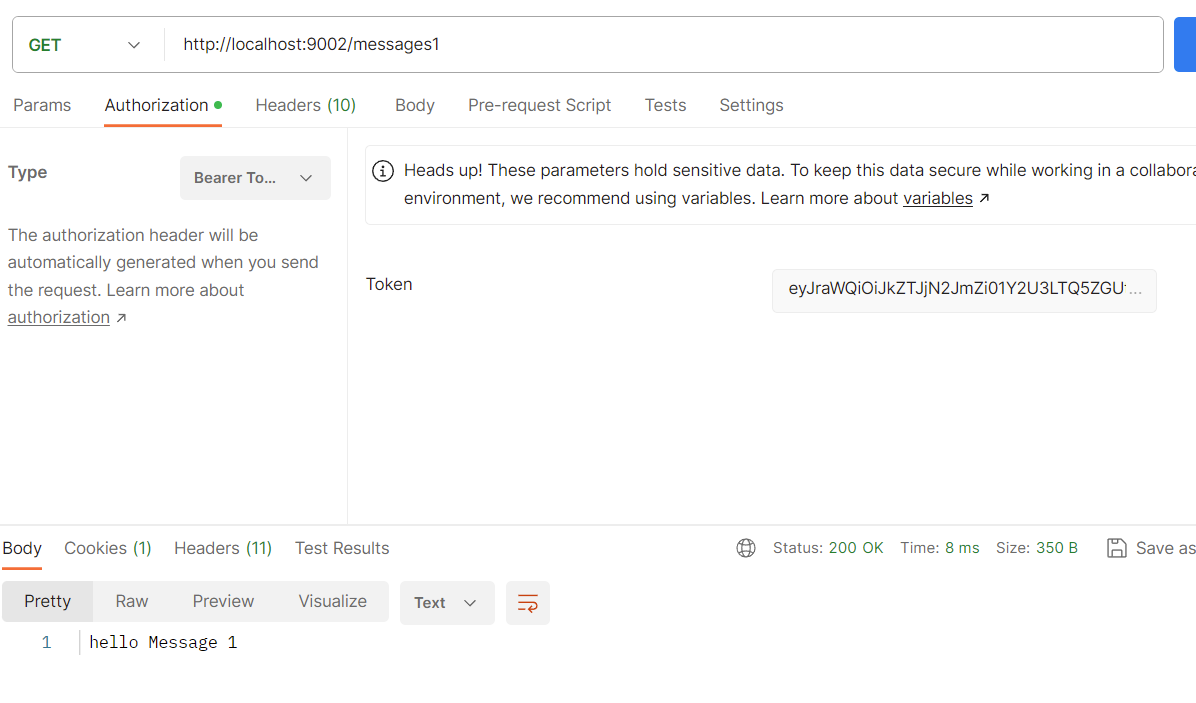
然后请求[http://localhost:9002/messages1](http://localhost:9002/messages1)地址,带上
accessToken,则返回如下成功结果:
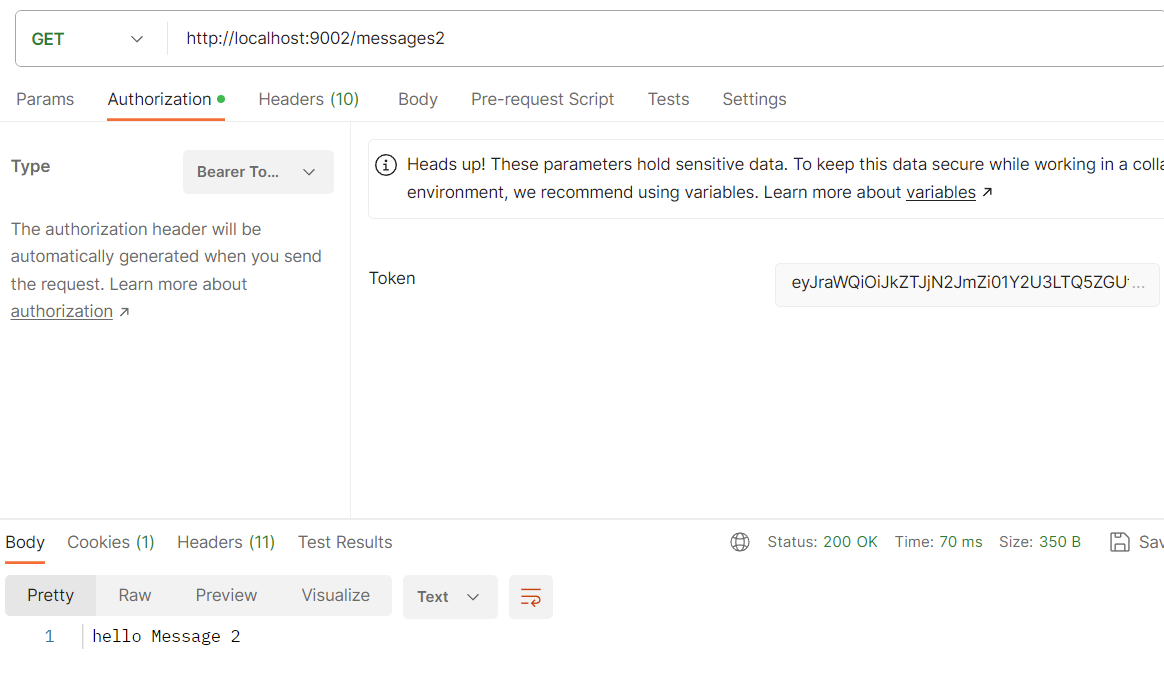
再请求[http://localhost:9002/messages2](http://localhost:9002/messages2)地址,带上
accessToken,同样返回成功,结果如下:
再请求[http://localhost:9002/messages3](http://localhost:9002/messages3)地址,带上
accessToken,则返回 403 了,结果如下:
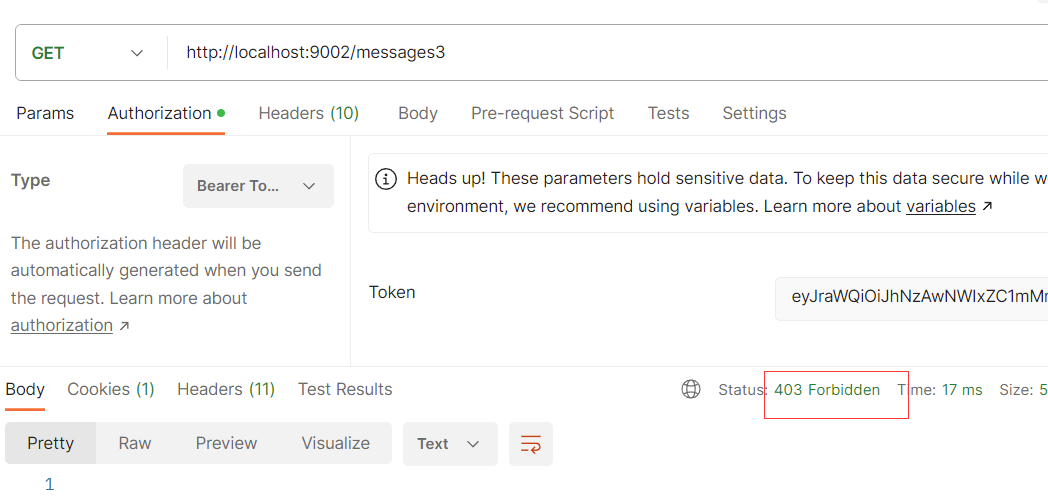
打开 Headers 信息,看到 WWW-Authenticate 返回错误信息了,意思是权限不足,因为 messages3 接口需要有 Message
权限。

自定义异常处理类
在 Spring Authorization Server 的过滤链中有一个叫 ExceptionTranslationFilter
的过滤器,在认证或授权过程中,如果出现 AuthenticationException(认证异常)和
AccessDeniedException(授权异常),都由 ExceptionTranslationFilter 过滤器捕获进行处理。
ExceptionTranslationFilter 会处理捕获到的 AuthenticationException 或
AccessDeniedException异常。
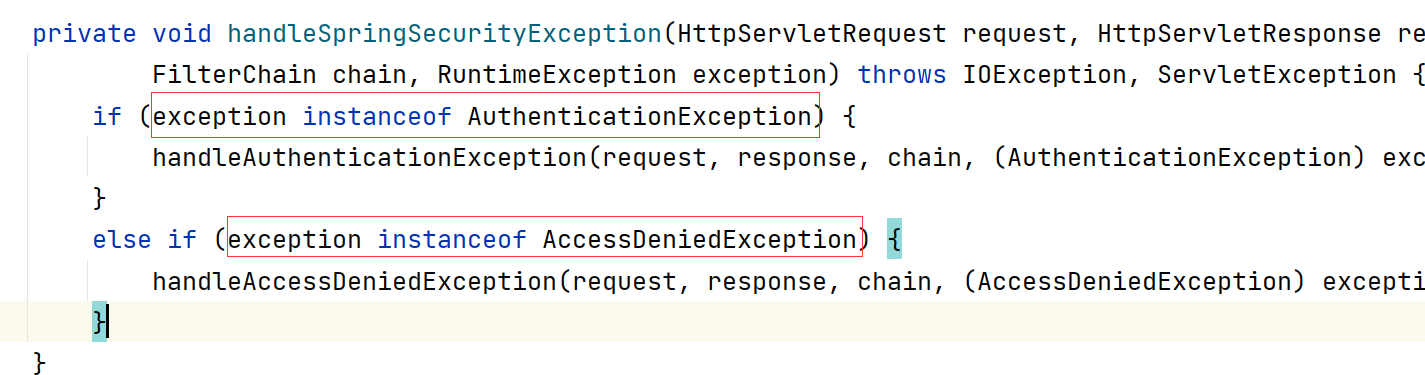
如果我们要自定义对 AuthenticationException、AccessDeniedException
异常的处理,那么我们就需自定义AuthenticationEntryPoint、AccessDeniedException
的实现类,然后将自定义的异常实现类设置到配置中去。我们可以通过 accessDeniedHandler(AccessDeniedHandler
accessDeniedHandler)、authenticationEntryPoint(AuthenticationEntryPoint
authenticationEntryPoint) 方法,将自定义的异常设置到配置中去。
1)自定义 AuthenticationEntryPoint
public class MyAuthenticationEntryPoint implements AuthenticationEntryPoint {
@Override
public void commence(HttpServletRequest request, HttpServletResponse response, AuthenticationException authException) throws IOException, ServletException {
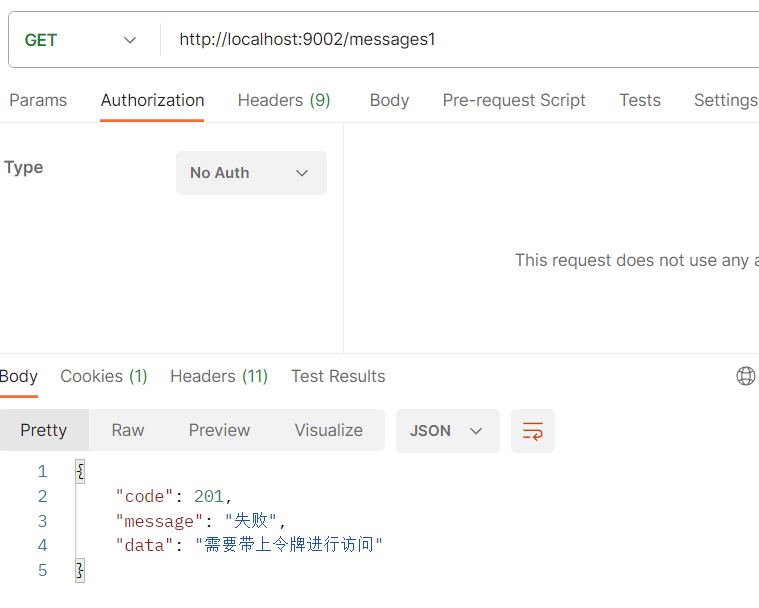
if(authException instanceof InsufficientAuthenticationException){
String accept = request.getHeader("accept");
if(accept.contains(MediaType.TEXT_HTML_VALUE)){
//如果是html请求类型,则返回登录页
LoginUrlAuthenticationEntryPoint loginUrlAuthenticationEntryPoint = new LoginUrlAuthenticationEntryPoint("/login");
loginUrlAuthenticationEntryPoint.commence(request,response,authException);
}else {
//如果是api请求类型,则返回json
ResponseResult.exceptionResponse(response,"需要带上令牌进行访问");
}
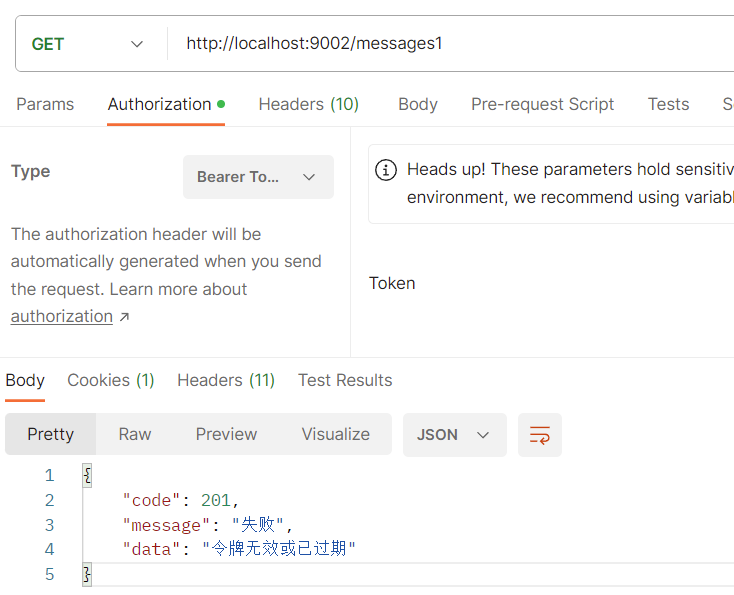
}else if(authException instanceof InvalidBearerTokenException){
ResponseResult.exceptionResponse(response,"令牌无效或已过期");
}else{
ResponseResult.exceptionResponse(response,authException);
}
}
}
2)自定义AccessDeniedHandler
public class MyAccessDeniedHandler implements AccessDeniedHandler {
    @Override
    public void handle(HttpServletRequest request, HttpServletResponse response, AccessDeniedException accessDeniedException) throws IOException, ServletException {
        if(request.getUserPrincipal() instanceof AbstractOAuth2TokenAuthenticationToken){
            ResponseResult.exceptionResponse(response,"权限不足");
        }else {
            ResponseResult.exceptionResponse(response,accessDeniedException);
        }
    }
}
3)SecurityConfig 中配置异常
http
.oauth2ResourceServer((resourceServer) -> resourceServer
    .jwt(Customizer.withDefaults())
    .authenticationEntryPoint(new MyAuthenticationEntryPoint())
    .accessDeniedHandler(new MyAccessDeniedHandler())
);
4)测试
令牌过期:
没有带上令牌:
权限不足:

基于数据库存储改造授权服务器
客户端注册信息存储改造
1)引入依赖
<!--Spring Authorization Server-->
<dependency>
    <groupId>org.springframework.boot</groupId>
    <artifactId>spring-boot-starter-oauth2-authorization-server</artifactId>
</dependency>
<!--lombok-->
<dependency>
    <groupId>org.projectlombok</groupId>
    <artifactId>lombok</artifactId>
</dependency>
<!--mysql-->
<dependency>
    <groupId>com.mysql</groupId>
    <artifactId>mysql-connector-j</artifactId>
</dependency>
<!-- mybatis-plus 3.5.3及以上版本 才支持 spring boot 3-->
<dependency>
    <groupId>com.baomidou</groupId>
    <artifactId>mybatis-plus-boot-starter</artifactId>
    <version>3.5.3.1</version>
</dependency>
<!-- 添加spring security cas支持 -->
<dependency>
    <groupId>org.springframework.security</groupId>
    <artifactId>spring-security-cas</artifactId>
</dependency>
注意:这里需添加 spring-security-cas 依赖,否则启动时报 java.lang.ClassNotFoundException: org.springframework.security.cas.jackson2.CasJackson2Module 错误。
2)准备 sql 脚本,创建 oauth-server 数据库
在上面的认证过程中,客户端信息是基于内存的,写死在代码中,现在我们将他改造从数据库中读取。
我们在 org.springframework.security.oauth2.server.authorization 包下,可以看到
oauth2-registered-client-schema.sql、oauth2-authorization-consent-
schema.sql、oauth2-authorization-schema.sql 三个 sql 文件。
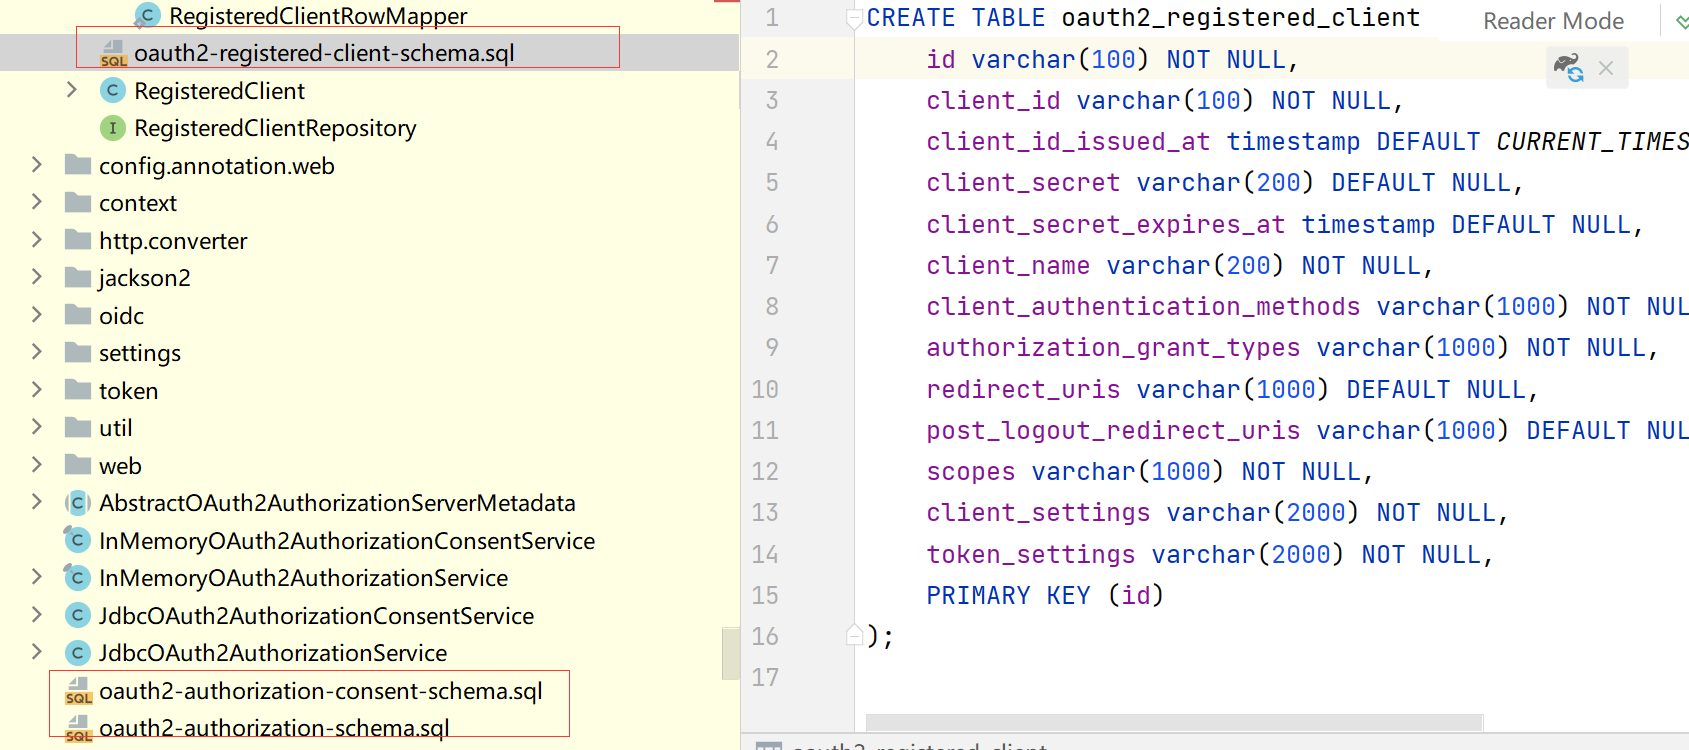
上面三个 sql 文件整理如下:
/**
 * 客户端信息表
 */
CREATE TABLE oauth2_registered_client (
  id varchar(100) NOT NULL,
  client_id varchar(100) NOT NULL,
  client_id_issued_at timestamp DEFAULT CURRENT_TIMESTAMP NOT NULL,
  client_secret varchar(200) DEFAULT NULL,
  client_secret_expires_at timestamp DEFAULT NULL,
  client_name varchar(200) NOT NULL,
  client_authentication_methods varchar(1000) NOT NULL,
  authorization_grant_types varchar(1000) NOT NULL,
  redirect_uris varchar(1000) DEFAULT NULL,
  post_logout_redirect_uris varchar(1000) DEFAULT NULL,
  scopes varchar(1000) NOT NULL,
  client_settings varchar(2000) NOT NULL,
  token_settings varchar(2000) NOT NULL,
  PRIMARY KEY (id)
);


/**
 * 授权确认表
 */
CREATE TABLE oauth2_authorization_consent (
  registered_client_id varchar(100) NOT NULL,
  principal_name varchar(200) NOT NULL,
  authorities varchar(1000) NOT NULL,
  PRIMARY KEY (registered_client_id, principal_name)
);


/**
 * 授权信息表
 */
CREATE TABLE oauth2_authorization (
  id varchar(100) NOT NULL,
  registered_client_id varchar(100) NOT NULL,
  principal_name varchar(200) NOT NULL,
  authorization_grant_type varchar(100) NOT NULL,
  authorized_scopes varchar(1000) DEFAULT NULL,
  attributes blob DEFAULT NULL,
  state varchar(500) DEFAULT NULL,
  authorization_code_value blob DEFAULT NULL,
  authorization_code_issued_at timestamp DEFAULT NULL,
  authorization_code_expires_at timestamp DEFAULT NULL,
  authorization_code_metadata blob DEFAULT NULL,
  access_token_value blob DEFAULT NULL,
  access_token_issued_at timestamp DEFAULT NULL,
  access_token_expires_at timestamp DEFAULT NULL,
  access_token_metadata blob DEFAULT NULL,
  access_token_type varchar(100) DEFAULT NULL,
  access_token_scopes varchar(1000) DEFAULT NULL,
  oidc_id_token_value blob DEFAULT NULL,
  oidc_id_token_issued_at timestamp DEFAULT NULL,
  oidc_id_token_expires_at timestamp DEFAULT NULL,
  oidc_id_token_metadata blob DEFAULT NULL,
  refresh_token_value blob DEFAULT NULL,
  refresh_token_issued_at timestamp DEFAULT NULL,
  refresh_token_expires_at timestamp DEFAULT NULL,
  refresh_token_metadata blob DEFAULT NULL,
  user_code_value blob DEFAULT NULL,
  user_code_issued_at timestamp DEFAULT NULL,
  user_code_expires_at timestamp DEFAULT NULL,
  user_code_metadata blob DEFAULT NULL,
  device_code_value blob DEFAULT NULL,
  device_code_issued_at timestamp DEFAULT NULL,
  device_code_expires_at timestamp DEFAULT NULL,
  device_code_metadata blob DEFAULT NULL,
  PRIMARY KEY (id)
);
新建 mysql 数据库 oauth-server,执行上面的 sql 语句。
3)注册客户端信息
将上面代码中注册的客户端信息整理成 sql 语句插入数据库表。
INSERT INTO `oauth-server`.`oauth2_registered_client` (`id`, `client_id`, `client_id_issued_at`, `client_secret`, `client_secret_expires_at`, `client_name`, `client_authentication_methods`, `authorization_grant_types`, `redirect_uris`, `post_logout_redirect_uris`, `scopes`, `client_settings`, `token_settings`) VALUES ('3eacac0e-0de9-4727-9a64-6bdd4be2ee1f', 'oidc-client', '2023-07-12 07:33:42', '$2a$10$.J0Rfg7y2Mu8AN8Dk2vL.eBFa9NGbOYCPOAFEw.QhgGLVXjO7eFDC', NULL, '3eacac0e-0de9-4727-9a64-6bdd4be2ee1f', 'client_secret_basic', 'refresh_token,authorization_code', 'http://www.baidu.com', 'http://127.0.0.1:8080/', 'openid,profile', '{\"@class\":\"java.util.Collections$UnmodifiableMap\",\"settings.client.require-proof-key\":false,\"settings.client.require-authorization-consent\":true}', '{\"@class\":\"java.util.Collections$UnmodifiableMap\",\"settings.token.reuse-refresh-tokens\":true,\"settings.token.id-token-signature-algorithm\":[\"org.springframework.security.oauth2.jose.jws.SignatureAlgorithm\",\"RS256\"],\"settings.token.access-token-time-to-live\":[\"java.time.Duration\",300.000000000],\"settings.token.access-token-format\":{\"@class\":\"org.springframework.security.oauth2.server.authorization.settings.OAuth2TokenFormat\",\"value\":\"self-contained\"},\"settings.token.refresh-token-time-to-live\":[\"java.time.Duration\",3600.000000000],\"settings.token.authorization-code-time-to-live\":[\"java.time.Duration\",300.000000000],\"settings.token.device-code-time-to-live\":[\"java.time.Duration\",300.000000000]}');
注意:此时将客户端密钥 {noop}secret,改为密文存储。
4)添加数据库连接,application.yml 配置如下
spring:
  application:
    name: spring-oauth-server
  datasource:
    driver-class-name: com.mysql.cj.jdbc.Driver
    url: jdbc:mysql://localhost:3306/oauth-server?serverTimezone=UTC&userUnicode=true&characterEncoding=utf-8
    username: root
    password: root
5)在 SecurityConfig 中分别注入
RegisteredClientRepository、OAuth2AuthorizationService、OAuth2AuthorizationConsentService
。
/**
 * 客户端信息
 * 对应表:oauth2_registered_client
 */
@Bean
public RegisteredClientRepository registeredClientRepository(JdbcTemplate jdbcTemplate) {
return new JdbcRegisteredClientRepository(jdbcTemplate);
}


/**
 * 授权信息
 * 对应表:oauth2_authorization
 */
@Bean
public OAuth2AuthorizationService authorizationService(JdbcTemplate jdbcTemplate, RegisteredClientRepository registeredClientRepository) {
    return new JdbcOAuth2AuthorizationService(jdbcTemplate, registeredClientRepository);
}

/**
 * 授权确认
 *对应表:oauth2_authorization_consent
 */
@Bean
public OAuth2AuthorizationConsentService authorizationConsentService(JdbcTemplate jdbcTemplate, RegisteredClientRepository registeredClientRepository) {
    return new JdbcOAuth2AuthorizationConsentService(jdbcTemplate, registeredClientRepository);
}
用户信息存储改造
在 SecurityConfig 类中的 UserDetailsService 也是基于内存的,用户信息在代码中写死,我们也把他改成从数据库中读取,新建
sys_user 表如下。
CREATE TABLE `sys_user` (
  `id` bigint NOT NULL AUTO_INCREMENT COMMENT 'id',
  `username` varchar(20) CHARACTER SET utf8mb4 COLLATE utf8mb4_0900_ai_ci NOT NULL DEFAULT '' COMMENT '用户名',
  `password` varchar(255) CHARACTER SET utf8mb4 COLLATE utf8mb4_0900_ai_ci NOT NULL DEFAULT '' COMMENT '密码',
  `name` varchar(50) CHARACTER SET utf8mb4 COLLATE utf8mb4_0900_ai_ci DEFAULT NULL COMMENT '姓名',
  `description` varchar(255) CHARACTER SET utf8mb4 COLLATE utf8mb4_0900_ai_ci DEFAULT NULL COMMENT '描述',
  `status` tinyint DEFAULT NULL COMMENT '状态(1:正常 0:停用)',
  PRIMARY KEY (`id`) USING BTREE,
  UNIQUE KEY `idx_username` (`username`) USING BTREE
) ENGINE=InnoDB AUTO_INCREMENT=14 DEFAULT CHARSET=utf8mb4 COLLATE=utf8mb4_0900_ai_ci ROW_FORMAT=DYNAMIC COMMENT='用户表';

INSERT INTO `oauth-server`.`sys_user` (`id`, `username`, `password`, `name`, `description`, `status`) VALUES (1, 'jay', '$2a$10$8fyY0WbNAr980e6nLcPL5ugmpkLLH3serye5SJ3UcDForTW5b0Sx.', '测试用户', 'Spring Security 测试用户', 1);
给 sys_user
增加对应的对应的实体和功能实现类,SysUserEntity、SysUserMapper、SysUserService、SysUserServiceImpl
代码如下。
@Data
@AllArgsConstructor
@NoArgsConstructor
@TableName("sys_user")
public class SysUserEntity implements Serializable {

    /**
     * 主键
     */
    @TableId(type = IdType.AUTO)
    private Integer id;

    /**
     * 用户名
     */
    private String username;

    /**
     * 密码
     */
    private String password;

    /**
     * 名字
     */
    private String name;

    /**
     * 描述
     */
    private String description;

    /**
     * 状态
     */
    private Integer status;

}

@Mapper
public interface SysUserMapper extends BaseMapper<SysUserEntity> {

}

public interface SysUserService {

    /**
     *
     * @param username
     * @return
     * @author  Rommel
     * @date    2023/7/12-23:48
     * @version 1.0
     * @description  根据用户名查询用户信息
     */
    SysUserEntity selectByUsername(String username);
}

@Service
public class SysUserServiceImpl extends ServiceImpl<SysUserMapper, SysUserEntity> implements SysUserService {
    @Override
    public SysUserEntity selectByUsername(String username) {
        LambdaQueryWrapper<SysUserEntity> lambdaQueryWrapper = new LambdaQueryWrapper();
        lambdaQueryWrapper.eq(SysUserEntity::getUsername,username);
        return this.getOne(lambdaQueryWrapper);
    }
}
SecurityConfig 类,将 UserDetailsService 基于内存实现的代码注释掉,增加 PasswordEncoder
配置,SecurityConfig 改造后代码如下。
/**
     *设置用户信息,校验用户名、密码
     */
//    @Bean
//    public UserDetailsService userDetailsService() {
//        UserDetails userDetails = User.withDefaultPasswordEncoder()
//                .username("jay")
//                .password("123456")
//                .roles("USER")
//                .build();
//        //基于内存的用户数据校验
//        return new InMemoryUserDetailsManager(userDetails);
//    }

@Bean
public PasswordEncoder passwordEncoder() {
    return new BCryptPasswordEncoder();
}
创建 UserDetailsServiceImpl 类继承 UserDetailsService 接口,添加 @Service 注解交给 Spring
容器管理,重写 loadUserByUsername(String username)
方法,实现用户信息从数据库查询,UserDetailsServiceImpl 代码如下。
@Service
public class UserDetailsServiceImpl implements UserDetailsService {

    @Resource
    private SysUserService sysUserService;

    @Override
    public UserDetails loadUserByUsername(String username) throws UsernameNotFoundException {

        SysUserEntity sysUserEntity = sysUserService.selectByUsername(username);
        List<SimpleGrantedAuthority> grantedAuthorityList = Arrays.asList("USER").stream().map(SimpleGrantedAuthority::new).collect(Collectors.toList());

        return new User(username,sysUserEntity.getPassword(),grantedAuthorityList);
    }
}
测试
启动服务,再次访问
[http://localhost:9000/oauth2/authorize?response_type=code&client_id=oidc- client&scope=profile](http://localhost:9000/oauth2/authorize?response_type=code&client_id=oidc- client&scope=profile) openid&redirect_uri=[http://www.baidu.com](http://www.baidu.com) 地址,会跳转到登录界面
输入用户名:jay,密码:123456,则跳转至授权页面

勾选授权信息 profile,点击提交按钮,则返回如下结果
SSO 单点登录实战
单点登录(Single Sign On),简称为
SSO,是比较流行的企业业务整合的解决方案之一。它的用途在于,不管多么复杂的应用群,只要在用户权限范围内,那么就可以做到,用户只需要登录一次就可以访问权限范围内的所有应用子系统。
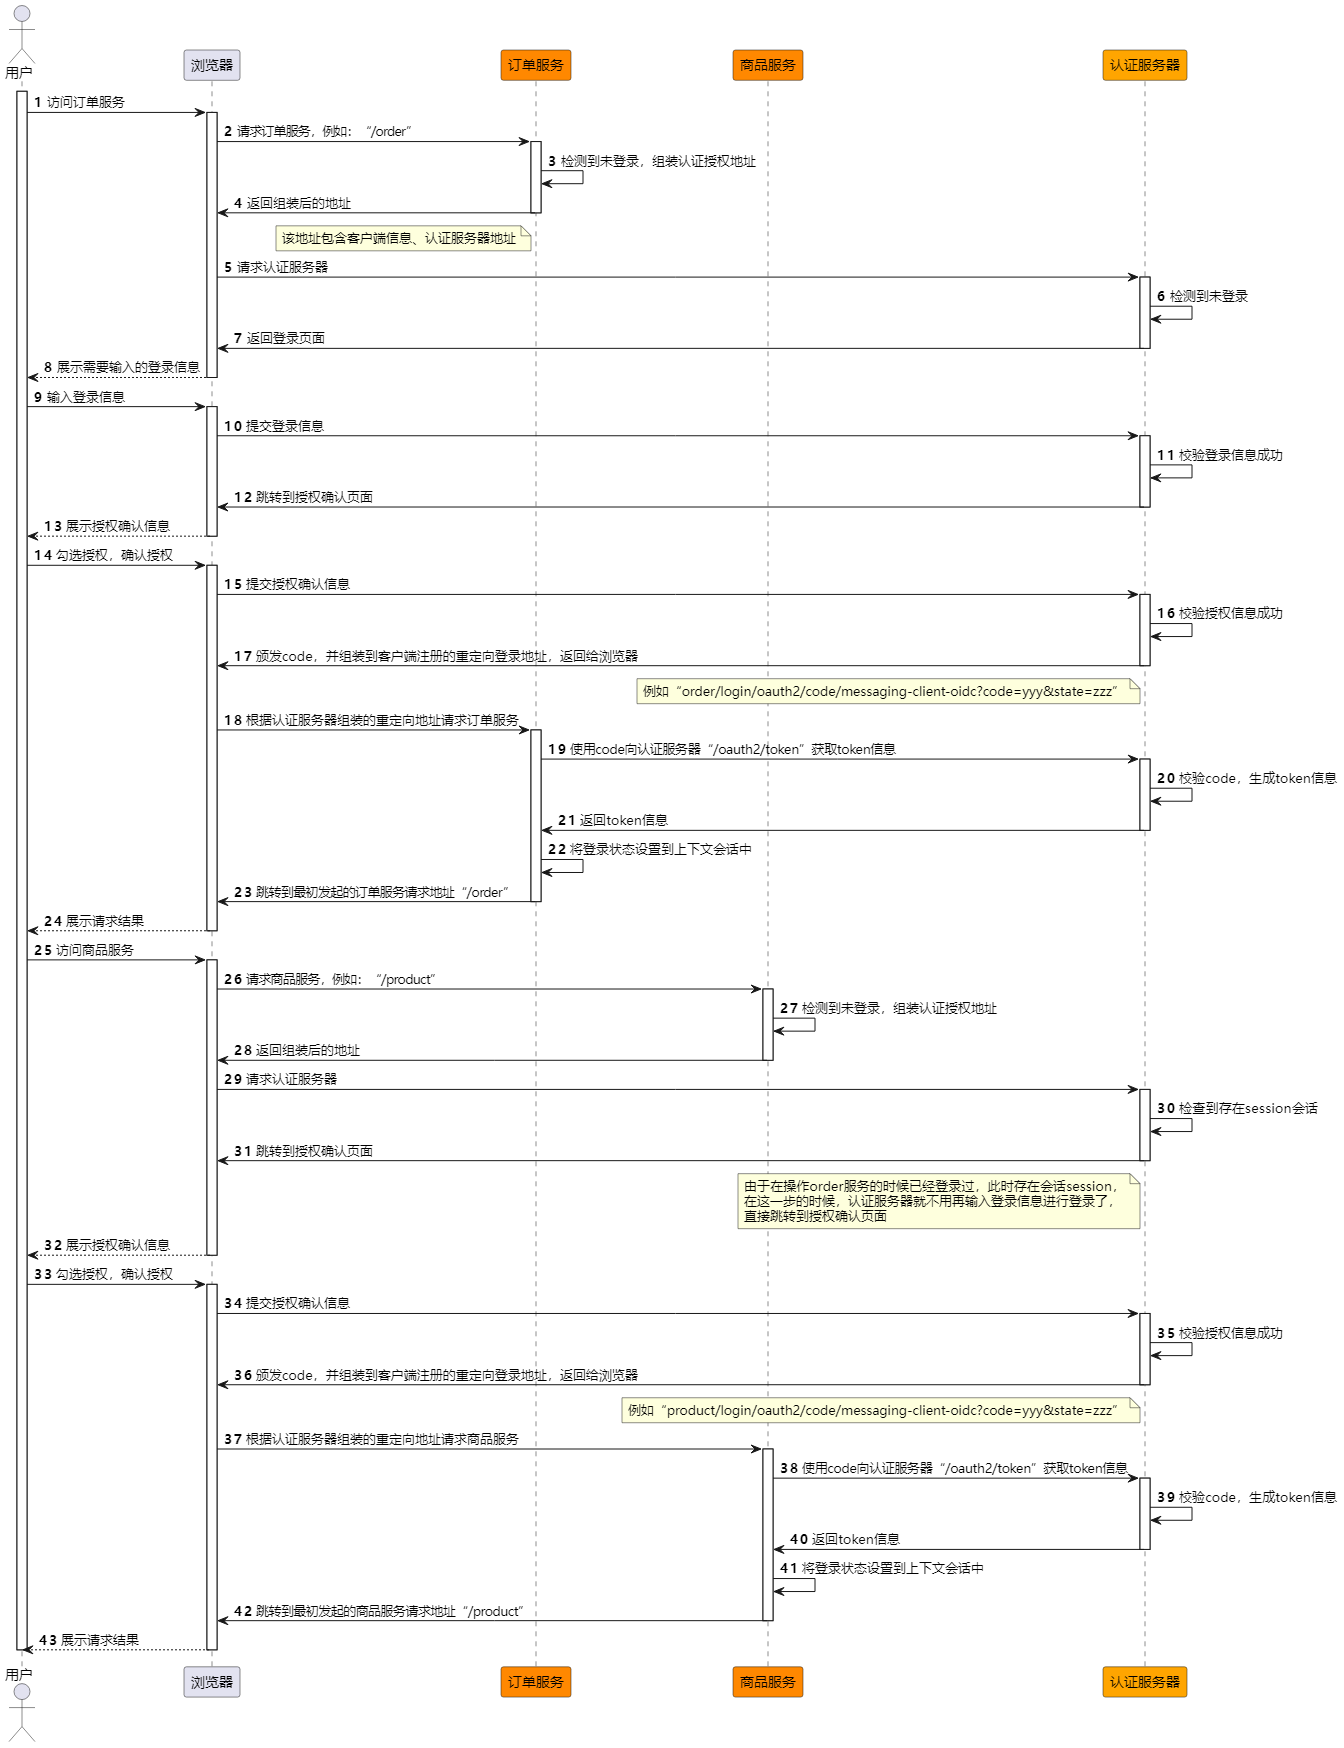
实现思路
单点登录涉及到多个客户端,客户端就以订单服务、商品服务为例。以下是单点登录中,订单服务、商品服务、认证服务器的交互时序图:
授权服务器搭建
参考前面的授权服务器搭建例子。
订单服务搭建
订单服务作为客户端,参考前面客户端的搭建。
application.yml 配置如下:
server:
  ip: spring-oauth-client-order
  port: 9003

logging:
  level:
    org.springframework.security: trace

spring:
  application:
    name: spring-oauth-client-order
  security:
    oauth2:
      client:
        provider:
          #认证服务器信息
          oauth-server:
            #授权地址
            issuer-uri: http://spring-oauth-server:9000
            authorizationUri: ${spring.security.oauth2.client.provider.oauth-server.issuer-uri}/oauth2/authorize
            #令牌获取地址
            tokenUri: ${spring.security.oauth2.client.provider.oauth-server.issuer-uri}/oauth2/token
        registration:
          messaging-client-oidc:
            #认证提供者,标识由哪个认证服务器进行认证,和上面的oauth-server进行关联
            provider: oauth-server
            #客户端名称
            client-name: web平台-SSO客户端-订单服务
            #客户端id,从认证平台申请的客户端id
            client-id: web-client-id-order
            #客户端秘钥
            client-secret: secret
            #客户端认证方式
            client-authentication-method: client_secret_basic
            #使用授权码模式获取令牌(token)
            authorization-grant-type: authorization_code
            #回调地址,接收认证服务器回传code的接口地址,之前我们是使用http://www.baidu.com代替
            redirect-uri: http://spring-oauth-client-order:9003/login/oauth2/code/messaging-client-oidc
            scope:
              - profile
              - openid
oauth2_registered_client 表增加一条订单服务的客户端记录:
INSERT INTO `oauth-server`.`oauth2_registered_client` (`id`, `client_id`, `client_id_issued_at`, `client_secret`, `client_secret_expires_at`, `client_name`, `client_authentication_methods`, `authorization_grant_types`, `redirect_uris`, `post_logout_redirect_uris`, `scopes`, `client_settings`, `token_settings`) VALUES ('3eacac0e-0de9-4727-9a64-6bdd4be2ee3', 'web-client-id-order', '2023-07-12 07:33:42', '$2a$10$.J0Rfg7y2Mu8AN8Dk2vL.eBFa9NGbOYCPOAFEw.QhgGLVXjO7eFDC', NULL, 'web平台-SSO客户端-订单服务', 'client_secret_basic', 'refresh_token,authorization_code', 'http://spring-oauth-client-order:9003/login/oauth2/code/messaging-client-oidc', 'http://127.0.0.1:9000/', 'openid,profile', '{\"@class\":\"java.util.Collections$UnmodifiableMap\",\"settings.client.require-proof-key\":false,\"settings.client.require-authorization-consent\":true}', '{\"@class\":\"java.util.Collections$UnmodifiableMap\",\"settings.token.reuse-refresh-tokens\":true,\"settings.token.id-token-signature-algorithm\":[\"org.springframework.security.oauth2.jose.jws.SignatureAlgorithm\",\"RS256\"],\"settings.token.access-token-time-to-live\":[\"java.time.Duration\",1800.000000000],\"settings.token.access-token-format\":{\"@class\":\"org.springframework.security.oauth2.server.authorization.settings.OAuth2TokenFormat\",\"value\":\"self-contained\"},\"settings.token.refresh-token-time-to-live\":[\"java.time.Duration\",3600.000000000],\"settings.token.authorization-code-time-to-live\":[\"java.time.Duration\",300.000000000],\"settings.token.device-code-time-to-live\":[\"java.time.Duration\",300.000000000]}');
商品服务搭建
商品服务作为客户端,参考前面客户端的搭建。
application.yml 配置如下:
server:
  ip: spring-oauth-client-product
  port: 9004

logging:
  level:
    org.springframework.security: trace

spring:
  application:
    name: spring-oauth-client-product
  security:
    oauth2:
      client:
        provider:
          #认证服务器信息
          oauth-server:
            #授权地址
            issuer-uri: http://spring-oauth-server:9000
            authorizationUri: ${spring.security.oauth2.client.provider.oauth-server.issuer-uri}/oauth2/authorize
            #令牌获取地址
            tokenUri: ${spring.security.oauth2.client.provider.oauth-server.issuer-uri}/oauth2/token
        registration:
          messaging-client-oidc:
            #认证提供者,标识由哪个认证服务器进行认证,和上面的oauth-server进行关联
            provider: oauth-server
            #客户端名称
            client-name: web平台-SSO客户端-商品服务
            #客户端id,从认证平台申请的客户端id
            client-id: web-client-id-product
            #客户端秘钥
            client-secret: secret
            #客户端认证方式
            client-authentication-method: client_secret_basic
            #使用授权码模式获取令牌(token)
            authorization-grant-type: authorization_code
            #回调地址,接收认证服务器回传code的接口地址,之前我们是使用http://www.baidu.com代替
            redirect-uri: http://spring-oauth-client-product:9004/login/oauth2/code/messaging-client-oidc
            scope:
              - profile
              - openid
oauth2_registered_client 表增加一条商品服务的客户端记录:
INSERT INTO `oauth-server`.`oauth2_registered_client` (`id`, `client_id`, `client_id_issued_at`, `client_secret`, `client_secret_expires_at`, `client_name`, `client_authentication_methods`, `authorization_grant_types`, `redirect_uris`, `post_logout_redirect_uris`, `scopes`, `client_settings`, `token_settings`) VALUES ('3eacac0e-0de9-4727-9a64-6bdd4be2ee4', 'web-client-id-product', '2023-07-12 07:33:42', '$2a$10$.J0Rfg7y2Mu8AN8Dk2vL.eBFa9NGbOYCPOAFEw.QhgGLVXjO7eFDC', NULL, 'web平台-SSO客户端-商品服务', 'client_secret_basic', 'refresh_token,authorization_code', 'http://spring-oauth-client-product:9004/login/oauth2/code/messaging-client-oidc', 'http://127.0.0.1:9000/', 'openid,profile', '{\"@class\":\"java.util.Collections$UnmodifiableMap\",\"settings.client.require-proof-key\":false,\"settings.client.require-authorization-consent\":true}', '{\"@class\":\"java.util.Collections$UnmodifiableMap\",\"settings.token.reuse-refresh-tokens\":true,\"settings.token.id-token-signature-algorithm\":[\"org.springframework.security.oauth2.jose.jws.SignatureAlgorithm\",\"RS256\"],\"settings.token.access-token-time-to-live\":[\"java.time.Duration\",1800.000000000],\"settings.token.access-token-format\":{\"@class\":\"org.springframework.security.oauth2.server.authorization.settings.OAuth2TokenFormat\",\"value\":\"self-contained\"},\"settings.token.refresh-token-time-to-live\":[\"java.time.Duration\",3600.000000000],\"settings.token.authorization-code-time-to-live\":[\"java.time.Duration\",300.000000000],\"settings.token.device-code-time-to-live\":[\"java.time.Duration\",300.000000000]}');
单点登录测试
测试无需登录的请求
浏览器输入地址[http://spring-oauth-client-order:9003/index](http://spring-oauth- client-order:9003/index),测试放开保护的资源,结果如下:

测试需要登录的请求
浏览器输入地址[http://spring-oauth-client-order:9003/order1](http://spring-oauth- client-order:9003/order1),测试受保护的资源,结果如下:
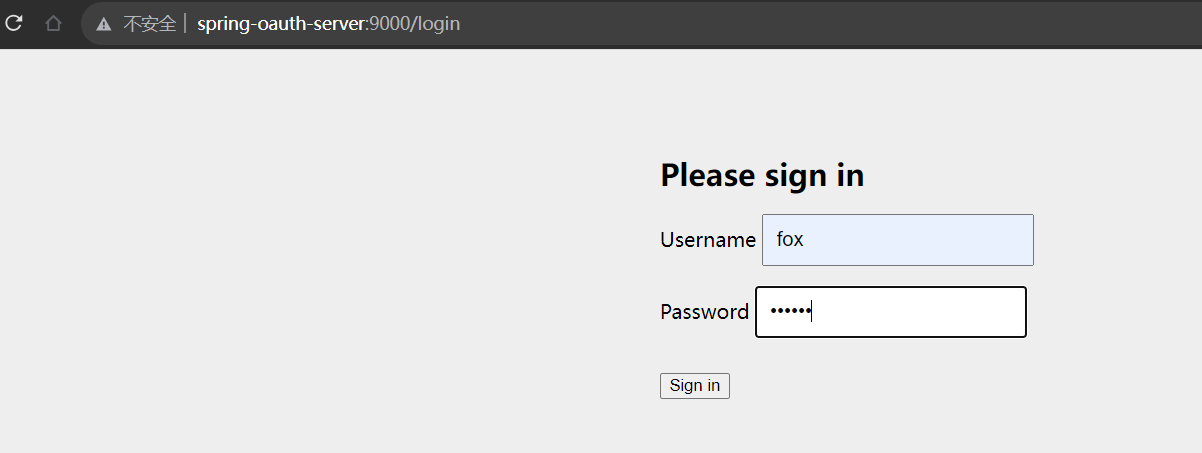
输入用户:user,密码:123456,提交登录,跳转到授权确认页面。勾选授权信息,提交确认授权,则成功跳转到订单页面1,结果如下:
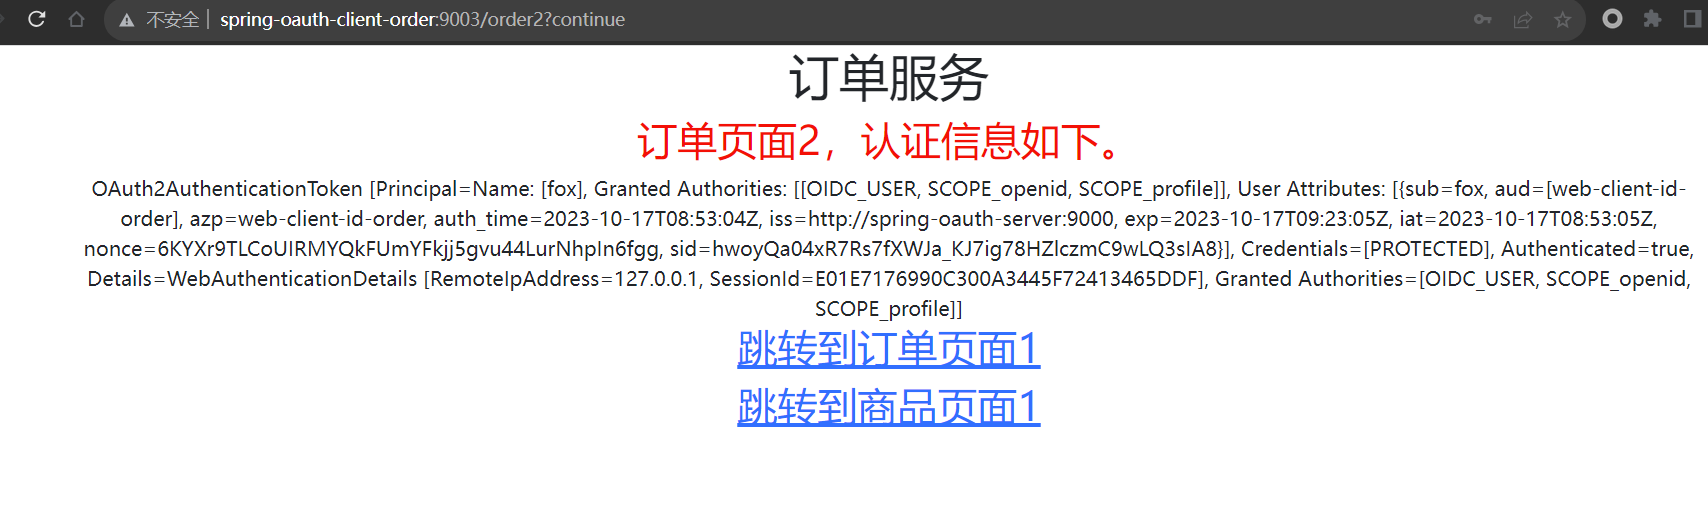
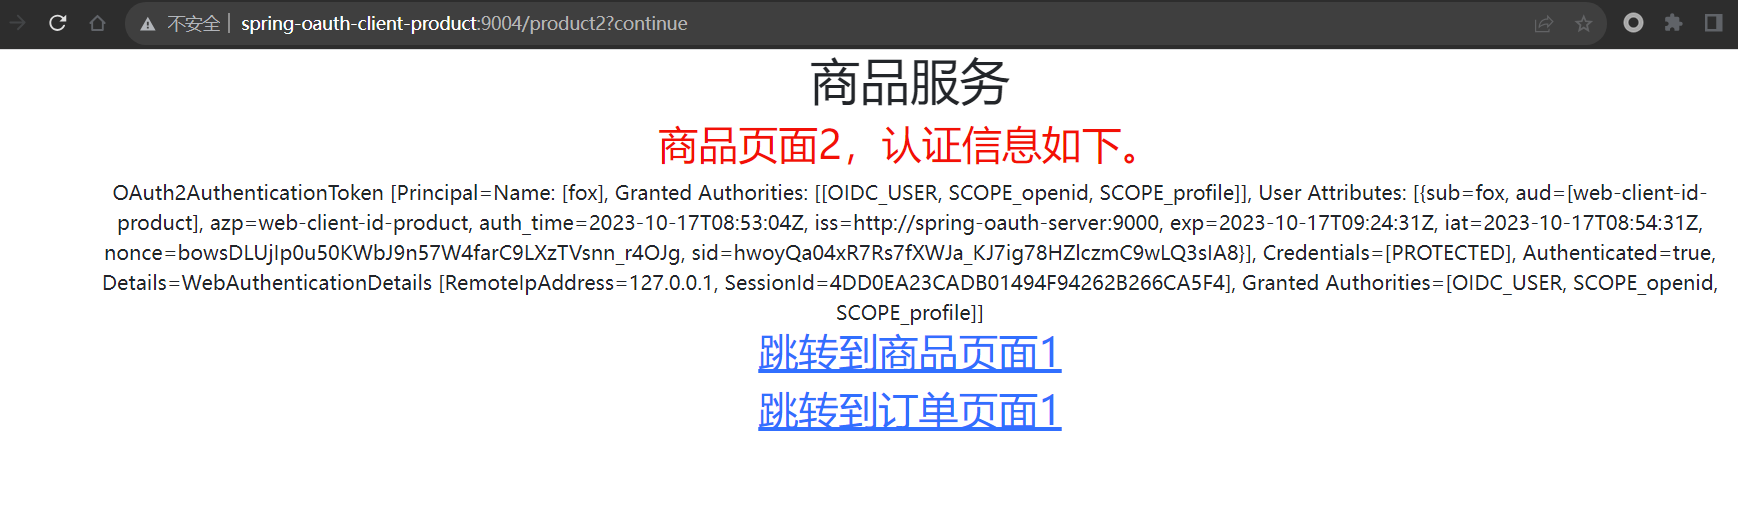
点击“跳转到商品页面1”,此时我们从订单服务跳转到商品服务,属于跨客户端服务,由于我们在操作订单服务时已经输入用户名和密码进行了登录,session
会话已存在,因此在此处就绕过了用户名、密码登录了。勾选授权信息,提交确认授权,则成功跳转到订单页面1,结果如下:
在首次访问订单服务或商品服务受保护的资源时,在登录过程中,都会跳转到授权确认页面进行授权确认,如果想去掉授权确认页面的这一步操作,实现无感确认,可以将oauth2_registered_client表中对应的客户端记录,client_settings字段的settings.client.require-
authorization-consent值设置为false。将settings.client.require-authorization-
consent值设置为false后,上面的测试,首次访问商品服务进行登录时,输入用户名、密码提交后,将不会跳转到授权确认页面,直接默认授权,从商品服务的页面首次跳转到订单服务的页面时,也不会先跳转到授权确认页面,而是直接跳转到订单服务的页面。
微服务网关整合 Oauth2 安全认证实战
实现思路
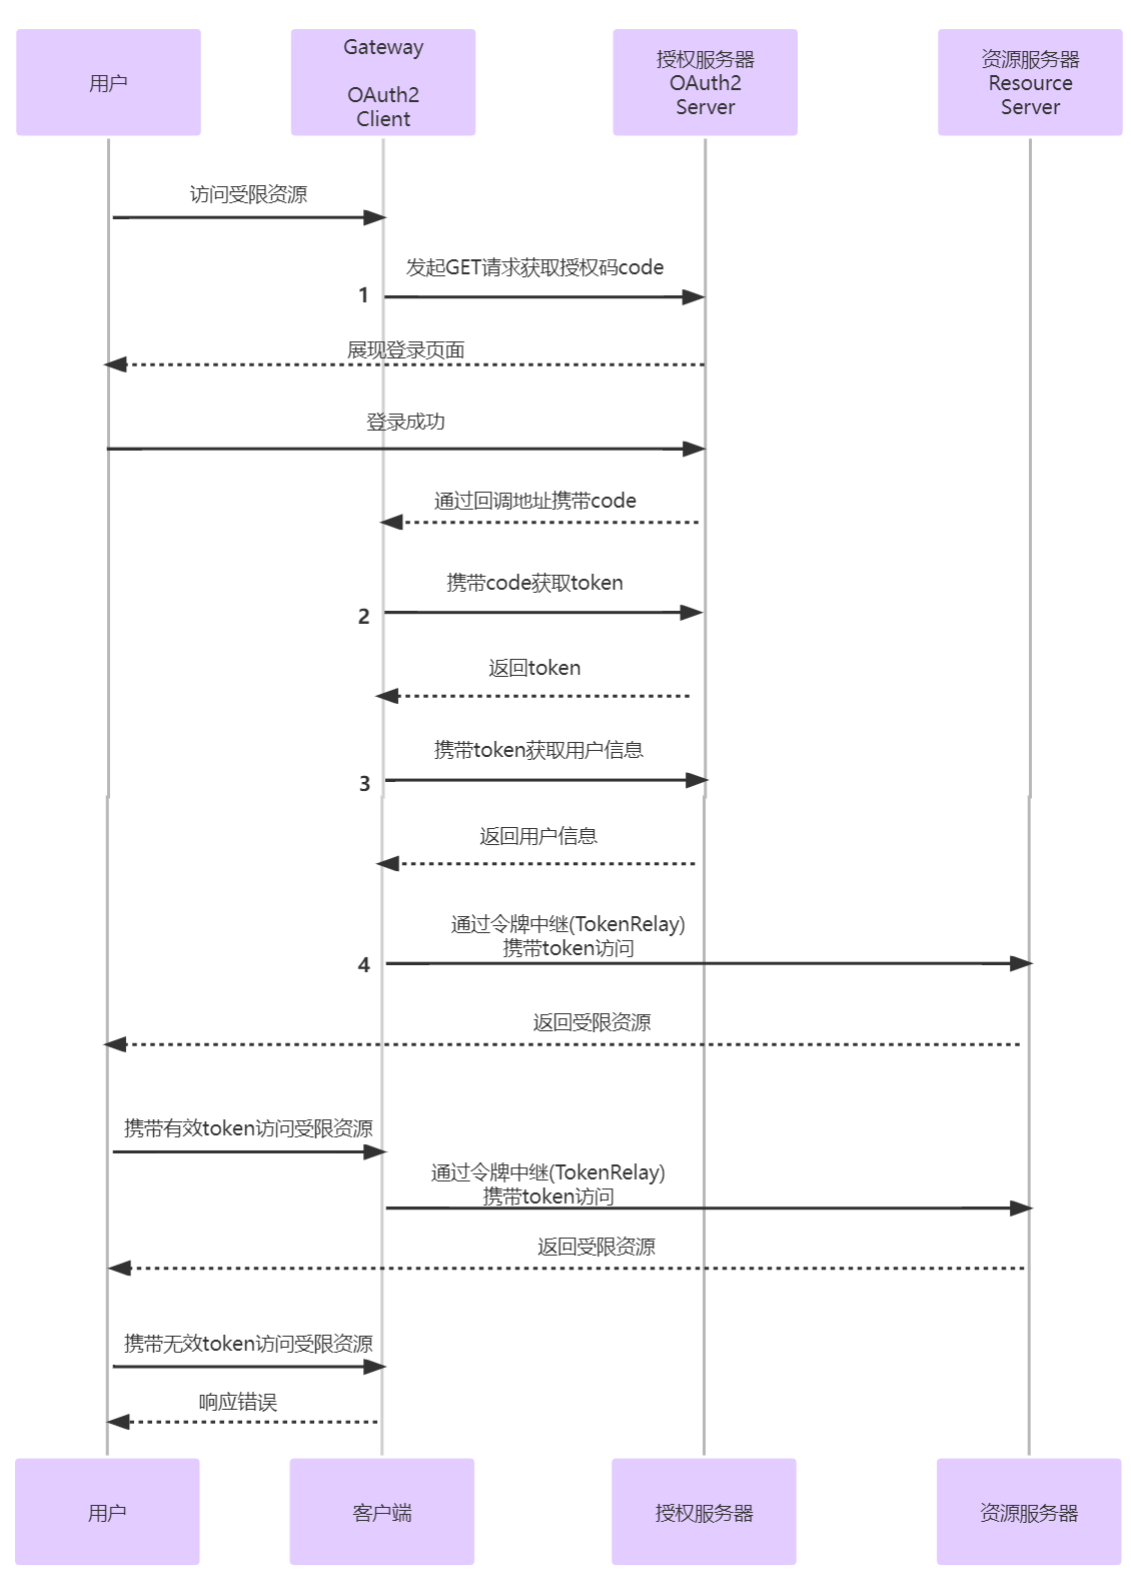
- 用户请求受限资源
- 网关检测没有认证信息,通过 RedirectServerAuthenticationEntryPoint 处理并发起 OAuth2 登录授权申请
- 授权申请到达认证服务,认证服务检测到未登录重定向至登录页面并展示给用户
- 用户登录成功后请求重定向至授权申请接口,通过校验后携带 Token 重定向至回调地址(redirect_uri),注意:这里回调地址要设置为网关的地址,
htttp://{网关ip}:{网关port}/login/oauth2/code/{registrationId},后边的/login/oauth2/code/{registrationId}路径是固定的,这是框架(Security OAuth2 Client)自带的端点 - 请求到达网关,由 OAuth2LoginAuthenticationWebFilter 拦截并调用父类 AuthenticationWebFilter的filter 方法进行处理
- AuthenticationWebFilter 调用 OidcAuthorizationCodeReactiveAuthenticationManager 或 OAuth2LoginReactiveAuthenticationManager 类处理(由授权申请的 scope 决定,包含 openid 就走 OidcAuthorizationCodeReactiveAuthenticationManager,否则走另一个)
- 在获取 AccessToken 成功以后调用 ReactiveOAuth2UserService 获取用户信息
- 获取到用户信息后会解析并将认证信息保存至 ReactiveSecurityContextHolder 中
- 完成这一系列的认证之后会重定向至最一开始请求的受限资源,这时候就能获取到认证信息了
- 如果访问的是被网关代理的服务则会通过令牌中继(TokenRelay)携带 token 访问
这就是网关通过认证服务获取认证信息的一个流程,基本上只需要添加配置文件即可由框架引导进行 OAuth2 认证流程。
配置授权服务器
授权服务器中注册网关客户端信息。
INSERT INTO `oauth-server`.`oauth2_registered_client` (`id`, `client_id`, `client_id_issued_at`, `client_secret`, `client_secret_expires_at`, `client_name`, `client_authentication_methods`, `authorization_grant_types`, `redirect_uris`, `post_logout_redirect_uris`, `scopes`, `client_settings`, `token_settings`) VALUES ('3eacac0e-0de9-4727-9a64-6bdd4be2ee6', 'mall-gateway-id', '2023-07-12 07:33:42', '$2a$10$.J0Rfg7y2Mu8AN8Dk2vL.eBFa9NGbOYCPOAFEw.QhgGLVXjO7eFDC', NULL, '网关服务', 'client_secret_basic', 'refresh_token,authorization_code', 'http://mall-gateway:8888/login/oauth2/code/messaging-client-oidc', 'http://127.0.0.1:9000/', 'openid,profile', '{\"@class\":\"java.util.Collections$UnmodifiableMap\",\"settings.client.require-proof-key\":false,\"settings.client.require-authorization-consent\":true}', '{\"@class\":\"java.util.Collections$UnmodifiableMap\",\"settings.token.reuse-refresh-tokens\":true,\"settings.token.id-token-signature-algorithm\":[\"org.springframework.security.oauth2.jose.jws.SignatureAlgorithm\",\"RS256\"],\"settings.token.access-token-time-to-live\":[\"java.time.Duration\",1800.000000000],\"settings.token.access-token-format\":{\"@class\":\"org.springframework.security.oauth2.server.authorization.settings.OAuth2TokenFormat\",\"value\":\"self-contained\"},\"settings.token.refresh-token-time-to-live\":[\"java.time.Duration\",3600.000000000],\"settings.token.authorization-code-time-to-live\":[\"java.time.Duration\",300.000000000],\"settings.token.device-code-time-to-live\":[\"java.time.Duration\",300.000000000]}');
网关接入 OAuth2
网关可以作为客户端和资源服务器。
注意:Spring Cloud Gateway 网关使用的是 webflux,需要 webflux 版本的 Spring Security 支持
官方文档:<https://docs.spring.io/spring-
security/reference/reactive/oauth2/client/index.html>
1)引入依赖
引入 oauth2 客户端和资源服务的依赖
<!--spring-boot-starter-oauth2-client-->
<dependency>
    <groupId>org.springframework.boot</groupId>
    <artifactId>spring-boot-starter-oauth2-client</artifactId>
    <version>3.1.4</version>
</dependency>

<!--spring-boot-starter-oauth2-resource-server-->
<dependency>
    <groupId>org.springframework.boot</groupId>
    <artifactId>spring-boot-starter-oauth2-resource-server</artifactId>
    <version>3.1.4</version>
</dependency>
- application.yml 中添加客户端与资源服务配置配置
spring:
  security:
  oauth2:
    # 资源服务器配置
    resourceserver:
      jwt:
        # Jwt中claims的iss属性,也就是jwt的签发地址,即认证服务器的根路径
        # 资源服务器会进一步的配置,通过该地址获取公钥以解析jwt
        issuer-uri: http://spring-oauth-server:9000
    client:
      provider:
        #认证服务器信息
        oauth-server:
          #授权地址
          issuer-uri: http://spring-oauth-server:9000
          # 获取用户信息的地址,默认的/userinfo端点需要IdToken获取,为避免麻烦自定一个用户信息接口
#            user-info-uri: ${spring.security.oauth2.client.provider.oauth-server.issuer-uri}/user
#            user-name-attribute: name
          authorizationUri: ${spring.security.oauth2.client.provider.oauth-server.issuer-uri}/oauth2/authorize
          #令牌获取地址
          tokenUri: ${spring.security.oauth2.client.provider.oauth-server.issuer-uri}/oauth2/token
      registration:
        messaging-client-oidc:
          #认证提供者,标识由哪个认证服务器进行认证,和上面的oauth-server进行关联
          provider: oauth-server
          #客户端名称
          client-name: 网关服务
          #客户端id,从认证平台申请的客户端id
          client-id: mall-gateway-id
          #客户端秘钥
          client-secret: secret
          #客户端认证方式
          client-authentication-method: client_secret_basic
          #使用授权码模式获取令牌(token)
          authorization-grant-type: authorization_code
          #回调地址,接收认证服务器回传code的接口地址,之前我们是使用http://www.baidu.com代替
          redirect-uri: http://mall-gateway:8888/login/oauth2/code/messaging-client-oidc
          scope:
            - profile
            - openid
3)编写网关资源服务配置
/**
 * 资源服务器配置
 */
@Configuration
@EnableWebFluxSecurity
@EnableReactiveMethodSecurity
public class WebSecurityConfig {
    /**
     * 配置认证相关的过滤器链
     *
     * @param http Spring Security的核心配置类
     * @return 过滤器链
     */
    @Bean
    public SecurityWebFilterChain defaultSecurityFilterChain(ServerHttpSecurity http) {
        // 全部请求都需要认证
        http.authorizeExchange((authorize) -> authorize
                .anyExchange().authenticated()
        );
        // 开启OAuth2登录
        http.oauth2Login(Customizer.withDefaults());

        // 设置当前服务为资源服务,解析请求头中的token
        http.oauth2ResourceServer((resourceServer) -> resourceServer
                        // 使用jwt
                        .jwt(Customizer.withDefaults())
                /*
                // 请求未携带Token处理
                .authenticationEntryPoint(this::authenticationEntryPoint)
                // 权限不足处理
                .accessDeniedHandler(this::accessDeniedHandler)
                // Token解析失败处理
                .authenticationFailureHandler(this::failureHandler)
                */
        );
        // 禁用csrf与cors
        http.csrf((csrf) -> csrf.disable());
        http.cors((cors)->cors.disable());

        return http.build();
    }
}
需要注意的是开启方法级别鉴权的注解变了,webflux 的注解和 webmvc 的注解不一样,并且过滤器链也换成
SecurityWebFilterChain 了。
4)增加令牌中继配置
注意:配置文件中令牌中继(TokenRelay)的配置就是添加一个 filter:TokenRelay=; 当网关引入 spring-boot-
starter-oauth2-client 依赖并设置 spring.security.oauth2.client.* 属性时,会自动创建一个
TokenRelayGatewayFilterFactory 过滤器,它会从认证信息中获取 access token,并放入下游请求的请求头中。
Gateway关于TokenRelay的文档: <https://docs.spring.io/spring-cloud-
gateway/docs/current/reference/html/#the-tokenrelay-gatewayfilter-factory>
spring:
  cloud:
    gateway:
      default-filters:
        # 令牌中继  会在请求头中添加token向下游传递
        - TokenRelay=
资源服务器配置
以会员微服务为例,需要调用订单微服务,都属于资源服务器。
1)引入资源服务器依赖
<!--spring-boot-starter-oauth2-resource-server-->
<dependency>
    <groupId>org.springframework.boot</groupId>
    <artifactId>spring-boot-starter-oauth2-resource-server</artifactId>
    <version>3.1.4</version>
</dependency>
2)application.yml 中添加资源服务器配置
spring:
    security:
      oauth2:
        # 资源服务器配置
        resource-server:
          jwt:
            # Jwt中claims的iss属性,也就是jwt的签发地址,即认证服务器的根路径
            # 资源服务器会进一步的配置,通过该地址获取公钥以解析jwt
            issuer-uri: http://spring-oauth-server:9000
3)配置资源服务器
@Configuration
@EnableWebSecurity
@EnableMethodSecurity(jsr250Enabled = true, securedEnabled = true)
public class ResourceServerConfig {

    @Bean
    SecurityFilterChain securityFilterChain(HttpSecurity http) throws Exception {

        http.authorizeHttpRequests((authorizeHttpRequests) -> authorizeHttpRequests
                        //所有的访问都需要通过身份认证
                        .anyRequest().authenticated()
                )
                .oauth2ResourceServer((oauth2ResourceServer) -> oauth2ResourceServer
                        .jwt(Customizer.withDefaults())

                );

        return http.build();
    }

}
4)添加 openFeign 拦截器
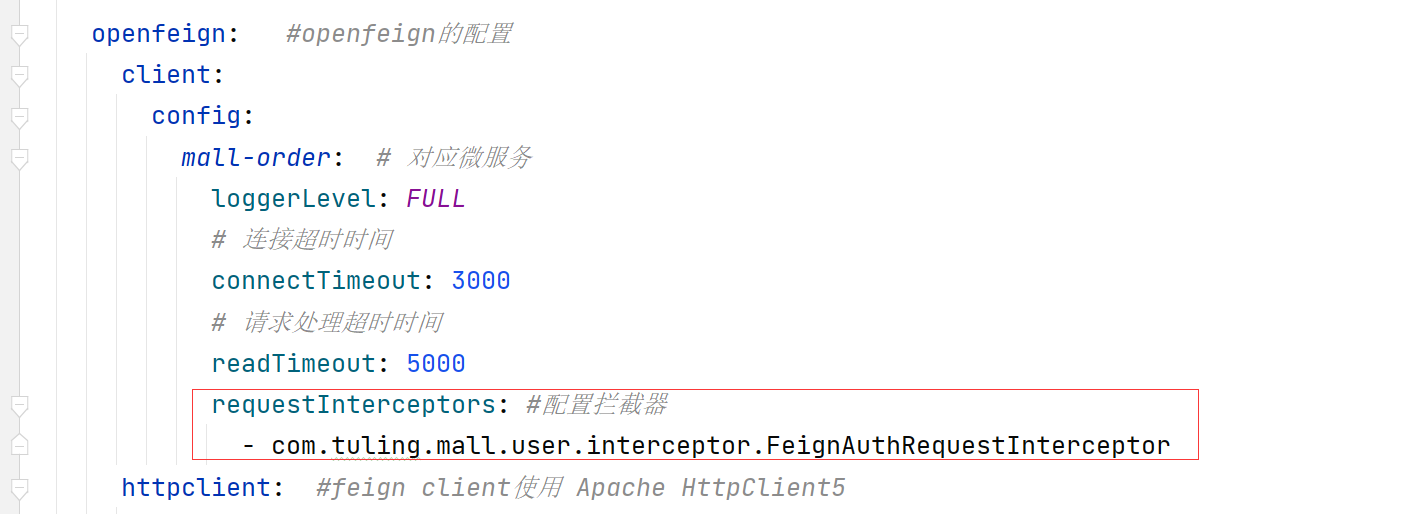
会员服务调用订单服务,token 令牌需要向下游微服务传递,可以借助 openFeign 拦截器实现
@Slf4j
public class FeignAuthRequestInterceptor implements RequestInterceptor {
    @Override
    public void apply(RequestTemplate template) {
        // 业务逻辑  模拟认证逻辑
        ServletRequestAttributes attributes = (ServletRequestAttributes) RequestContextHolder
                .getRequestAttributes();
        if(null != attributes){
            HttpServletRequest request = attributes.getRequest();
            String access_token = request.getHeader("Authorization");
            log.info("从Request中解析请求头:{}",access_token);
            //设置token
            template.header("Authorization",access_token);
        }

    }
}
在 application.yml 中增加 openFeign 拦截器配置
测试
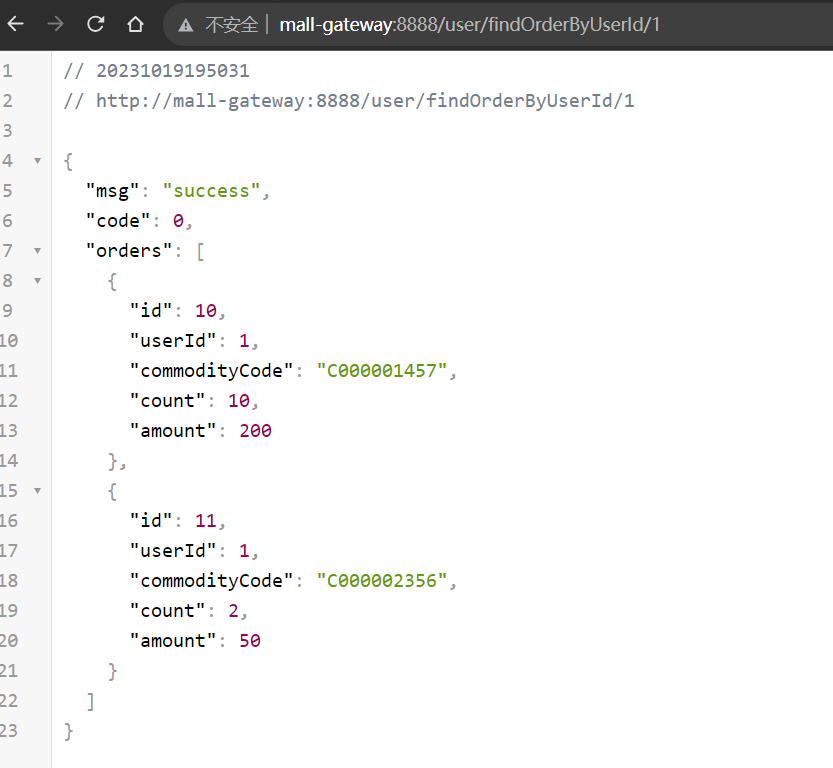
访问:[http://mall-gateway:8888/user/findOrderByUserId/1](http://mall- gateway:8888/user/findOrderByUserId/1)
因为没有访问权限,会跳转到授权服务器登录界面
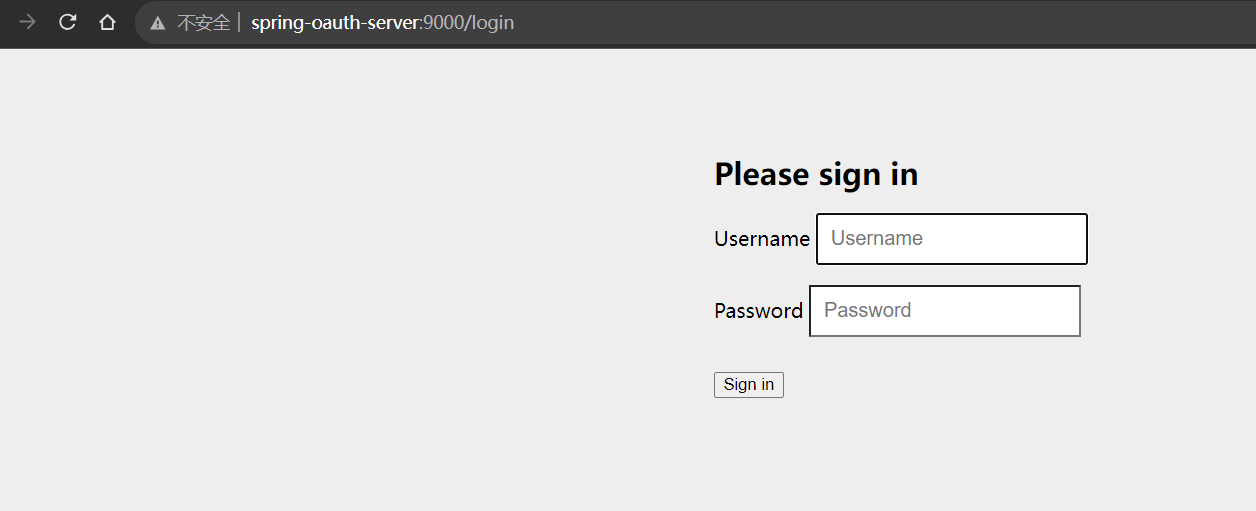
登录,勾选授权之后,返回如下结果:
网络安全工程师(白帽子)企业级学习路线
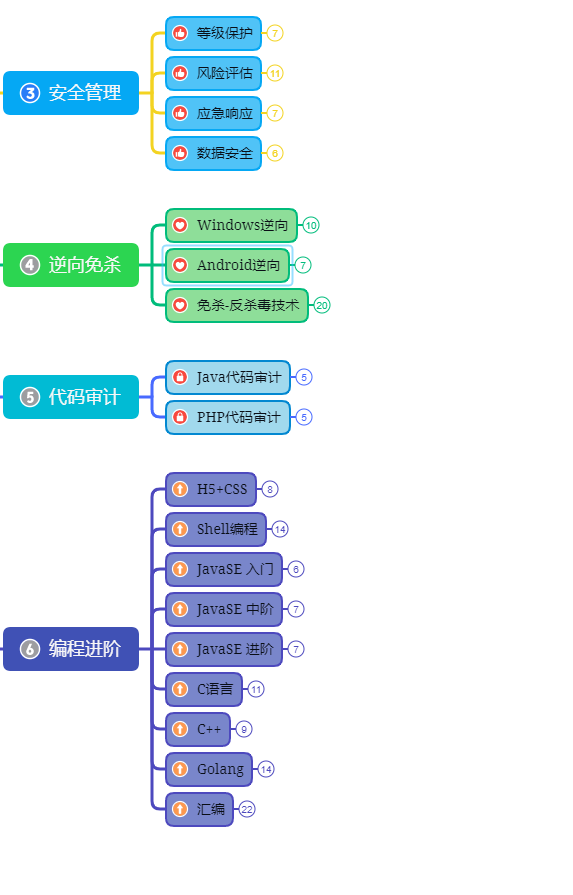
第一阶段:安全基础(入门)
第二阶段:Web渗透(初级网安工程师)
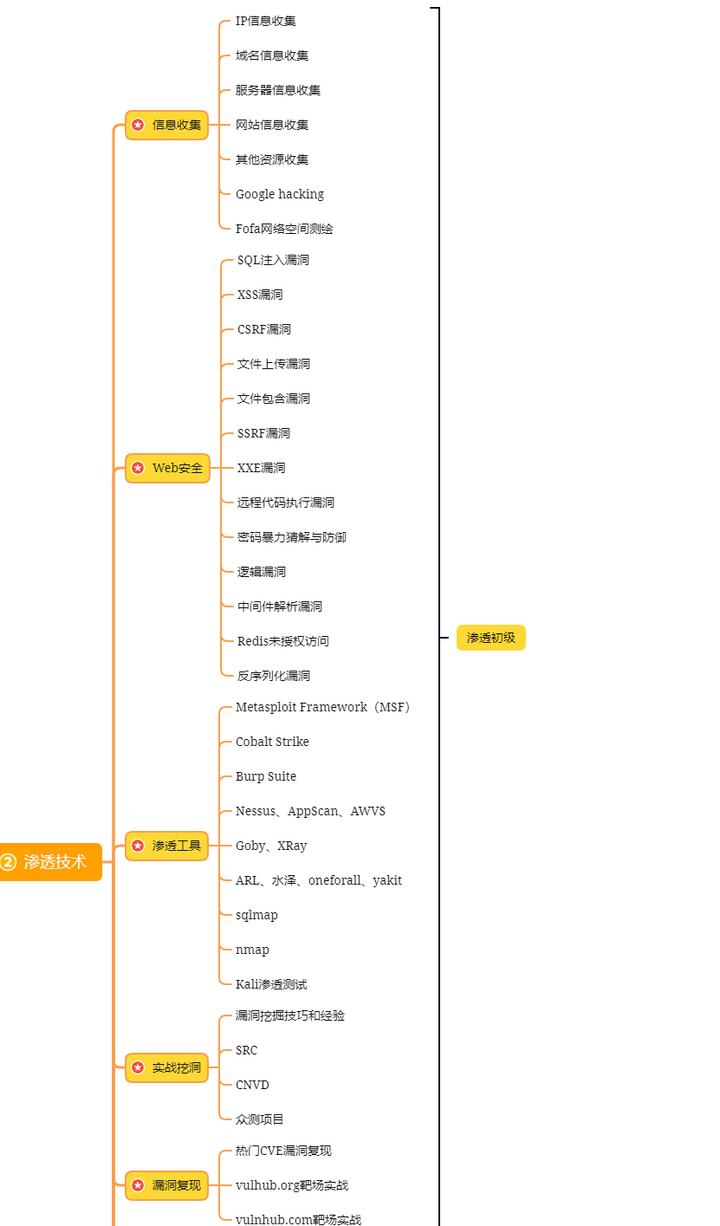
第三阶段:进阶部分(中级网络安全工程师)
如果你对网络安全入门感兴趣,那么你需要的话可以点击这里👉网络安全重磅福利:入门&进阶全套282G学习资源包免费分享!
学习资源分享


 1211
1211


 被折叠的 条评论
为什么被折叠?
被折叠的 条评论
为什么被折叠?
 到【灌水乐园】发言


