


没看到动画情况,只看到了特效,听说gif是专利,微软好像下不了手。
Private Declare Function BitBlt _
Lib "gdi32" (ByVal hDestDC As Long, _
ByVal x As Long, _
ByVal y As Long, _
ByVal nWidth As Long, _
ByVal nHeight As Long, _
ByVal hSrcDC As Long, _
ByVal xSrc As Long, _
ByVal ySrc As Long, _
ByVal dwRop As Long) As Long
Private Sub Command1_Click()
Set Picture3(0).Picture = Picture1.Picture
Set Picture3(1).Picture = Picture1.Picture
Set Picture3(2).Picture = Picture1.Picture
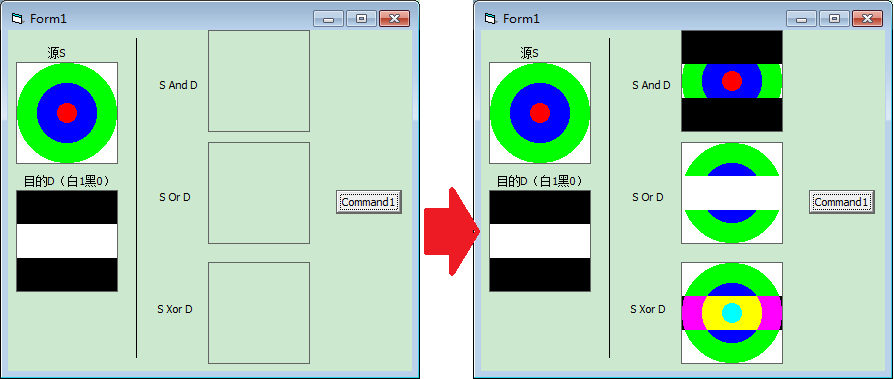
BitBlt Picture3(0).hDC, 0, 0, 100, 100, Picture2.hDC, 0, 0, vbSrcAnd 'and
BitBlt Picture3(1).hDC, 0, 0, 100, 100, Picture2.hDC, 0, 0, vbSrcPaint 'or
BitBlt Picture3(2).hDC, 0, 0, 100, 100, Picture2.hDC, 0, 0, vbSrcInvert 'xor
End Sub白色是1,,,黑色是0
各图就是与0和1进行运算。
利用这个特性,用一张Mask图进行1或0的运算,就可以取出或挖出“孔”图
Private Declare Function BitBlt _
Lib "gdi32" (ByVal hDestDC As Long, _
ByVal x As Long, _
ByVal y As Long, _
ByVal nWidth As Long, _
ByVal nHeight As Long, _
ByVal hSrcDC As Long, _
ByVal xSrc As Long, _
ByVal ySrc As Long, _
ByVal dwRop As Long) As Long
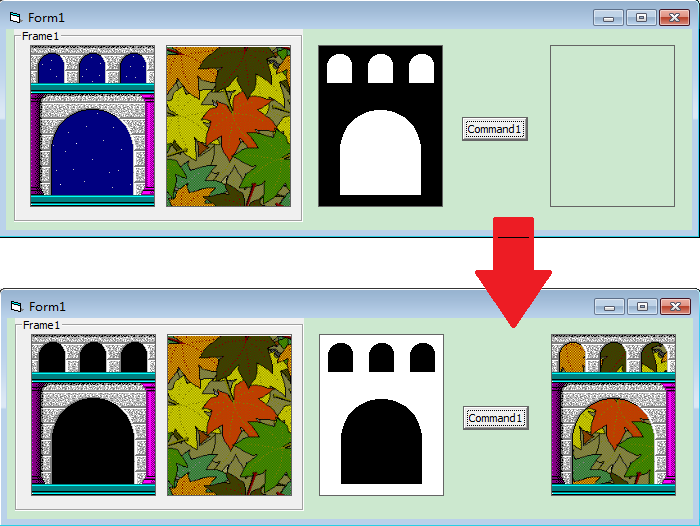
Private Sub Command1_Click() 'p1,p2原图,p3为mask图,p4为结果图
Dim w As Long, h As Long
w = Picture1.Width
h = Picture1.Height
Set Picture4.Picture = Picture2.Picture '设置p4图片
BitBlt Picture4.hDC, 0, 0, w, h, Picture3.hDC, 0, 0, vbSrcAnd '由p3提取p4中“孔”图
BitBlt Picture3.hDC, 0, 0, w, h, 0, 0, 0, vbDstInvert 'p3反相
BitBlt Picture1.hDC, 0, 0, w, h, Picture3.hDC, 0, 0, vbSrcAnd '在p1中挖去“孔”图
BitBlt Picture4.hDC, 0, 0, w, h, Picture1.hDC, 0, 0, vbSrcPaint 'p1与p4合成
End Sub如果要保存画的图片,可以把autoRedraw开启(一开始画就开启),保存后再关闭。下面代码(没设置p4的图片,通过复制)
Private Sub Command1_Click() 'p1,p2原图,p3为mask图,p4为结果图
    Dim w As Long, h As Long
    w = Picture1.Width
    h = Picture1.Height
    Picture4.AutoRedraw = True
'    Set Picture4.Picture = Picture2.Picture '设置p4图片
    BitBlt Picture4.hDC, 0, 0, w, h, Picture2.hDC, 0, 0, vbSrcCopy
    BitBlt Picture4.hDC, 0, 0, w, h, Picture3.hDC, 0, 0, vbSrcAnd '由p3提取p4中“孔”图
    BitBlt Picture3.hDC, 0, 0, w, h, 0, 0, 0, vbDstInvert         'p3反相
    BitBlt Picture1.hDC, 0, 0, w, h, Picture3.hDC, 0, 0, vbSrcAnd '在p1中挖去“孔”图
    BitBlt Picture4.hDC, 0, 0, w, h, Picture1.hDC, 0, 0, vbSrcPaint 'p1与p4合成
    Picture1.Refresh
    Picture2.Refresh
    Picture3.Refresh

    Set Picture4.Picture = Picture4.Image
    SavePicture Picture4, "D:\44.jpg"
    Picture4.AutoRedraw = False
End Sub
为了防止P4闪烁情况,可以为P4建立内存DC
Private Sub Command1_Click() 'p1,p2原图,p3为mask图,p4为结果图

    Dim w As Long, h As Long, hMemDc As Long, hBitmap As Long

    w = Picture1.Width
    h = Picture1.Height
    Set Picture4.Picture = Picture2.Picture '设置p4图片
    hMemDc = CreateCompatibleDC(Picture4.hDC) '建立内存DC
    hBitmap = CreateCompatibleBitmap(Picture4.hDC, w, h) '任何内存DC图像转移时,必须要有Bitmap,建立和p4兼容bitmap
    SelectObject hMemDc, hBitmap                         '选用对象

    '这里为hMemDC与各图像的运算,略去

    BitBlt Picture4.hDC, 0, 0, w, h, hMemDc, 0, 0, vbSrcCopy '内存DC复制到DC
    DeleteDC hMemDc       '先删除DC
    DeleteObject hBitmap  '后删bitmap,不然出错。因被其上引用

End Sub
建立兼容的bitmap:
CreateCompatibleBitmap
Private Declare Function CreateCompatibleBitmap Lib "gdi32" Alias "CreateCompatibleBitmap" (ByVal hdc As Long, ByVal nWidth As Long, ByVal nHeight As Long) As Long
原因:建立了DC并不会建立Bitmap,还要建立和另一个DC中Bitmap结构相一致的兼容Bitmap,这个建立后,还没完事,还得再把这个选用进来。
相当于先进行规划(建立DC)建房,但某一区域(Bitmap)并没有修建,为了和别人的房子保护一致,因为建立一个和别人一样的房子(CompatibleBitmap)
最后,房子“全部”完成后,需要去房管局(DC)中去登记(selectObject),表示有记载了。才能被正式认可。
上面全部加了一个引号,是因为在建立兼容bitmap(房子)时,不但指定了结构还有内容(picture4),相当于房子结构建立,内部装饰家具完成(内容)。
所以这个细节要注意。若只是建立结构,没有内容,这个图是不完整的,可能是一个全黑的图(全为0)。
对于这个,释放时用delectObject.
至此:releaseDC (删除DC)
DelecteDC (删除内存DC)
DelecteObject (删除对象)
这个程序有点长,主要是图片进行了与、或操作。因为在内存中操作没看出来,
我加了几个中断并用显示在前台DC中,才明白了,原来是这样的。拷拷,内存就是不可想象的:)
Option Explicit
Private Type BITMAP
bmType As Long
bmWidth As Long
bmHeight As Long
bmWidthBytes As Long
bmPlanes As Integer
bmBitsPixel As Integer
bmBits As Long
End Type
Private Declare Function BitBlt _
Lib "gdi32" (ByVal hDestDC As Long, _
ByVal X As Long, _
ByVal Y As Long, _
ByVal nWidth As Long, _
ByVal nHeight As Long, _
ByVal hSrcDC As Long, _
ByVal xSrc As Long, _
ByVal ySrc As Long, _
ByVal dwRop As Long) As Long
Private Declare Function CreateCompatibleDC Lib "gdi32" (ByVal hDC As Long) As Long
Private Declare Function CreateCompatibleBitmap _
Lib "gdi32" (ByVal hDC As Long, _
ByVal nWidth As Long, _
ByVal nHeight As Long) As Long
Private Declare Function CreateBitmapIndirect Lib "gdi32" (lpBitmap As BITMAP) As Long
Private Declare Function DeleteDC Lib "gdi32" (ByVal hDC As Long) As Long
Private Declare Function DeleteObject Lib "gdi32" (ByVal hObject As Long) As Long
Private Declare Function SelectObject _
Lib "gdi32" (ByVal hDC As Long, _
ByVal hObject As Long) As Long
Private Declare Function GetObject _
Lib "gdi32" _
Alias "GetObjectA" (ByVal hObject As Long, _
ByVal nCount As Long, _
lpObject As Any) As Long
Dim pic As Picture
Dim picNum As Integer
Dim picWidth As Integer
Dim picHeight As Integer
Dim hDCSave As Long, hBmpSave As Long
Dim hDCPaint As Long, hBmpPaint As Long
Const Xoffset = 2
Const Yoffset = 2
Dim X As Integer, Y As Integer
Sub Form_Load() '分割图片(pic由2X4=8个单元图组成一个大图)
Dim bm As BITMAP
ScaleMode = vbPixels
picNum = 4
Set pic = LoadPicture(App.Path & "\" & "Anim.bmp") '加载图片并分割成单元小图
GetObject pic.Handle, LenB(bm), bm
picWidth = bm.bmWidth / 2
picHeight = bm.bmHeight / picNum
hDCPaint = CreateCompatibleDC(Me.hDC)
'黑C区域图,不需要整个,因为我们专注的是变化区域
hBmpPaint = CreateCompatibleBitmap(Me.hDC, picWidth + Abs(Xoffset), picHeight + Abs(Yoffset))
SelectObject hDCPaint, hBmpPaint
X = 0
Y = (Me.ScaleHeight - picHeight) / 2
End Sub
Private Sub Form_Paint() '窗体变化(显示或大小变化)会重绘时,会影响hDCPaint,这里重新提取
Dim hOldBmp As Long
Cls '为了获取变化后窗体的真实底图,先清除已经绘制的
hDCSave = CreateCompatibleDC(Me.hDC)
hBmpSave = CreateCompatibleBitmap(Me.hDC, Me.ScaleWidth, Me.ScaleHeight) '整个窗体客户区图
hOldBmp = SelectObject(hDCSave, hBmpSave)
If hOldBmp <> 0 Then DeleteObject hOldBmp '抛弃原图,使用现有图
BitBlt hDCSave, 0, 0, Me.ScaleWidth, Me.ScaleHeight, Me.hDC, 0, 0, vbSrcCopy
End Sub
Private Sub Timer1_Timer() 'hDCSave始终为原图"纯洁无污染",hDCPaint包含已经绘制上的"污染"图
Static Idx As Integer
Dim hMemDC As Long
'在内存DC中,将原图把黑色框区域恢复回来。相当于恢复该区域的原底图(内存DC中),
'这里不用整个图,只恢复变化的区域,效率更高。这样保证了窗体原图hDCPaint的“纯洁性”
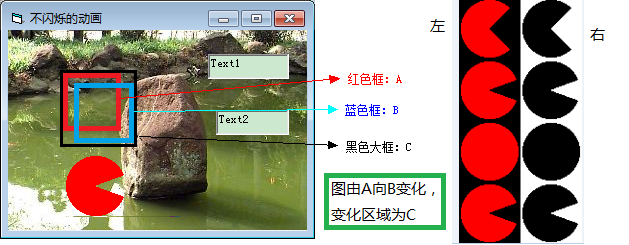
BitBlt hDCPaint, 0, 0, picWidth + Abs(Xoffset), picHeight + Abs(Yoffset), hDCSave, X, Y, vbSrcCopy
'再建临时窗体内存DC
hMemDC = CreateCompatibleDC(Me.hDC)
SelectObject hMemDC, pic.Handle '选用大图
'用右图,AND运算,因白1黑0,0与背景与就把黑色部分的背景给“挖去了”
BitBlt hDCPaint, Xoffset, Yoffset, picWidth, picHeight, hMemDC, picWidth, picHeight * Idx, vbSrcAnd
'用左图,OR去处,因白1黑0,0保持原背景图,1就把自己的图去“堵住”上去的孔。效果就是把形状图“画上”去
BitBlt hDCPaint, Xoffset, Yoffset, picWidth, picHeight, hMemDC, 0, picHeight * Idx, vbSrcPaint
Idx = Idx + 1
If Idx = picNum Then Idx = 0
DeleteDC hMemDC '至此临时DC作用使用完了,删除
'从内存DC提到前台DC中,就看到形状画上了。因为上面的所有动作在内存DC中,只有下面一次更新,所以没有闪烁
BitBlt Me.hDC, X, Y, picWidth + Abs(Xoffset), picHeight + Abs(Yoffset), hDCPaint, 0, 0, vbSrcCopy
'下面是图片的移动,以及判断是否出了边框
X = X + Xoffset
Y = Y + Yoffset
If X > Me.ScaleWidth Then X = 0
If X + picWidth < 0 Then X = Me.ScaleWidth
If Y > Me.ScaleHeight Then Y = 0
If Y + picHeight < 0 Then Y = Me.ScaleHeight
End Sub
Private Sub Form_Unload(Cancel As Integer)
DeleteDC hDCSave
DeleteDC hDCPaint
DeleteObject hBmpSave
DeleteObject hBmpPaint
End Sub
注意点:1、图片上加了两个textbox是为了看看,都是由form创建的内存DC,他们的句柄是不是一样的。
结论是:不一样,说明分配不同的内存来存储,因此,双缓冲、三缓冲内存DC是不同区域。
2、为了提高效率,兼容bitmap都是尽可能使用变化的区域,而不是整个区域。
3、操作细节:
恢复C区域(这之前C区域只有A占用,B还没有出现)
画B区域 (通过与、或操作)
显示C区域(这时C区域只有B了)
这样,完成了清除C,再画B,在界面上只画了一次C,就完成了清除原图A,再画现图B的两次动作。
-----------------------------------------------------------
下面是一个加载图片,让其在内存DC中透明后,再返回到窗体DC中。只写主要代码:
透明API:
Private Declare Function GdiTransparentBlt _
Lib "gdi32" (ByVal hdc1 As Long, _
ByVal X1 As Long, _
ByVal Y1 As Long, _
ByVal W1 As Long, _
ByVal H1 As Long, _
ByVal Hdc2 As Long, _
ByVal X2 As Long, _
ByVal Y2 As Long, _
ByVal W2 As Long, _
ByVal H2 As Long, _
ByVal Color As Long) As Long
Dim pic   As Picture, picStru As BITMAP
Dim w     As Long, h As Long
Dim x     As Long, y As Long
Dim fMDC  As Long, fBitmap As Long, fOldObject As Long
Dim fMDC1 As Long, fBitMap1 As Long

Private Sub Form_Load()
    Set pic = LoadPicture("D:\1.jpg")
    GetObject pic, Len(picStru), picStru
    w = picStru.bmWidth
    h = picStru.bmHeight

    fMDC1 = CreateCompatibleDC(Me.hdc)  '建立内存DC(变化区域,指定水平移动变量1,w+1)
    fBitMap1 = CreateCompatibleBitmap(Me.hdc, w + 1, h)
    SelectObject fMDC1, fBitMap1
    x = 10
End Sub

Private Sub Form_Paint()
    Form1.ScaleMode = vbPixels
    Cls
    fMDC = CreateCompatibleDC(Me.hdc)  '建立内存DC(原始纯洁图)
    fBitmap = CreateCompatibleBitmap(Me.hdc, Me.ScaleWidth, Me.ScaleHeight)

    fOldObject = SelectObject(fMDC, fBitmap)

    If fOldObject <> 0 Then DeleteObject fOldObject
    BitBlt fMDC, 0, 0, Me.ScaleWidth, Me.ScaleHeight, Me.hdc, 0, 0, vbSrcCopy

End Sub

Private Sub Timer1_Timer()
    Dim tempMDC As Long
    Me.ScaleMode = vbPixels

    BitBlt fMDC1, 0, 0, w + 1, h, fMDC, x, 0, vbSrcCopy '内存中清除

    tempMDC = CreateCompatibleDC(Me.hdc)
    SelectObject tempMDC, pic.Handle

    GdiTransparentBlt fMDC1, 1, 0, w + 1, h, tempMDC, 0, 0, w, h, RGB(35, 177, 76) '内存中透明

    DeleteDC tempMDC
    BitBlt Me.hdc, x + 1, 0, w + 1, h, fMDC1, 0, 0, vbSrcCopy '内存DC显示在窗体DC中

    If x < Me.ScaleWidth Then '移动坐标
        x = x + 1
    Else
        x = 0
    End If
End Sub
====================================================================
图片缩放API
Private Declare Function StretchBlt Lib "gdi32" Alias "StretchBlt" (ByVal hdc As Long, ByVal x As Long, ByVal y As Long, ByVal nWidth As Long, ByVal nHeight As Long, ByVal hSrcDC As Long, ByVal xSrc As Long, ByVal ySrc As Long, ByVal nSrcWidth As Long, ByVal nSrcHeight As Long, ByVal dwRop As Long) As Long
这个比BitBlt多了一个源DC的宽和高,这样源与目的的宽、高不同就呈现不同的放大效果。
所以,又把StretchBlt称为BitBlt的加强版
Private Declare Function StretchBlt _
                Lib "gdi32" (ByVal hdc As Long, _
                             ByVal x As Long, _
                             ByVal y As Long, _
                             ByVal nWidth As Long, _
                             ByVal nHeight As Long, _
                             ByVal hSrcDC As Long, _
                             ByVal xSrc As Long, _
                             ByVal ySrc As Long, _
                             ByVal nSrcWidth As Long, _
                             ByVal nSrcHeight As Long, _
                             ByVal dwRop As Long) As Long

Private Sub Command1_Click()
    Dim i As Long, j As Long
    Dim w As Long, h As Long

    w = Picture1.ScaleWidth / Screen.TwipsPerPixelX
    h = Picture2.ScaleHeight / Screen.TwipsPerPixelY
    StretchBlt Picture2.hdc, w, 0, -w, h, Picture1.hdc, 0, 0, w, h, vbSrcCopy
    StretchBlt Picture3.hdc, w / 2, 0, -w / 2, h / 2, Picture1.hdc, 0, 0, w, h, vbSrcCopy

    '水平翻转,h不变,w变化
    For i = 0 To w
        Picture4(0).Cls
        StretchBlt Picture4(0).hdc, i, 0, w - 2 * i, h, Picture1.hdc, 0, 0, w, h, vbSrcCopy
        DoEvents

        '为了看到效果,延时
        For j = 0 To 3000000
        Next
    Next

    '垂直翻转,w不变,H变化
    For i = 0 To h
        Picture4(0).Cls
        StretchBlt Picture4(0).hdc, 0, i, w, h - 2 * i, Picture1.hdc, 0, 0, w, h, vbSrcCopy
        DoEvents

        For j = 0 To 3000000
        Next
    Next

    '中间逐渐变大
    For i = w / 2 To 0 Step -1
        Picture4(1).Cls
        StretchBlt Picture4(1).hdc, i, i * h / w, w - 2 * i, h - 2 * i * h / w, Picture1.hdc, 0, 0, w, h, vbSrcCopy
        DoEvents

        For j = 0 To 3000000
        Next
    Next

    '向中间逐渐变小
    For i = 0 To w / 2
        Picture4(1).Cls
        StretchBlt Picture4(1).hdc, i, i * h / w, w - 2 * i, h - 2 * i * h / w, Picture1.hdc, 0, 0, w, h, vbSrcCopy
        DoEvents

        For j = 0 To 3000000
        Next
    Next
End Sub
注意:1、上面全用的前台DC,所有图片有些闪,可以用内存DC加以改善。
2、延时,可单独用一函数来完成
3、翻转可以用另外一个图来表示背面,这样看上去就有点象是翻牌一样。


 2万+
2万+

 被折叠的 条评论
为什么被折叠?
被折叠的 条评论
为什么被折叠?
 到【灌水乐园】发言


