


背景:
基于mysql的复制高可用方案,参考业界的方案,目前觉得有两种觉得改动工作量会小些。一个是oracle提供的innodb cluster(使用group cluster, 性能远高于异步复制和半复制),一个是Percona 公司提供的Percona XtraDB Cluster。现在先对innodb cluster进行可靠性验证。
异步复制:
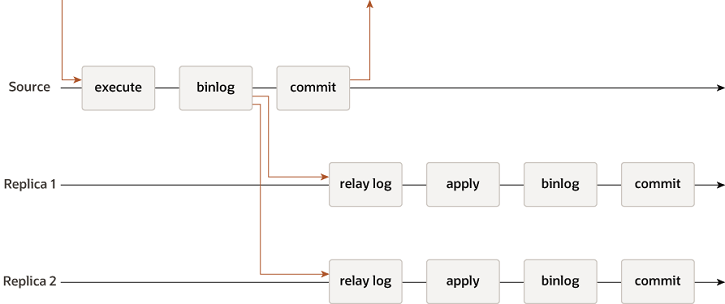
半复制:
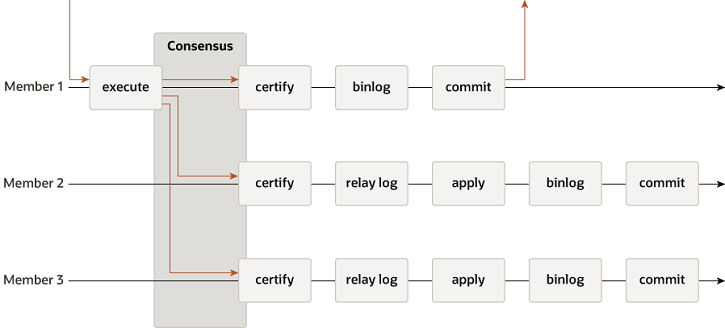
group replication:
安装mysql
在该地址下找到对应的系统版本。本测试操作系统为centos6 64bit。
本文下载的是: mysql-5.7.24-linux-glibc2.12-x86_64.tar。需要注意的是下载前需要在oracle有账号。
如果要对mysql进行测试推荐附带下载: mysql-test-5.7.24-linux-glibc2.12-x86_64.tar.gz
2. 安装:
yum install libaio numactl
#ps: 如果不安装numactl 的话,运行mysqld回报错---mysqld: error while loading shared libraries: libnuma.so.1: cannot open shared object file: No such file or directory
tar zxvf mysql-5.7.24-linux-glibc2.12-x86_64.tar
ln -s {path_to_mysql-5.7.24-linux-glibc2.12-x86_64} /usr/local/mysql5.7.24
3. 配置环境变量:
vi ~/.bash_profile
#这样会优先使用现在安装的mysql版本
PATH=/usr/local/mysql5.7.24/bin:$PATH;
source ~/.bash_profile
4. 测试:
mysql -V
Ver 14.14 Distrib 5.7.24, for linux-glibc2.12 (x86_64) using EditLine wrapper
mysqld --version
mysqld Ver 5.7.24 for linux-glibc2.12 on x86_64 (MySQL Community Server (GPL))
如上结果表示安装成功。
安装mysql shell && mysql router
1. 配置repo
cd /etc/yum.repos.d
touch mysql5.7-community.repo
[mysql-tools-preview]
name=MySQL Tools Preview
baseurl=http://repo.mysql.com/yum/mysql-tools-preview/el/6/$basearch/
enabled=1
gpgcheck=0
gpgkey=file:///etc/pki/rpm-gpg/RPM-GPG-KEY-mysql
[root@bogon yum.repos.d]# pwd
/etc/yum.repos.d
ps: 出现如下错误GPG key retrieval failed: [Errno 14] Could not open/read file:///etc/pki/rpm-gpg/RPM-GPG-KEY-EPEL-6 时,
是因为gpgcheck配置的为1的缘故,将gpgcheck设置为0即可解决。
2. install
yum makecache
yum -y update
yum install mysql-shell
如果执行 mysqlsh出现如下结果证明安装成功。
[root@bogon bin]# mysqlsh
MySQL Shell 8.0.4-rc

Copyright (c) 2016, 2018, Oracle and/or its affiliates. All rights reserved.

Oracle is a registered trademark of Oracle Corporation and/or its
affiliates. Other names may be trademarks of their respective
owners.

Type '\help' or '\?' for help; '\quit' to exit.


 MySQL  JS > quit
ReferenceError: quit is not defined
yum install mysql-router
执行命令: mysqlrouter -V 如果出现如下结果表明mysqlrouter安装成功。
# mysqlrouter -V
MySQL Router v8.0.4 on Linux (64-bit) (GPL community edition)
test MGR
使用innodb cluster提供的sandbox来进行测试:
shell> mysqlsh
############################################
dba, cluster可使用的命令可以通过 dba.help() 和 cluster.help()进行查看
使用: \sql, \js, \py来切换语言。


############################################
mysql-js> dba.deploySandboxInstance(3310)
mysql-js> dba.deploySandboxInstance(3320)
mysql-js> dba.deploySandboxInstance(3330)
创建实例时会要求输入密码,本次测试输入的123456
执行完以上命令后,ps -ef | grep mysql,结果如下:
[root@bogon ~]# ps -ef | grep mysql
root 5348 5278 0 15:35 pts/1 00:00:02 mysqlsh
root 5411 1 0 15:35 pts/1 00:00:12 /root/mysql-sandboxes/3310/mysqld --defaults-file=/root/mysql-sandboxes/3310/my.cnf --user=root
root 5526 1 0 15:36 pts/1 00:00:09 /root/mysql-sandboxes/3320/mysqld --defaults-file=/root/mysql-sandboxes/3320/my.cnf --user=root
root 5618 1 0 15:37 pts/1 00:00:08 /root/mysql-sandboxes/3330/mysqld --defaults-file=/root/mysql-sandboxes/3330/my.cnf --user=root
###########################################
mysql-js> \connect root@localhost:3310
mysql-js> var cluster = dba.createCluster('testCluster')
mysql-js> cluster.addInstance('root@localhost:3320')
mysql-js> cluster.addInstance('root@localhost:3330')
############################################
#使用如下语句对3320,3330实例进行配置:
mysql-js> \connect root@localhost:port_number)
mysql-js> dba.configureLocalInstance('root@localhost:port_number)
#############################################
执行如上命令后:有如下问题,3320,3330两个实例的复制状态有问题。
MySQL  localhost:3320 ssl  JS > cluster.status();
{
    "clusterName": "testCluster",
    "defaultReplicaSet": {
        "name": "default",
        "primary": "localhost:3310",
        "ssl": "REQUIRED",
        "status": "OK_NO_TOLERANCE",
        "statusText": "Cluster is NOT tolerant to any failures. 2 members are not active",
        "topology": {
            "localhost:3310": {
                "address": "localhost:3310",
                "mode": "R/W",
                "readReplicas": {},
                "role": "HA",
                "status": "ONLINE"
            },
            "localhost:3320": {
                "address": "localhost:3320",
                "mode": "R/O",
                "readReplicas": {},
                "role": "HA",
                "status": "(MISSING)"
            },
            "localhost:3330": {
                "address": "localhost:3330",
                "mode": "R/O",
                "readReplicas": {},
                "role": "HA",
                "status": "(MISSING)"
            }
        }
    },
    "groupInformationSourceMember": "mysql://root@localhost:3310"
}
查询3320实例的错误日志,定位结果为:
 MySQL  localhost:3320 ssl  SQL > select * from performance_schema.replication_connection_status \G
*************************** 1. row ***************************
             CHANNEL_NAME: group_replication_recovery
               GROUP_NAME:
              SOURCE_UUID:
                THREAD_ID: NULL
            SERVICE_STATE: OFF
COUNT_RECEIVED_HEARTBEATS: 0
 LAST_HEARTBEAT_TIMESTAMP: 0000-00-00 00:00:00
 RECEIVED_TRANSACTION_SET:
        LAST_ERROR_NUMBER: 2005
       LAST_ERROR_MESSAGE: error connecting to master 'mysql_innodb_cluster_rp466456108@bogon:3310' - retry-time: 60  retries: 1
     LAST_ERROR_TIMESTAMP: 2018-11-20 18:12:45
*************************** 2. row ***************************
             CHANNEL_NAME: group_replication_applier
               GROUP_NAME: 9fb57a31-ecab-11e8-a417-005056a17264
              SOURCE_UUID: 9fb57a31-ecab-11e8-a417-005056a17264
                THREAD_ID: NULL
            SERVICE_STATE: ON
COUNT_RECEIVED_HEARTBEATS: 0
 LAST_HEARTBEAT_TIMESTAMP: 0000-00-00 00:00:00
 RECEIVED_TRANSACTION_SET:
        LAST_ERROR_NUMBER: 0
       LAST_ERROR_MESSAGE:
     LAST_ERROR_TIMESTAMP: 0000-00-00 00:00:00
2 rows in set (0.00 sec)
以上错误很明显是host的问题;
在/etc/hosts文件中配置 127.0.0.1 bogon即可。
改完host后,重新将3320,3330加入cluster:
cluster.rejoinInstance('root@localhost:3320');
cluster.rejoinInstance('root@localhost:3330');
再次执行cluster.status(),结果如下:
 MySQL  localhost:3320 ssl  JS > cluster.status()
{
    "clusterName": "testCluster",
    "defaultReplicaSet": {
        "name": "default",
        "primary": "localhost:3310",
        "ssl": "REQUIRED",
        "status": "OK",
        "statusText": "Cluster is ONLINE and can tolerate up to ONE failure.",
        "topology": {
            "localhost:3310": {
                "address": "localhost:3310",
                "mode": "R/W",
                "readReplicas": {},
                "role": "HA",
                "status": "ONLINE"
            },
            "localhost:3320": {
                "address": "localhost:3320",
                "mode": "R/O",
                "readReplicas": {},
                "role": "HA",
                "status": "ONLINE"
            },
            "localhost:3330": {
                "address": "localhost:3330",
                "mode": "R/O",
                "readReplicas": {},
                "role": "HA",
                "status": "ONLINE"
            }
        }
    },
    "groupInformationSourceMember": "mysql://root@localhost:3310"
}
配置router
mysqlrouter --bootstrap root@localhost:3310 --user=mysqlrouter
[root@bogon ~]#  mysqlrouter --bootstrap root@localhost:3310 --user=mysqlrouter
Please enter MySQL password for root:

Bootstrapping system MySQL Router instance...
MySQL Router  has now been configured for the InnoDB cluster 'testCluster'.

The following connection information can be used to connect to the cluster.

Classic MySQL protocol connections to cluster 'testCluster':
- Read/Write Connections: localhost:6446
- Read/Only Connections: localhost:6447
X protocol connections to cluster 'testCluster':
- Read/Write Connections: localhost:64460
- Read/Only Connections: localhost:64470

Existing configurations backed up to '/etc/mysqlrouter/mysqlrouter.conf.bak'
mysqlrouter &
配置文件位置:/etc/mysqlrouter/mysqlrouter.conf
mysqlsh --uri root@localhost:6446
mysqlsh --uri root@localhost:6447
需要注意的是如果有实例被新添加到cluster需要重新执行 mysqlrouter --bootstrap命令
测试MyIsam表:
可以连接6446端口,创建一个MyIsam表,但是插入表数据时会报如下错误
ERROR: 3098 (HY000): ClassicSession.runSql: The table does not comply with the requirements by an external plugin.
修改表引擎为Innodb后,插入数据正常。
测试myrouter 6446读端口,某一个读实例down掉的,而后又恢复的情况:
测试mysqlrouter 读服务器的配置:
使用了一个简短的python代码:https://blog.csdn.net/eaglejiawo1120/article/details/84325854
将代码中的mockNum设置为20,端口设置为6447,执行结果如下:
[root@bogon mysql_5.7]# python mysql.py
Database port : 3330
Database port : 3320
Database port : 3330
Database port : 3320
Database port : 3330
Database port : 3320
Database port : 3330
Database port : 3320
Database port : 3330
Database port : 3320
Database port : 3330
Database port : 3320
Database port : 3330
Database port : 3320
Database port : 3330
Database port : 3320
Database port : 3330
Database port : 3320
Database port : 3330
可以看到请求被平均的分发到3320,3330两个读实例上。
将代码中的mockNum设置为20,端口设置为6446,执行结果如下:
CREATE TABLE t1 (c1 int(11) UNSIGNED NOT NULL AUTO_INCREMENT PRIMARY KEY, c2 TEXT NOT NULL);python mysql.py
Database port : 3310
Database port : 3310
Database port : 3310
Database port : 3310
Database port : 3310
Database port : 3310
Database port : 3310
Database port : 3310
Database port : 3310
Database port : 3310
Database port : 3310
Database port : 3310
Database port : 3310
Database port : 3310
Database port : 3310
Database port : 3310
Database port : 3310
Database port : 3310
Database port : 3310下来测试下关闭一个实例的情况。
#注意要连接6446,否则无法将将读实例移出cluster
mysqlsh --uri root@localhost:6446
MySQL  localhost:6446 ssl  JS > var cluster=dba.getCluster;
MySQL  localhost:6446 ssl  JS > cluster.removeInstance('root@localhost:3320');
MySQL  localhost:6446 ssl  JS > cluster.status();
经过以上操作,3320被移出cluster,正常再访问6447端口时,读到的应该都是3330实例,结果也是如此:
[root@bogon mysql_5.7]# python mysql.py
Database port : 3330
Database port : 3330
Database port : 3330
Database port : 3330
Database port : 3330
Database port : 3330
Database port : 3330
Database port : 3330
Database port : 3330
Database port : 3330
Database port : 3330
Database port : 3330
Database port : 3330
Database port : 3330
Database port : 3330
Database port : 3330
Database port : 3330
Database port : 3330
Database port : 3330
再讲3320实例加入cluster后,再次访问6447端口,发现连接被均匀的分配到3320和3330两个实例上,操作如下:
MySQL  localhost:6446 ssl  JS > cluster.addInstance('root@localhost:3320');
MySQL  localhost:6446 ssl  JS > cluster.status()
测试某一个写实例down掉的情况:
操作如下:
 MySQL  localhost:6446 ssl  JS > cluster.removeInstance('root@localhost:3310');
The instance will be removed from the InnoDB cluster. Depending on the
instance being the Seed or not, the Metadata session might become invalid.
If so, please start a new session to the Metadata Storage R/W instance.

The instance 'root@localhost:3310' was successfully removed from the cluster.

WARNING: The 'group_replication_start_on_boot' variable must be set to 'OFF' in the server configuration file, otherwise it might silently rejoin the cluster upon restart.


 MySQL  localhost:6446 ssl  JS > cluster.status();
Cluster.status: This function is not available through a session to a standalone instance (RuntimeError)

 MySQL  localhost:6446 ssl  JS > cluster.status()
Cluster.status: This function is not available through a session to a standalone instance (RuntimeError)

 MySQL  localhost:6446 ssl  JS > var cluster=dba.getCluster();
 MySQL  localhost:6446 ssl  JS > cluster.status()
{
    "clusterName": "testCluster",
    "defaultReplicaSet": {
        "name": "default",
        "primary": "localhost:3320",
        "ssl": "REQUIRED",
        "status": "OK_NO_TOLERANCE",
        "statusText": "Cluster is NOT tolerant to any failures.",
        "topology": {
            "localhost:3320": {
                "address": "localhost:3320",
                "mode": "R/W",
                "readReplicas": {},
                "role": "HA",
                "status": "ONLINE"
            },
            "localhost:3330": {
                "address": "localhost:3330",
                "mode": "R/O",
                "readReplicas": {},
                "role": "HA",
                "status": "ONLINE"
            }
        }
    },
    "groupInformationSourceMember": "mysql://root@localhost:6446"
}
可以发现将写实例移出后,首先需要重新获取cluser。并且 写实例由原来的3310飘向了3320实例。
综上。如果一个读实例或者一个写实例有问题,不会影响mysqlrouter对读写请求的处理。且mysqlrouter会根据实例的加入和离开做弹性伸缩匹配。但是在使用mysqlrouter的6446端口时,访问到的实例只是写实例. 使用mysqlrouter的6447端口时,访问到的实例只是读实例。
针对mysqlrouter的读写端口不一样的问题。可以在代码层修改来适配,但是改动量太大,而且不够灵活。
参考:
1. linux tar包安装: https://dev.mysql.com/doc/refman/5.7/en/binary-installation.html
2. mysql shell安装:https://dev.mysql.com/doc/refman/5.7/en/installing-mysql-shell-linux-quick.html
3. mysql innodb cluster安装:https://dev.mysql.com/doc/mysql-router/5.7/en/mysql-router-installation-linux.html
4. mysql sandbox沙箱安装,待研究。 https://mysqlsandbox.net/index.html
5. 恒丰银行:pxc vs mgr---https://cloud.tencent.com/developer/article/1054463
6. innodb cluster初步搭建:https://yq.aliyun.com/articles/285333
7, 组复制 vs 异步复制 vs 半复制
https://dev.mysql.com/doc/refman/5.7/en/group-replication-primary-secondary-replication.html
https://dev.mysql.com/doc/refman/5.7/en/group-replication-summary.html
https://www.aliyun.com/jiaocheng/1110788.html?spm=5176.100033.2.6.23014d54khv5bo
8. MGR对fault的认定:https://dev.mysql.com/doc/refman/5.7/en/group-replication-fault-tolerance.html
9.MGR性能参数: https://dev.mysql.com/doc/refman/5.7/en/group-replication-performance.html
10. mysql router using cluster 启动:https://dev.mysql.com/doc/refman/5.7/en/mysql-innodb-cluster-using-router.html


 122
122


 被折叠的 条评论
为什么被折叠?
被折叠的 条评论
为什么被折叠?
 到【灌水乐园】发言


