


顾名思义Camera就是拍照和录像的功能,像微信里面,我们想拍照传一下照片,就可以通过camera来拍照,然后存储照片,发送给好友。那么微信的app里面是不会直接通过camera api来实现的,因为系统一般都会有camera这个程序,那么直接调用camera app来实现拍照的功能不是很方便嘛,这里我们学习下。其实最终camera调用到android底层的是v4l2的接口,关于v4l2,还有android的camera的框架以后有机会再好好研究研究。
调用系统自带的camera需要用到intent,通过MediaStore获取照片路径,下面来试一下,新建工程CameraPictureTest,为layout添加代码如下:
<?xml version="1.0" encoding="utf-8"?>
<LinearLayout
    xmlns:android="http://schemas.android.com/apk/res/android"
    android:layout_width="match_parent"
    android:layout_height="match_parent"
    android:orientation="vertical"
    android:layout_margin="10dp">

    <ImageView
        android:id="@+id/picture"
        android:layout_width="wrap_content"
        android:layout_height="wrap_content"/>

    <Button
        android:id="@+id/take_photo"
        android:layout_width="match_parent"
        android:layout_height="wrap_content"
        android:text="拍照"/>

</LinearLayout>
编写代码如下:
package com.example.jared.camerapicturetest;

import android.content.Intent;
import android.graphics.Bitmap;
import android.graphics.BitmapFactory;
import android.net.Uri;
import android.os.Bundle;
import android.os.Environment;
import android.provider.MediaStore;
import android.support.v7.app.AppCompatActivity;
import android.view.View;
import android.widget.Button;
import android.widget.ImageView;

import java.io.File;
import java.io.FileNotFoundException;
import java.io.IOException;

public class MainActivity extends AppCompatActivity {

    public static final int TAKE_PHOTO = 1;
    public static final int CROP_PICTURE = 2;

    private Button takePhoto;
    private ImageView picture;
    private Uri imageUri;

    @Override
    protected void onCreate(Bundle savedInstanceState) {
        super.onCreate(savedInstanceState);
        setContentView(R.layout.activity_main);

        takePhoto = (Button)findViewById(R.id.take_photo);
        takePhoto.setOnClickListener(new myOnClickListener());

        picture = (ImageView)findViewById(R.id.picture);
        picture.setOnClickListener(new myOnClickListener());
    }

    private class myOnClickListener implements View.OnClickListener {
        @Override
        public void onClick(View view) {
            switch (view.getId()) {
                case R.id.take_photo:
                    setTakePhoto();
                    break;
                default:
                    break;
            }
        }
    }

    public void setTakePhoto() {
        File outputImage = new File(Environment.getExternalStorageDirectory(), "test.jpg");
        try {
            if(outputImage.exists()) {
                outputImage.delete();
            }
            outputImage.createNewFile();
        } catch (IOException e) {
            e.printStackTrace();
        }
        imageUri = Uri.fromFile(outputImage);
        Intent intent = new Intent(MediaStore.ACTION_IMAGE_CAPTURE);
        intent.putExtra(MediaStore.EXTRA_OUTPUT, imageUri);
        startActivityForResult(intent, TAKE_PHOTO);
    }

    @Override
    protected void onActivityResult(int requestCode, int resultCode, Intent data) {
        super.onActivityResult(requestCode, resultCode, data);
        switch (requestCode) {
            case TAKE_PHOTO:
                if(resultCode == RESULT_OK) {
                    Intent intent1 = new Intent("com.android.camera.action.CROP");
                    intent1.setDataAndType(imageUri, "image/*");
                    intent1.putExtra("scale", true);
                    intent1.putExtra(MediaStore.EXTRA_OUTPUT, imageUri);
                    startActivityForResult(intent1, CROP_PICTURE);
                }
                break;
            case CROP_PICTURE:
                if(resultCode == RESULT_OK) {
                    try {
                        Bitmap bitmap = BitmapFactory.decodeStream(getContentResolver()
                                .openInputStream(imageUri));
                        picture.setImageBitmap(bitmap);
                    } catch (FileNotFoundException e) {
                        e.printStackTrace();
                    }
                }
                break;
            default:
                break;
        }
    }
}
这里首先确定了保存的路径为根目录下的test.jpg,然后通过intent,传入这个路径的Uri,打开相机进行拍照,这里有对拍照的返回,如果返回成功,那么就调用CROP的功能对照片进行裁剪,进入到裁减后返回成功就把图片显示在layout创建的ImageView中。
具体需要真机显示,这里再插播一段关于真机屏幕在mac电脑上的显示,具体可以参考这篇文章,将你的安卓手机屏幕共享到PC或Mac上。通过一个chrome的Vysor插件来实现,需要android的5.0以上的版本才可以。
好了,下面看下显示的效果:
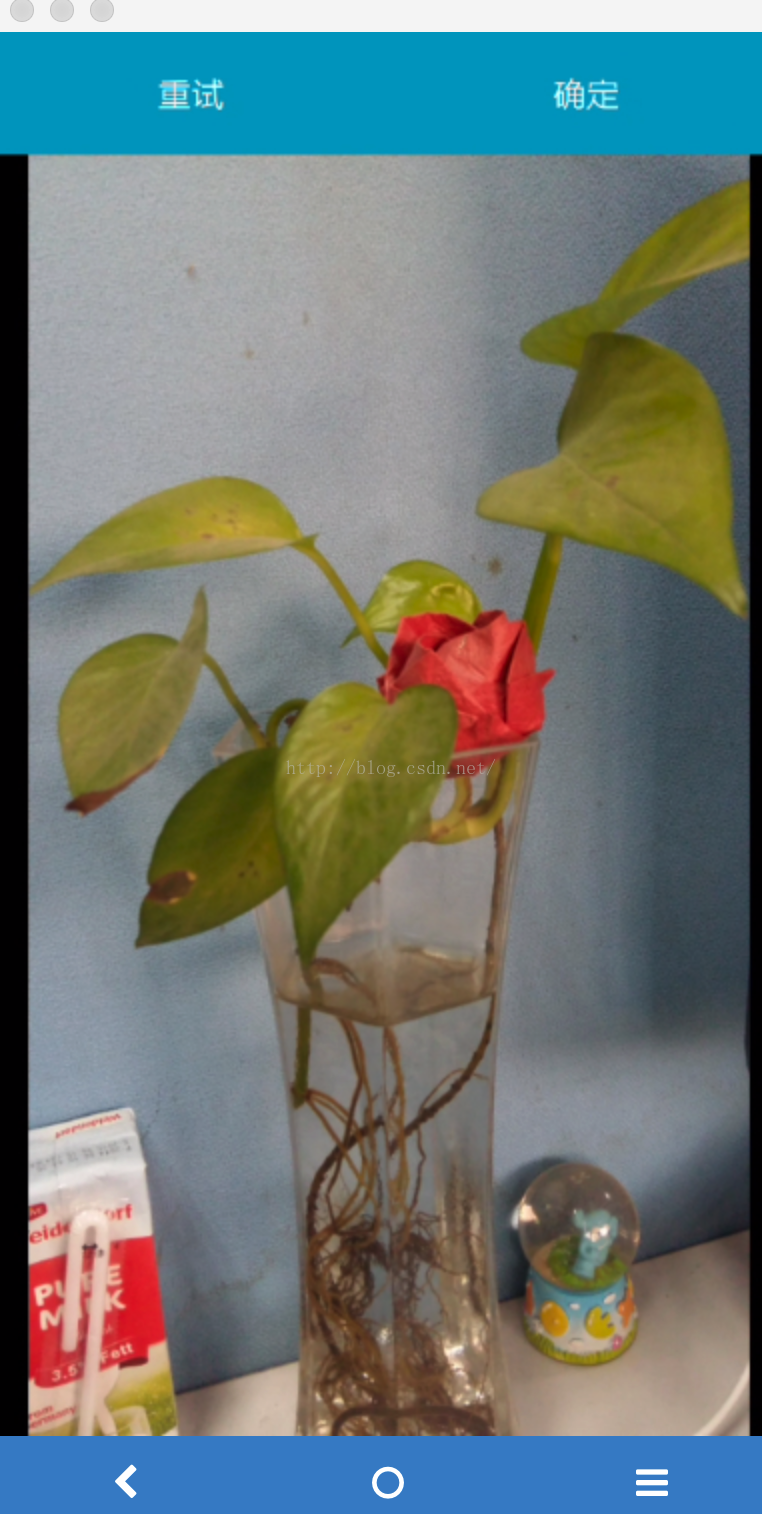


效果基本上出来了,很不错的插件。微信里面很多不是直接拍照发送的,还有通过选择相册的图片,已经拍好的照片来发送图片的,那么接着我们来实现这个功能,首先layout添加了choosephoto:
<?xml version="1.0" encoding="utf-8"?>
<LinearLayout
    xmlns:android="http://schemas.android.com/apk/res/android"
    android:layout_width="match_parent"
    android:layout_height="match_parent"
    android:orientation="vertical"
    android:layout_margin="10dp">

    <ImageView
        android:id="@+id/picture"
        android:layout_width="wrap_content"
        android:layout_height="wrap_content"/>

    <Button
        android:id="@+id/take_photo"
        android:layout_width="match_parent"
        android:layout_height="wrap_content"
        android:text="拍照"/>

    <Button
        android:id="@+id/choose_photo"
        android:layout_width="match_parent"
        android:layout_height="wrap_content"
        android:text="选取照片"/>
</LinearLayout>
接着修改MainActivity代码如下:
package com.example.jared.camerapicturetest;

import android.content.Intent;
import android.graphics.Bitmap;
import android.graphics.BitmapFactory;
import android.net.Uri;
import android.os.Bundle;
import android.os.Environment;
import android.provider.MediaStore;
import android.support.v7.app.AppCompatActivity;
import android.view.View;
import android.widget.Button;
import android.widget.ImageView;

import java.io.File;
import java.io.FileNotFoundException;
import java.io.IOException;

public class MainActivity extends AppCompatActivity {

    public static final int TAKE_PHOTO = 1;
    public static final int CROP_PICTURE = 2;

    private Button takePhoto;
    private Button choosePhoto;
    private ImageView picture;
    private Uri imageUri;

    @Override
    protected void onCreate(Bundle savedInstanceState) {
        super.onCreate(savedInstanceState);
        setContentView(R.layout.activity_main);

        takePhoto = (Button)findViewById(R.id.take_photo);
        takePhoto.setOnClickListener(new myOnClickListener());

        choosePhoto = (Button)findViewById(R.id.choose_photo);
        choosePhoto.setOnClickListener(new myOnClickListener());

        picture = (ImageView)findViewById(R.id.picture);
        picture.setOnClickListener(new myOnClickListener());
    }

    private class myOnClickListener implements View.OnClickListener {
        @Override
        public void onClick(View view) {
            switch (view.getId()) {
                case R.id.take_photo:
                    setTakePhoto();
                    break;
                case R.id.choose_photo:
                    setChoosePhoto();
                default:
                    break;
            }
        }
    }

    public void setChoosePhoto() {
        File outputImage1 = new File(Environment.getExternalStorageDirectory(), "test1.jpg");
        try {
            if(outputImage1.exists()) {
                outputImage1.delete();
            }
            outputImage1.createNewFile();
        } catch (IOException e) {
            e.printStackTrace();
        }
        imageUri = Uri.fromFile(outputImage1);
        Intent intent1 = new Intent("android.intent.action.GET_CONTENT");
        intent1.setType("image/*");
        intent1.putExtra("crop", true);
        intent1.putExtra("scale", true);
        intent1.putExtra(MediaStore.EXTRA_OUTPUT, imageUri);
        startActivityForResult(intent1, CROP_PICTURE);

    }

    public void setTakePhoto() {
        File outputImage = new File(Environment.getExternalStorageDirectory(), "test.jpg");
        try {
            if(outputImage.exists()) {
                outputImage.delete();
            }
            outputImage.createNewFile();
        } catch (IOException e) {
            e.printStackTrace();
        }
        imageUri = Uri.fromFile(outputImage);
        Intent intent = new Intent(MediaStore.ACTION_IMAGE_CAPTURE);
        intent.putExtra(MediaStore.EXTRA_OUTPUT, imageUri);
        startActivityForResult(intent, TAKE_PHOTO);
    }

    @Override
    protected void onActivityResult(int requestCode, int resultCode, Intent data) {
        super.onActivityResult(requestCode, resultCode, data);
        switch (requestCode) {
            case TAKE_PHOTO:
                if(resultCode == RESULT_OK) {
                    Intent intent1 = new Intent("com.android.camera.action.CROP");
                    intent1.setDataAndType(imageUri, "image/*");
                    intent1.putExtra("scale", true);
                    intent1.putExtra(MediaStore.EXTRA_OUTPUT, imageUri);
                    startActivityForResult(intent1, CROP_PICTURE);
                }
                break;
            case CROP_PICTURE:
                if(resultCode == RESULT_OK) {
                    try {
                        Bitmap bitmap = BitmapFactory.decodeStream(getContentResolver()
                                .openInputStream(imageUri));
                        picture.setImageBitmap(bitmap);
                    } catch (FileNotFoundException e) {
                        e.printStackTrace();
                    }
                }
                break;
            default:
                break;
        }
    }
}
基本上和拍照也差不多,然后我们运行下看看效果:

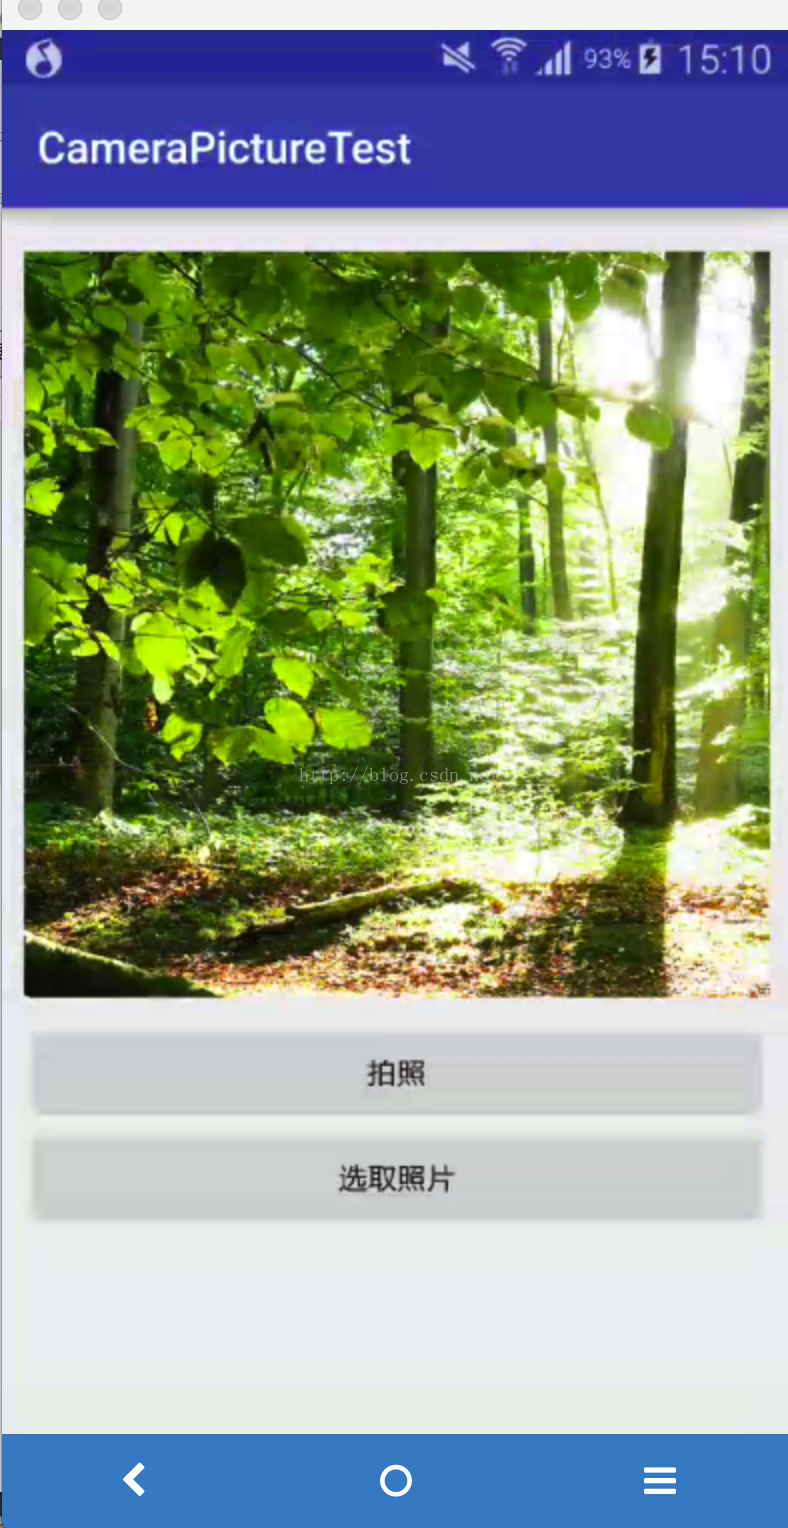
点击选择照片按钮,我们会进入到相册的app里面,然后选择一张照片,然后裁剪后保存,如上图所示。
附:参考《第一行代码》


 9564
9564


 被折叠的 条评论
为什么被折叠?
被折叠的 条评论
为什么被折叠?
 到【灌水乐园】发言


