


【VirtualBox】 共享文件夹和复制粘贴功能。
创建共享文件夹
-
在【VirtualBox】->【设置】->【常规】->【高级】->【共享粘贴板】选择“双向”->【拖放】选择“双向”

-
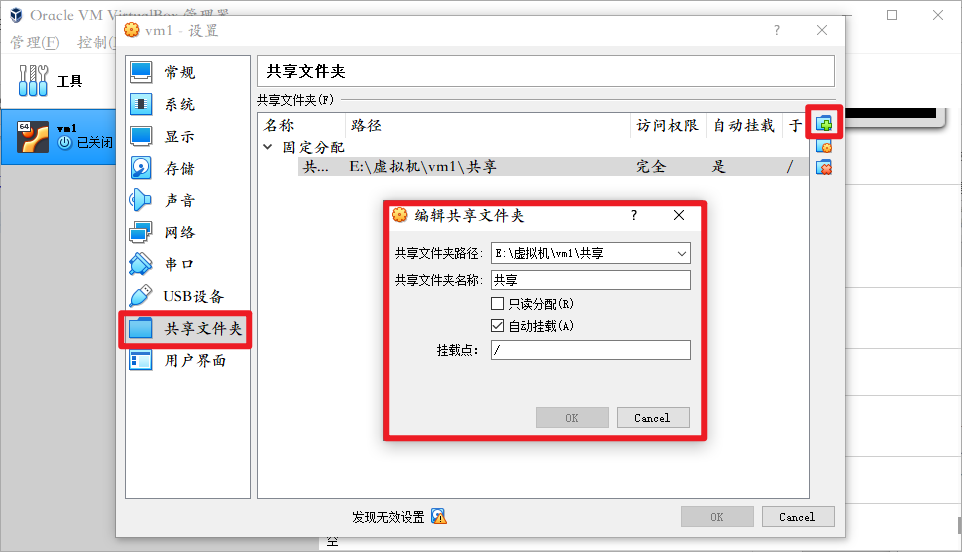
在【VirtualBox】->【设置】->【共享文件夹】
设置一下共享文件夹在主机的位置和名字。注意,我上面名字起的是“共享”,但是名字最好起英文,如果一进去就下载各种输入法的话。比如我现在把文件夹名字更改为“share”。注意下文要用。
-
建立虚拟机共享文件夹
- 进入虚拟机后,打开终端,输入
mkdir share_dir - 查看是否创建成功
ls -ld share_dir - 将共享文件夹挂载
sudo mount -t vboxsf share share_dir(share是主机文件夹的名字,share_dir是虚拟机文件夹的名称),然后如果没有报错,share_dir已经出现在桌面上。 - 如果遇到
/sbin/mount.vboxsf: mounting failed with the error: Invalid argument问题,先检查一下主机文件夹是不是输入正确。回到VirtualBox的设置页面查看一下。
- 进入虚拟机后,打开终端,输入
安装增强功能
在虚拟机中【菜单栏】->【设备】->【安装增强功能】
报错0:
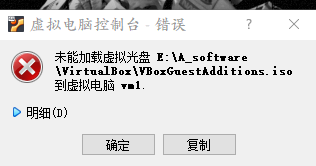 1. 查看自己虚拟机桌面是否有光盘小图标,如果有,则【右键】->【弹出】,然后安装增强功能 2. 如果没有,到【virtualBox管理器】-【设置】-【存储】-【存储介质(SATA)】,右边有两个光盘的小图标,点左边那个,加入VBoxGuestAdditions.iso。然后安装增强功能。
报错1:
Installing additional modules ...
VirtualBox Guest Additions: Starting.
VirtualBox Guest Additions: Building the VirtualBox Guest Additions ker nel
modules. This may take a while.
VirtualBox Guest Additions: To build modules for other installed kernel s, run
VirtualBox Guest Additions:
/sbin/rcvboxadd quicksetup <version> VirtualBox Guest Additions: or
VirtualBox Guest Additions:
/sbin/rcvboxadd quicksetup all
VirtualBox Guest Additions: Building the modules for kernel 6.2.0-33-ge neric.
This system is currently not set up to build kernel modules. Please install the gcc make perl packages from your distribution.
VirtualBox Guest Additions: Running kernel modules will not be replaced until
the system is restarted
Press Return to close this window...
错误原因:
这个提示意味着系统当前没有配置好以构建内核模块。您需要从您的发行版安装 gcc、make 和 perl 软件包,以便设置系统以构建内核模块。
解决方法:需要先下载一下包。
sudo apt-get install gcc make perl
报错2
错误:26 http://cn.archive.ubuntu.com/ubuntu focal/universe amd64 libz3-dev amd64 4.8.7-4build1
无法发起与 cn.archive.ubuntu.com:80 (2001:67c:1562::18) 的连接 - connect (101: 网络不可达) 无法发起与 cn.archive.ubuntu.com:80 (2001:67c:1562::15) 的连接 - connect (101: 网络不可达)
错误:27 http://cn.archive.ubuntu.com/ubuntu focal-updates/universe amd64 llvm-11-dev amd64 1:11.0.0-2~ubuntu20.04.1
无法发起与 cn.archive.ubuntu.com:80 (2001:67c:1562::18) 的连接 - connect (101: 网络不可达) 无法发起与 cn.archive.ubuntu.com:80 (2001:67c:1562::15) 的连接 - connect (101: 网络不可达)
错误:7 http://cn.archive.ubuntu.com/ubuntu focal-updates/universe amd64 clang-11-doc all 1:11.0.0-2~ubuntu20.04.1
无法发起与 cn.archive.ubuntu.com:80 (2001:67c:1562::18) 的连接 - connect (101: 网络不可达) 无法发起与 cn.archive.ubuntu.com:80 (2001:67c:1562::15) 的连接 - connect (101: 网络不可达)
错误原因:是下载源需要替换。(用了梯子也无法解决,所以直接替换源)
解决方法:下载vim,打开源的文件
sudo apt-get install vim
sudo vim /etc/apt/sources.list
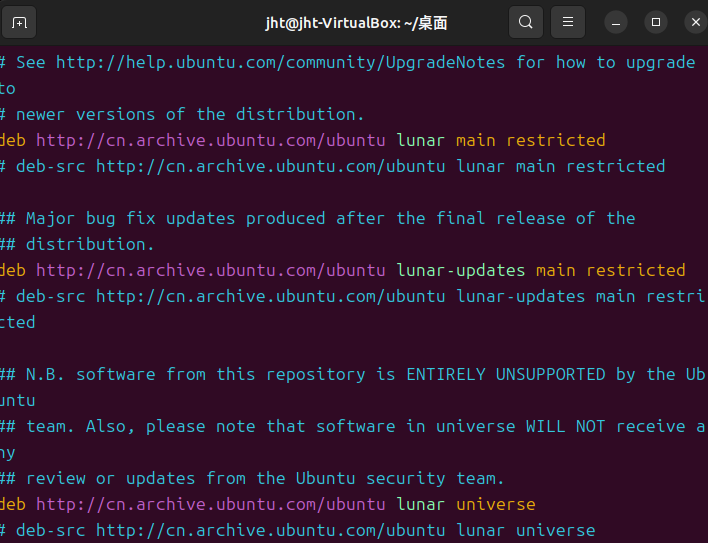
将其中http://cn.archive.ubuntu.com和http://security.ubuntu.com/ubuntu全部替换成阿里源 http://mirrors.aliyun.com
然后再次尝试:
sudo apt-get install gcc make perl
报错3:
W: 目标 Translations (multiverse/i18n/Translation-zh_CN) 在 /etc/apt/sources.lis t:34 和 /etc/apt/sources.list:71 中被配置了多次
W: 目标 Translations (multiverse/i18n/Translation-zh) 在 /etc/apt/sources.list:3 4 和 /etc/apt/sources.list:71 中被配置了多次
W: 目标 Translations (multiverse/i18n/Translation-en) 在 /etc/apt/sources.list:3 4 和 /etc/apt/sources.list:71 中被配置了多次
W:目标 DEP-11 (multiverse/dep11/Components-amd64.yml) 在 /etc/apt/sources.list: 34 和 /etc/apt/sources.list:71 中被配置了多次
W:目标 DEP-11(multiverse/dep11/Components-all.yml) 在 /etc/apt/sources.list:34 和/etc/apt/sources.list:71 中被配置了多次
W: 目标 DEP-11-icons-small (multiverse/dep11/icons-48x48.tar) 在 /etc/apt/source s.list:34 和 /etc/apt/sources.list:71 中被配置了多次
W:目标 DEP-11-icons (multiverse/dep11/icons-64x64.tar) 在 /etc/apt/sources.list :34 和 /etc/apt/sources.list:71 中被配置了多次
W: 目标 DEP-11-icons-hidpi (multiverse/dep11/icons-64x64@2.tar)在/etc/apt/sour ces.list:34 和 /etc/apt/sources.list:71 中被配置了多次
W:目标 CNF (multiverse/cnf/Commands-amd64)在/etc/apt/sources.list:34和/etc/ apt/sources.list:71 中被配置了多次
W:目标 CNF (multiverse/cnf/Commands-all) 在 /etc/apt/sources.list:34 和 /etc/ap t/sources.list:71 中被配置了多次
E:无法定位软件包 gcc
E:软件包 make 没有可安装候选
错误原因:上面说34和71行配置多次。
解决方法:注释掉两行中一行。
报错4
没有可用的软件包 make,但是它被其它的软件包引用了。这可能意味着这个缺失的软件包可能已被废弃,
或者只能在其他发布源中找到E:无法定位软件包 gcc
E:软件包 make 没有可安装候选
错误原因:修改完sources.list,没有更新。
解决方法:每次修改sources.list,需要对系统安装包进行更新,sudo apt-get update。
之后再执行sudo apt-get install gcc make perl
报错5
有一些软件包无法被安装。如果您用的是 unstable 发行版,这也许是
因为系统无法达到您要求的状态造成的。该版本中可能会有一些您需要的软件包尚未被创建或是它们已被从新到(Incoming)目录移出。
下列信息可能会对解决问题有所帮助:下列软件包有未满足的依赖关系:
gcc:依赖:cpp(=4:9.3.0-1ubuntu2)但是 4:12.2.0-3ubuntu1 正要被安装
推荐:libc6—dev 但是它将不会被安装 或
libc-dev
E:无法修正错误,因为您要求某些软件包保持现状,就是它们破坏了软件包间的依赖关系
错误原因:版本冲突,不能直接安装最新版本gcc,需要安装gcc4.9版本。
解决方法:安装gcc4.9。
当然了,直接安装4.9版本会说找不到这个老版本。阿里源里面的比较新,所以需要在sources.list文件中添加两行:
deb http://dk.archive.ubuntu.com/ubuntu/ xenial main
deb http://dk.archive.ubuntu.com/ubuntu/ xenial universe
然后
sudo apt-get update
sudo apt-get install gcc-4.9
报错6
错误:……由于没有公钥,无法验证下列签名:xxxxx
解决方法:添加公钥
sudo apt-key adv --keyserver hkp://keyserver.ubuntu.com:80 --recv-keys xxxxx
xxxx是报错中的公钥
然后重新执行:
sudo apt-get update
sudo apt-get install gcc-4.9 make perl
报错7:
明明安装了gcc成功了,但是终端窗口测试gcc的时候gcc -v却说找不到命令gcc。
找了很久才发现,还是源的问题。ubuntu的版本不一样,源也不一样。
首先使用lsb_release -a命令,查看自己的版本。
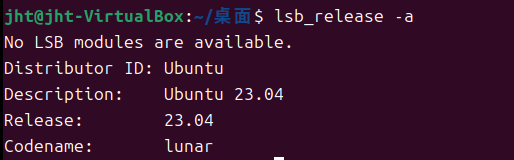
关注codename,我的是lunar。有些人是focal或者bionic,jammy。
所以我得找lunar源。
https://blog.csdn.net/yinminsumeng/article/details/128625827
这篇博客中有所有源的推荐。
!!!所以,这才是正确的解法。
用正确的源安装,根本不会出现gcc版本问题提示,不用安装那个破4.9版本,不用添加破公钥,不会安装gcc还说找不到gcc命令。
然后重新执行【安装增强版本】就好了。
报错8
VirtualBox Guest Additions: Look at /var/log/vboxadd-setup.log to find out what went wrong
VirtualBox Guest Additions: Running kernel modules will not be replaced until the system is restarted
Press Return to close this window...
看起来在安装VirtualBox Guest Additions时出现了问题。可以查看位于“/var/log/vboxadd-setup.log”文件中的详细信息以了解错误的原因。
错误日志中是这样的:
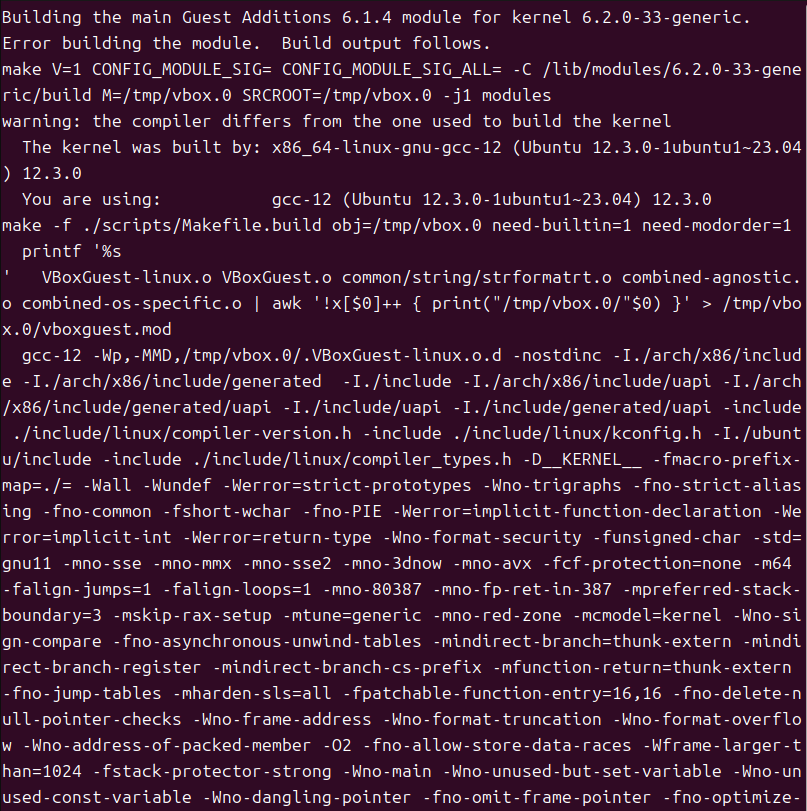
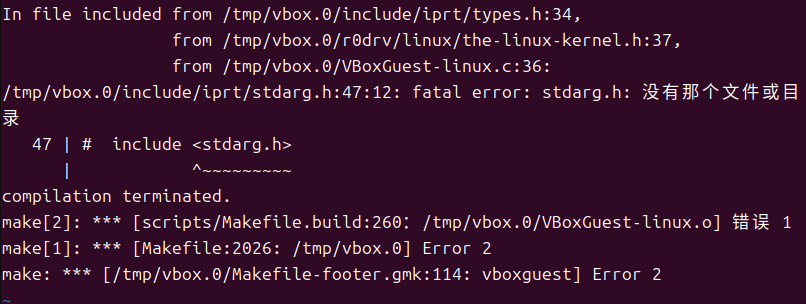
最主要的原因还是在前面几行:
Building the main Guest Additions 6.1.4 module for kernel 6.2.0-33-generic. Error building the module. Build output follows.
make V=1 CONFIG_MODULE_SIG= CONFIG_MODULE_SIG_ALL=-C/lib/modules/6.2.0-33-gene ric/build M=/tmp/vbox.0 SRCROOT=/tmp/vbox.0 -j1 modules
warning: the compiler differs from the one used to build the kernel
The kernel was built by: x86_64-linux-gnu-gcc-12 (Ubuntu 12.3.0-1ubuntu1~23.04 )12.3.0
You are using:
gcc-12 (Ubuntu 12.3.0-1ubuntu1~23.04) 12.3.0
make -f./scripts/Makefile.build obj=/tmp/vbox.0 need-builtin=1 need-modorder=1 printf '%s
VBoxGuest-linux.o VBoxGuest.o common/string/strformatrt.o combined-agnostic. o combined-os-specific.o | awk '!x[$0]#+ { print("/tmp/vbox.0/"$0) }' > /tmp/vbo x.0/vboxguest.mod
gcc-12 -Wp,-MMD,/tmp/vbox.0/.VBoxGuest-linux.o.d -nostdinc-I./arch/x86/includ e -I./arch/x86/include/generated -I./include-I./arch/x86/include/uapi-I./arch /x86/include/generated/uapi-I./include/uapi-I./include/generated/uapi-include ./include/linux/compiler-version.h-include./include/linux/kconfig.h-I./ubunt u/include -include./include/linux/compiler_types.h-D_KERNEL_-fmacro-prefix- map=./= -Wall -Wundef -Werror=strict-prototypes -Wno-trigraphs -fno-strict-alias ing -fno-common -fshort-wchar -fno-PIE -Werror=implicit-function-declaration-We rror=implicit-int -Werror=return-type -Wno-format-security -funsigned-char -std= gnu11 -mno-sse -mno-mmx -mno-sse2 -mno-3dnow -mno-avx -fcf-protection=none -m64
错误原因:安装的gcc版本与内核版本不符
内核:x86_64-linux-gnu-gcc-12
我安装的:gcc-12
报错8
This system is currently not set up to build kernel modules. Please install the gcc make perl packages from your distribution.
VirtualBox Guest Additions: Running kernel modules will not be replaced until the system is restarted
Press Return to close this window...
错误原因:关于 VirtualBox Guest Additions,正在运行的内核模块在系统重新启动之前不会被替换。请按回车键关闭当前窗口,并在重新启动系统后应用更改以应用 VirtualBox Guest Additions。
如果确定已经安装了gcc,make,perl。那就重启一下虚拟机。
结束
好,到这一步基本可以了。还是不行直接卸载,用VMware吧,死亡笑脸.jpg。


 632
632


 被折叠的 条评论
为什么被折叠?
被折叠的 条评论
为什么被折叠?
 到【灌水乐园】发言


