


目录
1.@MapperScan("com.example.*.mapper")
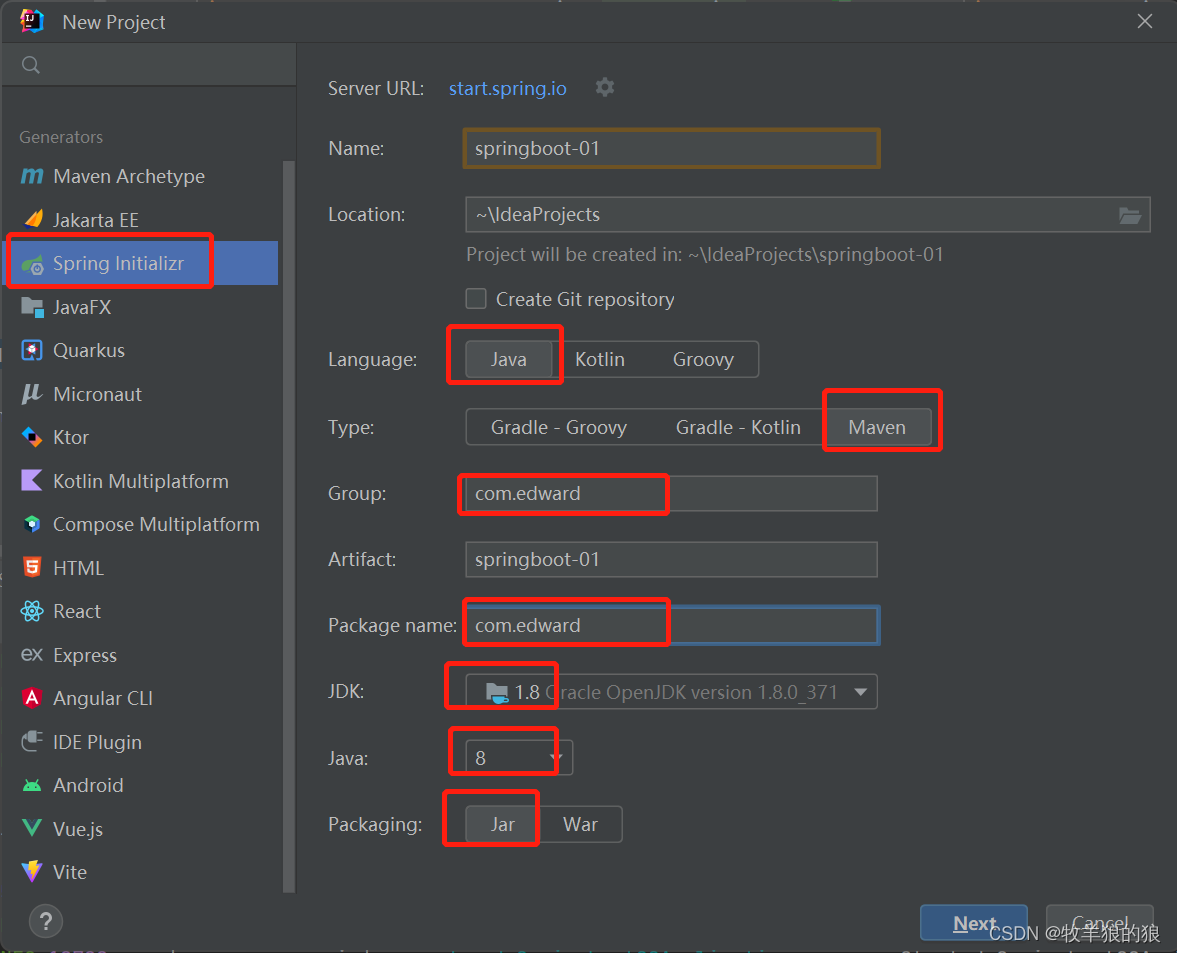
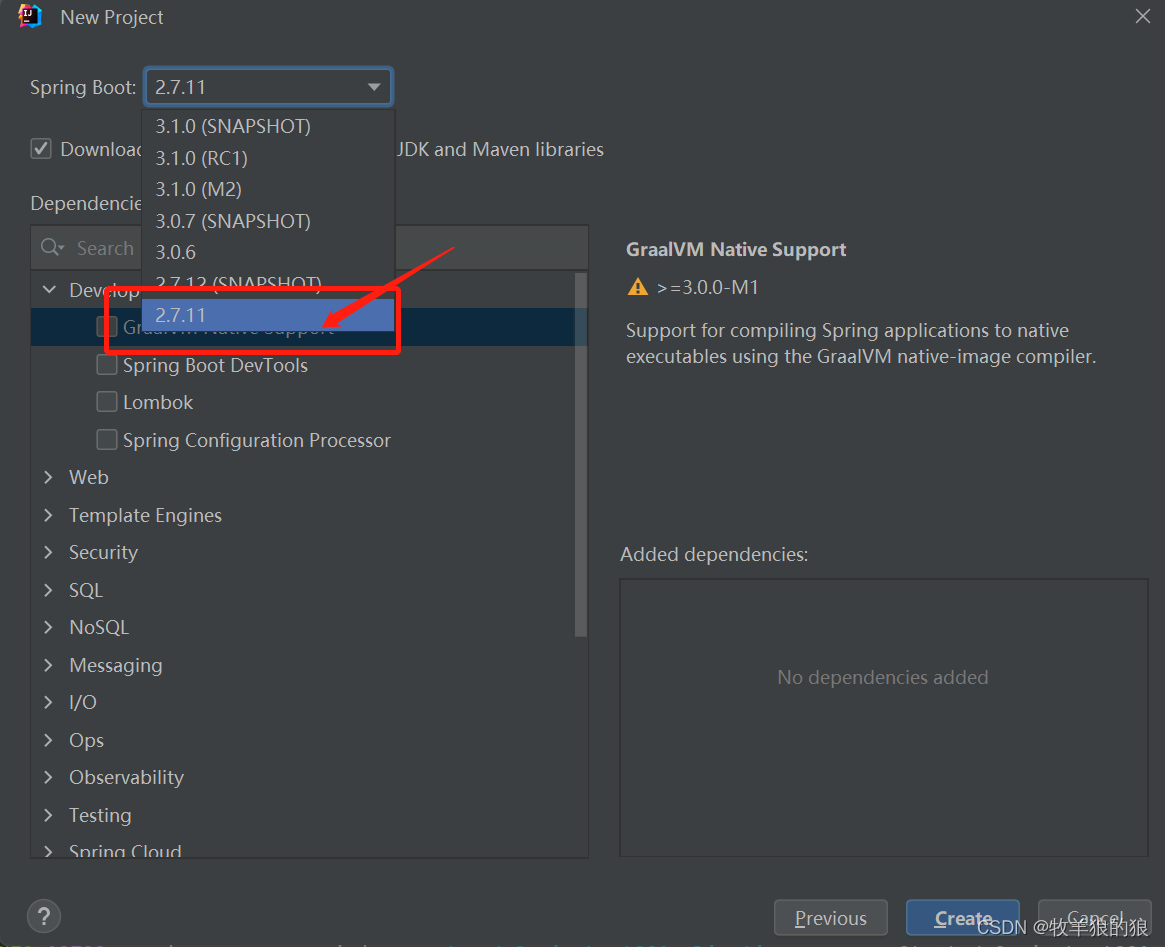
一、创建项目
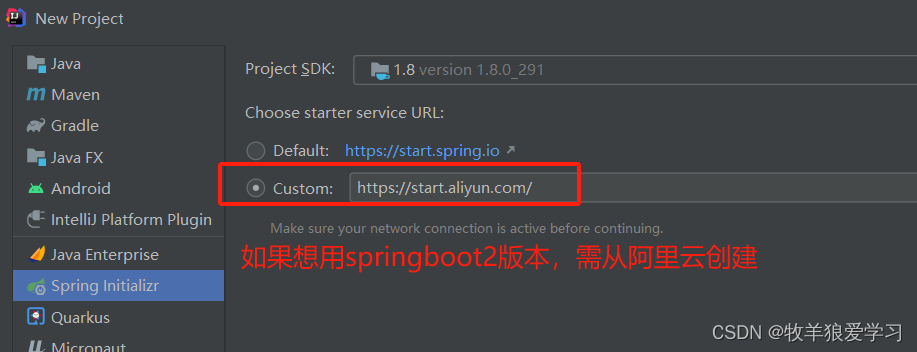
(阿里云地址: https://start.aliyun.com/ )
注意:springboot3版本,需要Java17及以上;springboot2版本一般用Java1.8。
二、配置 pom.xml 依赖文件
<?xml version="1.0" encoding="UTF-8"?>
<project xmlns="http://maven.apache.org/POM/4.0.0" xmlns:xsi="http://www.w3.org/2001/XMLSchema-instance"
xsi:schemaLocation="http://maven.apache.org/POM/4.0.0 https://maven.apache.org/xsd/maven-4.0.0.xsd">
<modelVersion>4.0.0</modelVersion>
<parent>
<groupId>org.springframework.boot</groupId>
<artifactId>spring-boot-starter-parent</artifactId>
<version>2.6.13</version>
<relativePath/> <!-- lookup parent from repository -->
</parent>
<groupId>com.edward</groupId>
<artifactId>demo-takeout</artifactId>
<version>0.0.1-SNAPSHOT</version>
<name>demo-takeout</name>
<description>demo-takeout</description>
<properties>
<java.version>1.8</java.version>
</properties>
<dependencies>
<dependency>
<groupId>org.springframework.boot</groupId>
<artifactId>spring-boot-starter</artifactId>
</dependency>
<dependency>
<groupId>org.springframework.boot</groupId>
<artifactId>spring-boot-starter-web</artifactId>
</dependency>
<dependency>
<groupId>org.springframework.boot</groupId>
<artifactId>spring-boot-starter-test</artifactId>
<scope>test</scope>
</dependency>
<dependency>
<groupId>com.baomidou</groupId>
<artifactId>mybatis-plus-boot-starter</artifactId>
<version>3.5.3</version>
</dependency>
<dependency>
<groupId>mysql</groupId>
<artifactId>mysql-connector-java</artifactId>
<version>8.0.32</version>
</dependency>
<dependency>
<groupId>org.freemarker</groupId>
<artifactId>freemarker</artifactId>
<version>2.3.32</version>
</dependency>
<dependency>
<groupId>org.projectlombok</groupId>
<artifactId>lombok</artifactId>
<optional>true</optional>
</dependency>
</dependencies>
<build>
<plugins>
<plugin>
<groupId>org.springframework.boot</groupId>
<artifactId>spring-boot-maven-plugin</artifactId>
</plugin>
<plugin>
<groupId>org.apache.maven.plugins</groupId>
<artifactId>maven-surefire-plugin</artifactId>
<version>2.5</version>
<configuration>
<skip>true</skip>
</configuration>
</plugin>
</plugins>
<resources>
<resource>
<directory>src/main/resources</directory>
<includes>
<include>**/*.yml</include>
<include>**/*.xml</include>
</includes>
<filtering>true</filtering>
</resource>
<resource>
<directory>src/main/java</directory>
<includes>
<include>**/*.yml</include>
<include>**/*.xml</include>
</includes>
<filtering>true</filtering>
</resource>
</resources>
</build>
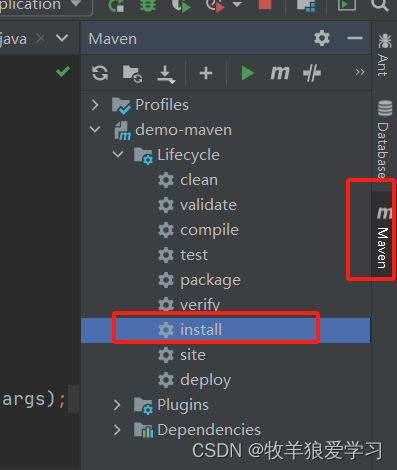
</project>三、设置 maven,下载依赖

配置好后点击 install 安装依赖
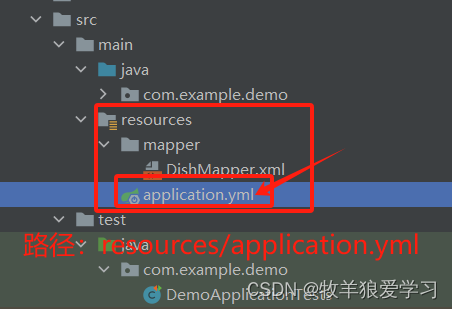
四、配置 application.yml
server:
  port: 8888
spring:
  datasource:
    username: root
    password: 8888888
    url: jdbc:mysql://localhost:3306/sky_take_out?serverTimezone=GMT%2B8&characterEncoding=utf-8&useSSL=false
    driver-class-name: com.mysql.cj.jdbc.Driver
mybatis-plus:
  type-aliases-package: com.example.demotakeout.entity
  mapper-locations: classpath:mybatis/*.xml
五、主启动类中,添加注解
1.@MapperScan("com.example.*.mapper")
2.@Configration
注意:启动类的层级!!!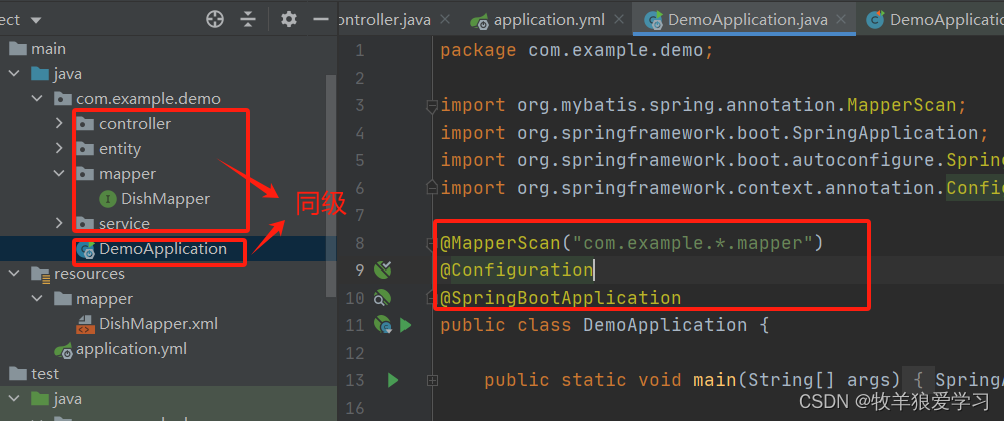
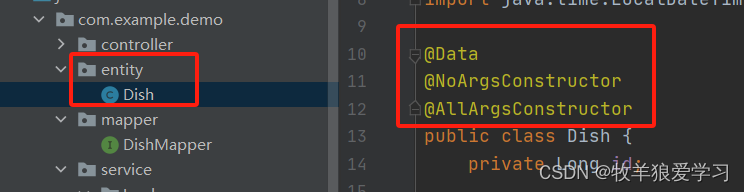
六、编写代码
1. entity
2. mapper
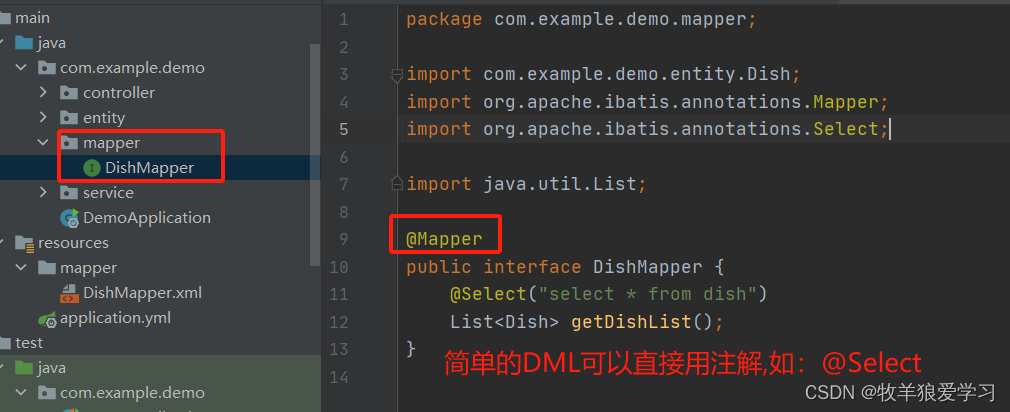
如果启动类中没有添加@MapperScan注解,则Mapper中需要添加 @Repository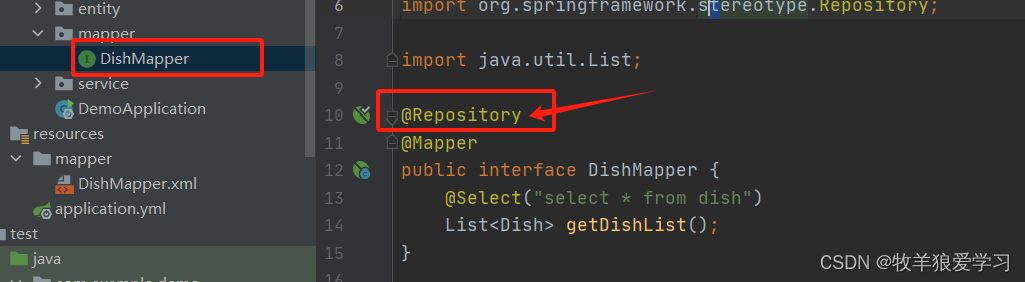
DishMapper.xml:
<!DOCTYPE mapper
PUBLIC "-//mybatis.org//DTD Mapper 3.0//EN"
"http://mybatis.org/dtd/mybatis-3-mapper.dtd">
<!--namespace 绑定一个对应的Mapper接口-->
<mapper namespace="com.example.demotakeout.mapper.DishMapper">
<select id="list" resultType="Dish">
select * from dish
</select>
<insert id="insertOne" parameterType="Dish">
insert into dish(name, category_id, price, image, description, status, create_time, create_user, update_time, update_user)
values
(#{name},#{categoryId},#{price},#{image},#{description},#{status},#{createTime},#{createUser},#{updateTime},#{updateUser})
</insert>
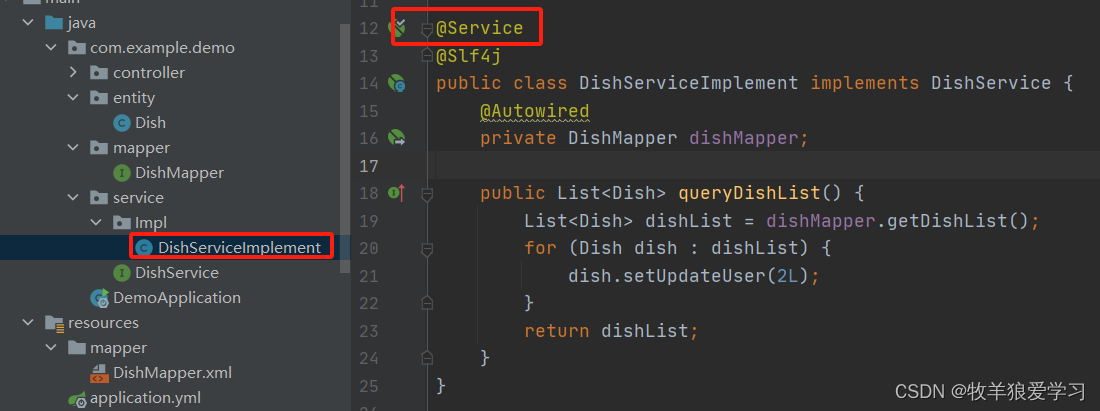
</mapper>3. service
注意:(@service注解写在实现类中,而不是interface中!!!)
4. controller

[代码]:
package com.edward.system.controller;

import com.edward.system.entity.User;
import com.edward.system.service.impl.UserServiceImpl;
import org.springframework.beans.factory.annotation.Autowired;
import org.springframework.stereotype.Service;
import org.springframework.web.bind.annotation.GetMapping;
import org.springframework.web.bind.annotation.RequestMapping;
import org.springframework.stereotype.Controller;
import org.springframework.web.bind.annotation.RestController;

import java.util.List;

@RestController
@RequestMapping("/system/user")
public class UserController {

    @Autowired
    private UserServiceImpl userServiceImpl;


    @GetMapping("/hello")
    public String hello() {
        return "你好,世界";
    }

    @GetMapping("/all")
    public List<User> getAllUser() {
        List<User> userList = userServiceImpl.list();
        return userList;
    }
}
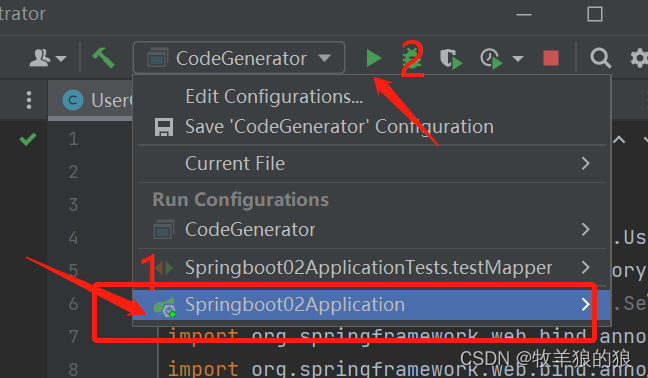
七、选择application类, 点击运行
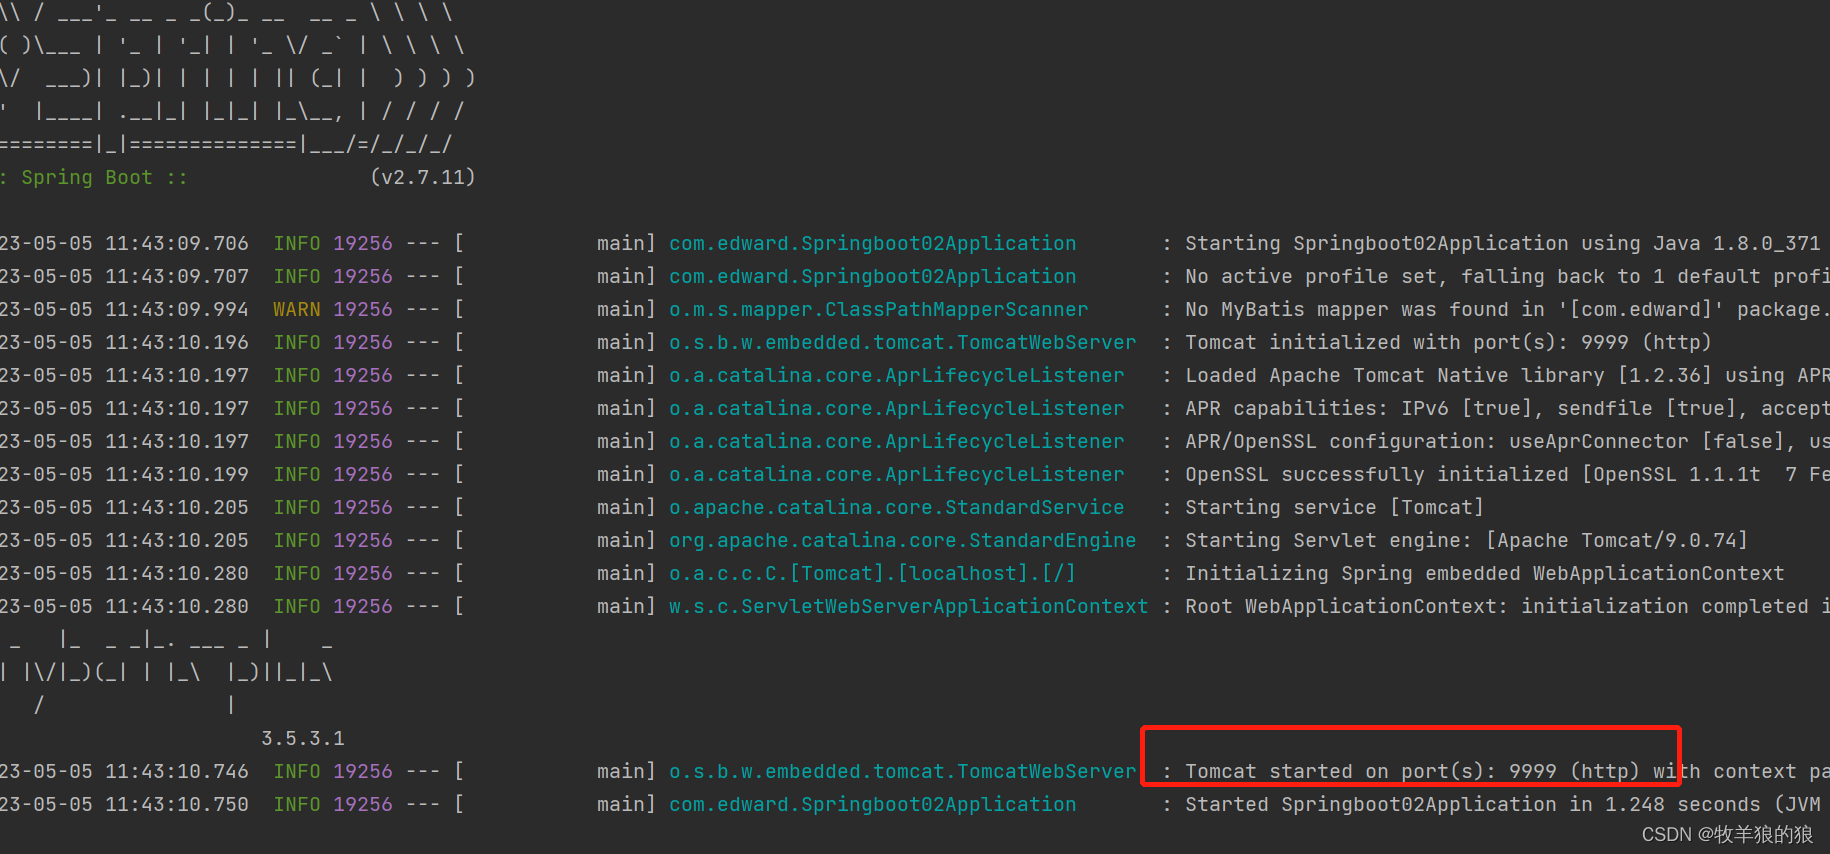
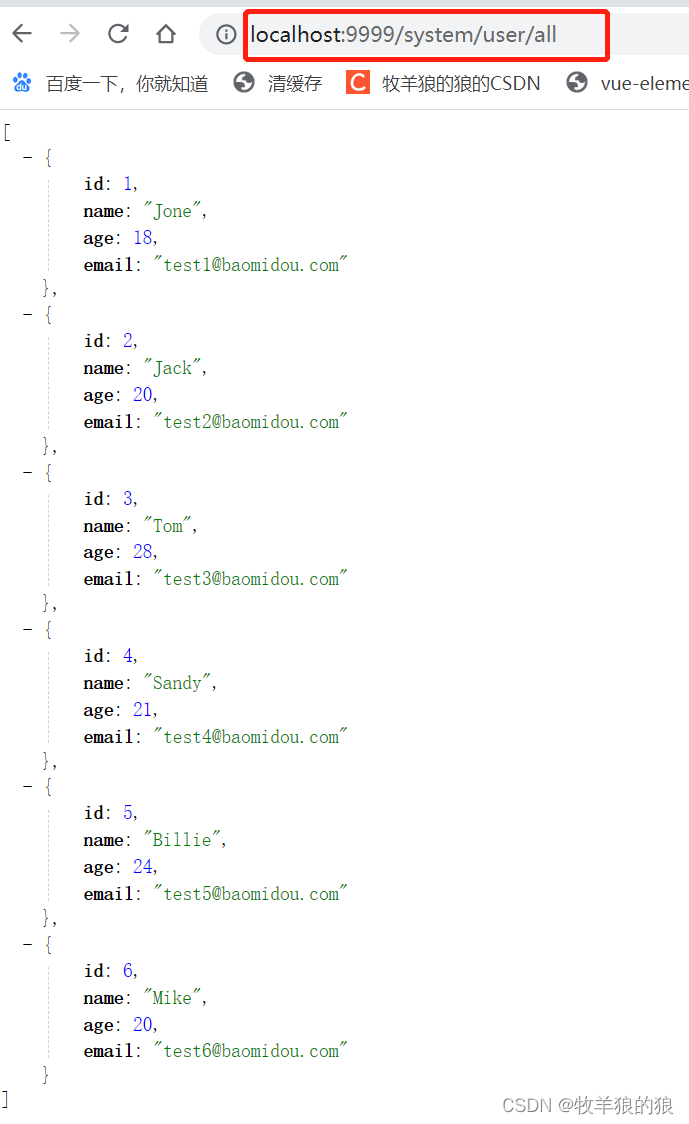
控制台上出现下方log时,表示在 localhost:9999 上启动成功:
访问页面:
八、搭建项目遇到的坑
1. springboot3以上,要求jdk17及以上;
2. 建好项目后,点开setting—>maven,手动更改maven为阿里云,并选择本地maven中相应的配置文件和仓库;
3. 点击install进行依赖项下载;
4. 下载完毕后显示build success,但是启动类和test类里都没有启动按钮,原因:注解未生效;
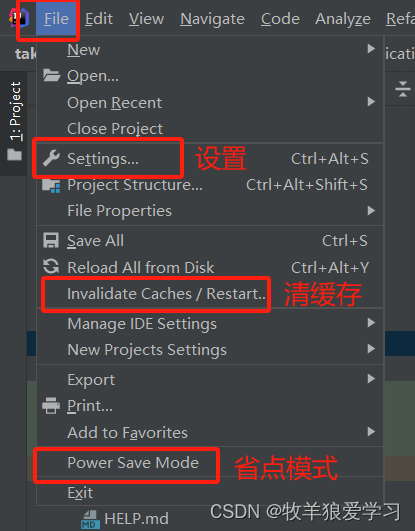
5. 注解不生效原因:idea调为了省电模式;
6. 关掉省电模式:Power Save Mode;
7. 彻底清除缓存并重启:file -> Invalidate Caches/Restart;
8. 点击启动按钮后服务未正常启动原因:约定大于配置,启动类里没有@configuration注解,要yml配置文件等目录要放在规定好的层级里;
9. 没有查出数据原因:@service注解在实现类,而不是interface里
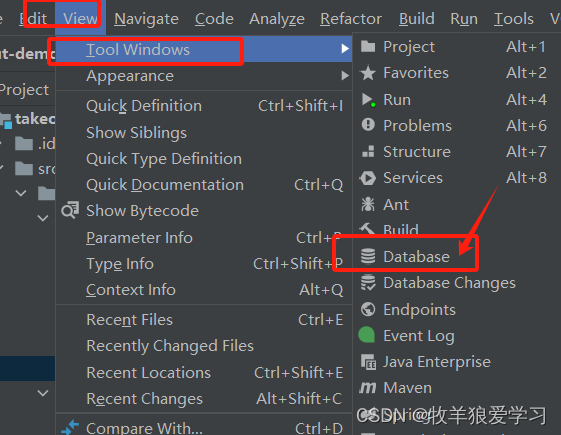
10. 当idea右侧没有Database选项时,可以通过如下步骤添加:
然后就有了: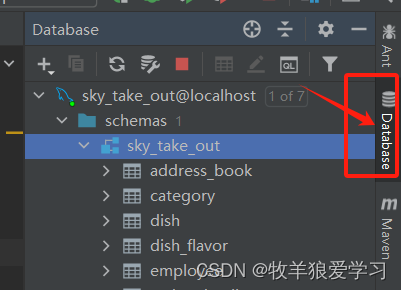


 4万+
4万+


 被折叠的 条评论
为什么被折叠?
被折叠的 条评论
为什么被折叠?
 到【灌水乐园】发言


