


 本文详细介绍了如何在AlmaLinux9操作系统上安装和配置Kubernetes1.24.12集群,包括禁用swap、设置SELinux为permissive模式、安装Docker、配置kubelet、kubeadm和kubectl、安装网络插件Flannel、添加worker节点、以及可选地安装MetalLB负载均衡器和local-path-provisioner存储解决方案。
AlmaLinux 9上安装Kubernetes 1.24.12集群
1. 禁用swap
sudo swapoff -a
2. 禁用防火墙
sudo systemctl stop firewalld
sudo systemctl disable firewalld
3. 将SELinux设置为permissive模式
sudo setenforce 0
sudo sed -i 's/^SELINUX=enforcing$/SELINUX=permissive/' /etc/selinux/config
4. 安装 docker-ce
卸载Podman,runc
sudo dnf remove -y podman runc cri-o docker-ce libcgroup cri-dockerd docker-buildx-plugin docker-compose-plugin libcgroup cri-dockerd
安装 docker-ce
sudo yum-config-manager \
    --add-repo \
    https://download.docker.com/linux/centos/docker-ce.repo

sudo yum install -y docker-ce docker-ce-cli containerd.io docker-buildx-plugin docker-compose-plugin
sudo rpm -ivh https://vault.centos.org/centos/8/BaseOS/x86_64/os/Packages/libcgroup-0.41-19.el8.x86_64.rpm
sudo rpm -ivh https://github.com/Mirantis/cri-dockerd/releases/download/v0.3.1/cri-dockerd-0.3.1-3.el8.x86_64.rpm

sudo systemctl daemon-reload
sudo systemctl enable --now docker
sudo systemctl enable --now cri-docker.service
sudo systemctl enable --now cri-docker.socket

systemctl status docker
systemctl status cri-docker
systemctl status cri-docker.socket

sudo usermod -a -G docker oracle
5. 安装kubelet kubeadm kubectl
cat <<EOF | sudo tee /etc/yum.repos.d/kubernetes.repo
[kubernetes]
name=Kubernetes
baseurl=https://packages.cloud.google.com/yum/repos/kubernetes-el7-\$basearch
enabled=1
gpgcheck=1
gpgkey=https://packages.cloud.google.com/yum/doc/rpm-package-key.gpg
exclude=kubelet kubeadm kubectl
EOF

sudo dnf install -y kubelet-1.24.12 kubeadm-1.24.12 kubectl-1.24.12 --disableexcludes=kubernetes
sudo systemctl enable --now kubelet
6. 更新模块设置
cat <<EOF | sudo tee /etc/modules-load.d/k8s.conf
overlay
br_netfilter
ip_tables
iptable_filter
EOF
对模块使用modprobe
sudo modprobe overlay
sudo modprobe br_netfilter
sudo modprobe ip_tables
sudo modprobe iptable_filter
为 k8s.conf 设置 sysctl.d
cat <<EOF | sudo tee /etc/sysctl.d/k8s.conf
net.bridge.bridge-nf-call-iptables  = 1
net.bridge.bridge-nf-call-ip6tables = 1
net.ipv4.ip_forward                 = 1
EOF
应用 sysctl 参数,无需重启
sysctl --system
7. 初始化Kubernetes集群
export PUBLIC_IP=YOUR_PUBLIC_IP
export HOST=`hostname`

cat <<EOF > kubeadm-config.yaml
kind: KubeletConfiguration
apiVersion: kubelet.config.k8s.io/v1beta1
cgroupDriver: systemd
---
apiVersion: kubeadm.k8s.io/v1beta3
bootstrapTokens:
- groups:
  - system:bootstrappers:kubeadm:default-node-token
  token: abcdef.0123456789abcdef
  ttl: 24h0m0s
  usages:
  - signing
  - authentication
kind: InitConfiguration
localAPIEndpoint:
  advertiseAddress: $PUBLIC_IP
  bindPort: 6443
nodeRegistration:
  criSocket: unix:///var/run/cri-dockerd.sock
  imagePullPolicy: IfNotPresent
  name: $HOST
  taints: null
---
apiServer:
  timeoutForControlPlane: 4m0s
apiVersion: kubeadm.k8s.io/v1beta3
certificatesDir: /etc/kubernetes/pki
clusterName: kubernetes
controllerManager: {}
dns: {}
etcd:
  local:
    dataDir: /var/lib/etcd
imageRepository: registry.k8s.io
kind: ClusterConfiguration
kubernetesVersion: 1.24.12
networking:
  dnsDomain: cluster.local
  podSubnet: 10.244.0.0/16
  serviceSubnet: 10.96.0.0/12
scheduler: {}
EOF

kubeadm init --config kubeadm-config.yaml
输出日志示例,
Your Kubernetes control-plane has initialized successfully!

To start using your cluster, you need to run the following as a regular user:

  mkdir -p $HOME/.kube
  sudo cp -i /etc/kubernetes/admin.conf $HOME/.kube/config
  sudo chown $(id -u):$(id -g) $HOME/.kube/config

Alternatively, if you are the root user, you can run:

  export KUBECONFIG=/etc/kubernetes/admin.conf

You should now deploy a pod network to the cluster.
Run "kubectl apply -f [podnetwork].yaml" with one of the options listed at:
  https://kubernetes.io/docs/concepts/cluster-administration/addons/

Then you can join any number of worker nodes by running the following on each as root:

kubeadm join 192.168.31.44:6443 --token abcdef.0123456789abcdef \
        --discovery-token-ca-cert-hash sha256:901a9b47e8615b1e80f1811f5ff6dbdbf5ffac78094dc23f37318d0faeda83e1
8. 配置集群访问
mkdir -p $HOME/.kube
sudo cp -i /etc/kubernetes/admin.conf $HOME/.kube/config
sudo chown $(id -u):$(id -g) $HOME/.kube/config

kubectl taint nodes --all node-role.kubernetes.io/control-plane-

kubectl completion bash | sudo tee /etc/bash_completion.d/kubectl > /dev/null
echo 'alias k=kubectl' >>~/.bashrc
echo 'complete -o default -F __start_kubectl k' >>~/.bashrc
9. 安装网络插件
kubectl apply -f https://raw.githubusercontent.com/flannel-io/flannel/master/Documentation/kube-flannel.yml
10. 加入2个worker节点
kubeadm join 192.168.31.44:6443 --token abcdef.0123456789abcdef \
        --discovery-token-ca-cert-hash sha256:901a9b47e8615b1e80f1811f5ff6dbdbf5ffac78094dc23f37318d0faeda83e1 --cir-socket unix:///var/run/cri-dockerd.sock
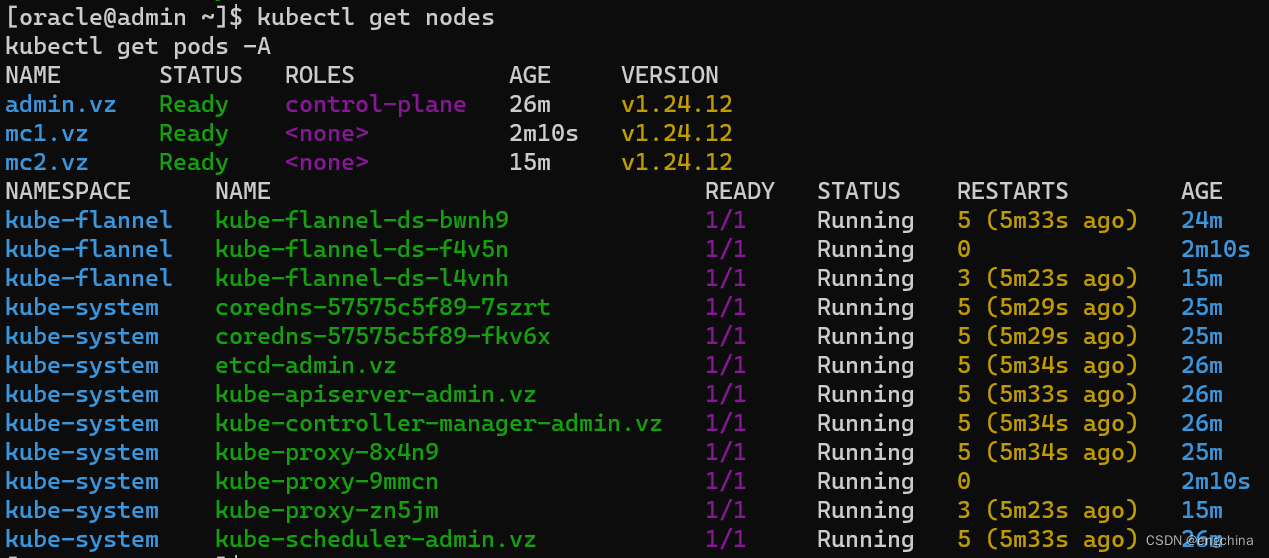
11. 确认集群
kubectl get nodes
kubectl get pods -A
(Optional) 安装 MetalLB
kubectl apply -f https://raw.githubusercontent.com/metallb/metallb/v0.11.0/manifests/namespace.yaml
kubectl create secret generic \
    -n metallb-system memberlist \
    --from-literal=secretkey="$(openssl rand -base64 128)"
kubectl apply -f https://raw.githubusercontent.com/metallb/metallb/v0.11.0/manifests/metallb.yaml
kubectl apply -f - <<-EOF
apiVersion: v1
kind: ConfigMap
metadata:
  namespace: metallb-system
  name: config
data:
  config: |
    address-pools:
    - name: my-ip-space
      protocol: layer2
      addresses:
      - 192.168.31.51-192.168.31.59
EOF
(Optional) 安装 local-path-provisioner
kubectl apply -f https://raw.githubusercontent.com/rancher/local-path-provisioner/v0.0.23/deploy/local-path-storage.yaml
kubectl patch storageclass local-path -p '{"metadata": {"annotations":{"storageclass.kubernetes.io/is-default-class":"true"}}}'
kubectl patch storageclass local-path -p '{"metadata": {"annotations":{"storageclass.beta.kubernetes.io/is-default-class":"true"}}}'
完结!


 5万+
5万+

 被折叠的 条评论
为什么被折叠?
被折叠的 条评论
为什么被折叠?
 到【灌水乐园】发言


