


RealInterceptorChain realChain = (RealInterceptorChain) chain;
Request request = realChain.request();
StreamAllocation streamAllocation = realChain.streamAllocation();

// We need the network to satisfy this request.     Possibly for validating a conditional GET.
boolean doExtensiveHealthChecks = !request.method().equals("GET");
// HttpCodec是对 HTTP 协议操作的抽象,有两个实现:Http1Codec和Http2Codec,顾名思义,它们分别对应 HTTP/1.1 和 HTTP/2 版本的实现。在这个方法的内部实现连接池的复用处理
HttpCodec httpCodec = streamAllocation.newStream(client, chain,     doExtensiveHealthChecks);
RealConnection connection = streamAllocation.connection();

return realChain.proceed(request, streamAllocation, httpCodec, connection);
}
// Returns a connection to host a new stream. This // prefers the existing connection if it exists,
// then the pool, finally building a new connection.
// 调用 streamAllocation 的 newStream() 方法的时候,最终会经过一系列
// 的判断到达 StreamAllocation 中的 findConnection() 方法
private RealConnection findConnection(int connectTimeout, int readTimeout, int writeTimeout,
int pingIntervalMillis, boolean connectionRetryEnabled) throws IOException {
…
  // Attempt to use an already-allocated connection. We need to be careful here because our
  // already-allocated connection may have been restricted from creating new streams.
  // 尝试使用已分配的连接,已经分配的连接可能已经被限制创建新的流
  releasedConnection = this.connection;
  // 释放当前连接的资源,如果该连接已经被限制创建新的流,就返回一个Socket以关闭连接
  toClose = releaseIfNoNewStreams();
  if (this.connection != null) {
    // We had an already-allocated connection and it's good.
    result = this.connection;
    releasedConnection = null;
  }
  if (!reportedAcquired) {
    // If the connection was never reported acquired, don't report it as released!
    // 如果该连接从未被标记为获得,不要标记为发布状态,reportedAcquired 通过 acquire()   方法修改
    releasedConnection = null;
  }

  if (result == null) {
    // Attempt to get a connection from the pool.
    // 尝试供连接池中获取一个连接
    Internal.instance.get(connectionPool, address, this, null);
    if (connection != null) {
      foundPooledConnection = true;
      result = connection;
    } else {
      selectedRoute = route;
    }
  }
}
// 关闭连接
closeQuietly(toClose);

if (releasedConnection != null) {
  eventListener.connectionReleased(call, releasedConnection);
}
if (foundPooledConnection) {
  eventListener.connectionAcquired(call, result);
}
if (result != null) {
  // If we found an already-allocated or pooled connection, we're done.
  // 如果已经从连接池中获取到了一个连接,就将其返回
  return result;
}

// If we need a route selection, make one. This   is a blocking operation.
boolean newRouteSelection = false;
if (selectedRoute == null && (routeSelection == null || !routeSelection.hasNext())) {
  newRouteSelection = true;
  routeSelection = routeSelector.next();
}

synchronized (connectionPool) {
  if (canceled) throw new IOException("Canceled");

  if (newRouteSelection) {
    // Now that we have a set of IP addresses,   make another attempt at getting a   connection from
    // the pool. This could match due to   connection coalescing.
     // 根据一系列的 IP地址从连接池中获取一个链接
    List<Route> routes = routeSelection.getAll();
    for (int i = 0, size = routes.size(); i < size;i++) {
      Route route = routes.get(i);
      // 从连接池中获取一个连接
      Internal.instance.get(connectionPool, address, this, route);
      if (connection != null) {
        foundPooledConnection = true;
        result = connection;
        this.route = route;
        break;
      }
    }
  }

  if (!foundPooledConnection) {
    if (selectedRoute == null) {
      selectedRoute = routeSelection.next();
    }

    // Create a connection and assign it to this allocation immediately. This makes it   possible
    // for an asynchronous cancel() to interrupt the handshake we're about to do.
    // 在连接池中如果没有该连接,则创建一个新的连接,并将其分配,这样我们就可以在握手之前进行终端
    route = selectedRoute;
    refusedStreamCount = 0;
    result = new RealConnection(connectionPool, selectedRoute);
    acquire(result, false);
  }
}
// If we found a pooled connection on the 2nd time around, we're done.
if (foundPooledConnection) {
// 如果我们在第二次的时候发现了一个池连接,那么我们就将其返回
  eventListener.connectionAcquired(call, result);
  return result;
}

// Do TCP + TLS handshakes. This is a blocking     operation.
 // 进行 TCP 和 TLS 握手
result.connect(connectTimeout, readTimeout, writeTimeout, pingIntervalMillis,
  connectionRetryEnabled, call, eventListener);
routeDatabase().connected(result.route());

Socket socket = null;
synchronized (connectionPool) {
  reportedAcquired = true;

  // Pool the connection.
  // 将该连接放进连接池中
  Internal.instance.put(connectionPool, result);

  // If another multiplexed connection to the same   address was created concurrently, then
  // release this connection and acquire that one.
  // 如果同时创建了另一个到同一地址的多路复用连接,释放这个连接并获取那个连接
  if (result.isMultiplexed()) {
    socket = Internal.instance.deduplicate(connectionPool, address, this);
    result = connection;
  }
}
closeQuietly(socket);

eventListener.connectionAcquired(call, result);
return result;
}
从以上的源码分析可知:


* 判断当前的连接是否可以使用:流是否已经被关闭,并且已经被限制创建新的流;
* 如果当前的连接无法使用,就从连接池中获取一个连接;
* 连接池中也没有发现可用的连接,创建一个新的连接,并进行握手,然后将其放到连接池中。


在从连接池中获取一个连接的时候,使用了 Internal 的 get() 方法。Internal 有一个静态的实例,会在 `OkHttpClient` 的静态代码快中被初始化。我们会在 Internal 的 get() 中调用连接池的 get() 方法来得到一个连接。并且,从中我们明白了连接复用的一个好处就是省去了进行 TCP 和 TLS 握手的一个过程。因为建立连接本身也是需要消耗一些时间的,连接被复用之后可以提升我们网络访问的效率。


接下来详细分析下`ConnectionPool`是如何实现连接管理的。


`OkHttp` 的缓存管理分成两个步骤,一边当我们创建了一个新的连接的时候,我们要把它放进缓存里面;另一边,我们还要来对缓存进行清理。在 `ConnectionPool` 中,当我们向连接池中缓存一个连接的时候,只要调用双端队列的 `add()` 方法,将其加入到双端队列即可,而清理连接缓存的操作则交给线程池来定时执行。
private final Deque connections = new ArrayDeque<>();
void put(RealConnection connection) {
assert (Thread.holdsLock(this));
if (!cleanupRunning) {
cleanupRunning = true;
// 使用线程池执行清理任务
executor.execute(cleanupRunnable);
}
// 将新建的连接插入到双端队列中
connections.add(connection);
}
private final Runnable cleanupRunnable = new Runnable() {
@Override public void run() {
while (true) {
// 内部调用 cleanup() 方法来清理无效的连接
long waitNanos = cleanup(System.nanoTime());
if (waitNanos == -1) return;
if (waitNanos > 0) {
long waitMillis = waitNanos / 1000000L;
waitNanos -= (waitMillis * 1000000L);
synchronized (ConnectionPool.this) {
try {
ConnectionPool.this.wait(waitMillis, (int) waitNanos);
} catch (InterruptedException ignored) {
}
}
}
}
};
long cleanup(long now) {
int inUseConnectionCount = 0;
int idleConnectionCount = 0;
RealConnection longestIdleConnection = null;
long longestIdleDurationNs = Long.MIN_VALUE;
// Find either a connection to evict, or the time that the next eviction is due.
synchronized (this) {
    // 遍历所有的连接
    for (Iterator<RealConnection> i = connections.iterator(); i.hasNext(); ) {
      RealConnection connection = i.next();

      // If the connection is in use, keep     searching.
      // 遍历所有的连接
      if (pruneAndGetAllocationCount(connection, now) > 0) {
        inUseConnectionCount++;
        continue;
      }

      idleConnectionCount++;

      // If the connection is ready to be     evicted,     we're done.
      // 如果找到了一个可以被清理的连接,会尝试去寻找闲置时间最久的连接来释放
      long idleDurationNs = now - connection.idleAtNanos;
      if (idleDurationNs > longestIdleDurationNs) {
        longestIdleDurationNs = idleDurationNs;
        longestIdleConnection = connection;
      }
    }

    // maxIdleConnections 表示最大允许的闲置的连接的数量,keepAliveDurationNs表示连接允许存活的最长的时间。
    // 默认空闲连接最大数目为5个,keepalive 时间最长为5分钟。
    if (longestIdleDurationNs >= this.keepAliveDurationNs
        || idleConnectionCount > this.maxIdleConnections) {
      // We've found a connection to evict. Remove it from the list, then close it     below (outside
      // of the synchronized block).
      // 该连接的时长超出了最大的活跃时长或者闲置的连接数量超出了最大允许的范围,直接移除
      connections.remove(longestIdleConnection);
    } else if (idleConnectionCount > 0) {
      // A connection will be ready to evict soon.
      // 闲置的连接的数量大于0,停顿指定的时间(等会儿会将其清理掉,现在还不是时候)
      return keepAliveDurationNs - longestIdleDurationNs;
    } else if (inUseConnectionCount > 0) {
      // All connections are in use. It'll be at least the keep alive duration 'til we run again.
      // 所有的连接都在使用中,5分钟后再清理
      return keepAliveDurationNs;
    } else {
      // No connections, idle or in use.
       // 没有连接
      cleanupRunning = false;
      return -1;
  }
}
从以上的源码分析可知,首先会对缓存中的连接进行遍历,以寻找一个闲置时间最长的连接,然后根据该连接的闲置时长和最大允许的连接数量等参数来决定是否应该清理该连接。同时注意上面的方法的返回值是一个时间,如果闲置时间最长的连接仍然需要一段时间才能被清理的时候,会返回这段时间的时间差,然后会在这段时间之后再次对连接池进行清理。


## 3,Retrofit


Retrofit 是一个 `RESTful` 的 `HTTP` 网络请求框架的封装,本质上网络请求是 OkHttp 完成的,而 `Retrofit` 仅负责网络请求接口的封装。客户端使用Retrofit ,实际上是使用 Retrofit 接口层封装请求参数、Header、Url 等信息,之后由 OkHttp 完成后续的请求操作,当服务端返回数据之后,OkHttp 再将原始的结果交给 Retrofit,Retrofit然后根据用户的需求,对结果进行解析。


### 3.1 基本使用


首先,定义一个HTTP API,用于描述请求,比如下面是一个Get请求。
public interface GitHubService {
 @GET("users/{user}/repos")
 Call<List<Repo>> listRepos(@Path("user") String user);
}
然后,创建一个Retrofit并生成API的实现,返回类型是请求的返回值类型,方法的参数即是请求的参数。
// 1.Retrofit构建过程
Retrofit retrofit = new Retrofit.Builder()
.baseUrl(“https://api.github.com/”)
.build();
// 2.创建网络请求接口类实例过程
GitHubService service = retrofit.create(GitHubService.class);
最后,再调用API方法生成Call完成请求。
// 3.生成并执行请求过程
Call<List> repos = service.listRepos(“octocat”);
repos.execute() or repos.enqueue()
上面是一个简单的Get请求的事例,POST请求只需要将API定义改为POST即可。Retrofit的基本使用流程很简洁,但是简洁并不代表简单,Retrofit为了实现这种简洁的使用流程,内部使用了优秀的架构设计和大量的设计模式,仔细阅读Retrofit最新版的源码会发现用到大量的设计模式。比如,Retrofit构建过程 会用到建造者模式、工厂方法模式,建网络请求接口实例过程会用到外观模式、代理模式、单例模式、策略模式、装饰模式(建造者模式),生成并执行请求过程 适配器模式(代理模式、装饰模式)。


### 3.2 源码分析


#### 3.2.1 Retrofit构建过程


##### 1,Retrofit核心对象解析


首先Retrofit中有一个全局变量非常关键,在V2.5之前的版本,使用的是LinkedHashMap(),它是一个网络请求配置对象,是由网络请求接口中方法注解进行解析后得到的。
public final class Retrofit {
private final Map<Method, ServiceMethod<?>> serviceMethodCache = new ConcurrentHashMap<>();
…
}
Retrofit使用了建造者模式通过内部类Builder类建立一个Retrofit实例,如下所示。
public static final class Builder {
// 平台类型对象(Platform -> Android)
private final Platform platform;
// 网络请求工厂,默认使用OkHttpCall(工厂方法模式)
private @Nullable okhttp3.Call.Factory callFactory;
// 网络请求的url地址
private @Nullable HttpUrl baseUrl;
// 数据转换器工厂的集合
private final List<Converter.Factory> converterFactories = new ArrayList<>();
// 网络请求适配器工厂的集合,默认是ExecutorCallAdapterFactory
private final List<CallAdapter.Factory> callAdapterFactories = new ArrayList<>();
// 回调方法执行器,在 Android 上默认是封装了 handler 的 MainThreadExecutor, 默认作用是:切换线程(子线程 -> 主线程)
private @Nullable Executor callbackExecutor;

private boolean validateEagerly;
##### 2,Builder内部构造
public static final class Builder {
...

Builder(Platform platform) {
    this.platform = platform;
}

public Builder() {
    this(Platform.get());
}

...
}
class Platform {
private static final Platform PLATFORM = findPlatform();

static Platform get() {
  return PLATFORM;
}

private static Platform findPlatform() {
  try {
    // 使用JVM加载类的方式判断是否是Android平台
    Class.forName("android.os.Build");
    if (Build.VERSION.SDK_INT != 0) {
      return new Android();
    }
  } catch (ClassNotFoundException ignored) {
  }
  try {
    // 同时支持Java平台
    Class.forName("java.util.Optional");
    return new Java8();
  } catch (ClassNotFoundException ignored) {
  }
  return new Platform();
}
static class Android extends Platform {
...

@Override public Executor defaultCallbackExecutor() {
    //切换线程(子线程 -> 主线程)
    return new MainThreadExecutor();
}

// 创建默认的网络请求适配器工厂,如果是Android7.0或Java8上,则使
// 用了并发包中的CompletableFuture保证了回调的同步
// 在Retrofit中提供了四种CallAdapterFactory(策略模式):
// ExecutorCallAdapterFactory(默认)、GuavaCallAdapterFactory、
// va8CallAdapterFactory、RxJavaCallAdapterFactory
@Override List<? extends CallAdapter.Factory> defaultCallAdapterFactories(
    @Nullable Executor callbackExecutor) {
  if (callbackExecutor == null) throw new AssertionError();
  ExecutorCallAdapterFactory executorFactory = new   ExecutorCallAdapterFactory(callbackExecutor);
  return Build.VERSION.SDK_INT >= 24
    ? asList(CompletableFutureCallAdapterFactory.INSTANCE, executorFactory)
    : singletonList(executorFactory);
}

...

@Override List<? extends Converter.Factory> defaultConverterFactories() {
  return Build.VERSION.SDK_INT >= 24
      ? singletonList(OptionalConverterFactory.INSTANCE)
      : Collections.<Converter.Factory>emptyList();
}

...

static class MainThreadExecutor implements Executor {

    // 获取Android 主线程的Handler
    private final Handler handler = new Handler(Looper.getMainLooper());

    @Override public void execute(Runnable r) {

        // 在UI线程对网络请求返回数据处理
        handler.post(r);
    }
}
}
##### 3, 添加baseUrl


baseUrl最基本的功能就是将String类型的url转换为OkHttp的HttpUrl的过程,涉及的代码如下。
public Builder baseUrl(String baseUrl) {
checkNotNull(baseUrl, “baseUrl == null”);
return baseUrl(HttpUrl.get(baseUrl));
}
public Builder baseUrl(HttpUrl baseUrl) {
checkNotNull(baseUrl, “baseUrl == null”);
List pathSegments = baseUrl.pathSegments();
if (!“”.equals(pathSegments.get(pathSegments.size() - 1))) {
throw new IllegalArgumentException("baseUrl must end in /: " + baseUrl);
}
this.baseUrl = baseUrl;
return this;
}
##### 4,build过程


build()主要任务是执行Retrofit对象的创建,涉及代码如下。
public Retrofit build() {
if (baseUrl == null) {
  throw new IllegalStateException("Base URL required.");
}

okhttp3.Call.Factory callFactory = this.callFactory;
if (callFactory == null) {
    // 默认使用okhttp
     callFactory = new OkHttpClient();
}

Executor callbackExecutor = this.callbackExecutor;
if (callbackExecutor == null) {
    // Android默认的callbackExecutor
    callbackExecutor = platform.defaultCallbackExecutor();
}

// Make a defensive copy of the adapters and add the defaultCall adapter.
List<CallAdapter.Factory> callAdapterFactories = new ArrayList<>(this.callAdapterFactories);
// 添加默认适配器工厂在集合尾部
callAdapterFactories.addAll(platform.defaultCallAdapterFactorisca  llbackExecutor));

// Make a defensive copy of the converters.
List<Converter.Factory> converterFactories = new ArrayList<>(
    1 + this.converterFactories.size() + platform.defaultConverterFactoriesSize());
// Add the built-in converter factory first. This prevents overriding its behavior but also
// ensures correct behavior when using converters thatconsumeall types.
converterFactories.add(new BuiltInConverters());
converterFactories.addAll(this.converterFactories);
converterFactories.addAll(platform.defaultConverterFactories();

return new Retrofit(callFactory, baseUrl, unmodifiableList(converterFactories),
    unmodifiableList(callAdapterFactories), callbackExecutor, validateEagerly);
}
#### 3.2.2 创建网络请求接口实例


Retrofit.create()使用了外观模式和代理模式创建了网络请求的接口实例,创建create()的方法如下。
public T create(final Class service) {
Utils.validateServiceInterface(service);
if (validateEagerly) {
// 判断是否需要提前缓存ServiceMethod对象
eagerlyValidateMethods(service);
}
// 使用动态代理拿到请求接口所有注解配置后,创建网络请求接口实例
return (T) Proxy.newProxyInstance(service.getClassLoader(), new  Class<?>[] { service },
    new InvocationHandler() {
      private final Platform platform = Platform.get();
      private final Object[] emptyArgs = new Object[0];

      @Override public Object invoke(Object proxy, Method method, @Nullable Object[] args)
          throws Throwable {
        // If the method is a method from Object then defer to normal invocation.
        if (method.getDeclaringClass() == Object.class) {
          return method.invoke(this, args);
        }
        if (platform.isDefaultMethod(method)) {
          return platform.invokeDefaultMethod(method, service, proxy, args);
        }
        return loadServiceMethod(method).invoke(args != null ? args : emptyArgs);
      }
});
}
private void eagerlyValidateMethods(Class<?> service) {
Platform platform = Platform.get();
for (Method method : service.getDeclaredMethods()) {
if (!platform.isDefaultMethod(method)) {
loadServiceMethod(method);
}
}
}
然后,我们再看一下loadServiceMethod()方法。
ServiceMethod<?> loadServiceMethod(Method method) {
ServiceMethod<?> result = serviceMethodCache.get(method);
if (result != null) return result;

synchronized (serviceMethodCache) {
  result = serviceMethodCache.get(method);
  if (result == null) {
        // 解析注解配置得到了ServiceMethod
        result = ServiceMethod.parseAnnotations(this, method);
        // 可以看到,最终加入到ConcurrentHashMap缓存中
        serviceMethodCache.put(method, result);
  }
}
return result;
}
abstract class ServiceMethod {
static ServiceMethod parseAnnotations(Retrofit retrofit, Method method) {
// 通过RequestFactory解析注解配置(工厂模式、内部使用了建造者模式)
RequestFactory requestFactory = RequestFactory.parseAnnotations(retrofit, method);
    Type returnType = method.getGenericReturnType();
    if (Utils.hasUnresolvableType(returnType)) {
      throw methodError(method,
          "Method return type must not include a type variable or wildcard: %s", returnType);
    }
    if (returnType == void.class) {
      throw methodError(method, "Service methods cannot return void.");
    }

    // 最终是通过HttpServiceMethod构建的请求方法
    return HttpServiceMethod.parseAnnotations(retrofit, method, requestFactory);
}

abstract T invoke(Object[] args);
}
### 3.3 Retrofit流程图
Retrofit最新的版本是2.9.0,已经大半年没有更新了。Retrofit虽然只是一个RESTful 的HTTP 网络请求框架的封装库。但是,它内部通过 大量的设计模式 封装了 OkHttp,让使用者感到它非常简洁、易懂。它内部主要是用动态代理的方式,动态将网络请求接口的注解解析成HTTP请求,最后执行请求的过程。Retrofit完整的流程如下图所示。

## 4,Glide
### 4.1 基本使用
作为一个Android图片加载框架,Glide具有功能全、性能高,使用简单等优点。使用下面这一行代码就可以完成图片的加载与展示。
Glide.with(context).load(url).into(iv);
除此之外,我们还可以在图片的加载过程中指定一个占位图。
Glide.with(this)
.load(url)
.placeholder(R.drawable.noimage)
.into(iv);
### 4.2 源码分析
下面是一个完整的Glide框架的架构图。
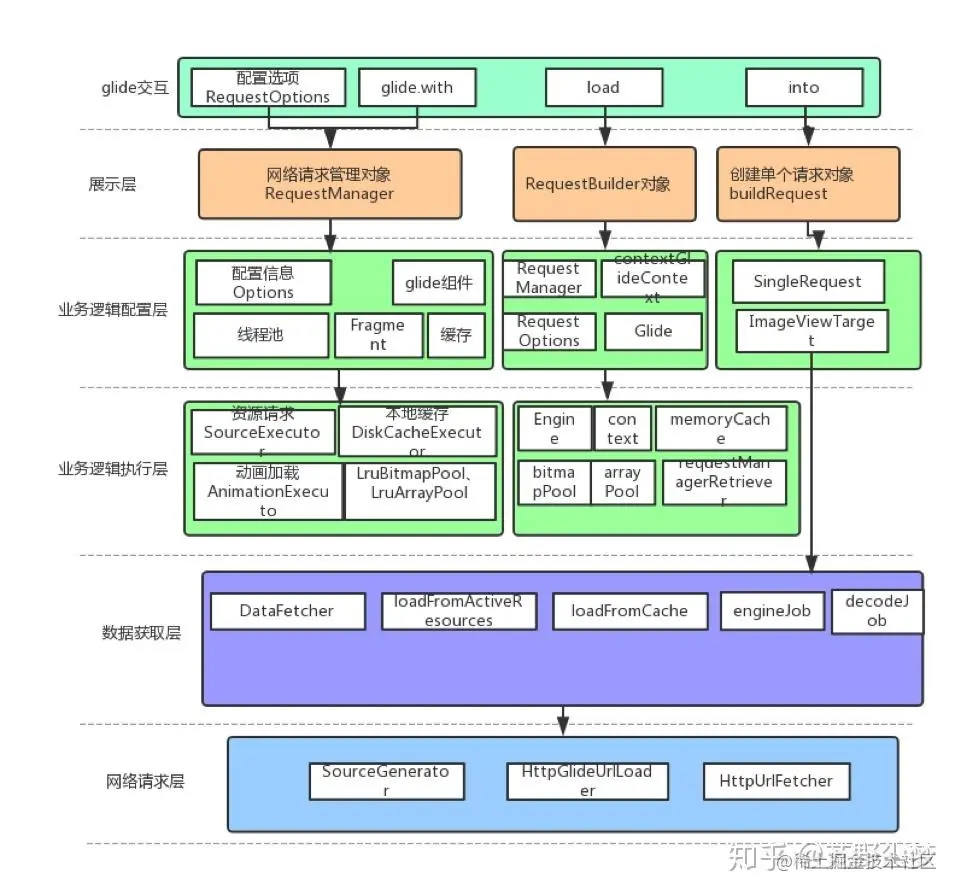
#### 4.2.1 with(context)
我们使用Glide,都是从Glide.with()方法开始的,源码如下。
public static RequestManager with(Context context) {
    RequestManagerRetriever retriever = RequestManagerRetriever.get();
    return retriever.get(context);
}

public static RequestManager with(Activity activity) {
    RequestManagerRetriever retriever = RequestManagerRetriever.get();
    return retriever.get(activity);
}

public static RequestManager with(FragmentActivity activity) {
    RequestManagerRetriever retriever = RequestManagerRetriever.get();
    return retriever.get(activity);
}

public static RequestManager with(android.app.Fragment fragment) {
    RequestManagerRetriever retriever = RequestManagerRetriever.get();
    return retriever.get(fragment);
}

public static RequestManager with(Fragment fragment) {
    RequestManagerRetriever retriever = RequestManagerRetriever.get();
    return retriever.get(fragment);
}
可以看到,with()方法有很多,但内容基本一致,都是通过RequestManagerRetriever.get()获取RequestManagerRetriever对象retriever,然后通过retriever.get(context)获取一个RequestManager对象并返回。这些with()方法关键的不同在于传入的参数不同,可以是Context、Activity、Fragment等等。


之所以Glide在加载图片的时候要绑定with(context)方法中传入的context的生命周期,如果传入的是Activity,那么在这个Activity销毁的时候Glide会停止图片的加载。这样做的好处在于:避免了消耗多余的资源,也避免了在Activity销毁之后加载图片从而导致空指针问题。


接下来,我们看一下RequestManagerRetriever类的源码。
public class RequestManagerRetriever implements Handler.Callback {
//饿汉式创建单例
private static final RequestManagerRetriever INSTANCE = new RequestManagerRetriever();
//返回单例对象
public static RequestManagerRetriever get() {
    return INSTANCE;
}

//根据传入的参数,获取不同的RequestManager
public RequestManager get(Context context) {
    if (context == null) {
        throw new IllegalArgumentException("You cannot start a load on a null Context");
    } else if (Util.isOnMainThread() && !(context instanceof Application)) {
        if (context instanceof FragmentActivity) {
            return get((FragmentActivity) context);
        } else if (context instanceof Activity) {
            return get((Activity) context);
        } else if (context instanceof ContextWrapper) {
            return get(((ContextWrapper) context).getBaseContext());
        }
    }

    return getApplicationManager(context);
}

//省略无关代码......
}
上面的代码是一个饿汉式单例模式,核心是根据传入的参数获取不同的RequestManager。接下来,我们看一下getApplicationManager方法。
private RequestManager getApplicationManager(Context context) {
// 返回一个单例
if (applicationManager == null) {
synchronized (this) {
if (applicationManager == null) {
applicationManager = new RequestManager(context.getApplicationContext(),
new ApplicationLifecycle(), new EmptyRequestManagerTreeNode());
}
}
}
return applicationManager;
}
getApplicationManager(Context context)通过双检查单例模式创建并返回applicationManager。如果传入的context是Activity时,操作如下。
public RequestManager get(Activity activity) {
//如果不在主线程或者Android SDK的版本低于HONEYCOMB,传入的还是Application类型的context
if (Util.isOnBackgroundThread() || Build.VERSION.SDK_INT < Build.VERSION_CODES.HONEYCOMB) {
return get(activity.getApplicationContext());
} else {
//判断当前activity是否被销毁
assertNotDestroyed(activity);
android.app.FragmentManager fm = activity.getFragmentManager();
//通过fragmentGet(activity, fm)获取RequestManager
return fragmentGet(activity, fm);
}
}
如果传入的context是Activity时,操作如下。
public RequestManager get(Activity activity) {
//如果不在主线程或者Android SDK的版本低于HONEYCOMB,传入的还是Application类型的context
if (Util.isOnBackgroundThread() || Build.VERSION.SDK_INT < Build.VERSION_CODES.HONEYCOMB) {
return get(activity.getApplicationContext());
} else {
//判断当前activity是否被销毁
assertNotDestroyed(activity);
android.app.FragmentManager fm = activity.getFragmentManager();
//通过fragmentGet(activity, fm)获取RequestManager
return fragmentGet(activity, fm);
}
}
下面是with()方法的一个简单的总结。


* 通过RequestManagerRetriever.get()获取RequestManagerRetriever单例对象。
* 通过retriever.get(context)获取RequestManager,在get(context)方法中通过对context类型的判断做不同的处理。
* 当context是Application,通过getApplicationManager(Context context)创建并返回一个RequestManager对象。
* 当context是Activity,通过fragmentGet(activity, fm)在当前activity创建并添加一个没有界面的fragment,从而实现图片加载与activity的生命周期相绑定,之后创建并返回一个RequestManager对象。


#### 4.2.2 load(url)


load(url)主要是用于加载网络的图片,如下所示。
Glide.with(context)
.load(url)
.placeholder(R.drawable.place_image)
.error(R.drawable.error_image)
.into(imageView);
load(url)方法的源码如下。
public DrawableTypeRequest load(String string) {
return (DrawableTypeRequest) fromString().load(string);
}
load()方法涉及fromString()、load(string)两个方法,接下来看下这两个方法。


**fromString()**
public DrawableTypeRequest fromString() {
return loadGeneric(String.class);
}
private DrawableTypeRequest loadGeneric(Class modelClass) {
ModelLoader<T, InputStream> streamModelLoader =
Glide.buildStreamModelLoader(modelClass, context);
ModelLoader<T, ParcelFileDescriptor> fileDescriptorModelLoader =
Glide.buildFileDescriptorModelLoader(modelClass, context);
if (modelClass != null && streamModelLoader == null && fileDescriptorModelLoader == null) {
throw new IllegalArgumentException(“Unknown type " + modelClass + “. You must provide a Model of a type for”
+ " which there is a registered ModelLoader, if you are using a custom model, you must first call”
+ " Glide#register with a ModelLoaderFactory for your custom model class");
}
    //这句是核心,本质是创建并返回了一个DrawableTypeRequest
    return optionsApplier.apply(
            new DrawableTypeRequest<T>(modelClass, streamModelLoader,
                    fileDescriptorModelLoader, context,
                    glide, requestTracker, lifecycle, optionsApplier));
}
loadGeneric()方法本质是创建并返回一个DrawableTypeRequest,Drawable类型的请求。


**load(string)** load(string)方法的代码如下。
@Override
public DrawableRequestBuilder load(ModelType model) {
super.load(model);
return this;
}
此方法首先调用`DrawableRequestBuilder`的父类`GenericRequestBuilder的load()`方法,然后返回自身。接下来,看一下DrawableRequestBuilder父类中的load()方法,如下所示。
public GenericRequestBuilder<ModelType, DataType, ResourceType, TranscodeType> load(ModelType model) {
this.model = model;
isModelSet = true;
return this;
}
DrawableRequestBuilder的父类是GenericRequestBuilder,从名字中我们也可以看出来,前者是Drawable请求的构建者,后者是通用的请求构建者,他们是子父关系。


经过上面的分析我们可以知道,在Glide.with(context).load(url)之后会返回一个DrawableTypeRequest的对象,它的父类是DrawableRequestBuilder,DrawableRequestBuilder的父类是GenericRequestBuilder,我们写的placeHolder()、error()等等相关图片请求配置的方法都定义在GenericRequestBuilder中。


#### 4.2.3 into(imageView)


Glide中的前两部是创建了一个Request,这个Request可以理解为对图片加载的配置请求,需要注意的是仅仅是创建了一个请求,而没有去执行。只有当调用into()方法时,这个请求才会真正的被执行。into(imageView)的源码如下。
public Target into(ImageView view) {
return super.into(view);
}
发现它调用的是父类GenericRequestBuilder的into()方法,那我们继续看GenericRequestBuilder中的into()方法。
public Target into(ImageView view) {
//确保在主线程
Util.assertMainThread();
//确保view不为空
if (view == null) {
throw new IllegalArgumentException(“You must pass in a non null View”);
}
//对ScaleType进行配置
if (!isTransformationSet && view.getScaleType() != null) {
switch (view.getScaleType()) {
case CENTER_CROP:
applyCenterCrop();
break;
case FIT_CENTER:
case FIT_START:
case FIT_END:
applyFitCenter();
break;
//
C
A
S
E
S
−
O
M
I
T
T
E
D
CASES-OMITTED
CASES−OMITTED
default:
// Do nothing.
}
}
    //核心
    return into(glide.buildImageViewTarget(view, transcodeClass));
}
可以看到,上面的方法就是into()的核心代码,它定义在GenericRequestBuilder这个通用的请求构建者中。方法的核心是最后一行:into(glide.buildImageViewTarget(view, transcodeClass)),首先通过glide.buildImageViewTarget(view, transcodeClass)创建出一个Target类型的对象,然后把这个target传入GenericRequestBuilder中的into()方法中。


关于buildImageViewTarget(view, transcodeClass)方法,我们就不再赘述了。


## 6,EventBus


### 6.1 基本使用


#### 6.1.1 基本概念


EventBus是一种用于Android的事件发布-订阅的事件总线。它简化了应用程序内各个组件之间进行通信的复杂度,尤其是碎片之间进行通信的问题,可以避免由于使用广播通信而带来的诸多不便。


EventBus由三个角色构成:Publisher、Event和Subscriber。


* **Event**:事件,它可以是任意类型,EventBus会根据事件类型进行全局的通知。
* **Subscriber**:事件订阅者,在EventBus 3.0之前我们必须定义以onEvent开头的那几个方法,分别是onEvent、onEventMainThread、onEventBackgroundThread和onEventAsync,而在3.0之后事件处理的方法名可以随意取,不过需要加上注解@subscribe,并且指定线程模型,默认是POSTING。
* **Publisher**:事件的发布者,可以在任意线程里发布事件。一般情况下,使用EventBus.getDefault()就可以得到一个EventBus对象,然后再调用post(Object)方法即可。


EventBus是一种典型的事件发布-订阅模式,事件由发布者通过EvenentBus传递给订阅者,总体框架如下。 [图片上传失败…(image-91c9a-1659682506847)]


EventBus提供了四种线程模型,分别是:


* POSTING:默认,表示事件处理函数的线程跟发布事件的线程在同一个线程。
* MAIN:表示事件处理函数的线程在主线程(UI)线程,因此在这里不能进行耗时操作。
* BACKGROUND:表示事件处理函数的线程在后台线程,因此不能进行UI操作。如果发布事件的线程是主线程(UI线程),那么事件处理函数将会开启一个后台线程,如果果发布事件的线程是在后台线程,那么事件处理函数就使用该线程。
* ASYNC:表示无论事件发布的线程是哪一个,事件处理函数始终会新建一个子线程运行,同样不能进行UI操作。


#### 6.1.2 基本使用


EventBus使用流程上分为3步。首先,定义一个事件类。
public class SayHelloEvent {
private String message;
public void sayHellow(String message) {
    this.message = message;
}
}
然后,准备一个事件的订阅者,为了防止事件带来的性能消耗问题,还需要在onStop生命周期中注销事件的订阅。
@Subscribe(threadMode = ThreadMode.MAIN)
public void onMessageEvent(SayHelloEvent event) {
String message = event.getMessage();
…
}
@Override
public void onStart() {
super.onStart();
EventBus.getDefault().register(this);
}
@Override
public void onStop() {
EventBus.getDefault().unregister(this);
super.onStop();
}
最后,在需要发送事件的地方调用EventBus.getDefault().post方法发送事件。
EventBus.getDefault().post(new SayHelloEvent(“Hello,EventBus!!!”));
复制代码
### 6.2 源码分析


#### 6.2.1 EventBus.getDefault().register(this)


首先,我们从获取EventBus实例的方法getDefault()开发看EventBus。
public static EventBus getDefault() {
if (defaultInstance == null) {
synchronized (EventBus.class) {
if (defaultInstance == null) {
defaultInstance = new EventBus();
}
}
}
return defaultInstance;
}
可以看到,在getDefault()中使用了双重校验并加锁的单例模式来创建EventBus实例,然后我们看一下构造方法。
private static final EventBusBuilder DEFAULT_BUILDER = new EventBusBuilder();
public EventBus() {
this(DEFAULT_BUILDER);
}
在EventBus的默认构造方法中又调用了它的另一个有参构造方法,将一个类型为EventBusBuilder的DEFAULT\_BUILDER对象传递进去了。再看一下EventBusBuilder的构造方法。
public class EventBusBuilder {
…
EventBusBuilder() {
}
...
}
里面基本什么也没做,继续查看EventBus的这个有参构造方法。
private final Map<Class<?>, CopyOnWriteArrayList> subscriptionsByEventType; private final Map
EventBus(EventBusBuilder builder) {
…
// 1
subscriptionsByEventType = new HashMap<>();

// 2
typesBySubscriber = new HashMap<>();

// 3
stickyEvents = new ConcurrentHashMap<>();

// 4
mainThreadSupport = builder.getMainThreadSupport();
mainThreadPoster = mainThreadSupport != null ? mainThreadSupport.createPoster(this) : null;
backgroundPoster = new BackgroundPoster(this);
asyncPoster = new AsyncPoster(this);

...

// 5
subscriberMethodFinder = new SubscriberMethodFinder(builder.subscriberInfoIndexes,
        builder.strictMethodVerification, builder.ignoreGeneratedIndex);

// 从builder取中一些列订阅相关信息进行赋值
...

// 6
executorService = builder.executorService;
}
在注释1处,创建了一个subscriptionsByEventType对象,可以看到它是一个类型为HashMap的subscriptionsByEventType对象,并且其key为 Event 类型,value为 Subscription链表。这里的Subscription是一个订阅信息对象,它里面保存了两个重要的字段,一个是类型为 Object 的 subscriber,该字段即为注册的对象(在 Android 中时通常是 Activity对象);另一个是 类型为SubscriberMethod 的 subscriberMethod,它就是被@Subscribe注解的那个订阅方法,里面保存了一个重要的字段eventType,它是 Class<?> 类型的,代表了 Event 的类型。在注释2处,新建了一个类型为 Map 的typesBySubscriber对象,它的key为subscriber对象,value为subscriber对象中所有的 Event 类型链表,日常使用中仅用于判断某个对象是否注册过。在注释3处新建了一个类型为ConcurrentHashMap的stickyEvents对象,它是专用于粘性事件处理的一个字段,key为事件的Class对象,value为当前的事件。
可能有的同学还不知道粘性事件,所谓粘性事件是相对普通事件来说的。普通事件是先注册,然后发送事件才能收到;而粘性事件,在发送事件之后再订阅该事件也能收到。并且,粘性事件会保存在内存中,每次进入都会去内存中查找获取最新的粘性事件,除非你手动解除注册。
然后,我们看注释5这行代码新建了一个subscriberMethodFinder对象,这是从EventBus中抽离出的订阅方法查询的一个对象。在注释6处,从builder中取出了一个默认的线程池对象,它由Executors的newCachedThreadPool()方法创建,它是一个有则用、无则创建、无数量上限的线程池。
接下来,我们再看一下EventBus的regist()方法。
### 学习分享
在当下这个信息共享的时代,很多资源都可以在网络上找到,只取决于你愿不愿意找或是找的方法对不对了
很多朋友不是没有资料,大多都是有几十上百个G,但是杂乱无章,不知道怎么看从哪看起,甚至是看后就忘
如果大家觉得自己在网上找的资料非常杂乱、不成体系的话,我也分享一套给大家,比较系统,我平常自己也会经常研读。
**2021最新上万页的大厂面试真题**

**七大模块学习资料:如NDK模块开发、Android框架体系架构…**

只有系统,有方向的学习,才能在段时间内迅速提高自己的技术。
> 这份体系学习笔记,适应人群:
> **第一,**学习知识比较碎片化,没有合理的学习路线与进阶方向。
> **第二,**开发几年,不知道如何进阶更进一步,比较迷茫。
> **第三,**到了合适的年纪,后续不知道该如何发展,转型管理,还是加强技术研究。
### 由于文章内容比较多,篇幅不允许,部分未展示内容以截图方式展示 。
**网上学习资料一大堆,但如果学到的知识不成体系,遇到问题时只是浅尝辄止,不再深入研究,那么很难做到真正的技术提升。**
**[需要这份系统化学习资料的朋友,可以戳这里获取](https://bbs.csdn.net/topics/618156601)**
**一个人可以走的很快,但一群人才能走的更远!不论你是正从事IT行业的老鸟或是对IT行业感兴趣的新人,都欢迎加入我们的的圈子(技术交流、学习资源、职场吐槽、大厂内推、面试辅导),让我们一起学习成长!**
的stickyEvents对象,它是专用于粘性事件处理的一个字段,key为事件的Class对象,value为当前的事件。
可能有的同学还不知道粘性事件,所谓粘性事件是相对普通事件来说的。普通事件是先注册,然后发送事件才能收到;而粘性事件,在发送事件之后再订阅该事件也能收到。并且,粘性事件会保存在内存中,每次进入都会去内存中查找获取最新的粘性事件,除非你手动解除注册。
然后,我们看注释5这行代码新建了一个subscriberMethodFinder对象,这是从EventBus中抽离出的订阅方法查询的一个对象。在注释6处,从builder中取出了一个默认的线程池对象,它由Executors的newCachedThreadPool()方法创建,它是一个有则用、无则创建、无数量上限的线程池。
接下来,我们再看一下EventBus的regist()方法。
### 学习分享
在当下这个信息共享的时代,很多资源都可以在网络上找到,只取决于你愿不愿意找或是找的方法对不对了
很多朋友不是没有资料,大多都是有几十上百个G,但是杂乱无章,不知道怎么看从哪看起,甚至是看后就忘
如果大家觉得自己在网上找的资料非常杂乱、不成体系的话,我也分享一套给大家,比较系统,我平常自己也会经常研读。
**2021最新上万页的大厂面试真题**
[外链图片转存中...(img-Tod6vDd4-1714335730606)]
**七大模块学习资料:如NDK模块开发、Android框架体系架构…**
[外链图片转存中...(img-fLQ9Gqfk-1714335730607)]
只有系统,有方向的学习,才能在段时间内迅速提高自己的技术。
> 这份体系学习笔记,适应人群:
> **第一,**学习知识比较碎片化,没有合理的学习路线与进阶方向。
> **第二,**开发几年,不知道如何进阶更进一步,比较迷茫。
> **第三,**到了合适的年纪,后续不知道该如何发展,转型管理,还是加强技术研究。
### 由于文章内容比较多,篇幅不允许,部分未展示内容以截图方式展示 。
**网上学习资料一大堆,但如果学到的知识不成体系,遇到问题时只是浅尝辄止,不再深入研究,那么很难做到真正的技术提升。**
**[需要这份系统化学习资料的朋友,可以戳这里获取](https://bbs.csdn.net/topics/618156601)**
**一个人可以走的很快,但一群人才能走的更远!不论你是正从事IT行业的老鸟或是对IT行业感兴趣的新人,都欢迎加入我们的的圈子(技术交流、学习资源、职场吐槽、大厂内推、面试辅导),让我们一起学习成长!**


 12万+
12万+

 被折叠的 条评论
为什么被折叠?
被折叠的 条评论
为什么被折叠?
 到【灌水乐园】发言


