


因为在 Angular 中的广泛使用,装饰器(Decorator)变得流行起来。 在 Angular 中,因为使用了 TypeScript,装饰器才可用。
但在 JavaScript 中,装饰器目前仍然是第2阶段的提案,这意味着装饰器将成为该语言未来更新的一部分。
本篇主要介绍装饰器是什么,以及如何使用它们来使代码更清晰、更易于理解。
1、什么是装饰器
在最简单的使用形式中,装饰器就是一种用一段代码将另一端代码包裹起来的方式, 按照字面意思讲就是“装饰”代码。之前你可能听说过这种方式,就是组合函数或者高阶函数的概念。
在标准 JavaScript 中这种装饰方式已经可以实现,只需要简单的使用一个方法将另一个方法进行包裹即可:
// 目标方法
function sayHello(name) {
console.log('Hello, ' + name);
}
//作为装饰的方法
function loggingDecorator(wrappedMethod) {
return function () {
console.log(`call function ${wrappedMethod.name} start`);
const result = wrappedMethod.apply(this, arguments);
console.log(`call function ${wrappedMethod.name} end`);
return result;
}
}
//包裹后的方法
const wrappedHello = loggingDecorator(sayHello);
//装饰后的方法调用
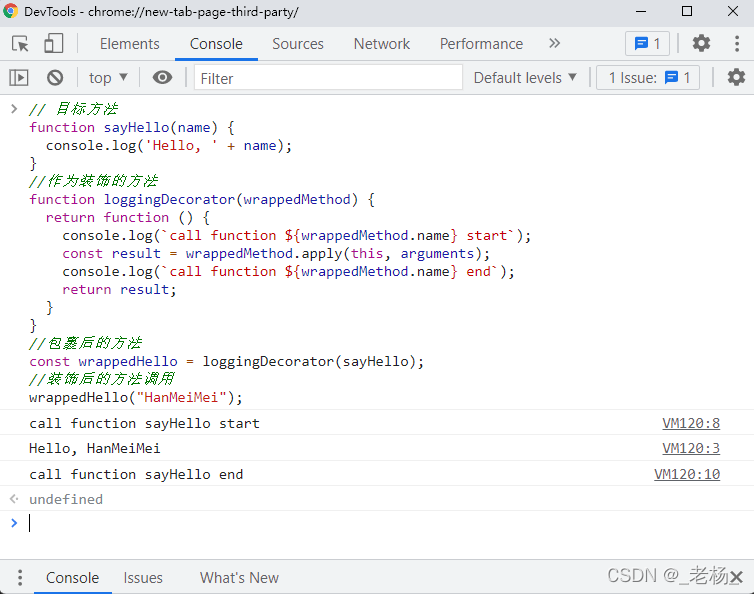
wrappedHello("HanMeiMei");这个例子构建了一个新的方法 wrappedHello,它通过 loggingDecorator(sayHello) 方法返回,它与 sayHello() 方法完成同样的操作。不同的事在目标方法调用前后 wrappedHello 多了日志打印动作。运行代码,输出如下图所示:
同样的装饰方法,我们也可以用来“装饰”其他的目标方法:
function sayHi(name){
console.log('Hi, ' + name);
}
const wrappedHi = loggingDecorator(sayHi);
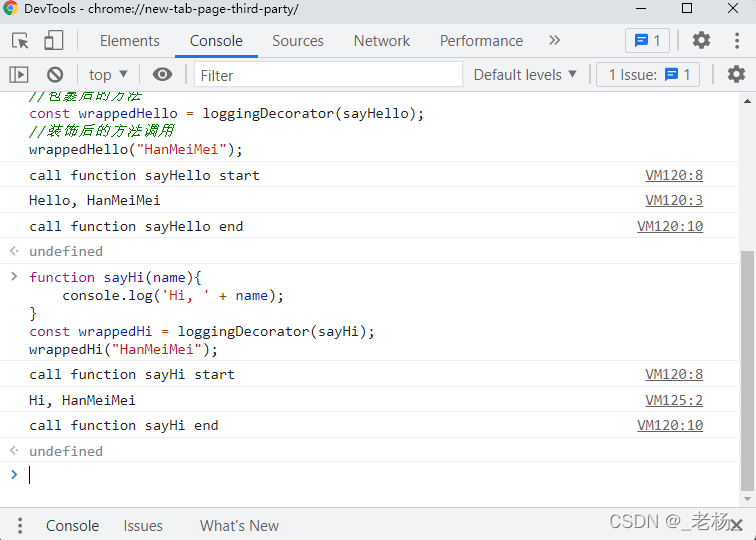
wrappedHi("HanMeiMei");运行结果:
2、如何使用装饰器
装饰器在 JavaScript 中使用一种特殊的语法,即它们以 @ 符号为前缀,并放在被装饰的代码之前。
由于目前的浏览器或Node版本还没有支持装饰器,不能直接在浏览器中进行使用调试。本篇演示的装饰器都是在Angular环境中调试运行。
以下示例演示简单的类的装饰器的用法:
function changePrice<T extends { new(...args: any[]): {} }>(constructor: T) {
    return class extends constructor {
        price = 666;
    };
}

@changePrice
export class Grape {
    price: number = 0;
    constructor(price: number) {
        this.price = price;
        console.log(`constructor price : ${this.price}`);
    }
}

//组件中调用代码
let grape = new Grape(4);
console.log(grape);
在类 Grape 的定义上方通过使用 @ 加装饰器名称的方式 应用了装饰器方法,上例中装饰器方法 changePrice 将目标类的构造方法进行了扩展,将 price 字段的值设置为 666, 装饰器方法返回的是一个新的构造方法。运行代码打印如下:
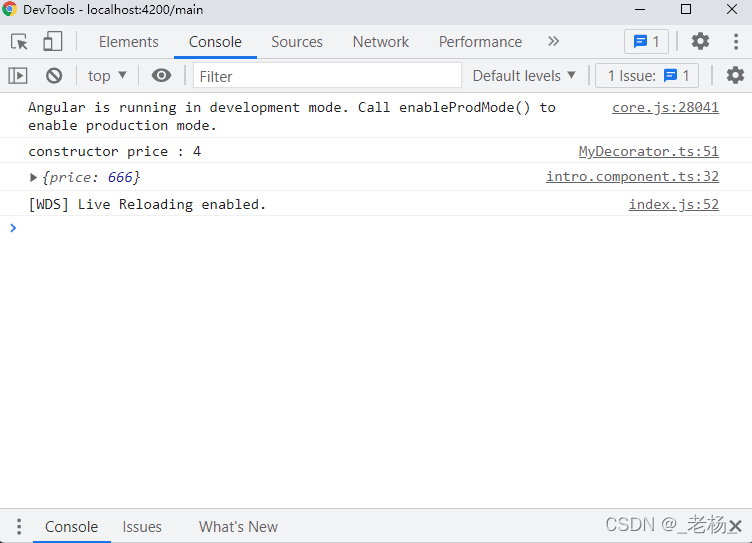
可见组件中通过 new Grape(4) 调用了被装饰器 changePrice 返回的扩展的构造方法,其中 price 被设置为 666 。相当于先调用了
this.price = price;
console.log(`constructor price : ${this.price}`);
然后再调用 this.price = 666; 。
关于装饰器的简单介绍就到此为止,后面会分类介绍具体的装饰器。


 1471
1471

 被折叠的 条评论
为什么被折叠?
被折叠的 条评论
为什么被折叠?
 到【灌水乐园】发言


