


点击上方“AI搞事情”关注我们
❝官 网:https://www.gradio.app/
github:https://github.com/gradio-app/gradio
论 文:Abid A , Abdalla A , Abid A ,et al.Gradio: Hassle-Free Sharing and Testing of ML Models in the Wild[J]. 2019.DOI:10.48550/arXiv.1906.02569.
简介
快速构建针对人工智能交互式界面的python 的 webApp 库,封装前端页面 + 后端接口 + AI 算法模型推理,无需编写繁琐的HTML、CSS和JavaScript代码,方便 AI 算法工程师快速展示成果,支持机器学习模型、自然语言处理模型、计算机视觉模型等。
Gradio支持多种输入和输出类型,包括文本、图像、音频和视频。可以通过定义回调函数来处理输入,并将输出返回给用户。Gradio还提供了自动化的界面布局和样式,使得界面设计变得简单而直观。
安装初体验
pip install gradiohello world 小栗子
import gradio as gr

def greet(name):
    return "Hello " + name + "!"

demo = gr.Interface(fn=greet, inputs="text", outputs="text")
demo.launch()运行后在http://localhost:7860/可以访问web程序,访问IP和端口可以通过server_name="0.0.0.0", server_port=1234设置,并进行交互体验.
PC端打开是这样的:

移动端打开是这样的,看来还做了移动端的兼容:

傻瓜聊天机器人
import random
import gradio as gr

def random_response(message, history):
    return random.choice(["Yes", "No"])

demo = gr.ChatInterface(fn=random_response, title='chatgpt')

demo.launch()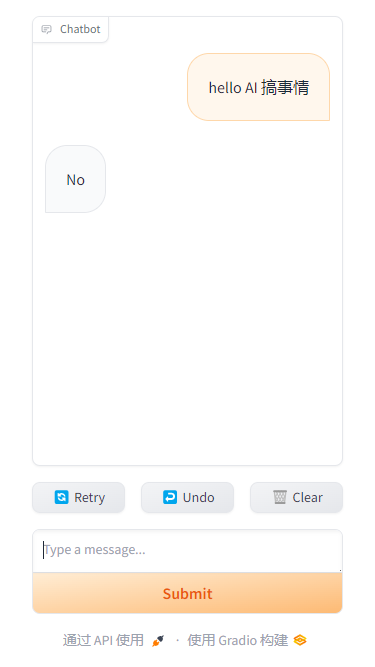
根据上面两个简单demo,Gradio应用的基础模块有:
应用界面:gr.Interface(简易场景),gr.ChatInterface(对话场景), gr.Blocks(定制化场景) gr.TabbedInterface (多页面场景)输入输出:gr.Image(图像), gr.Textbox(文本框), gr.DataFrame(数据框), gr.Dropdown(下拉选项), gr.Number(数字), gr.Markdown, gr.Filesfn功能函数:核心功能实现函数控制组件:gr.Button(按钮),gr.Checkbox(复选框),gr.Radio(单选按钮)等布局组件:gr.Tab(标签页), gr.Row(行布局), gr.Column(列布局)等
构建应用
图像处理
展示简单的图像旋转、灰度图转换操作,并将输入图片和结果展示在web页面。
import gradio as gr


def process_image(img, op_type):
    if op_type == "旋转90度":
        img = img.rotate(90)
    if op_type == "转绘图":
        img = img.convert("L")
    return img


demo = gr.Interface(
    fn=process_image,
    inputs=[gr.Image(type="pil"), gr.Radio(["旋转90度", "转绘图"])],
    outputs="image"
)

if __name__ == '__main__':
    demo.launch()
人脸检测
import gradio as gr
import time
import cv2

# 人脸检测函数
def face_rec(img):
    # 转为灰度图
    gray = cv2.cvtColor(img, cv2.COLOR_BGR2GRAY)
    # 创建人脸级联分类器
    face_detecter = cv2.CascadeClassifier('./haarcascades/haarcascade_frontalface_default.xml')
    faces = face_detecter.detectMultiScale(gray,
                                           scaleFactor=1.15,
                                           minNeighbors=3,
                                           minSize=(40, 40))
    for face in faces:
        print('face: ', face)
        (x, y, w, h) = face
        cv2.rectangle(img, (x, y), (x + w, y + h), [0, 0, 255], 2)
        face_img = img[y:y + h, x:x + w]  # 把检测处理的人脸框切片出来

        eye = cv2.CascadeClassifier('./haarcascades/haarcascade_eye.xml')  # 创建眼睛级联分类器
        eyes = eye.detectMultiScale(face_img)  # 在人脸切片图片上检测眼睛

        for eye in eyes:
            (ex, ey, ew, eh) = eye
            cv2.rectangle(face_img, (ex, ey), (ex + ew, ey + eh), [0, 255, 0], 2)  ##在人脸切片图片上框出眼睛,face_img已经修改
            img[y:y + h, x:x + w] = face_img  # 把框出眼睛的人脸切片图片贴到img上去

    return img

demo = gr.Interface(
    fn=face_rec,
    inputs=gr.Image(),
    outputs="image",
    examples=["images/1.jpg", "images/2.jpg", "images/3.jpg", "images/4.jpg", "images/5.png"],
)

if __name__ == "__main__":
    demo.launch()
examples:指定输入的示例,如左下角所示
文本分类
根据语义信息进行情感分类,判断积极情绪还是消极情绪。这里采用的是distilbert-base-multilingual-cased-sentiments-student模型;这个模型是一个多语言模型,可以处理多种语言,包括英文、中文、日语等。
import gradio as gr
from transformers import pipeline

pipe = pipeline("text-classification",
                model="lxyuan/distilbert-base-multilingual-cased-sentiments-student",
                return_all_scores=True
                )  # 会自动从huggingface下载模型,不过一般打不开

def clf(text):
    result = pipe(text)
    res = {}
    for pred_label in result[0]:
        res[pred_label['label']] = pred_label['score']
    return res

demo = gr.Interface(fn=clf, inputs="text", outputs="label")
gr.close_all()

if __name__ == '__main__':
    demo.launch(share=True)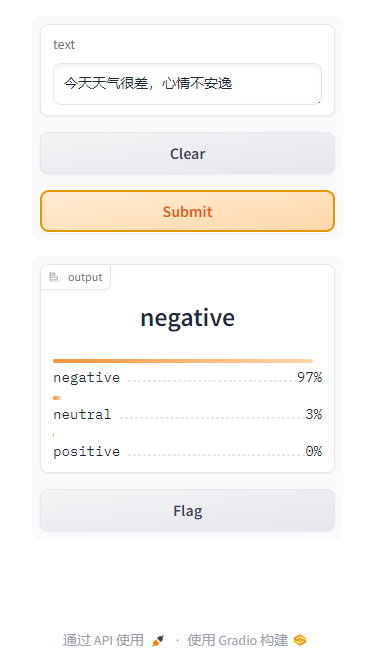
模型下载可以看这个项目:HuggingFace-Download-Accelerator
python hf_download.py --model lxyuan/distilbert-base-multilingual-cased-sentiments-student --save_dir ./hf_hub矩阵操作
demo实现了矩阵的转置操作,输入输出为Dataframe和numpy
import numpy as np

import gradio as gr

def transpose(matrix):
    return matrix.T

demo = gr.Interface(
    transpose,
    gr.Dataframe(type="numpy", datatype="number", row_count=5, col_count=3),
    "numpy",
    examples=[
        [np.zeros((3, 3)).tolist()],
        [np.ones((2, 2)).tolist()],
        [np.random.randint(0, 10, (3, 10)).tolist()],
        [np.random.randint(0, 10, (10, 3)).tolist()],
        [np.random.randint(0, 10, (10, 10)).tolist()],
    ],
    cache_examples=False
)

if __name__ == "__main__":
    demo.launch()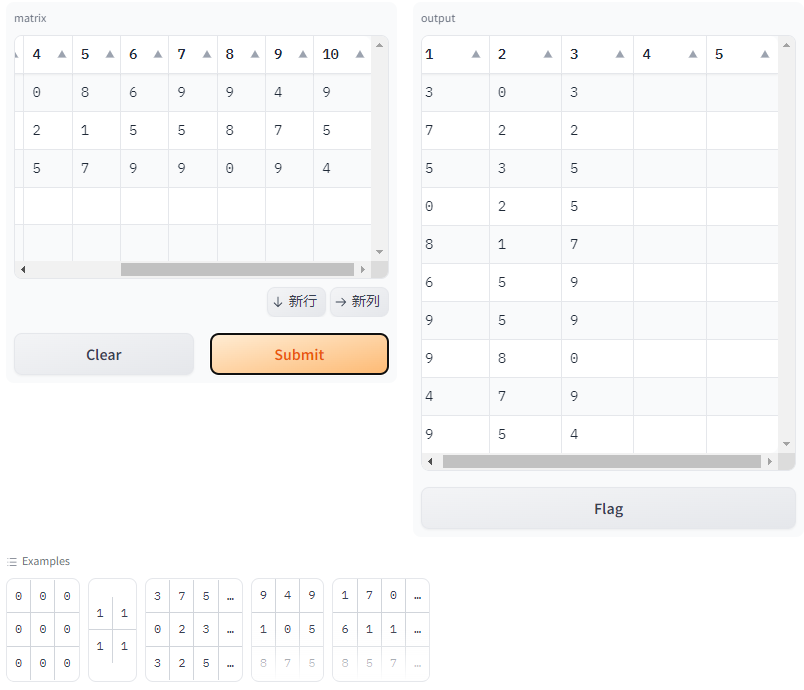
分享应用
1. 内网穿透共享应用
通过在 launch() 方法中设置 share=True,可以轻松地公开共享 Gradio服务。通过内网穿透工具frpc可以将本地服务映射到公共网络,使得远程可以访问。
没有安装frpc会提示如下信息:则需要按提示安装软件,才能将本地服务通过Gradio服务器以XXXXXX.gradio.app的链接分享到公网上,且共享链接在 72 小时内有效。
注意:由于将本地服务暴露到公网,需要注意隐私和数据安全,注意不要函数公开任何敏感信息或者违法乱纪的不当言论,或允许在您的设备上发生任何关键更改。
Could not create share link. Missing file: F:\Users\admin\anaconda3\lib\site-packages\gradio\frpc_windows_amd64_v0.2.

Please check your internet connection. This can happen if your antivirus software blocks the download of this file. You can install manually by following these steps:

1. Download this file: https://cdn-media.huggingface.co/frpc-gradio-0.2/frpc_windows_amd64.exe
2. Rename the downloaded file to: frpc_windows_amd64_v0.2
3. Move the file to this location: F:\Users\admin\anaconda3\lib\site-packages\gradio
2. 托管社区
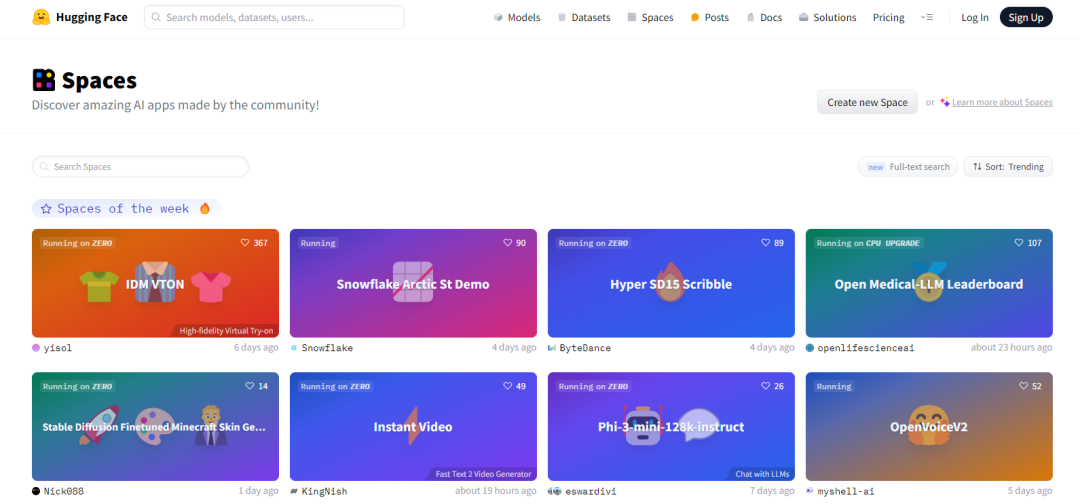
HuggingFace
HuggingFace:目前最大的开源机器学习模型社区(AI模型的GitHub),Gradio团队21年已经被HuggingFace的收购;为了在公网展示模型效果,可以将 Gradio 的模型部署到 HuggingFace的 Space托管空间中。
注册huggingface账号:
https://huggingface.co/join在space空间中创建项目:
https://huggingface.co/spaces创建好的项目有一个
Readme文档,可以根据说明操作,也可以手工编辑app.py和requirements.txt文件。
modelscope
modelscope:国内的开源AI模型共享网站,对标国外的HuggingFace,modelscope创空间是AI应用展示空间,支持Gradio、Streamlit、Static搭建web AI应用。

3. 部署到云服务器
首先,你得有一台云服务器。
运行启动gradio项目代码,通过通过
server_name="0.0.0.0",server_port=8000指定所有ID可访问和端口。防火墙、安全组添加端口,开放指定端口。
IP:port【域名,有的话】访问,即可访问服务器的AI服务。
关注我们
有趣的灵魂在等你


 2057
2057

 被折叠的 条评论
为什么被折叠?
被折叠的 条评论
为什么被折叠?
 到【灌水乐园】发言


