


1. TCP网络优化的两种机制
TCP(Transmission Control Protocol 传输控制协议)是一种面向连接的、可靠的、全双工、基于字节流的传输层通信协议,由IETF的RFC 793定义。
TCP协议是网络编程中最重要的协议之一,TCP协议将上层的数据附上TCP报头等信息,封装成一个个报文段(segment),然后交由下层网络层去处理。TCP协议定义了TCP报文段的结构,如下图所示:
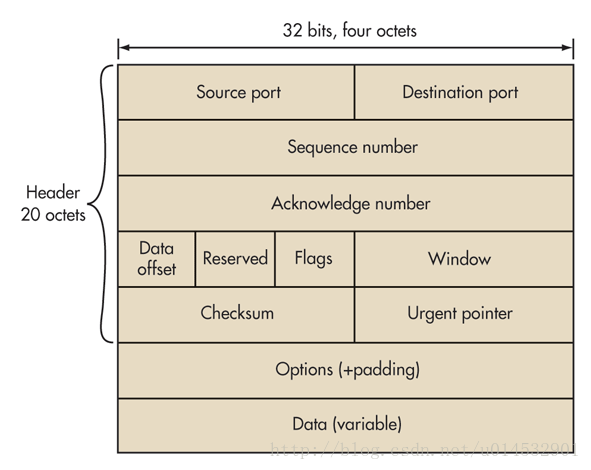
可以看出,TCP每个报文段的首部大小至少是20字节的数据,因此若用户数据为1字节,再加上网络层IP包头20字节,则整个IP数据包的大小为41字节,那么整个IP数据包的负荷率为1 / 41。这显然是不划算的,会降低网络的传输效率,当网络都充斥着这种IP数据包的时候,可想而知整个网络几乎都在传输一些无用的包头信息,这种问题被称为小包问题。特别是在Telnet协议中,当用户远程登录到一个主机,他的每一次键盘敲击实际上都会产生一个携带用户数据量小的数据包,这是典型的小包问题。
为了解决这种问题,出现了Nagle's Algorithms,这个算法是John Nagle为解决实际过程中出现的小包问题而发明的。它的思想很朴素,就是将多个即将发送的小段的用户数据,缓存并合并成一个大段数据时,一次性一并发送出去。特别的是,只要当发送者还没有收到前一次发送TCP报文段的的ACK(即连接中还存在未回执ACK的TCP报文段)时,发送方就应该一直缓存数据直到数据达到可以发送的大小,然后再统一合并到一起发送出去,如果收到上一次发送的TCP报文段的ACK则立马将缓存的数据发送出去。
以下是Nigle算法的伪代码:
if there is new data to send
  if the window size >= MSS and available data is >= MSS
    send complete MSS segment now
  else
    if there is unconfirmed data still in the pipe
      enqueue data in the buffer until an acknowledge is received
    else
      send data immediately
    end if
  end if
end if
MSS = maximum segment size
与之相呼应的还有一个网络优化的机制叫做TCP延迟确认,这个是针对接收方来讲的机制,由于ACK包属于有效数据比较少的小包,因此延迟确认机制就会导致接收方将多个收到数据包的ACK打包成一个回复包返回给发送方。这样就可以避免导致只包含ACK的TCP报文段过多导致网络额外的开销(前面提到的小包问题)。延迟确认机制有一个超时机制,就是当收到每一个TCP报文段后,如果该TCP报文段的ACK超过一定时间还未发送就启动超时机制,立刻将该ACK发送出去。因此延迟确认机制会可能会带来500ms的ACK延迟确认时间。
延迟确认机制和Nigle算法几乎是在同一时期提出来的,但是是由不同的组提出的。这两种机制在某种程度上的确对网络传输进行了优化,在通常的协议栈实现中,这两种机制是默认开启的。
但是,这两种机制结合起来的时候会产生一些负面的影响,可能会导致应用程序的性能下降。
2. write-write-read模式带来的问题
考虑这么一种情况,
-
假设发送方A启用了Nigle算法,接收方B启用了延迟确认机制,则当发送方A向TCP连接进行了两次write操作,每次write操作都之写入了少量的数据(少于MSS),假设写入的数据片段为w1,w2,然后紧接着调用了阻塞式的read操作。
-
因为连接中没有未收到ACK的TCP报文段,发送方A的第一次写入的w1会立马发送出去;
-
则在接收方来B来看,它会首先收到包含w1数据段的TCP报文段,但是由于延迟确认机制,接收方B会延迟发送该TCP报文段的ACK直到超时。
-
而对于发送方A来说,根据Nigle算法,由于连接中上一个TCP报文段未收到ACK,并且第二次写入的w2数据段过于小(小于MSS),则发送方A会将w2入队列缓存起来,不会立即发送。
-
然而不幸的是,发送方A此时并不继续发送数据,因此依靠发送方A将缓存填满来把w2数据段发送出是不可能的了,现在只能傻傻的等待接收方B因为超时而返回w1的ACK了。
-
这样当接收方B因为超时而返回ACK后,发送方A就会立即发送包含w2数据段的TCP报文段。
自此,w1、w2数据段才被完整的发送给接收方B,如果忽略传输时间等其他因素,这额外增加的数据传输延迟就是接收方B启用的延迟确认机制中的超时的值。
因此当延迟确认机制和Nigle算法都启用的时候,正好碰上了这种write-write-read模式的数据传输,就会出现这种问题,因此wiki上就有这些建议:
The user-level solution is to avoid write-write-read sequences on sockets. write-read-write-read is fine. write-write-write is fine. But write-write-read is a killer. So, if you can, buffer up your little writes to TCP and send them all at once. Using the standard UNIX I/O package and flushing write before each read usually works.
Nigle算法在一次性写入比较大的数据段时会出现延迟的现象,特别是对于Request-Response模式的程序来讲,通常一个请求的数据会大于MMS,这样一个请求就会跨越多个TCP报文段,因此Nigle算法会导致最后一个TCP报文段被Hold住,出现延时;同样的一个回复的数据也会大于MMS,因此也会出现这种延时。
Nigle算法通常是用来防止那些写得不太好的程序,防止这些程序随意的发小包降低网络传输效率;而对于一些精心编写的程序,Nigle算法几乎没什么用,应用程序编写者应该合理的把握、判断好每次写入的数据的大小,进而采取适当的策略进行发送,要么将小包合并到MMS大小,然后一次性写入并发送;要么禁用Nigle算法。
当然以上只是一种解决方案,通常的协议栈会预留接口来禁用Nigle算法,即设置TCP_NODELAY选项。
3. TCP的NO_DELAY选项
Socket编程模型会有一个预留接口来禁用Nigle算法,这个接口就是TCP NODELAY。
这是网上的用Java写的一个关于是否启用TCP NODELAY的实验
需要说明的是这个实验在同一台windows上是不成功的,在windows上的loopback地址的处理可能和Linux不太一样。在windows下实验,开启TCP NODELAY与否都不会出现延迟的情况。奇怪的是我选一台windows做Client,一台Max机器做Server,实验仍然失败,不知道Windows对于Nagle算法是否是否是默认的开启。但是我选windows机器做Server,Mac机器做Client,实验结果显而易见。
需要说明的是这个实验在同一台windows上是不成功的,在windows上的loopback地址的处理可能和Linux不太一样。在windows下实验,开启TCP NODELAY与否都不会出现延迟的情况。奇怪的是我选一台windows做Client,一台Max机器做Server,实验仍然失败,不知道Windows对于Nagle算法是否是否是默认的开启。但是我选windows机器做Server,Mac机器做Client,实验结果显而易见。
Server端代码
public class Server {

    public static void main(String[] args) {
        // TODO Auto-generated method stub
        try {
            ServerSocket socket = new ServerSocket(9989);
            System.out.println("绑定端口");
            while(true) {
                Socket con  = socket.accept();
                new Thread( new Runnable() {

                    @Override
                    public void run() {
                        // TODO Auto-generated method stub
                        try {
                            InputStream in = con.getInputStream();
                            OutputStream out = con.getOutputStream();
                            BufferedReader reader = new BufferedReader(new InputStreamReader(in));
                            while (true) {
                                String line = reader.readLine();
                                if(!con.isClosed())
                                    out.write((line + "\r\n").getBytes());
                            }
                        } catch (IOException e) {
                            // TODO Auto-generated catch block
                            e.printStackTrace();
                        }
                    }
                }).start();
            }

        } catch (IOException e) {
            // TODO Auto-generated catch block
            e.printStackTrace();
        }
    }

}
Client端
public class Client {

    public static void main(String[] args) {
        // TODO Auto-generated method stub
        try {
            Socket s = new Socket("192.168.31.235", 9989);
            s.setTcpNoDelay(true);
            OutputStream ops = s.getOutputStream();
            InputStream in = s.getInputStream();
            BufferedReader reader = new BufferedReader(new InputStreamReader(in));

            // write-write-read
            String head = "h";
            String body = "w\r\n";

            int i = 10;

            while ( i-- > 0) {
                long label = System.currentTimeMillis();
                ops.write(head.getBytes());
                ops.write(body.getBytes());// 会有延迟吧应该,有可能不会阻塞
                InputStream ips = s.getInputStream();
                String line = reader.readLine();
                System.out.println("RTT:" + (System.currentTimeMillis() - label) + ", receive: " + line);
            }
            s.close();
        } catch (UnknownHostException e) {
            // TODO Auto-generated catch block
            e.printStackTrace();
        } catch (IOException e) {
            // TODO Auto-generated catch block
            e.printStackTrace();
        }

    }

}
其中Server代码跑在Windows上,Client代码跑在Mac上
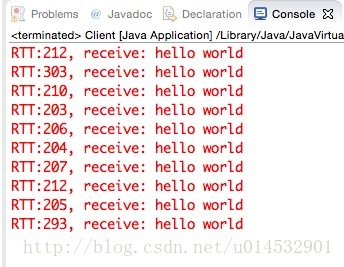
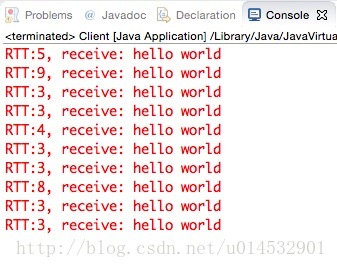
未开启TCP NODELAY,write-write-read模式
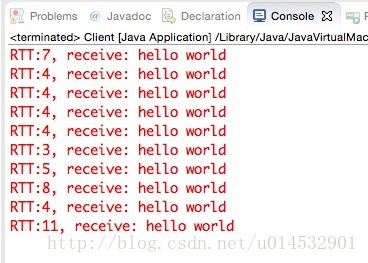
开启TCP NODELAY,write-write-read模式
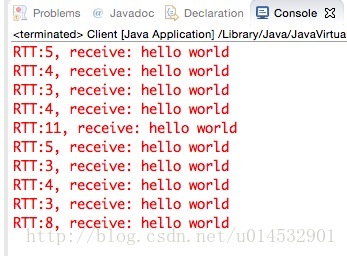
未开启TCP NODELAY, write-read模式
开启TCP NODELAY, write-read模式
可以明显的看出,当采用write-write-read模式,且未开启TCP NODELAY选项时(未禁用Nagle算法)时,延迟产生了,大约200ms。


 5233
5233


 被折叠的 条评论
为什么被折叠?
被折叠的 条评论
为什么被折叠?
 到【灌水乐园】发言


