


27 SpEL 解决了哪些问题?
实际工作中,我们经常会在一些注解中使用 SpEL 表达式,当然在 JPA 里也不例外,如果想知道它在 JPA 中的使用详情,必须要先从了解开始。那么这一讲,我们就来聊聊 SpEL 表达式相关知识。
SpEL 基础语法
SpEL 大纲
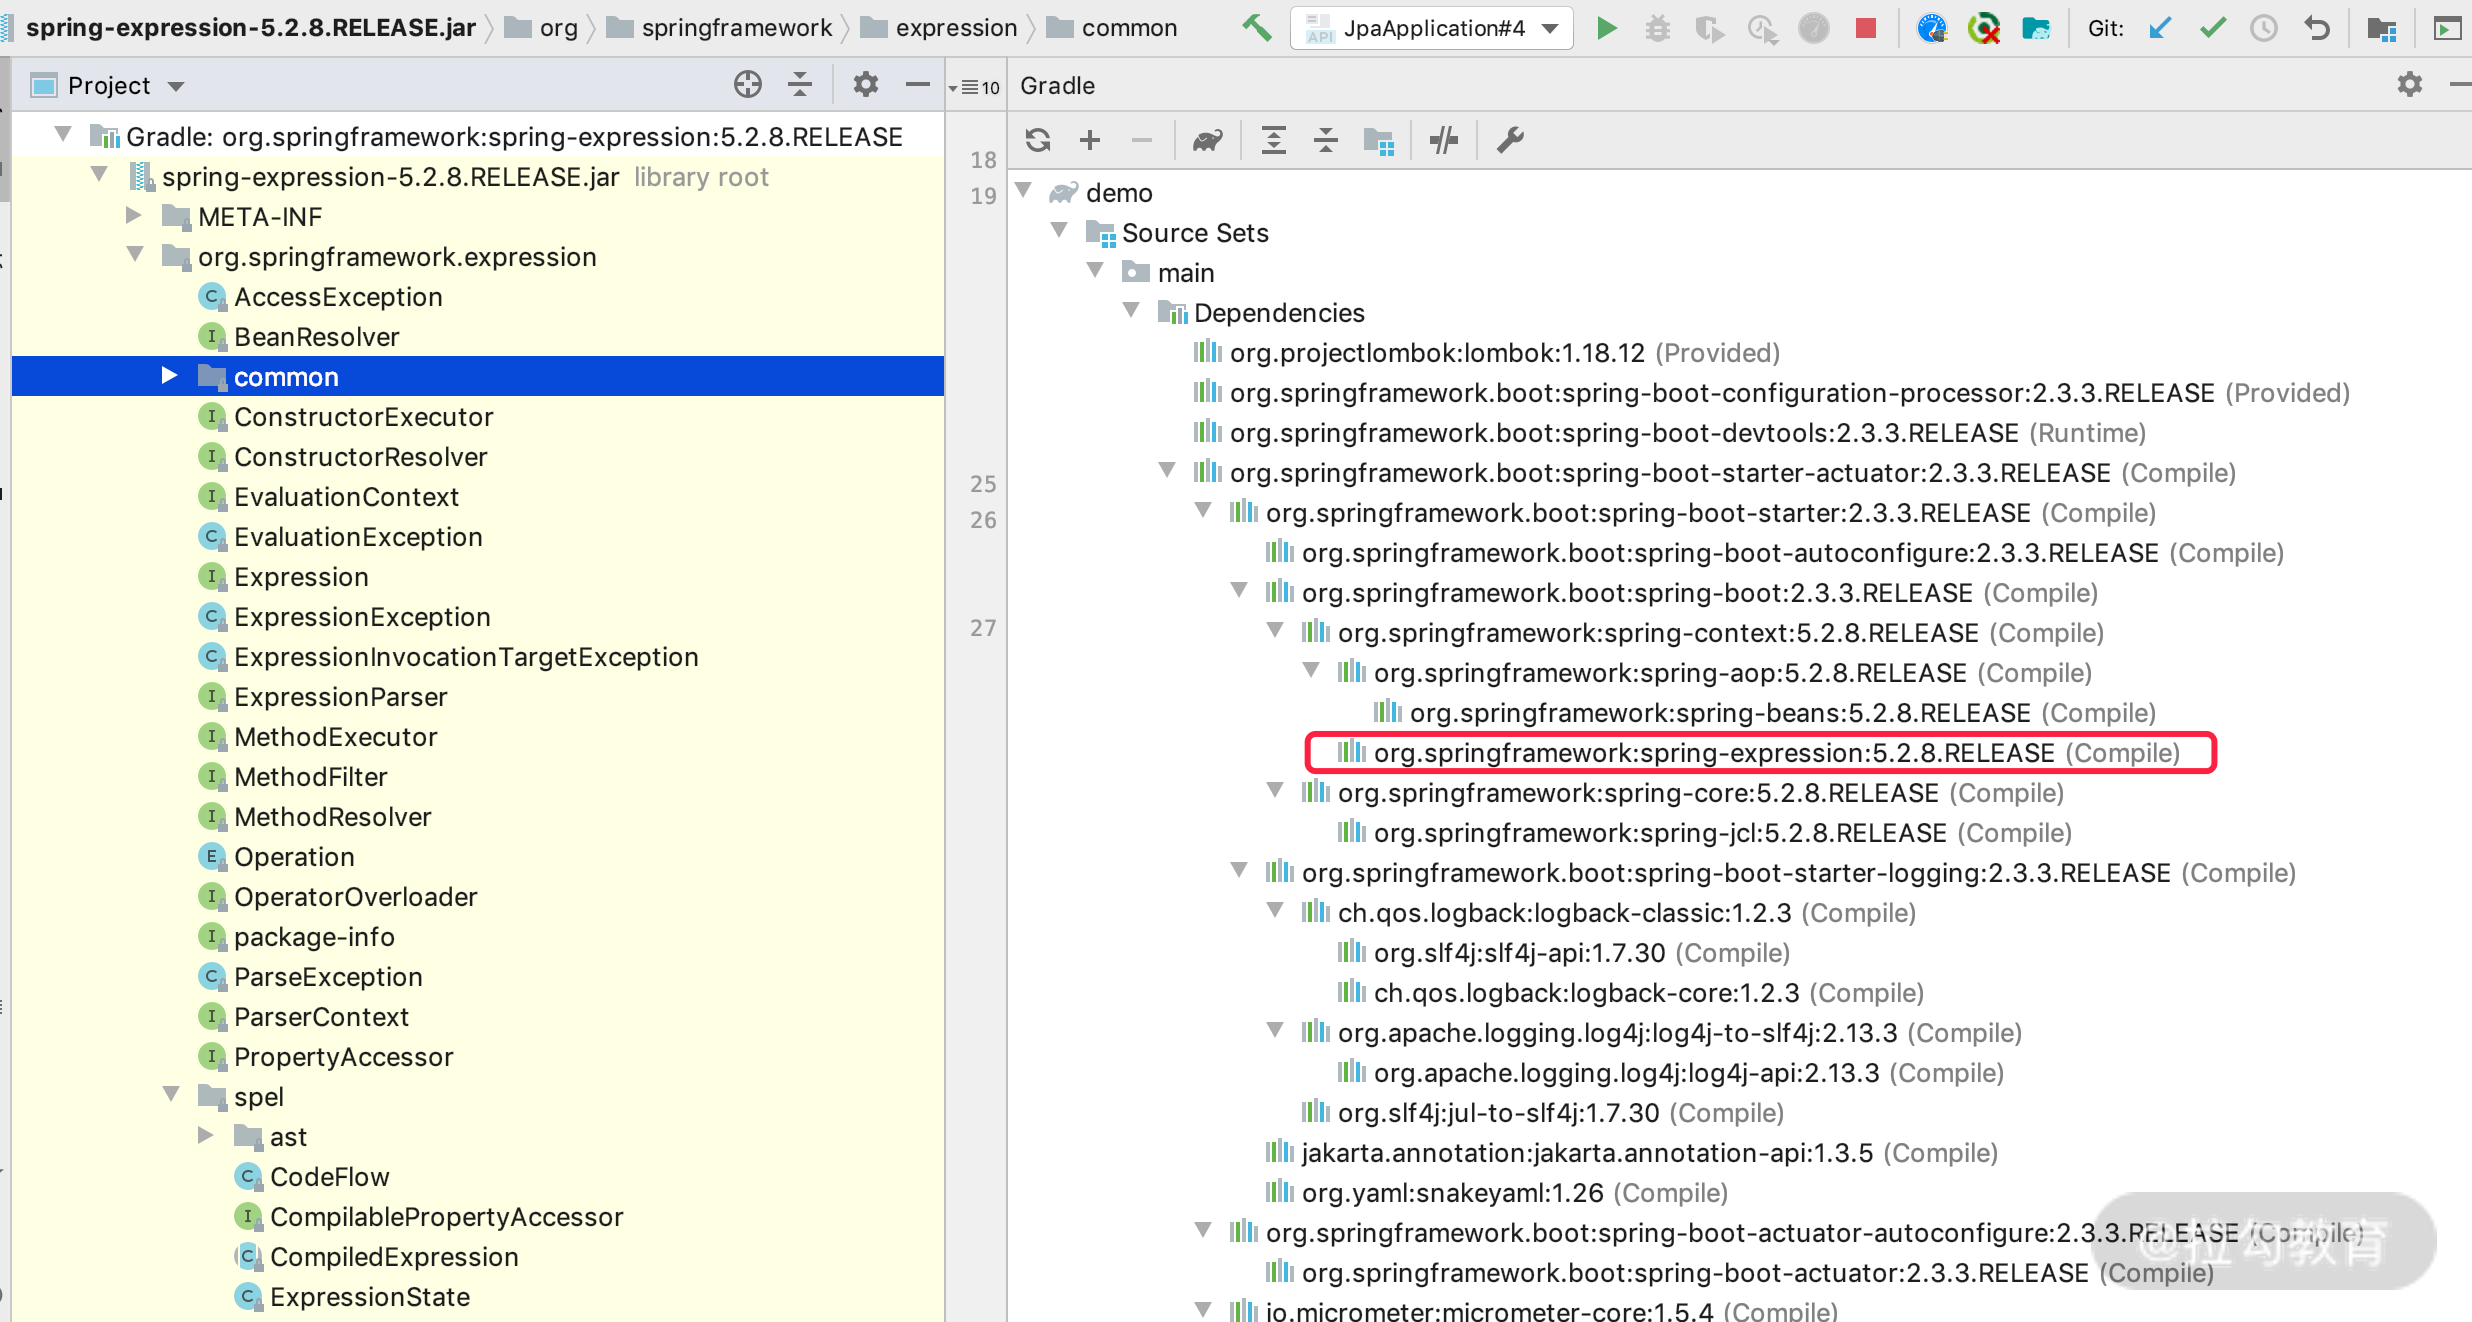
SpEL 的全称为 Spring Expression Language,即 Spring 表达式语言,是 Spring framework 里面的核心项目。我们先来看一下 spring-expression 的 jar 包的引用关系,如下图所示。
从核心引用来看,SpEL 贯穿所有 Spring 的核心功能。当然了,SpEL 可以脱离 Spring 工程独立使用,其项目里有三个重要的接口:ExpressionParser、Expression、EvaluationContext,我从官方文档中找了一张图来说明它们之间的关系。

注:图片来自网络
ExpressionParser
它是 SpEL 的处理接口,默认实现类是 SpelExpressionParser,对外提供的只有两个方法,如下述代码所示。
public interface ExpressionParser {
   // 根据传入的表达式生成Expression
   Expression parseExpression(String expressionString) throws ParseException;
   // 根据传入的表达式和ParserContext生成Expression对象
   Expression parseExpression(String expressionString, ParserContext context) throws ParseException;
}
我们可以看到,这两个方法的目的都是生成 Expression。
Expression
它默认的实现是 SpELExpression,主要对外提供的接口就是根据表达式获得表达式响应的结果,如下图所示。
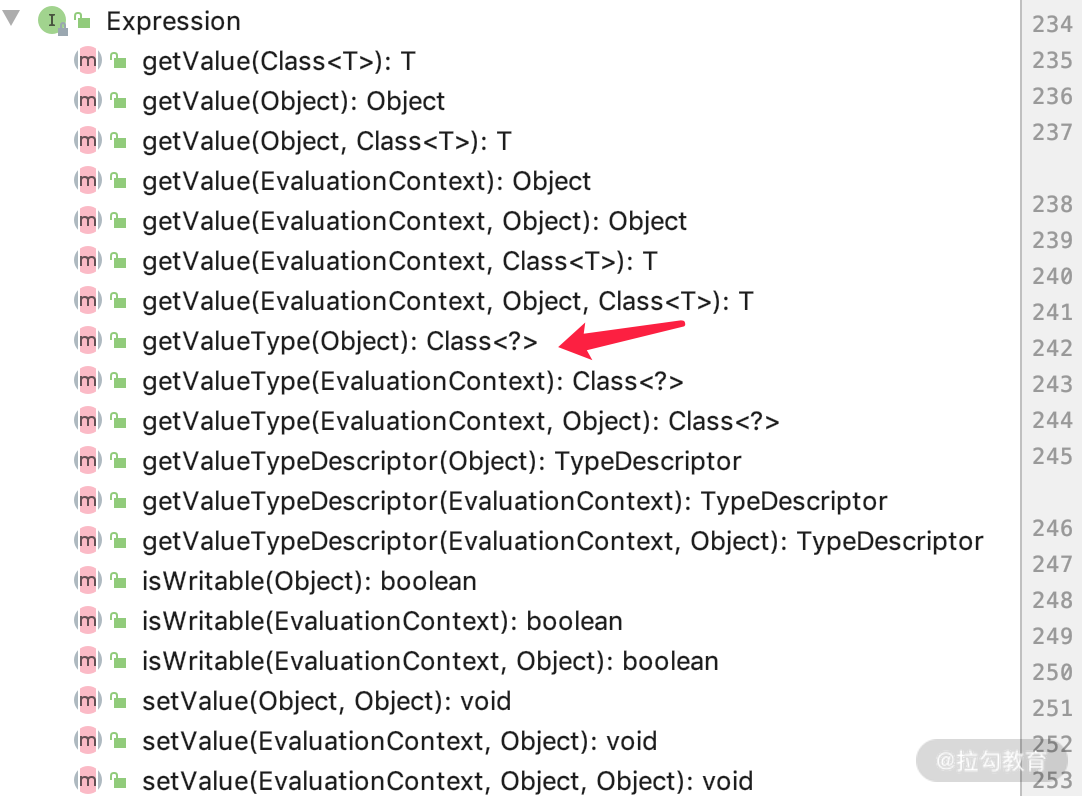
而它的这些方法中,最重的一个参数就是 EvaluationContext。
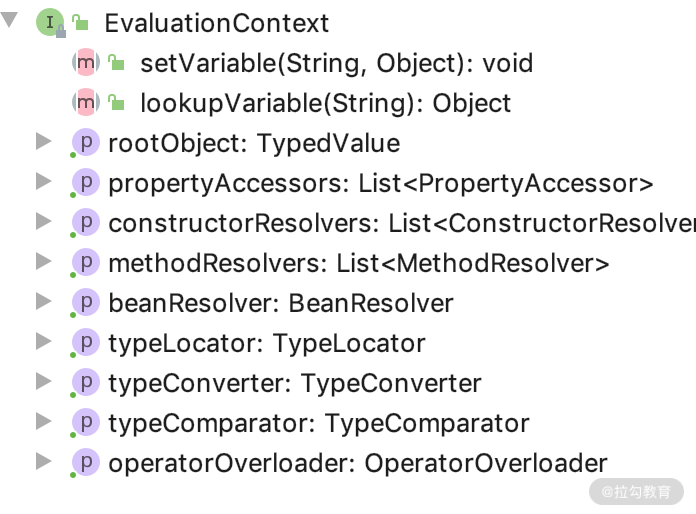
EvaluationContext
表示解析 String 表达式所需要的上下文,例如寻找 ROOT 是谁,反射解析的 Method、Field、Constructor 的解析器和取值所需要的上下文。我们看一下其接口提供的方法,如下图所示。
现在对这三个接口有了初步认识之后,我们通过实例来看一下基本用法。
SpEL 的基本用法
下面是一个 SpEL 基本用法的例子,你可以结合注释来理解。
//ExpressionParser是操作SpEL的总入口,创建一个接口ExpressionParser对应的实例SpelExpressionParser
ExpressionParser parser = new SpelExpressionParser();
//通过上面我们讲的parser.parseExpression方法获得一个Expression的实例,里面实现的就是new一个SpelExpression对象;而parseExpression的参数就是SpEL的使用重点,各种表达式的字符串
//1.简单的string类型用'' 引用
Expression exp = parser.parseExpression("'Hello World'");
//2.SpEL支持很多功能特性,如调用方法、访问属性、调用构造函数,我们可以直接调用String对象里面的concat方法进行字符串拼接
Expression exp = parser.parseExpression("'Hello World'.concat('!')");
//通过getValue方法可以得到经过Expresion计算parseExpression方法的字符串参数(符合SpEL语法的表达式)的结果
String message = (String) exp.getValue();
而访问属性值如下所示。
//3.invokes getBytes()方法
Expression exp = parser.parseExpression("'Hello World'.bytes");
byte[] bytes = (byte[]) exp.getValue(); //得到 byte[]类型的结果
SpEL 字符串表达式还支持使用“.”进行嵌套属性 prop1.prop2.prop3 访问,代码如下。
// invokes getBytes().length
Expression exp = parser.parseExpression("'Hello World'.bytes.length");
int length = (Integer) exp.getValue();
访问构造方法,例如字符串的构造方法,如下所示。
Expression exp = parser.parseExpression("new String('hello world').toUpperCase()");
String message = exp.getValue(String.class);
我们也可以通过 EvaluationContext 来配置一些根元素,代码如下。
//我们通过一个Expression表达式想取name属性对应的值
ExpressionParser parser = new SpelExpressionParser();
Expression exp = parser.parseExpression("name");
//我们通过EvaluationContext设置rootObject等于我们new的UserInfo对象
UserInfo rootUserInfo = UserInfo.builder().name("jack").build();
EvaluationContext context = new StandardEvaluationContext(rootUserInfo);
//getValue根据我们设置context取值,可以得到jack字符串
String name = (String) exp.getValue(context);
//我们也可以利用SpEL的表达式进行运算,判断名字是否等于字符串Nikola
Expression exp2 = parser.parseExpression("name == 'Nikola'");
boolean result2 = exp2.getValue(context, Boolean.class); // 根据我们UserInfo的rootObject得到false
我们在看 SpelExpressionParser 的构造方法时,会发现其还支持一些配置,例如我们经常遇到空指针异常和下标越界的问题,就可以通过 SpelParserConfiguration 配置:当 Null 的时候自动初始化,当 Collection 越界的时候自动扩容增加。我们看一下例子,如下所示。
//构造一个Class,方便测试
class MyUser {
    public List<String> address;
}
//开启自动初始化null和自动扩容collection
SpelParserConfiguration config = new SpelParserConfiguration(true,true);
//利用config生成ExpressionParser的实例
ExpressionParser parser = new SpelExpressionParser(config);
//我们通过表达式取这个用户的第三个地址
Expression expression = parser.parseExpression("address[3]");
MyUser demo = new MyUser();
//new一个对象,但是没有初始化MyUser里面的address,由于我们配置了自动初始化和扩容,所以通过下面的计算,没有得到异常,o可以得到一个空的字符串
Object o = expression.getValue(demo);// 空字符串
通过上面的介绍,你大概就知道 SpEL 是什么意思了,也知道了该怎么单独使用它,其实不难理解。不过 SpEL 的功能远不止这么简单,我们通过在 Spring 中常见的应用场景,看一下它还有哪些功能。
SpEL 在 Spring 中常见的使用场景
SpEL 在 @Value 里面的用法最常见,我们通过 @Value 来了解一下。
@Value 的应用场景
新建一个 DemoProperties 对象,用 Spring 装载,测试一下两个语法点:运算符和 Map、List。
**第一个语法:通过 @Value 展示 SpEL 里面支持的各种运算符的写法。**如下面的表格所示。
| 类型 | 操作符 |
|---|---|
| 逻辑运算 | +, -, *, /, %, ^, div, mod |
| 逻辑比较符号 | <, >, ==, !=, <=, >=, lt, gt, eq, ne, le, ge |
| 逻辑关系 | and, or, not, &&, ||, ! |
| 三元表达式 | ?: |
| 正则表达式 | matches |
我们通过四部分代码展示一下 SpEL 里面支持的各种运算符,用法如下所示。
@Data
@ToString
@Component //通过@Value使用SpEL的地方,一定要将此对象交由Spring进行管理
public class DemoProperties {
//第一部分:逻辑运算操作
    @Value("#{19 + 1}") // 20
    private double add;
    @Value("#{'String1 ' + 'string2'}") // "String1 string2"
    private String addString;
    @Value("#{20 - 1}") // 19
    private double subtract;
    @Value("#{10 * 2}") // 20
    private double multiply;
    @Value("#{36 / 2}") // 19
    private double divide;
    @Value("#{36 div 2}") // 18, the same as for / operator
    private double divideAlphabetic;
    @Value("#{37 % 10}") // 7
    private double modulo;
    @Value("#{37 mod 10}") // 7, the same as for % operator
    private double moduloAlphabetic;
// 第二部分:逻辑比较符号
    @Value("#{1 == 1}") // true
    private boolean equal;
    @Value("#{1 eq 1}") // true
    private boolean equalAlphabetic;
    @Value("#{1 != 1}") // false
    private boolean notEqual;
    @Value("#{1 ne 1}") // false
    private boolean notEqualAlphabetic;
    @Value("#{1 < 1}") // false
    private boolean lessThan;
    @Value("#{1 lt 1}") // false
    private boolean lessThanAlphabetic;
    @Value("#{1 <= 1}") // true
    private boolean lessThanOrEqual;
    @Value("#{1 le 1}") // true
    private boolean lessThanOrEqualAlphabetic;
    @Value("#{1 > 1}") // false
    private boolean greaterThan;
    @Value("#{1 gt 1}") // false
    private boolean greaterThanAlphabetic;
    @Value("#{1 >= 1}") // true
    private boolean greaterThanOrEqual;
    @Value("#{1 ge 1}") // true
    private boolean greaterThanOrEqualAlphabetic;
//第三部分:逻辑关系运算符
    @Value("#{250 > 200 && 200 < 4000}") // true
    private boolean and;
    @Value("#{250 > 200 and 200 < 4000}") // true
    private boolean andAlphabetic;
    @Value("#{400 > 300 || 150 < 100}") // true
    private boolean or;
    @Value("#{400 > 300 or 150 < 100}") // true
    private boolean orAlphabetic;
    @Value("#{!true}") // false
    private boolean not;
    @Value("#{not true}") // false
    private boolean notAlphabetic;
//第四部分:三元表达式 & Elvis运算符
// “b”
private String ternary;
//demoProperties就是我们通过spring加载的当前对象,
//我们取spring容器里面的某个bean的属性,
//这里我们取的是demoProperties对象里面的someProperty属性,
//如果不为null就直接用,如果为null返回’default’字符串
private String ternaryProperty;
/**
* Elvis运算符是三元表达式简写的方式,和上面一样的结果。如果someProperty为null则返回default值。
/
private String elvis;
/*
* 取系统环境的属性,如果系统属性pop3.port已定义会直接注入,如果未定义,则返回默认值25。systemProperties是spring容器里面的systemProperties实体;
/
private Integer port;
/*
* 还可以用于安全引用运算符主要为了避免空指针,源于Groovy语言。
* 很多时候你引用一个对象的方法或者属性时都需要做非空校验。
* 为了避免此类问题,使用安全引用运算符只会返回null而不是抛出一个异常。
*/
//@Value(“#{demoPropertiesx?:someProperty}”)
// 如果demoPropertiesx不为null,则返回someProperty值
private String someProperty;
//第五部分:正则表达式的支持
// true
private boolean validNumericStringResult;
// false
private boolean invalidNumericStringResult;
// 利用matches匹配正则表达式,返回true
private boolean validAlphabeticStringResult;
// false
private boolean invalidAlphabeticStringResult;
//如果someValue只有数字
// true
private boolean validNumericValue;
//新增一个空的someValue属性方便测试
private String someValue=“”;
}
我们可以通过 @Value 测试各种 SpEL 的表达式,这和放在 parser.parseExpression("SpEL 的表达式字符串"); 里面的效果是一样的。我们可以写一个测试用例来看一下,如下所示。
@ExtendWith(SpringExtension.class)
@Import(TestConfiguration.class)
@ComponentScan(value = "com.example.jpa.demo.config.DemoProperties")
public class DemoPropertiesTest {
    @Autowired(required = false)
    private DemoProperties demoProperties;
    @Test
    public void testSpel() {
        //通过测试用例就可以测试@Value里面不同表达式的值了
        System.out.println(demoProperties.toString());
    }
    @TestConfiguration
    static class TestConfig {
        @Bean
        public DemoProperties demoProperties () {
            return new DemoProperties();
        }
    }
}
或者你可以启动一下项目,也能看到结果。
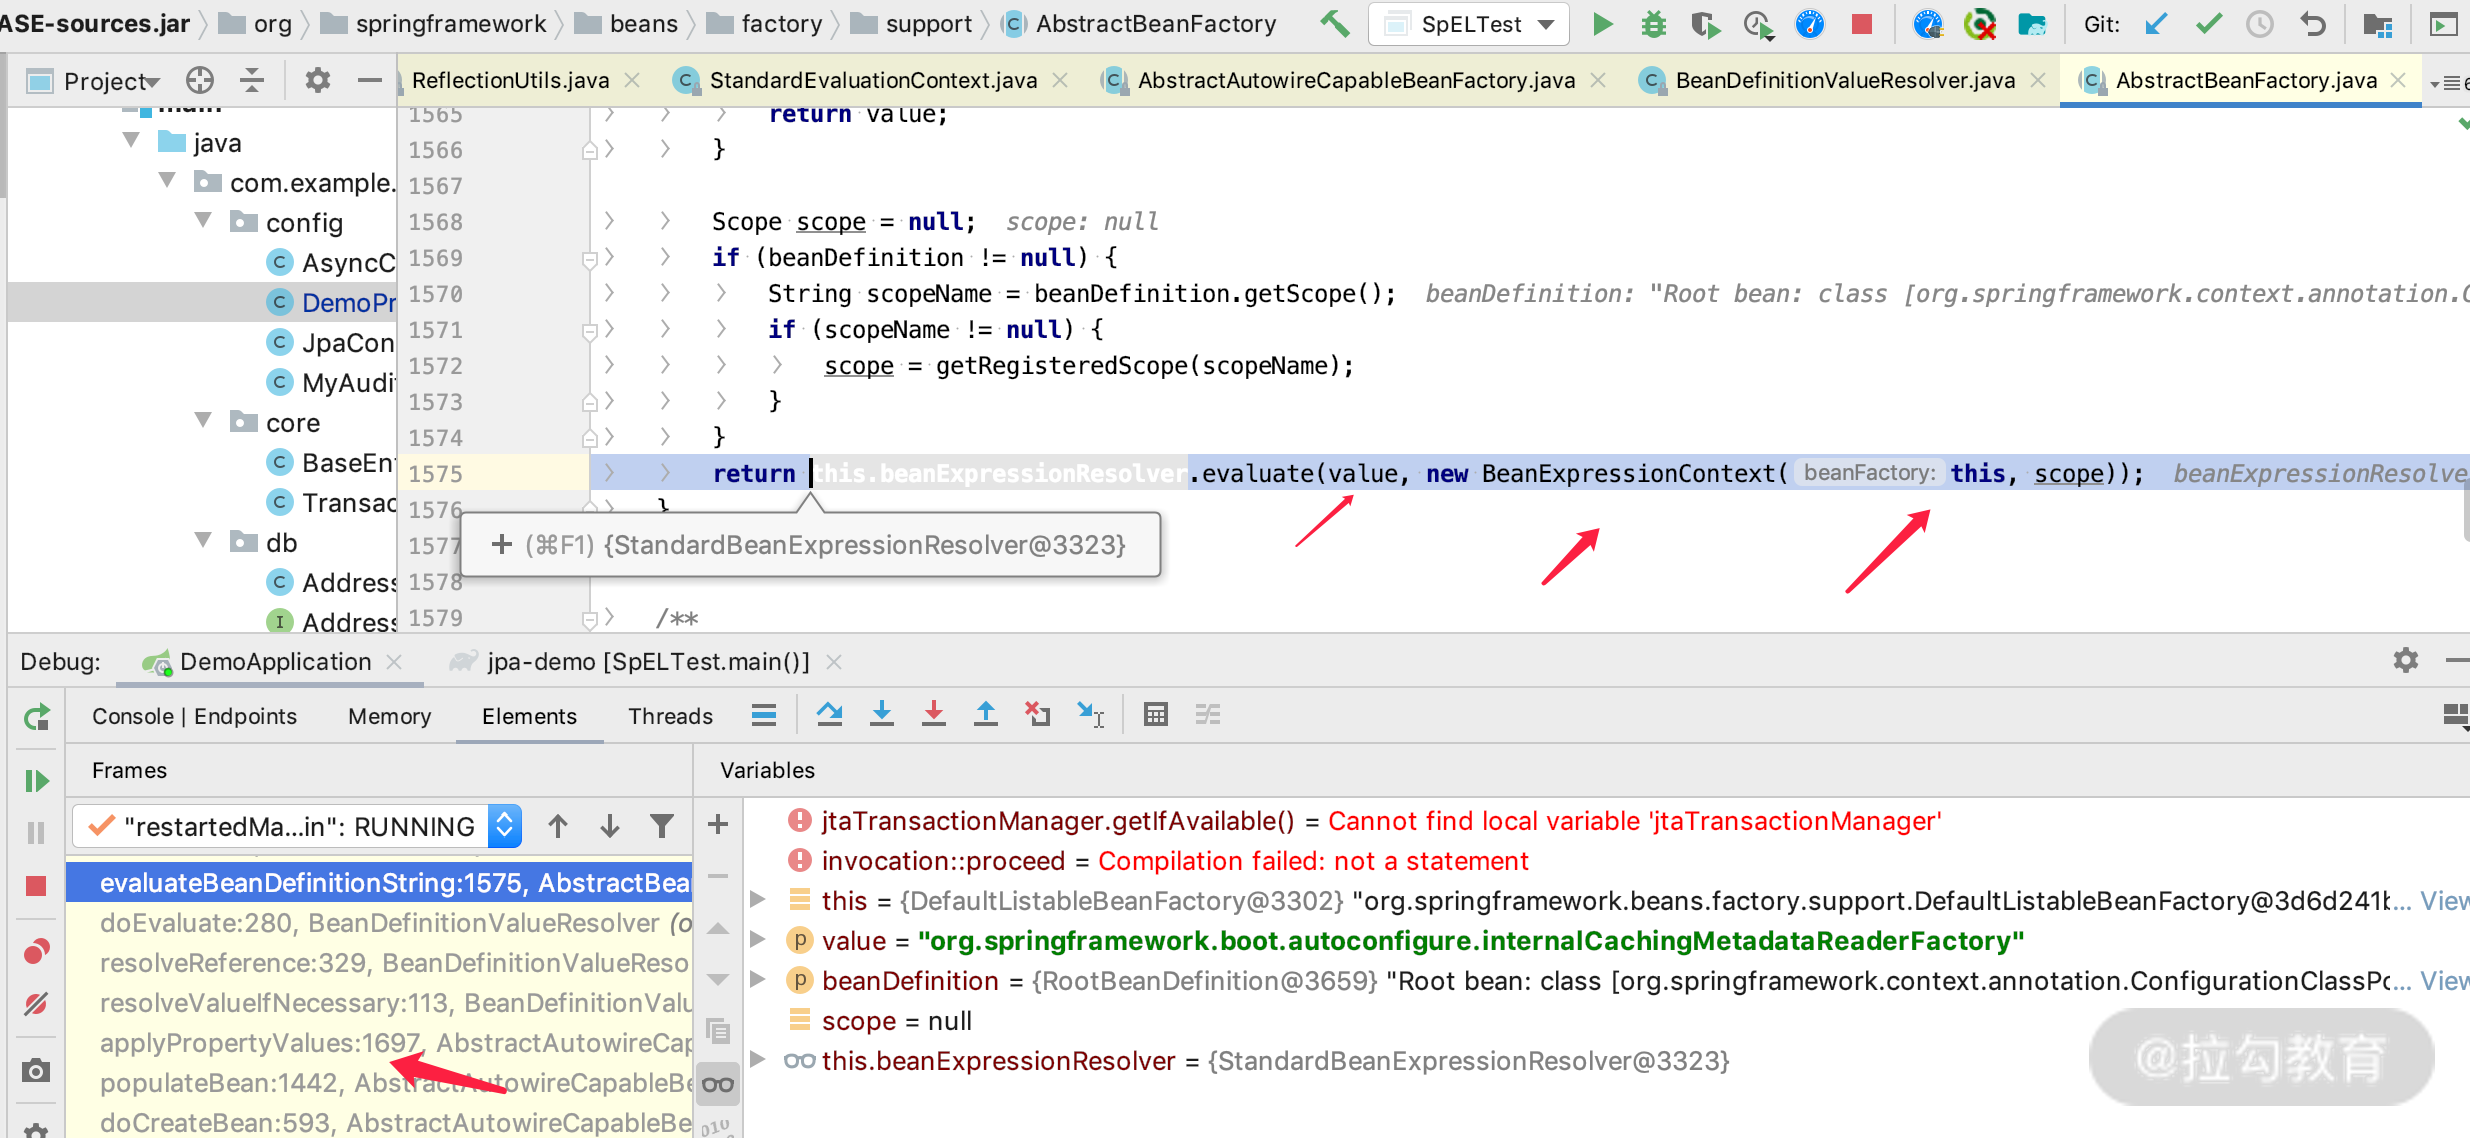
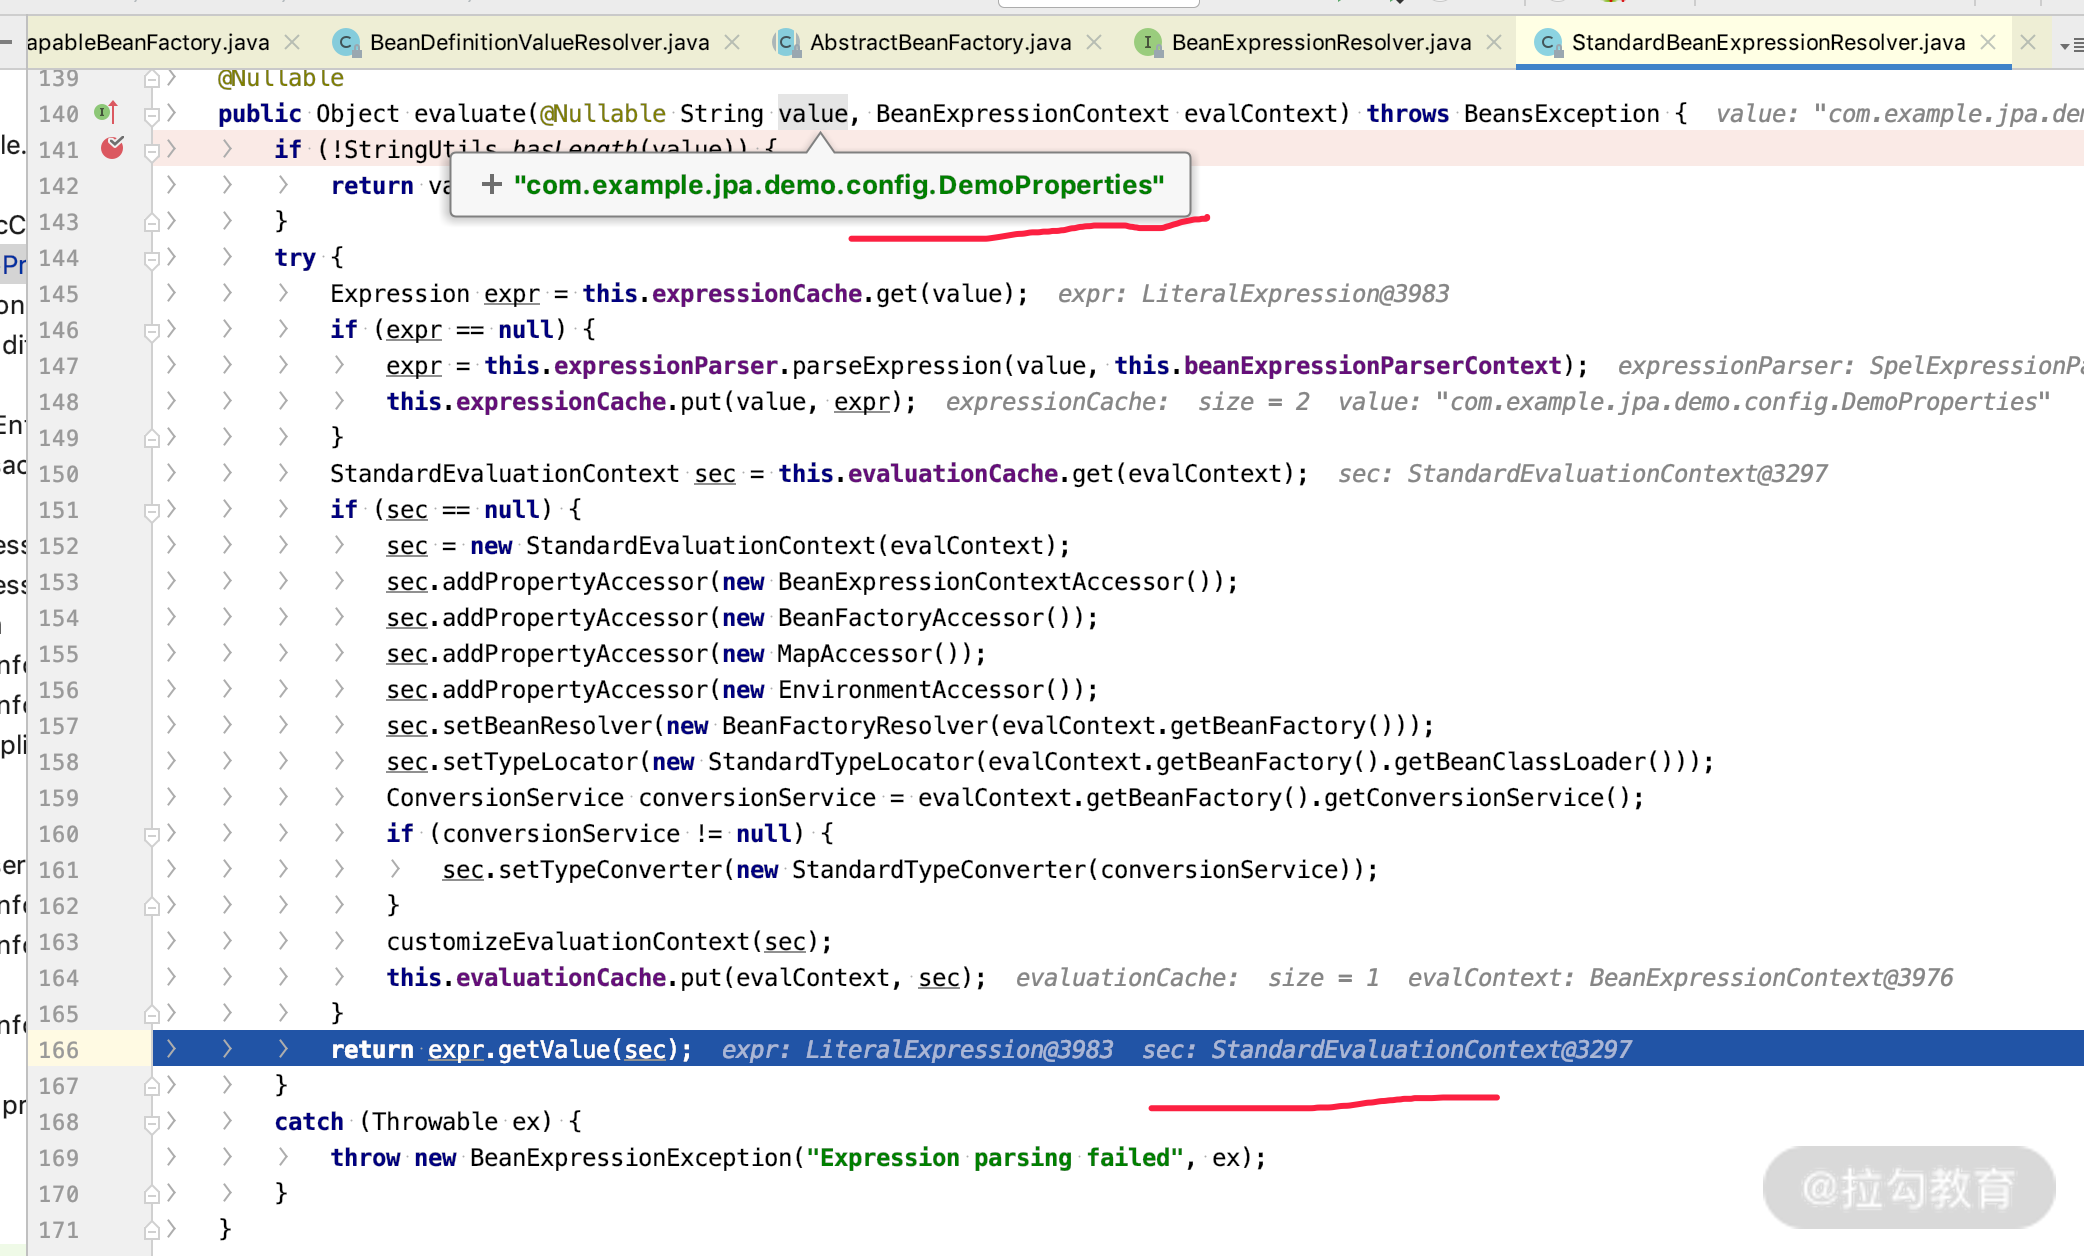
下面我们通过源码来分析一下 @Value 的解析原理。Spring 项目启动的时候会根据 @Value 的注解,去加载 SpelExpressionResolver 及算出来需要的 StandardEvaluationContext,然后再调用 Expression 方法进行 getValue 操作,其中计算 StandardEvaluationContext 的关键源码如下面两张图所示。
第二个语法:@Value 展示了 SpEL 可以直接读取 Map 和 List 里面的值,代码如下所示。
//我们通过@Component加载一个类,并且给其中的List和Map附上值
@Component("workersHolder")
public class WorkersHolder {
    private List<String> workers = new LinkedList<>();
    private Map<String, Integer> salaryByWorkers = new HashMap<>();
    public WorkersHolder() {
        workers.add("John");
        workers.add("Susie");
        workers.add("Alex");
        workers.add("George");
        salaryByWorkers.put("John", 35000);
        salaryByWorkers.put("Susie", 47000);
        salaryByWorkers.put("Alex", 12000);
        salaryByWorkers.put("George", 14000);
    }
    //Getters and setters ...
}
//SpEL直接读取Map和List里面的值
@Value("#{workersHolder.salaryByWorkers['John']}") // 35000
private Integer johnSalary;
@Value("#{workersHolder.salaryByWorkers['George']}") // 14000
private Integer georgeSalary;
@Value("#{workersHolder.salaryByWorkers['Susie']}") // 47000
private Integer susieSalary;
@Value("#{workersHolder.workers[0]}") // John
private String firstWorker;
@Value("#{workersHolder.workers[3]}") // George
private String lastWorker;
@Value("#{workersHolder.workers.size()}") // 4
private Integer numberOfWorkers;
以上就是 SpEL 的运算符和对 Map、List、SpringBeanFactory 里面的 Bean 的调用情况,不知道你是否掌握了?那么使用 @Value 都有哪些需要注意的呢?
@Value 使用的注意事项 # 与 $ 的区别
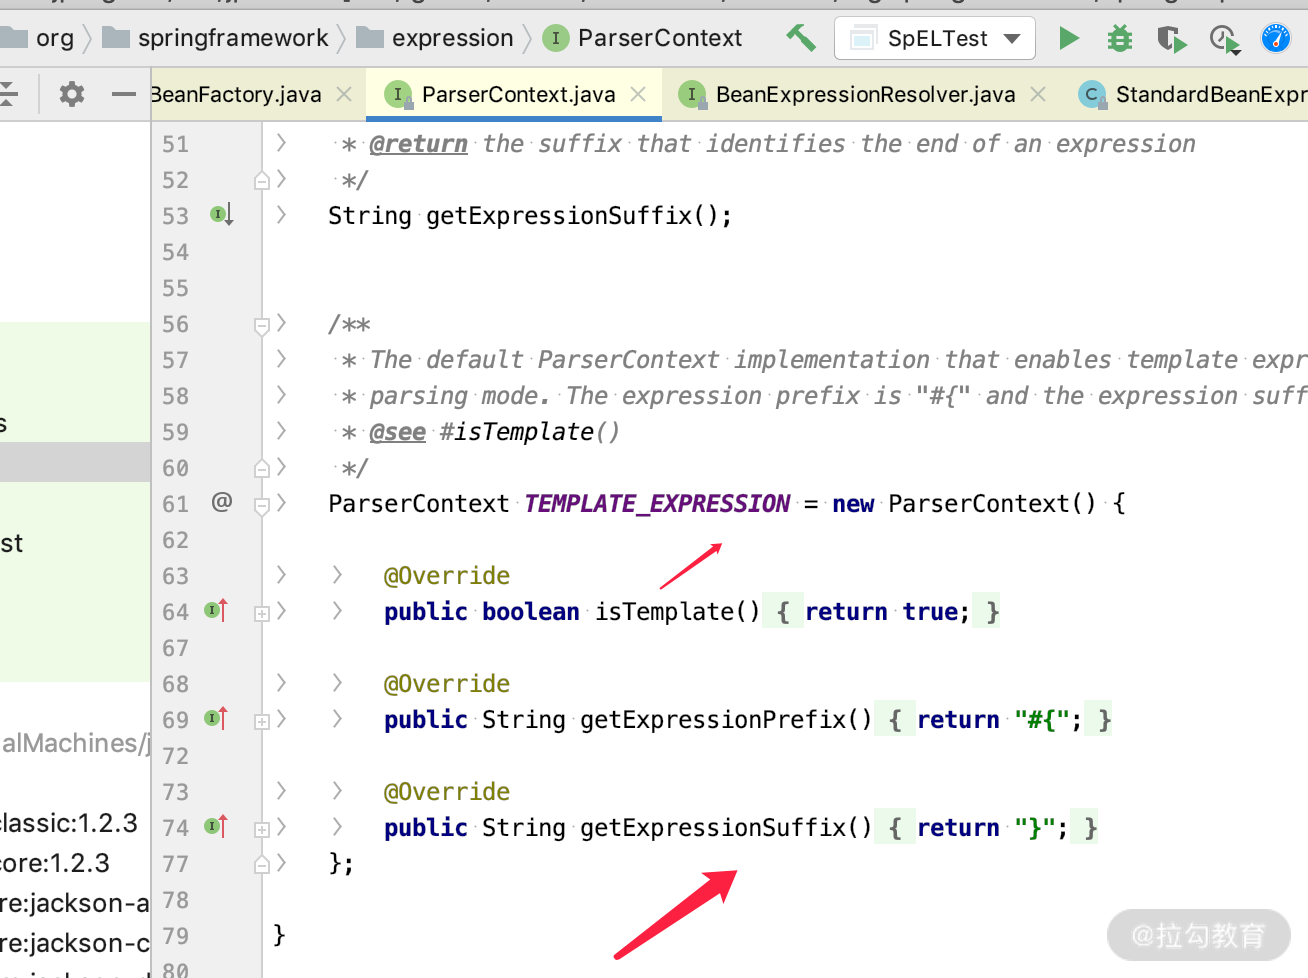
SpEL 表达式默认以 # 开始,以大括号进行包住,如 #{expression}。默认规则在 ParserContext 里面设置,我们也可以自定义,但是一般建议不要动。
这里注意要与 Spring 中的 Properties 进行区别,Properties 相关的表达式是以 $ 开始的大括号进行包住的,如 ${property.name}。
也就是说 @Value 的值有两类:
-
${ property**:**default_value }
-
#{ obj.property**? :**default_value }
第一个注入的是外部参数对应的 Property,第二个则是 SpEL 表达式对应的内容。
而 Property placeholders 不能包含 SpEL 表达式,但是 SpEL 表达式可以包含 Property 的引用。如 #{${someProperty} + 2},如果 someProperty=1,那么效果将是 #{ 1 + 2},最终的结果将是 3。
上面我们通过 @Value 的应用场景讲解了一部分 SpEL 的语法,此外它同样适用于 @Query 注解,那么我们通过 @Query 再学习一些 SpEL 的其他语法。
JPA 中 @Query 的应用场景
SpEL 除了能在 @Value 里面使用外,也能在 @Query 里使用,而在 @Query 里还有一个特殊的地方,就是它可以用来取方法的参数。
通过 SpEL 取被 @Query 注解的方法参数
在 @Query 注解中使用 SpEL 的主要目的是取方法的参数,主要有三种用法,如下所示。
//用法一:根据下标取方法里面的参数
@Query("select u from User u where u.age = ?#{[0]}")
List<User> findUsersByAge(int age);
//用法二:#customer取@Param("customer")里面的参数
@Query("select u from User u where u.firstname = :#{#customer.firstname}")
List<User> findUsersByCustomersFirstname(@Param("customer") Customer customer);
//用法三:用JPA约定的变量entityName取得当前实体的实体名字
@Query("from #{#entityName}")
List<UserInfo> findAllByEntityName();
其中,
-
方法一可以通过 [0] 的方式,根据下标取到方法的参数;
-
方法二通过 #customer 可以根据 @Param 注解的参数的名字取到参数,必须通过 ?#{} 和 :#{} 来触发 SpEL 的表达式语法;
-
方法三通过 #{#entityName} 取约定的实体的名字。
你要注意区别我们在“05 | @Query 解决了什么问题?什么时候应该选择它?”中介绍的取 @Param 的用法:lastname这种方式。
下面我们再来看一个更复杂一点的例子,代码如下。
public interface UserInfoRepository extends JpaRepository<UserInfo, Long> {
   // JPA约定的变量entityName取得当前实体的实体名字
   @Query("from #{#entityName}")
   List<UserInfo> findAllByEntityName();
//一个查询中既可以支持SpEL也可以支持普通的:ParamName的方式
void updateUserActiveState( String name, Long id);
//演示SpEL根据数组下标取参数,和根据普通的Parma的名字:name取参数
List<UserInfo> findContainingEscaped( String name);
//SpEL取Parma的名字customer里面的属性
List<UserInfo> findUsersByCustomersFirstname( UserInfo customer);
//利用SpEL根据一个写死的’jack’字符串作为参数
List<UserInfo> findOliverBySpELExpressionWithoutArgumentsWithQuestionmark();
//同时SpEL支持特殊函数escape和escapeCharacter
List<UserInfo> findByNameWithSpelExpression(String name);
// #entityName和#[]同时使用
List<UserInfo> findUsersByFirstnameForSpELExpressionWithParameterIndexOnlyWithEntityExpression(String name, String lastName);
//对于 native SQL同样适用,并且同样支持取pageable分页里面的属性值
Page<UserInfo> findUsersInNativeQueryWithPagination(Pageable pageable);
}
我个人比较推荐使用 @Param 的方式,这样语义清晰,参数换位置了也不影响执行结果。
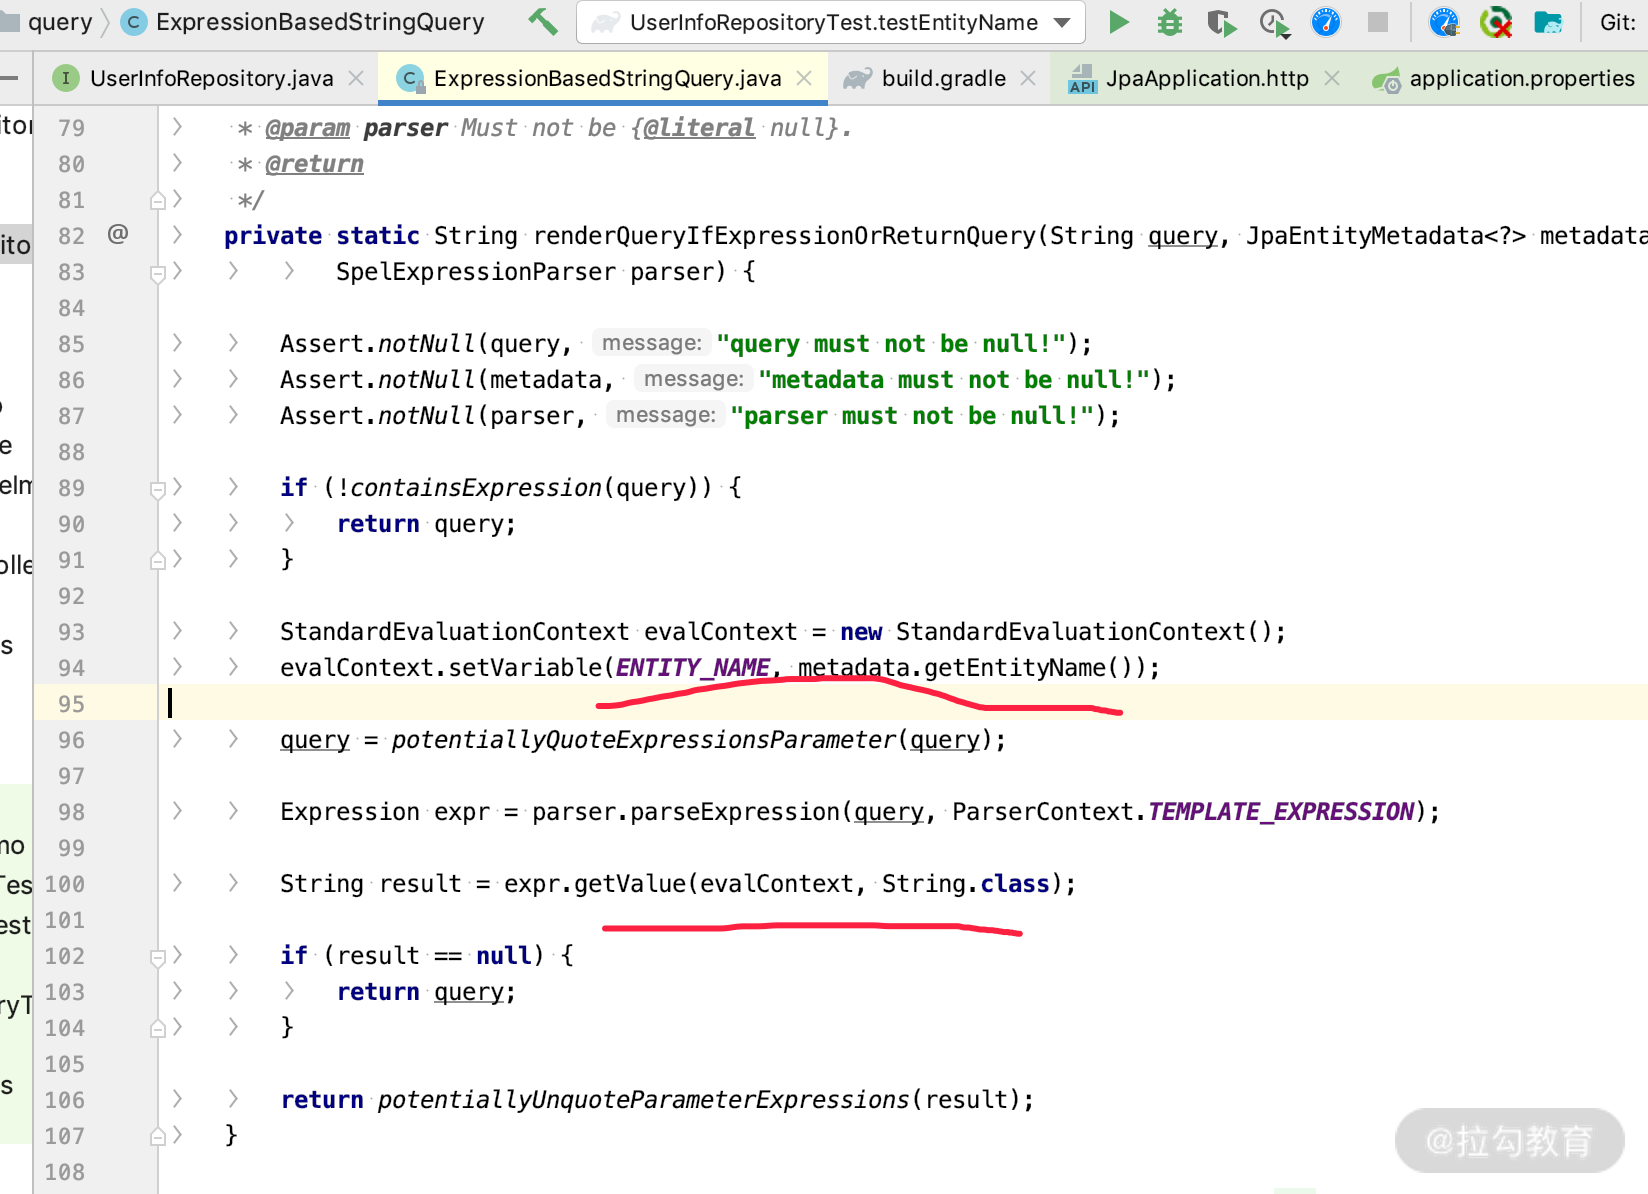
关于源码的实现,你可以到 ExpressionBasedStringQuery.class 里面继续研究,关键代码如下图所示。
好了,以上就是 @Query 支持的 SpEL 的基本语法,其他场景我就不多列举了。那么其实 JPA 还支持自定义 rootObject,我们看一下。
spring-security-data 在 @Query 中的用法
在实际工作中,我发现有些同事会用 spring-security 做鉴权,详细的 Spring Secrity 如何集成不是我们的重点,我就不多介绍了,具体怎么集成你可以查看官方文档:https://spring.io/projects/spring-security#learn。
我想说的是,当我们用 Spring Secrity 的时候,其实可以额外引入 jai 包 spring-security-data。如果我们使用了 JPA 和 Spring Secrity 的话,build.gradle 最终会变成如下形式,请看代码。
//引入spring data jpa
implementation 'org.springframework.boot:spring-boot-starter-data-jpa'
//集成spring security
implementation 'org.springframework.boot:spring-boot-starter-security'
// 集成spring security data对JPA的支持
implementation 'org.springframework.security:spring-security-data'
我们假设继承 Spring Security 之后,SecurityContextHolder 里面放置的 Authentication 是 UserInfo,代码如下。
//应用上下文中设置登录用户信息,此时Authentication类型为UserInfo
SecurityContextHolder.getContext().setAuthentication(authentication);
这样 JPA 里面的 @Query 就可以取到当前的 SecurityContext 信息,其用法如下所示。
// 根据当前用户email取当前用户的信息
@Query("select u from UserInfo u where u.emailAddress = ?#{principal.email}")
List<UserInfo> findCurrentUserWithCustomQuery();
//如果当前用户是admin,我们就返回某业务的所有对象;如果不是admin角色,就只给当前用户的某业务数据
@Query("select o from BusinessObject o where o.owner.emailAddress like "+
      "?#{hasRole('ROLE_ADMIN') ? '%' : principal.emailAddress}")
List<BusinessObject> findBusinessObjectsForCurrentUser();
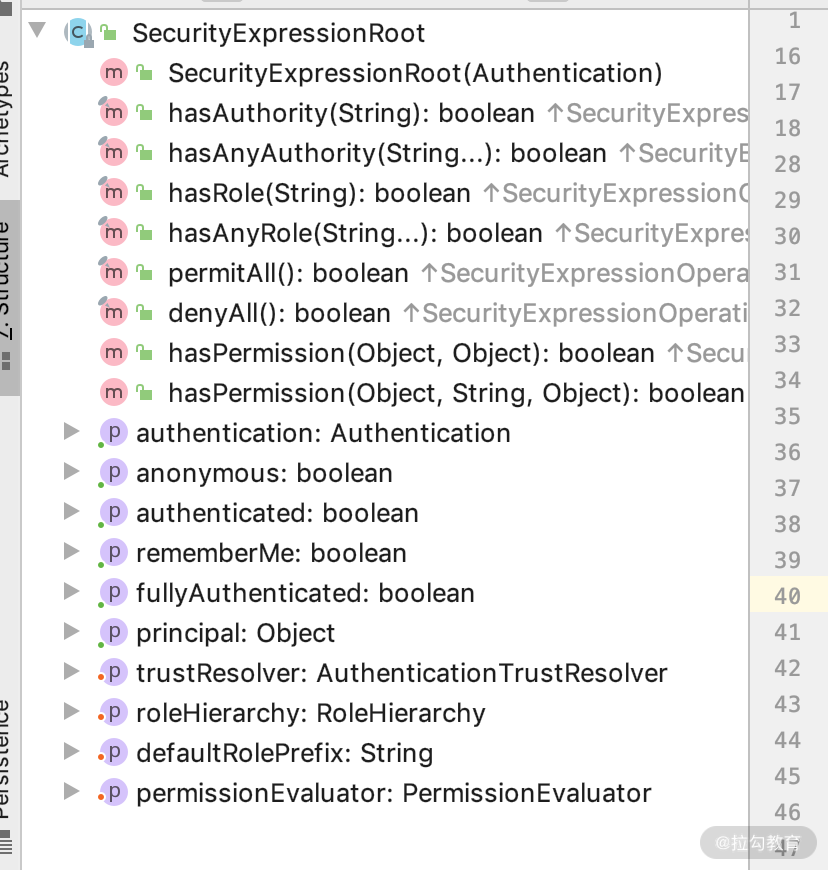
我们通过看源码会发现,spring-security-data 就帮我们做了一件事情:实现 EvaluationContextExtension,设置了 SpEL 所需要的 rootObject 为 SecurityExpressionRoot。关键代码如下图所示。

由于 SecurityExpressionRoot 是 rootObject,根据我们上面介绍的 SpEL 的基本用法,SecurityExpressionRoot 里面的各种属性和方法都可以在 SpEL 中使用,如下图所示。
这其实也给了我们一些启发:当需要自动 rootObject 给 @Query 使用的时候,也可以采用这种方式,这样 @Query 的灵活性会增强很多。
最后我们再看看 SpEL 在 @Cacheable 里面做了哪些支持。
SpEL 在 @Cacheable 中的应用场景
我们在实际工作中还有一个经常用到 SpEL 的场景,就是在 Cache 的时候,也就是 Spring Cache 的相关注解里面,如 @Cacheable、@CachePut、@CacheEvict 等。我们还是通过例子来体会一下,代码如下所示。
//缓存key取当前方法名,判断一下只有返回结果不为null或者非empty才进行缓存
@Cacheable(value = "APP", key = "#root.methodName", cacheManager = "redis.cache", unless = "#result == null || #result.isEmpty()")
@Override
public Map<String, Map<String, String>> getAppGlobalSettings() {}
//evict策略的key是当前参数customer里面的name属性
@Caching(evict = {
@CacheEvict(value="directory", key="#customer.name") })
public String getAddress(Customer customer) {...}
//在condition里面使用,当参数里面customer的name属性的值等于字符串Tom才放到缓存里面
@CachePut(value="addresses", condition="#customer.name=='Tom'")
public String getAddress(Customer customer) {...}
//用在unless里面,利用SpEL的条件表达式判断,排除返回的结果地址长度小于64的请求
@CachePut(value="addresses", unless="#result.length()<64")
public String getAddress(Customer customer) {...}
Spring Cache 中 SpEL 支持的上下文语法
Spring Cache 提供了一些供我们使用的 SpEL 上下文数据,如下表所示(摘自 Spring 官方文档)。
| 支持的属性 | 作用域 | 功能描述 | 使用方法 |
|---|---|---|---|
| methodName | root 对象 | 当前被调用的方法名 | #root.methodName |
| method | root 对象 | 当前被调用的方法 | #root.method.name |
| target | root 对象 | 当前被调用的目标对象 | #root.target |
| targetClass | root 对象 | 当前被调用的目标对象类 | #root.targetClass |
| args | root 对象 | 当前被调用的方法的参数列表 | #root.args[0] |
| caches | root 对象 | 当前方法调用使用的缓存列表(如@Cacheable(value={“cache1”, “cache2”})),则有两个 cache | #root.caches[0].name |
| argument name | 执行上下文 | 当前被调用的方法的参数,如 findById(Long id),我们可以通过 #id 拿到参数 | #user.id 表示参数 user 里面的 id |
| result | 执行上下文 | 方法执行后的返回值(仅当方法执行之后的判断有效,如‘unless’,’cache evict’的 beforeInvocation=false) | #result |
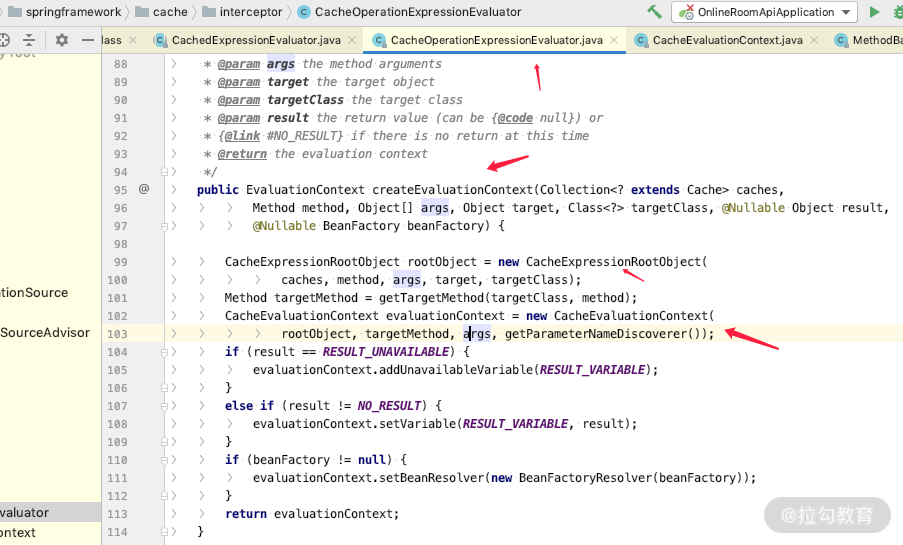
有兴趣的话,你可以看一下 Spring Cache 中 SpEL 的 EvaluationContext 加载方式,关键源码如下图所示。
总结
本讲内容到这里就结束了。这一讲我们通过 SpEL 的基本语法介绍,分别介绍了其在 @Value、@Query、@Cache 注解里面的使用场景和方法,其中 # 和 $ 是容易在 @Value 里面犯错的地方;@Param 的用法 : 和 # 也是 @Query 里面容易犯错的地方,你要注意一下。
其实任何形式的 SpEL 的变化都离不开它基本的三个接口:ExpressionParser、Expression、EvaluationContext,只不过框架提供了不同形式的封装,你也可以根据实际场景自由扩展。
关于这一讲内容,希望你能认真去思考,有问题可以在下方留言,我们一起讨论。下一讲我们来聊聊 Hibernate 中一级缓存的概念,到时见。
28 Hibernate 一级缓存是什么?起什么作用?
如果你已经看完了之前的课时,相信你对 Hibernate 和 JPA 已经有一些深入的认识了,那么这一讲开始,我再对大家平时感到迷惑的概念做一下解释,帮助你更好地掌握 JPA。
这一讲我们来聊聊经常说的 Hibernate 的一级缓存是什么意思,Query Plan Cache 又和一级缓存是什么关系呢?
一级缓存
什么是一级缓存?这个大家最容易存在疑惑,不知道你是否也在工作中遇见过这些问题:没有办法取到最新的数据、不知道一级缓存该如何释放、怎样关闭一级缓存?我们又为什么要用一级缓存呢?
什么是一级缓存?
按照 Hibernate 和 JPA 协议里面的解释,我们经常说的 First Level Cache(一级缓存)也就是我在之前的课时中说过的 PersistenceContext,既然如此,那么就意味着一级缓存的载体是 Session 或者 EntityManager;而一级缓存的实体也就是数据库里面对应的实体。
在 SessionImpl 的实现过程中,我们会发现 PersistenceContext 的实现类 StatefulPersistenceContext 是通过 HashMap 来存储实体信息的,其关键源码如下所示。
public class StatefulPersistenceContext implements PersistenceContext {
  //根据EntityUniqueKey作为key来储存Entity
  private HashMap<EntityUniqueKey, Object> entitiesByUniqueKey;
  //根据EntityUniqueKey作为key取当前实体
  @Override
  public Object getEntity(EntityUniqueKey euk) {
     return entitiesByUniqueKey == null ? null : entitiesByUniqueKey.get( euk );
  }
  //储存实体,如果是第一次,那么创建HashMap<>
  @Override
  public void addEntity(EntityUniqueKey euk, Object entity) {
     if ( entitiesByUniqueKey == null ) {
        entitiesByUniqueKey = new HashMap<>( INIT_COLL_SIZE );
     }
     entitiesByUniqueKey.put( euk, entity );
  }
......}
其中 EntityUniqueKey 的核心源码如下所示。
public class EntityUniqueKey implements Serializable {
   private final String uniqueKeyName;
   private final String entityName;
   private final Object key;
   private final Type keyType;
   private final EntityMode entityMode;
   private final int hashCode;
  @Override
  public boolean equals(Object other) {
     EntityUniqueKey that = (EntityUniqueKey) other;
     return that != null && that.entityName.equals( entityName )
           && that.uniqueKeyName.equals( uniqueKeyName )
           && keyType.isEqual( that.key, key );
  }
...
}
通过源码可以看到,用 PersistenceContext 来判断实体是不是同一个,可以直接根据实体里面的主键进行。那么一级缓存的作用是什么呢?
一级缓存的作用
由于一级缓存就是 PersistenceContext,那么一级缓存的最大作用就是管理 Entity 的生命周期,详细的内容我已经在“21 | Persistence Context 所表达的核心概念是什么?”介绍过了,这里我就稍加总结。
-
New(Transient)状态的,不在一级缓存管理之列,这是新创建的;
-
Detached 游离状态的,不在一级缓存里面,和 New 的唯一区别是它带有主键和 Version 信息;
-
Manager、Removed 状态的实体在一级缓存管理之列,所有对这两种状态的实体进行的更新操作,都不会立即更新到数据库里面,只有执行了 flush 之后才会同步到数据库里面。
我们用一张图来表示,如下所示。
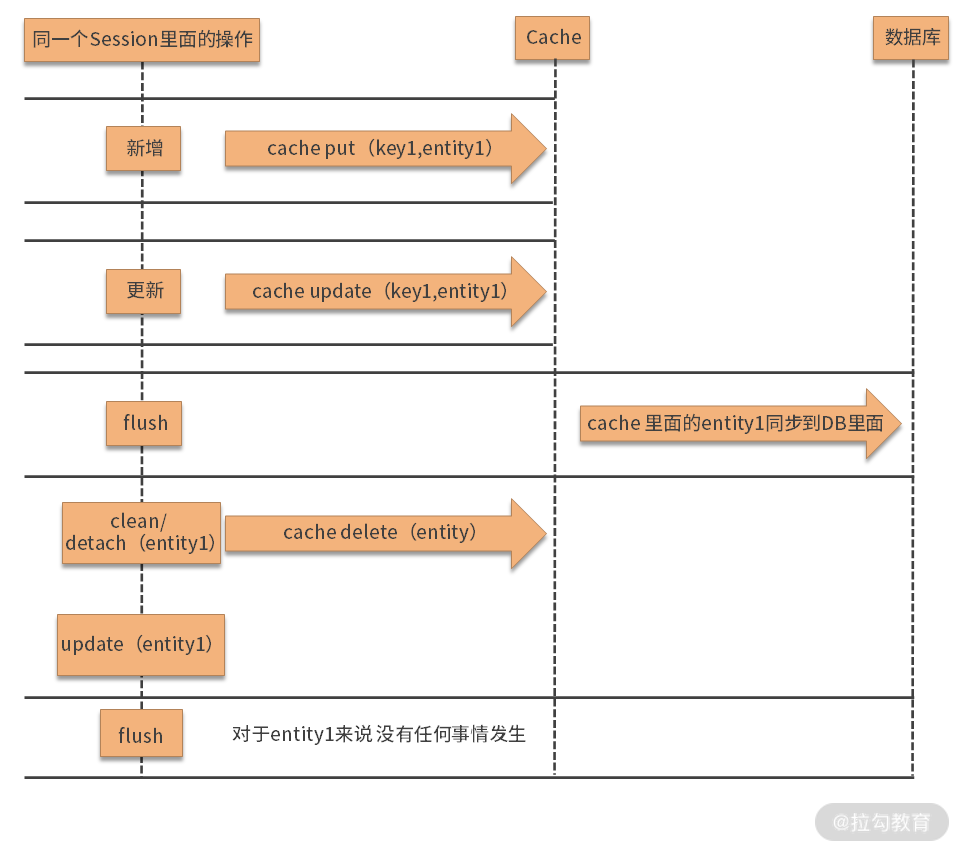
注:图片来源于网络
对于实体 1 来说,新增和更新操作都是先进行一级缓存,只有 flush 的时候才会同步到数据库里面。而当我们执行了 entityManager.clean() 或者是 entityManager.detach(entity1),那么实体 1 就会变成游离状态,这时再对实体 1 进行修改,如果再执行 flush 的话,就不会同步到 DB 里面了。我们用代码来说明一下,如下所示。
public class UserInfoRepositoryTest {
    @Autowired
    private UserInfoRepository userInfoRepository;
    @PersistenceContext(properties = {@PersistenceProperty(
            name = "org.hibernate.flushMode",
            value = "MANUAL"//手动flush
    )})
    private EntityManager entityManager;
    @Test
    @Transactional
    public void testLife() {
        UserInfo userInfo = UserInfo.builder().name("new name").build();
        //新增一个对象userInfo交给PersistenceContext管理,即一级缓存
        entityManager.persist(userInfo);
        //此时没有detach和clear之前,flush的时候还会产生更新SQL
        userInfo.setName("old name");
        entityManager.flush();
        entityManager.clear();
//        entityManager.detach(userInfo);
        // entityManager已经clear,此时已经不会对UserInfo进行更新了
        userInfo.setName("new name 11");
        entityManager.flush();
        //由于有cache机制,相同的对象查询只会触发一次查询SQL
        UserInfo u1 = userInfoRepository.findById(1L).get();
        //to do some thing
        UserInfo u2 = userInfoRepository.findById(1L).get();
    }
}
利用我们之前讲过的打印日志的方法,把 SQL 打印一下,输出到控制台的 SQL 如下所示。
Hibernate: insert into user_info (create_time, create_user_id, last_modified_time, last_modified_user_id, version, ages, email_address, last_name, name, telephone, id) values (?, ?, ?, ?, ?, ?, ?, ?, ?, ?, ?)
Hibernate: update user_info set create_time=?, create_user_id=?, last_modified_time=?, last_modified_user_id=?, version=?, ages=?, email_address=?, last_name=?, name=?, telephone=? where id=? and version=?
Hibernate: select userinfo0_.id as id1_2_0_, userinfo0_.create_time as create_t2_2_0_, userinfo0_.create_user_id as create_u3_2_0_, userinfo0_.last_modified_time as last_mod4_2_0_, userinfo0_.last_modified_user_id as last_mod5_2_0_, userinfo0_.version as version6_2_0_, userinfo0_.ages as ages7_2_0_, userinfo0_.email_address as email_ad8_2_0_, userinfo0_.last_name as last_nam9_2_0_, userinfo0_.name as name10_2_0_, userinfo0_.telephone as telepho11_2_0_, rooms1_.user_info_id as user_inf1_3_1_, room2_.id as rooms_id2_3_1_, room2_.id as id1_1_2_, room2_.create_time as create_t2_1_2_, room2_.create_user_id as create_u3_1_2_, room2_.last_modified_time as last_mod4_1_2_, room2_.last_modified_user_id as last_mod5_1_2_, room2_.version as version6_1_2_, room2_.title as title7_1_2_ from user_info userinfo0_ left outer join user_info_rooms rooms1_ on userinfo0_.id=rooms1_.user_info_id left outer join room room2_ on rooms1_.rooms_id=room2_.id where userinfo0_.id=?
通过日志可以看到没有第二次更新。
除此之外,关于一级缓存还有其他问题你应该了解一下。
它的生命周期是怎么样的呢?可想而知,肯定和 Session 一样,这个问题你可以回过头仔细看看“22 | Session 的 open-in-view 对事务的影响是什么?”。但同时实体在一级 Cache 里面的生命周期还受到的 entityManager.clear() 和 entityManger.detach() 两个方法的影响。
一级缓存的大小可以设置吗?这个肯定是不能的,我们从底层原理可以分析出:一级缓存依赖Java 内存堆的大小,所以受到最大堆和最小堆的限制,即清除一级缓存的机制就是利用 JVM 的 GC 机制,清理掉 GC 就会清理掉一级缓存。
所以当我们请求并发量大的时候,Session 的对象就会变得很多,此时就会需要更多内存。当请求结束之后,随着 GC 的回收,里面就会清除一级缓存留下来的对象。
一级缓存可以关闭吗?答案肯定是不能的,除非我们不用 Hibernate 或 JPA,改用 Mybatis,因为一级缓存是 JPA 的最大优势之一。
而在实际工作中,最容易被我们忽略的是和一级缓存差不多的 Query Plan Cache,我们来了解一下。
Query Plan Cache
我们都知道 JPA 里面大部分的查询都是基于 JPQL 查询语法,从而会有一个过程把 JPQL 转化成真正的 SQL,而后到数据库里执行。而 JPQL 转化成原始的 SQL 时,就会消耗一定的性能,所以 Hibernate 设计了一个 QueryPlanCache 的机制,用来存储 JPQL 或者 Criteria Query 到 Native SQL 中转化的结果,也就是说 QueryPlanCache 里面存储了最终要执行的 SQL,以及参数和返回结果的类型。
QueryPlanCache 是什么?
在 Hibernate 中,QueryPlanCache 就是指具体的某一个类。我们通过核心源码看一下它是什么,如下所示。
package org.hibernate.engine.query.spi;
//存储query plan 和 query parameter metdata
public class QueryPlanCache implements Serializable {
    //queryPlanCache的存储结构为自定义的HashMap结构,用来存储JPQL到SQL的转化过程及其SQL的执行语句和参数,返回结果的metadata;
    private final BoundedConcurrentHashMap queryPlanCache;
    //这个用来存储@Query的nativeQuery = true的query plan,即原始SQL的meta,包含参数和return type的 meta;
    private final BoundedConcurrentHashMap<ParameterMetadataKey,ParameterMetadataImpl> parameterMetadataCache;
    //QueryPlanCache的构造方法
    public QueryPlanCache(final SessionFactoryImplementor factory, QueryPlanCreator queryPlanCreator) {
       this.factory = factory;
       this.queryPlanCreator = queryPlanCreator;
       //maxParameterMetadata的个数,计算逻辑,可以自定义配置,或者采用默认值
       Integer maxParameterMetadataCount = ConfigurationHelper.getInteger(
             Environment.QUERY_PLAN_CACHE_PARAMETER_METADATA_MAX_SIZE,
             factory.getProperties()
       );
       if ( maxParameterMetadataCount == null ) {
          maxParameterMetadataCount = ConfigurationHelper.getInt(
                Environment.QUERY_PLAN_CACHE_MAX_STRONG_REFERENCES,
                factory.getProperties(),
                DEFAULT_PARAMETER_METADATA_MAX_COUNT
          );
       }
       //maxQueryPlan的个数,计算逻辑,可以自定义配置大小,或者采用默认值
       Integer maxQueryPlanCount = ConfigurationHelper.getInteger(
             Environment.QUERY_PLAN_CACHE_MAX_SIZE,
             factory.getProperties()
       );
       if ( maxQueryPlanCount == null ) {
          maxQueryPlanCount = ConfigurationHelper.getInt(
                Environment.QUERY_PLAN_CACHE_MAX_SOFT_REFERENCES,
                factory.getProperties(),
                DEFAULT_QUERY_PLAN_MAX_COUNT
          );
       }
       //新建一个 BoundedConcurrentHashMap的queryPlanCache,用来存储JPQL和Criteria Query到SQL的转化过程
       queryPlanCache = new BoundedConcurrentHashMap( maxQueryPlanCount, 20, BoundedConcurrentHashMap.Eviction.LIRS );
    //新建一个 BoundedConcurrentHashMap的parameterMetadataCache,用来存储Native SQL的转化过程
       parameterMetadataCache = new BoundedConcurrentHashMap<>(
             maxParameterMetadataCount,
             20,
             BoundedConcurrentHashMap.Eviction.LIRS
       );
       nativeQueryInterpreter = factory.getServiceRegistry().getService( NativeQueryInterpreter.class );
    }
    // 默认的parameterMetadataCache的HashMap的存储空间大小,默认128条
    public static final int DEFAULT_PARAMETER_METADATA_MAX_COUNT = 128;
    //默认的queryPlanCache的HashMap存储空间大小,默认2048条
    public static final int DEFAULT_QUERY_PLAN_MAX_COUNT = 2048;
......不重要的代码先省略
}
很好理解,通过源码和概念的分析你就大概知道 QueryPlanCache 是什么了,那么我们再来看一下它的里面具体会存储什么内容呢?
QueryPlanCache 存储的内容
我们新建一个 UserInfoRepository,来测试一下。假设 UserInfoRepository 里面有如下几个方法。
public interface UserInfoRepository extends JpaRepository<UserInfo, Long> {
   //没有用@Query,直接使用method name defining query
   List<UserInfo> findByNameAndCreateTimeBetween(String name, Instant begin, Instant endTime);
   //演示SpEL根据数组下标取参数,和根据普通的Parma的名字:name取参数
   @Query("select u from UserInfo u where u.lastName like %:#{[0]} and u.name like %:name%")
   List<UserInfo> findContainingEscaped(@Param("name") String name);
   //SpEL取Parma的名字customer里面的属性
   @Query("select u from UserInfo u where u.name = :#{#customer.name}")
   List<UserInfo> findUsersByCustomersFirstname(@Param("customer") UserInfo customer);
   //利用SpEL根据一个写死的'jack'字符串作为参数
   @Query("select u from UserInfo u where u.name = ?#{'jack'}")
   List<UserInfo> findOliverBySpELExpressionWithoutArgumentsWithQuestionmark();
   @Query(value = "select * from user_info where name=:name",nativeQuery = true)
   List<UserInfo> findByName(@Param(value = "name") String name);
}
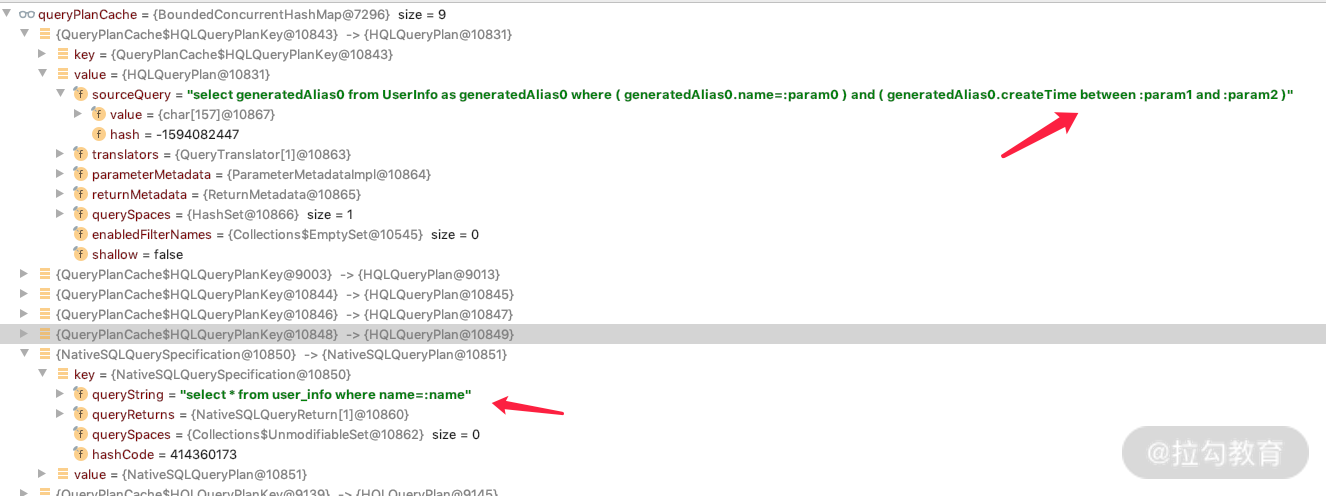
当项目启动成功之后你会发现,通过 @Query 定义的 nativeQuery=false 的 JPQL,会在启动成功之后预先放在 QueryPlanCache 里面,我们设置一个断点就可以看到如下内容。
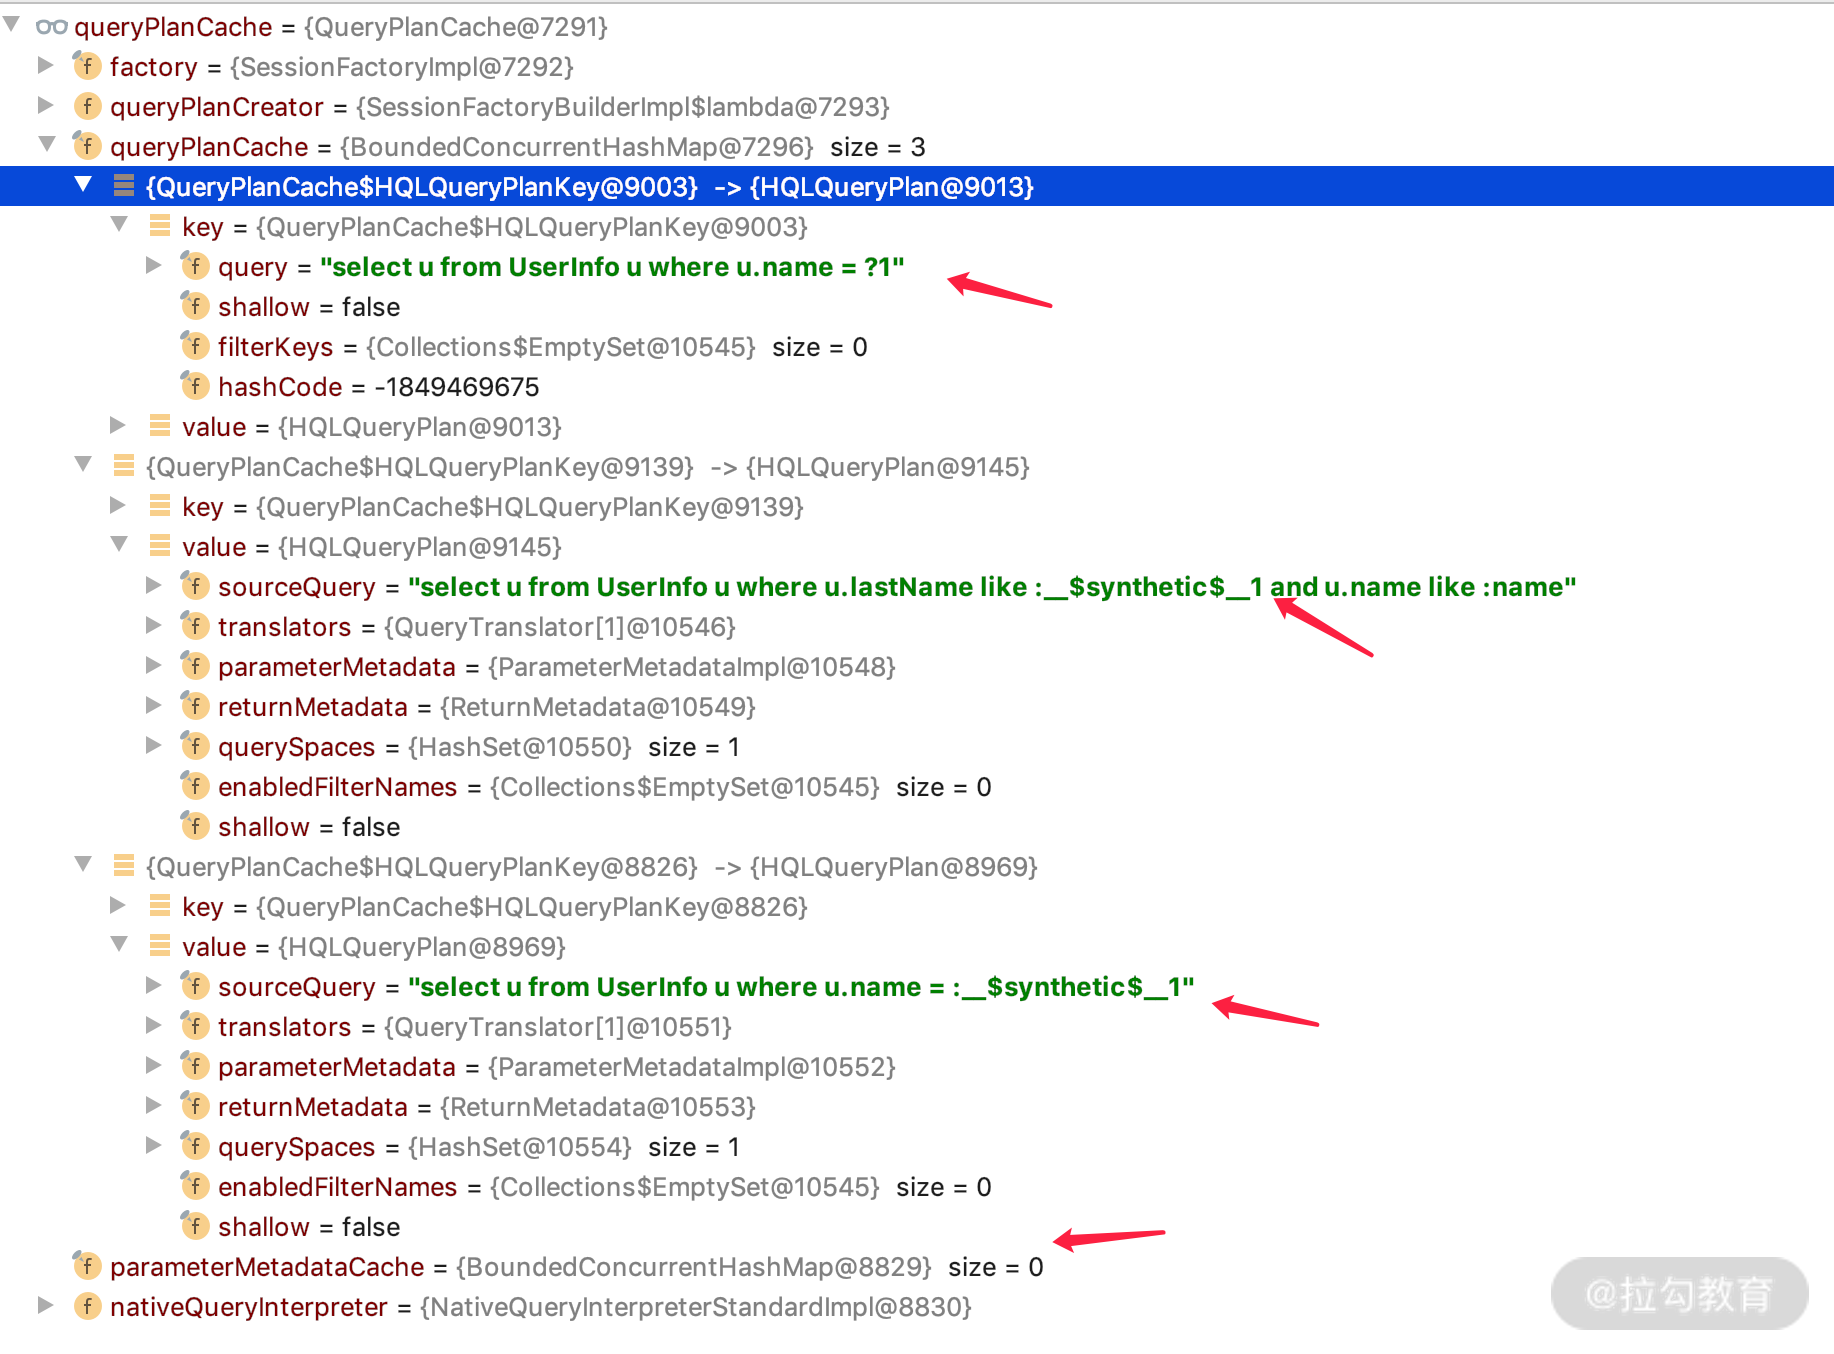
发现里面 parameterMetadataCache 是空的,也就是没有放置 nativeQuery=true 的 Query SQL,并且可以看到我们在方法里面定义的其他三个 @Query 的 JPQL 解析过程。那么我们打开第一个详细看一下,如下图所示。
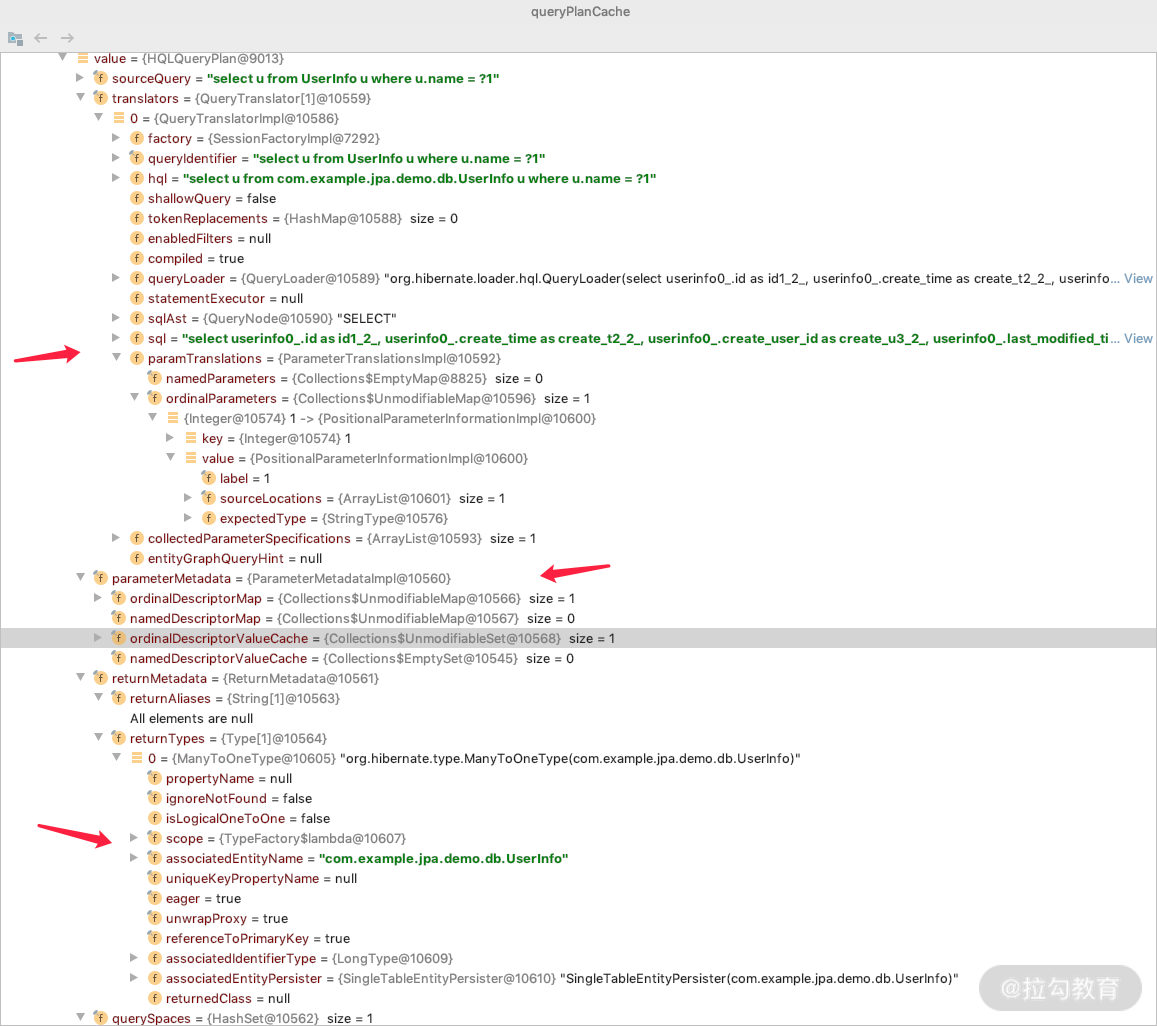
你会发现一个 QueryPlanCache 还是能存挺多东西的:navtive sql、参数、return 等各种 metadata。也可以看出一个简单的 JPQL 查询会有些占用堆内存,所以如果是复杂点的项目,各种查询的 JPQL 多一点的话,启动所需要的最小堆内存会占用 300M、400M 的空间,这是正常现象。
在 UserInfoRepository 的五个方法中,剩下的两个方法分别是 name defining query 和 nativeQuery=true。这两种情况是,当调用的时候发现 QueryPlanCache 里面没有它们,于是就会被增加进去,下次就可以直接从 QueryPlanCache 里面取了。那么我们在 Controller 里面执行这两个方法,如下所示。
userInfoRepository.findByNameAndCreateTimeBetween("JK", Instant.now(),Instant.now());
userInfoRepository.findByName("jack");
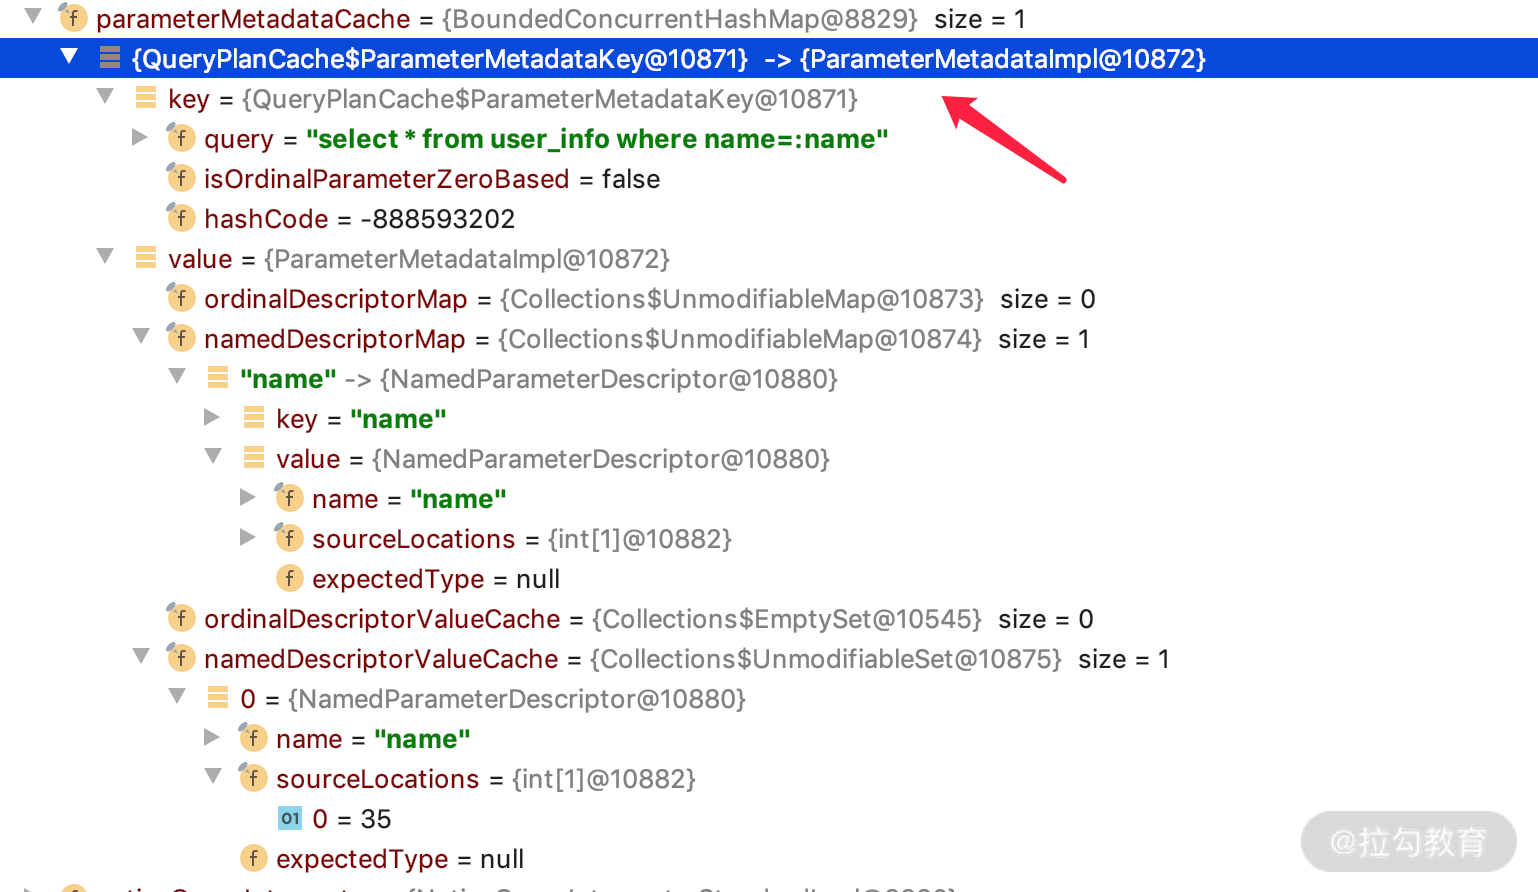
然后通过断点就会发现 QueryPlanCache 里面多了两个 Cache,如下图所示。
同时,parameterMetadataCache 里面就会多一条 key/value的nativeQuery=true 的解析记录,如下图所示。
通过上面的案例讲解,相信你已经清楚了 QueryPlanCache 的概念,总结起来就是,QueryPlanCache 用来存储的 JQPL 或者 SQL 的 Metadata 信息,从而提升了 Hibernate 执行 JPQL 的性能,因为只有第一次需要把 JPQL 转化成 SQL,后面的每次操作就可以直接从 HashMap 中找到对应的 SQL,直接执行就可以了。
那么它和 Session 到底是什么关系呢?它是否在一级缓存里面?
QueryPlanCache 和 Session 是什么关系?
我们通过查看源码会发现,在 SessionFactoryImpl 的构造方法里面会 new QueryPlanCache(...),关键源码如下。
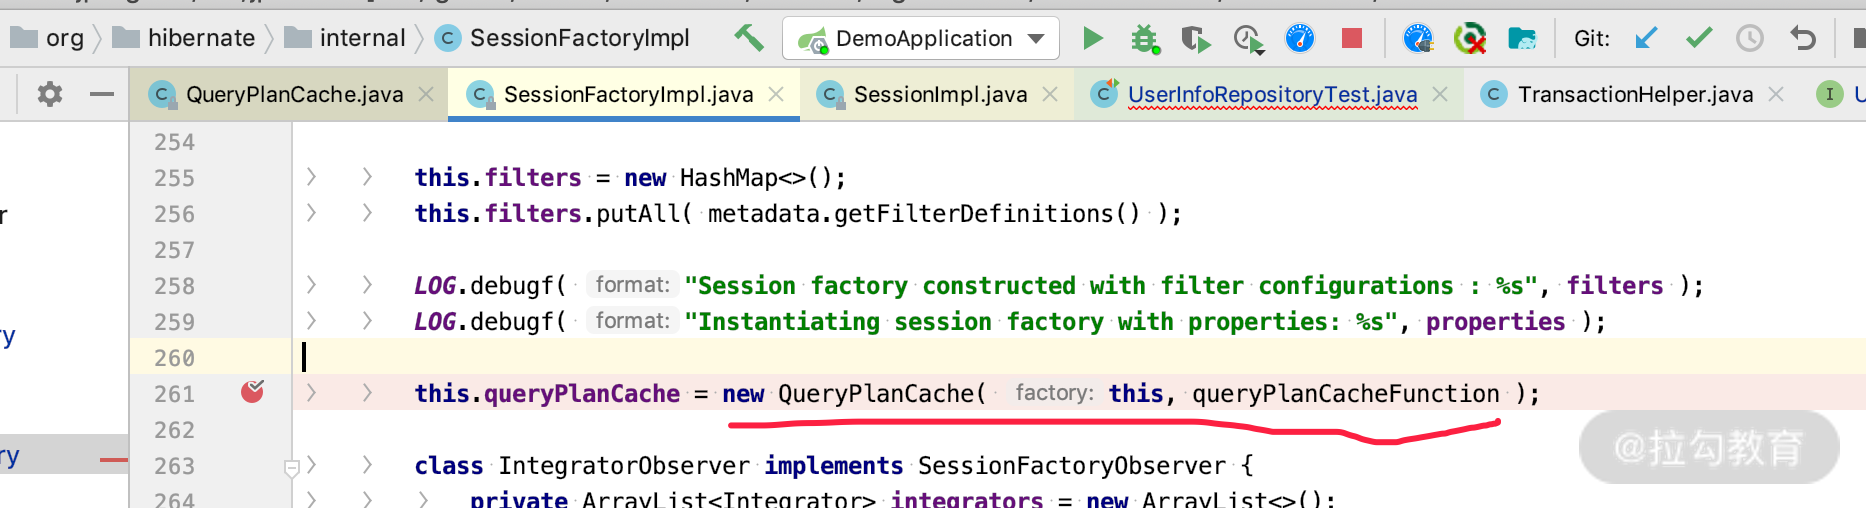
说明这个 application 只需要创建一次 QueryPlanCache,整个项目周期是单例的,也就是可以被不同的 Session 共享,那么我们可以查看 Session 的关键源码,如下图所示。
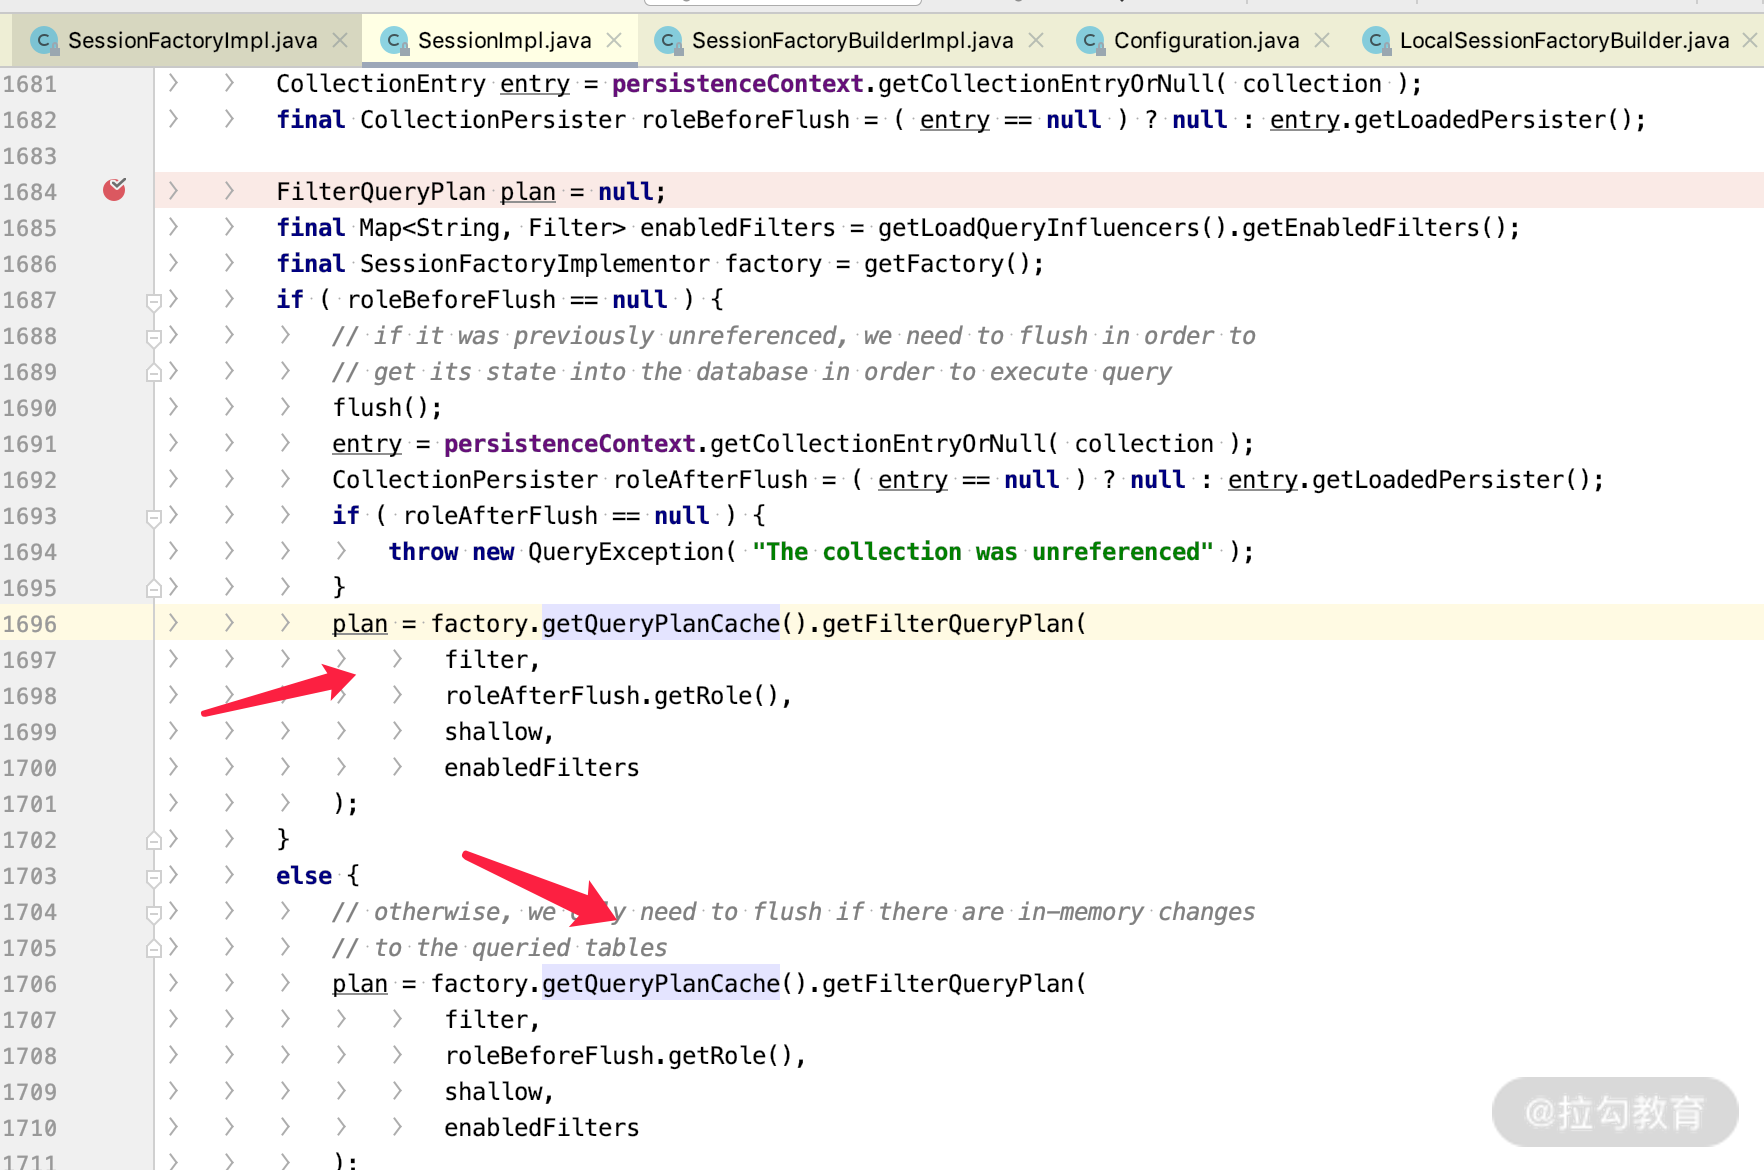
也就是说,每一个 SessionImpl 的实例在获得 query plan 之前,都会去同一个 QueryPlanCache 里面查询一下 JPQL 对应的执行计划。所以我们可以看得出来 QueryPlanCache 和 Session 的关系有如下几点。
-
QueryPlanCache 在整个 Spring Application 周期内就是一个实例;
-
不同的 Session 作用域,可以代表不同的 SessionImpl 实例共享 QueryPlanCache;
-
QueryPlanCache 和我们所说的一级缓存完全不是一个概念,这点你要分清楚。
而实际工作中大部分场景 QueryPlanCache 都是没有问题的,只有在 In 的 SQL 查询的场景会引发内存泄漏的问题,我们看一下。
QueryPlanCache 中 In 查询引发的内存泄漏问题
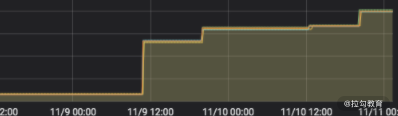
我们在实际的工作中使用 JPA 的时候,会发现其内存越来越大,而不会被垃圾回收机制给回收掉,现象就是堆内存随着时间的推移使用量越来越大,如下图所示,很明显是内存泄漏的问题。
而我们把堆栈拿出来分析的话会发现,其实是 Hibernate 的 QueryPlanCache 占用了大量的内存,如下图所示。
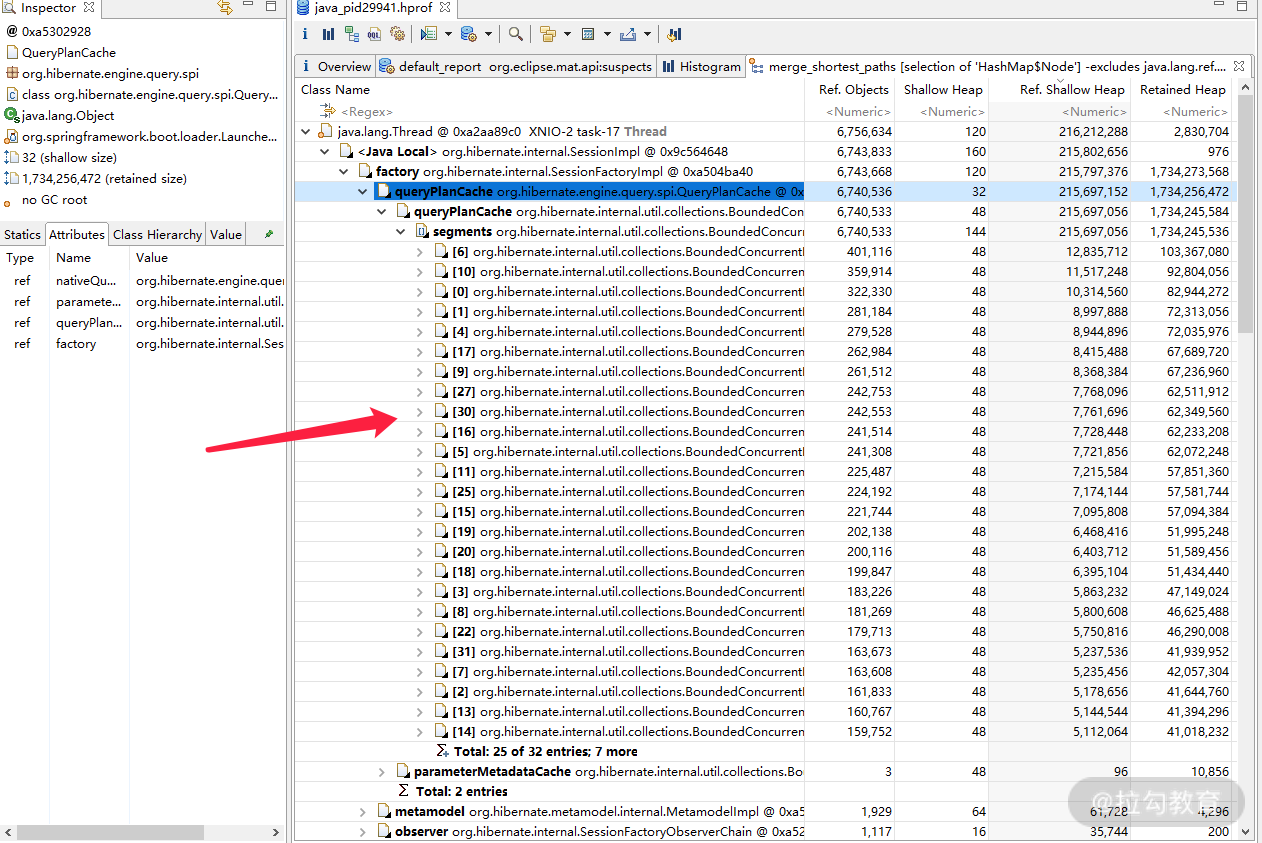
我们点开仔细看的话,发现大部分都是某些 In 相关的 SQL 语句。这就是我们常见的 In 查询引起的内存泄漏,那么为什么会发生这种现象呢?
In 查询条件引发内存泄漏的原因
我们在 UserInfoRepository 里面新增一个 In 条件的查询方法,模拟一下实际工作中的 In 查询条件的场景,如下所示。
public interface UserInfoRepository extends JpaRepository<UserInfo, Long> {
//测试In查询条件的情况
List<UserInfo> findByNameAndUrlIn(String name, Collection<String> urls);
}
假设有个需求,查询拥有个人博客地址的用户有哪些?那么我们的 Controller 里面有如下方法。
@GetMapping("/users")
public List<UserInfo> getUserInfos(List<String> urls) {
  //根据urls批量查询,我们模拟实际工作中的批量查询情况,实际工作中可能会有大量的根据不同的IDS批量查询的场景;
  return userInfoRepository.findByNameAndUrlIn("jack",urls);
}
我们 debug 看一下 QueryPlanCache 里面的情况,会发现随着 In 查询条件的个数增加,会生成不同的 QueryPlanCache,如下图所示,分别是 1 个参数、3 个参数、6个参数的情况。
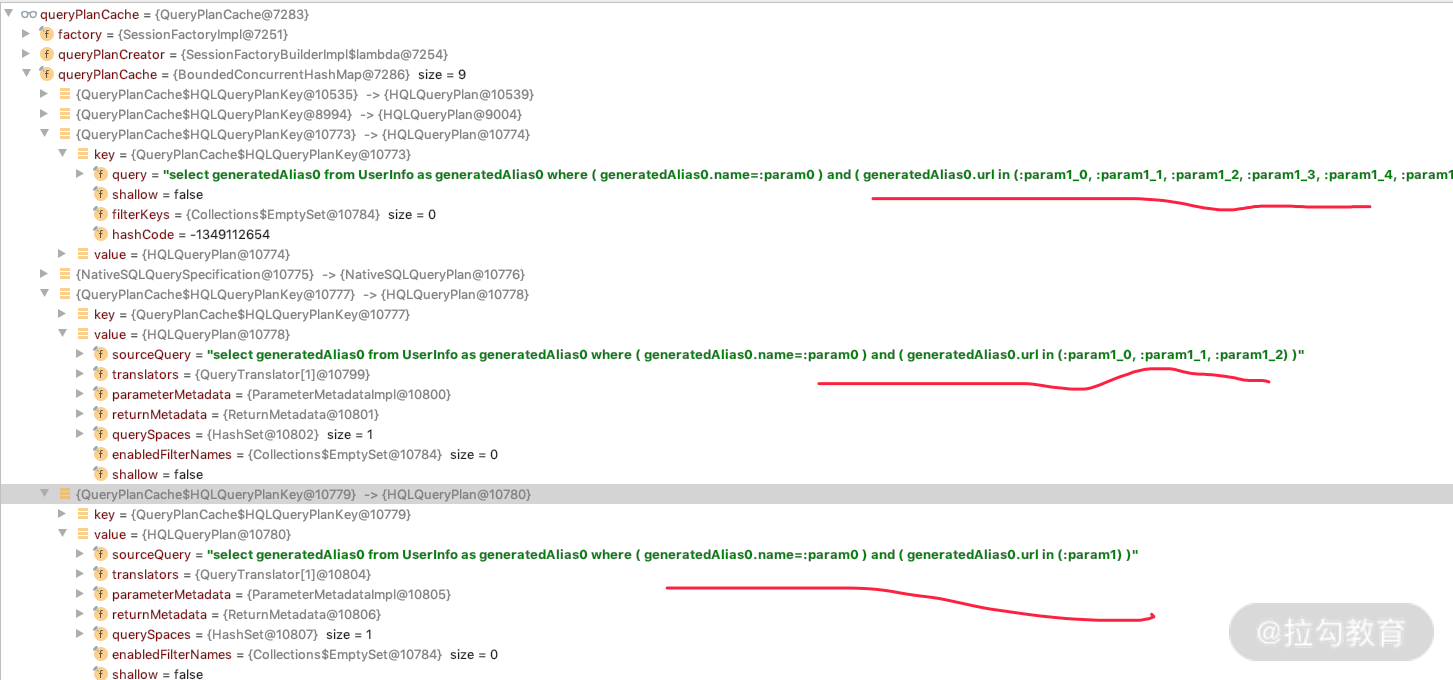
从图中我们可以想象一下,如果业务代码中有各种 In 的查询操作,不同的查询条件的个数肯定在大部分场景中也是不一样的,甚至有些场景我们能一下查询到几百个 ID 对应的数据,可想而知,那得生成多少个 In 相关的 QueryPlanCache 呀。
而依据 QueryPlanCache 的原理,整个工程都是单例的,放进去之后肯定不会进行内存垃圾回收,那么程序运行时间久了之后就会发生内存泄漏,甚至一段时间之后还会导致内存溢出的现象发生。那么该如何解决此类问题呢?
解决 In 查询条件内存泄漏的方法
第一种方法:修改缓存的最大条数限制
正如我们上面介绍的,默认 DEFAULT_QUERY_PLAN_MAX_COUNT = 2048,也就是 query plan 的最大条数限制是 2048。这样默认值可能有点大了,我们可以通过如下方式修改默认值,请看代码。
#修改 默认的plan_cache_max_size,太小会影响JPQL的执行性能,所以根据实际情况可以自由调整,不宜太小,也不宜太大,太大可能会引发内存溢出
spring.jpa.properties.hibernate.query.plan_cache_max_size=512
#修改 默认的native query的cache大小
spring.jpa.properties.hibernate.query.plan_parameter_metadata_max_size=128
第二种方法:根据 max plan count 适当增加堆内存大小
因为 QueryPlanMaxCount 是有限制的,那么肯定最大堆内存的使用也是有封顶限制的,我们找到临界值修改最小、最大堆内存即可。
第三种方法:减少 In 的查询 SQL 生成条数,配置如下所示。
### 默认情况下,不同的in查询条件的个数会生成不同的plan query cache,我们开启了in_clause_parameter_padding之后会减少in生成cache的个数,会根据参数的格式运用几何的算法生成QueryCache;
spring.jpa.properties.hibernate.query.in_clause_parameter_padding=true
也就是说,当 In 的时候,参数个数会对应归并 QueryPlanCache 变成 1、2、4、8、16、32、64、128 个参数的 QueryPlanCache。那么我们再看一下刚才参数个数分别在 1、3、4、5、6、7、8 个的时候生成 QueryPlanCache 的情况,如下图所示。
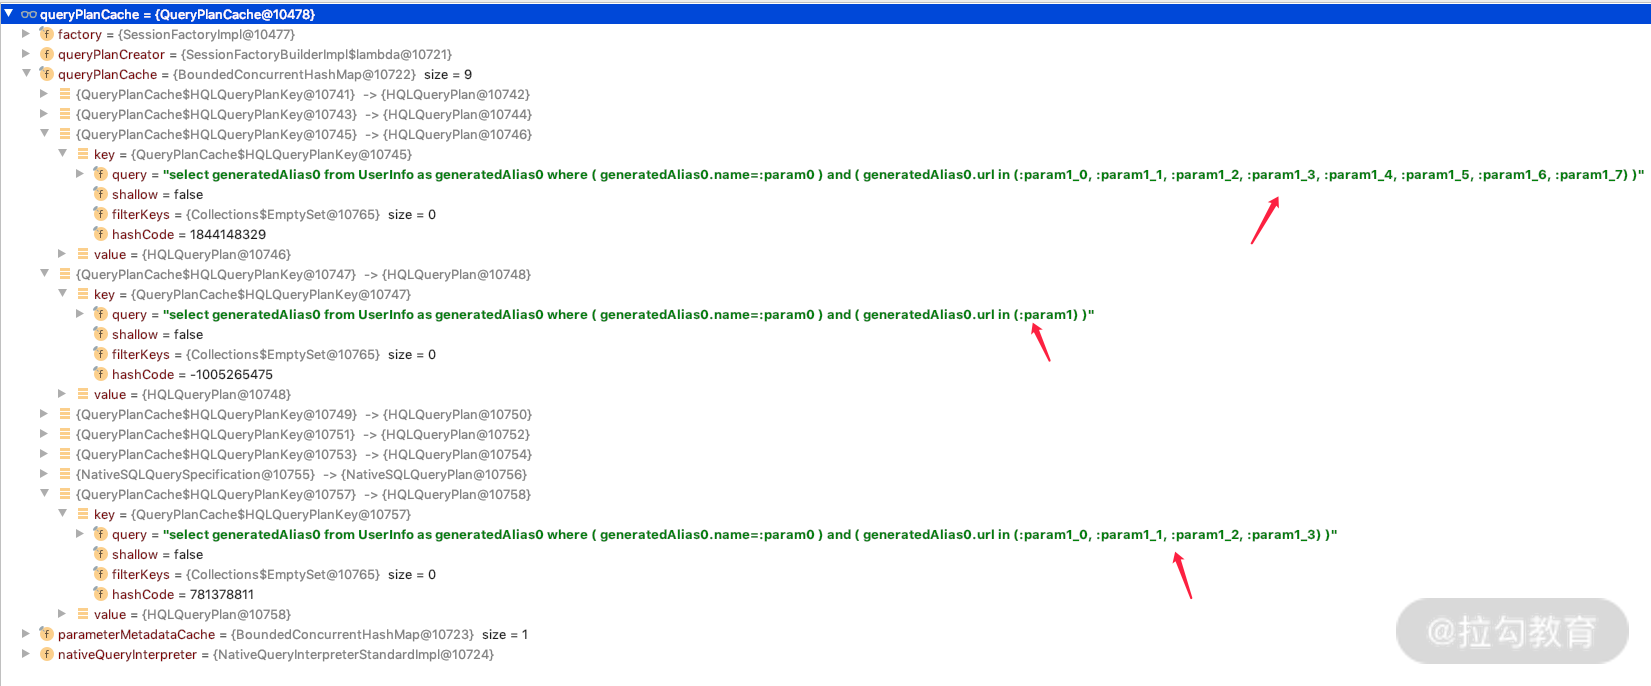
我们会发现,In 产生个数是 1 个的时候,它会共享参数为 1 个的 QueryPlanCache;而当参数是 3、4 个 In 参数的时候,它就会使用 4 个参数的 QueryPlanCache;以此类推,当参数是 5、6、7、8 个的时候,会使用 8 个参数的 QueryPlanCache……这种算法可以大大地减少 In 的不同查询参数生成的 QueryPlanCache 个数,占用的内存自然会减少很多。
总结
以上就是本讲介绍的全部内容,主要是帮助你理清工作中关于缓存的一些概念,其实一级缓存的原理我们在前面几讲都有详细介绍。其中你要重点了解一下 Query Plan Cache,因为实际工作中很多人会把它和一级缓存的概念混为一谈。
学习就是不断思考的过程,希望你能踊跃留言讨论。下个课时我会重点介绍二级缓存以及它的最佳实践,到时见。
29 二级缓存的思考:Redis 与 JPA 如何结合?
今天我们来聊聊二级缓存相关的话题。
我们在使用 Mybatis 的时候,基本不用关心什么是二级缓存。而如果你是 Hibernate 的使用者,一定经常听说和使用过 Hibernate 的二级缓存,那么我们应该怎么看待它呢?这一讲一起来揭晓 Cache 的相关概念以及在生产环境中的最佳实践。
二级缓存的概念
上一讲我们介绍了一级缓存相关的内容,一级缓存的实体的生命周期和 PersistenceContext 是相同的,即载体为同一个 Session 才有效;而 Hibernate 提出了二级缓存的概念,也就是可以在不同的 Session 之间共享实体实例,说白了就是在单个应用内的整个 application 生命周期之内共享实体,减少数据库查询。
由于 JPA 协议本身并没有规定二级缓存的概念,所以这是 Hiberante 独有的特性。所以在 Hibernate 中,从数据库里面查询实体的过程就变成了:第一步先看看一级缓存里面有没有实体,如果没有再看看二级缓存里面有没有,如果还是没有再从数据库里面查询。那么在 Hibernate 的环境下如何开启二级缓存呢?
Hibernate 中二级缓存的配置方法
Hibernate 中,默认情况下二级缓存是关闭的,如果想开启二级缓存需要通过如下三个步骤。
第一步:引入第三方二级缓存的实现的 jar。
因为 Hibernate 本身并没有实现缓存的功能,而是主要依赖第三方,如 Ehcache、jcache、redis 等第三方库。下面我们以 EhCache 为例,利用 gradle 引入 hibernate-ehcace 的依赖。代码如下所示。
implementation 'org.hibernate:hibernate-ehcache:5.2.2.Final'
如果我们想用 jcache,可以通过如下方式。
compile 'org.hibernate:hibernate-jcache:5.2.2.Final'
第二步:在配置文件里面开启二级缓存。
二级缓存默认是关闭的,所以需要我们用如下方式开启二级缓存,并且配置 cache.region.factory_class 为不同的缓存实现类。
hibernate.cache.use_second_level_cache=true
hibernate.cache.region.factory_class=org.hibernate.cache.ehcache.EhCacheRegionFactory
第三步:在用到二级缓存的地方配置 @Cacheable 和 @Cache 的策略。
import javax.persistence.Cacheable;
import javax.persistence.Entity;
@Entity
@Cacheable
@org.hibernate.annotations.Cache(usage = CacheConcurrencyStrategy.READ_WRITE)
public class UserInfo extends BaseEntity {......}
通过以上三步就可以轻松实现二级缓存了,但是这时请你思考一下,这真的能应用到我们实际生产环境中吗?会不会有副作用?
二级缓存的思考
二级缓存主要解决的是单应用场景下跨 Session 生命周期的实体共享问题,可是我们一定要通过 Hibernate 来做吗?答案并不是,其实我们可以通过各种 Cache 的手段来做,因为 Hibernate 里面一级缓存的复杂度相对较高,并且使用的话实体的生命周期会有变化,查询问题的过程较为麻烦。
同时,随着现在逐渐微服务化、分布式化,如今的应用都不是单机应用,那么缓存之间如何共享呢?分布式缓存又该如何解决?比如一个机器变了,另一个机器没变,应该如何处理?似乎 Hiberante 并没有考虑到这些问题。
此外,还有什么时间数据会变更、变化了之后如何清除缓存,等等,这些都是我们要思考的,所以 Hibernate 的二级缓存听起来“高大上”,但是使用起来绝对没有那么简单。
那么经过这一连串的疑问,如果我们不用 Hibernate 的二级缓存,还有没有更好的解决方案呢?
利用 Redis 进行缓存
在我们实际工作中经常需要 cache 的就是 Redis,那么我们通过一个例子,来看下 Spring Cache 结合 Redis 是怎么使用的。
Spring Cache 和 Redis 结合
第一步:在 gradle 中引入 cache 和 redis 的依赖,代码如下所示。
//原来我们只用到了JPA
implementation 'org.springframework.boot:spring-boot-starter-data-jpa'
//为了引入cache和redis机制需要引入如下两个jar包
implementation 'org.springframework.boot:spring-boot-starter-data-redis' //redis的依赖
implementation 'org.springframework.boot:spring-boot-starter-cache' //cache 的依赖
第二步:在 application.properties 里面增加 redis 的相关配置,代码如下。
spring.redis.host=127.0.0.1
spring.redis.port=6379
spring.redis.password=sySj6vmYke
spring.redis.timeout=6000
spring.redis.pool.max-active=8
spring.redis.pool.max-idle=8
spring.redis.pool.max-wait=-1
spring.redis.pool.min-idle=0
第三步:通过 @EnableCaching 开启缓存,增加 configuration 配置类,代码如下所示。
@EnableCaching
@Configuration
public class CacheConfiguration {
}
第四步:在我们需要缓存的地方添加 @Cacheable 注解即可。为了方便演示,我把 @Cacheable 注解配置在了 controller 方法上,代码如下。
@GetMapping("/user/info/{id}")
@Cacheable(value = "userInfo", key = "{#root.methodName, #id}", unless = "#result == null") //利用默认key值生成规则value加key生成一个redis的key值,result==null的时候不进行缓存
public UserInfo getUserInfo(@PathVariable("id") Long id) {
   //第二次就不会再执行这里了
   return userInfoRepository.findById(id).get();
}
第五步:启动项目,请求一下这个 API 会发现,第一次请求过后,redis 里面就有一条记录了,如下图所示。
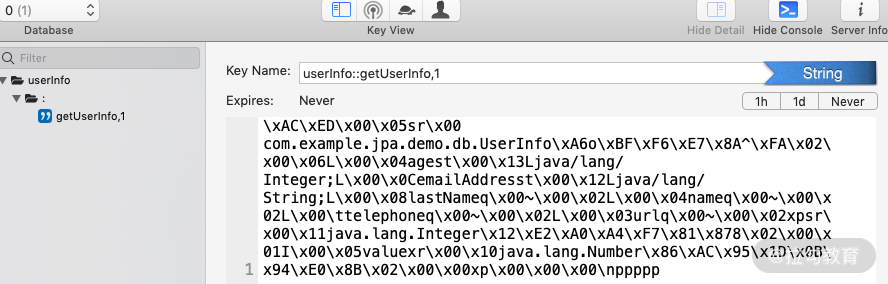
可以看到,第二次请求之后,取数据就不会再请求数据库了。那么 redis 我们已经熟悉了,那么来看一下 Spring Cache 都做了哪些事情。
Spring Cache 介绍
Spring 3.1 之后引入了基于注释(annotation)的缓存(cache)技术,它本质上不是一个具体的缓存实现方案(例如 EHCache 或者 Redis),而是一个对缓存使用的抽象概念,通过在既有代码中添加少量它定义的各种 annotation,就能够达到缓存方法的返回对象的效果。
Spring 的缓存技术还具备相当的灵活性,不仅能够使用 SpEL(Spring Expression Language)来定义缓存的 key 和各种 condition,还提供开箱即用的缓存临时存储方案,也支持主流的专业缓存,例如 Redis,EHCache 集成。而 Spring Cache 属于 Spring framework 的一部分,在下面图片所示的这个包里面。
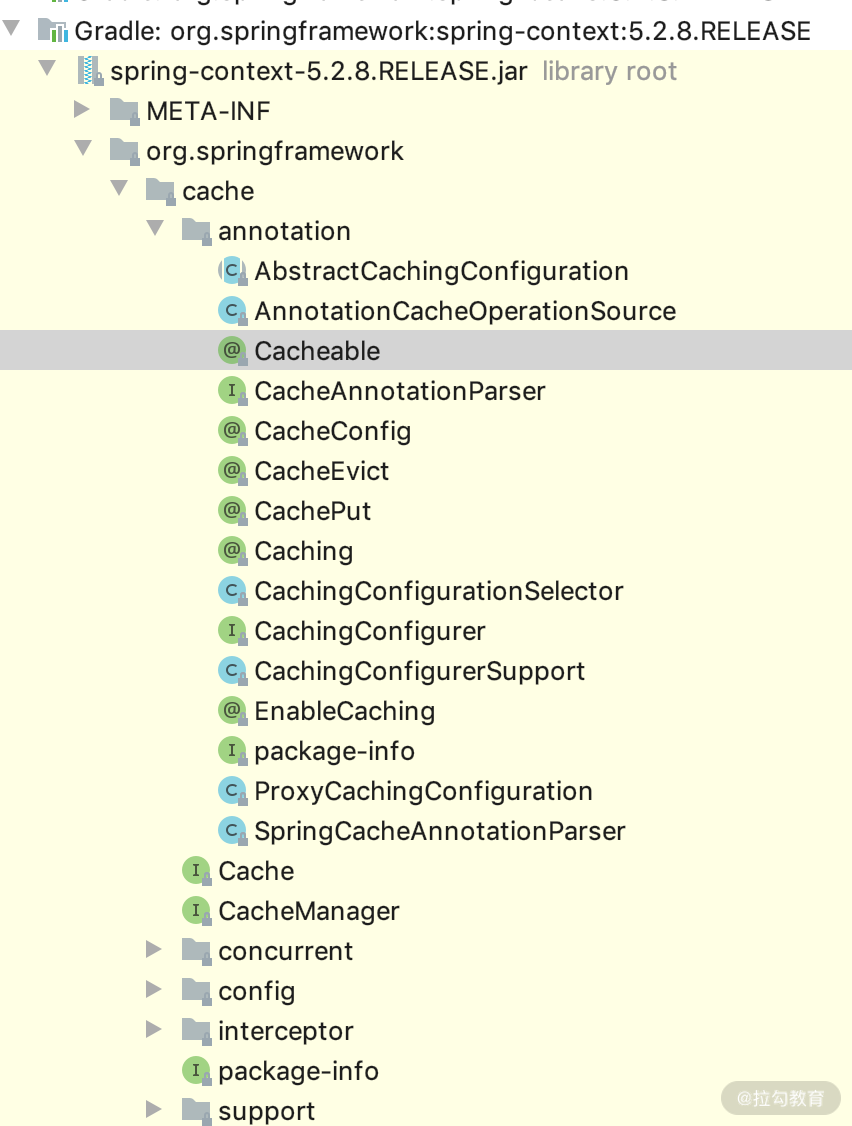
Spring cache 里面的主要的注解
@Cacheable
应用到读取数据的方法上,就是可以缓存的方法,如查找方法:先从缓存中读取,如果没有再调用方法获取数据,然后把数据添加到缓存中。
public @interface Cacheable {
   @AliasFor("cacheNames")
   String[] value() default {};
//cache的名字。可以根据名字设置不同cache处理类。redis里面可以根据cache名字设置不同的失效时间。
   @AliasFor("value")
   String[] cacheNames() default {};
//缓存的key的名字,支持spel
   String key() default "";
//key的生成策略,不指定可以用全局的默认的。
   String keyGenerator() default "";
   //客户选择不同的CacheManager
   String cacheManager() default "";
   //配置不同的cache resolver
   String cacheResolver() default "";
   //满足什么样的条件才能被缓存,支持SpEL,可以去掉方法名、参数
   String condition() default "";
//排除哪些返回结果不加入缓存里面去,支持SpEL,实际工作中常见的是result ==null等
   String unless() default "";
   //是否同步读取缓存、更新缓存
   boolean sync() default false;
}
下面是@Cacheable 相关的例子。
@Cacheable(cacheNames="book", condition="#name.length() < 32", unless="#result.notNeedCache")//利用SPEL表达式只有当name参数长度小于32的时候再进行缓存,排除notNeedCache的对象
public Book findBook(String name)
@CachePut
调用方法时会自动把相应的数据放入缓存,它与 @Cacheable 不同的是所有注解的方法每次都会执行,一般配置在 Update 和 insert 方法上。其源码里面的字段和用法基本与 @Cacheable 相同,只是使用场景不一样,我就不详细介绍了。
@CacheEvict
删除缓存,一般配置在删除方法上面。代码如下所示。
public @interface CacheEvict {
//与@Cacheable相同的部分咱我就不重复叙述了。
......
	//是否删除所有的实体对象
   boolean allEntries() default false;
   //是否方法执行之前执行。默认在方法调用成功之后删除
   boolean beforeInvocation() default false;
}
	@Caching 所有Cache注解的组合配置方法,源码如下:
	public @interface Caching {
   Cacheable[] cacheable() default {};
   CachePut[] put() default {};
   CacheEvict[] evict() default {};
}
此外,还有 @CacheConfig 表示全局 Cache 配置;@EnableCaching,表示是否开启 SpringCache 的配置。
以上是 SpringCache 中常见的注解,下面我们再来看 Spring Cache Redis 里面主要的类都有哪些。
Spring Cache Redis 里面主要的类
org.springframework.boot.autoconfigure.cache.CacheAutoConfiguration
cache 的自动装配类,此类被加载的方式是在 spring boot的spring.factories 文件里面,其关键源码如下所示。
@Configuration(proxyBeanMethods = false)
@ConditionalOnClass(CacheManager.class)
@ConditionalOnBean(CacheAspectSupport.class)
@ConditionalOnMissingBean(value = CacheManager.class, name = "cacheResolver")
@EnableConfigurationProperties(CacheProperties.class)
@AutoConfigureAfter({ CouchbaseDataAutoConfiguration.class, HazelcastAutoConfiguration.class,
      HibernateJpaAutoConfiguration.class, RedisAutoConfiguration.class })
@Import({ CacheConfigurationImportSelector.class, CacheManagerEntityManagerFactoryDependsOnPostProcessor.class })
public class CacheAutoConfiguration {
  /**
   * {@link ImportSelector} to add {@link CacheType} configuration classes.
   */
  static class CacheConfigurationImportSelector implements ImportSelector {
     @Override
     public String[] selectImports(AnnotationMetadata importingClassMetadata) {
        CacheType[] types = CacheType.values();
        String[] imports = new String[types.length];
        for (int i = 0; i < types.length; i++) {
           imports[i] = CacheConfigurations.getConfigurationClass(types[i]);
        }
        return imports;
     }
  }
}
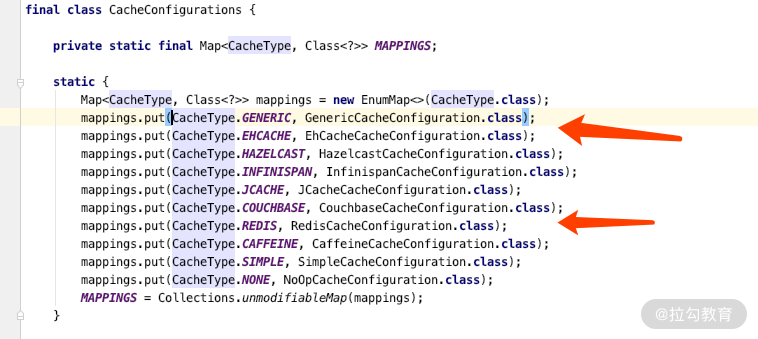
通过源码可以看到,此类的关键作用是加载 Cache 的依赖配置,以及加载所有 CacheType 的配置文件,而 CacheConfigurations 里面定义了不同的 Cache 实现方式的配置,里面包含了 Ehcache、Redis、Jcache 的各种实现方式,如下图所示。
org.springframework.cache.annotation.CachingConfigurerSupport
通过此类可以自定义 Cache 里面的 CacheManager、CacheResolver、KeyGenerator、CacheErrorHandler,代码如下所示。
public class CachingConfigurerSupport implements CachingConfigurer {
  // cache的manager,主要是管理不同的cache的实现方式,如redis还是ehcache等
   @Override
   @Nullable
   public CacheManager cacheManager() {
      return null;
   }
   // cache的不同实现者的操作方法,CacheResolver解析器,用于根据实际情况来动态解析使用哪个Cache
   @Override
   @Nullable
   public CacheResolver cacheResolver() {
      return null;
   }
   //cache的key的生成规则
   @Override
   @Nullable
   public KeyGenerator keyGenerator() {
      return null;
   }
   //cache发生异常的回调处理,一般情况下我会打印个warn日志,方便知道发生了什么事情
   @Override
   @Nullable
   public CacheErrorHandler errorHandler() {
      return null;
   }
}
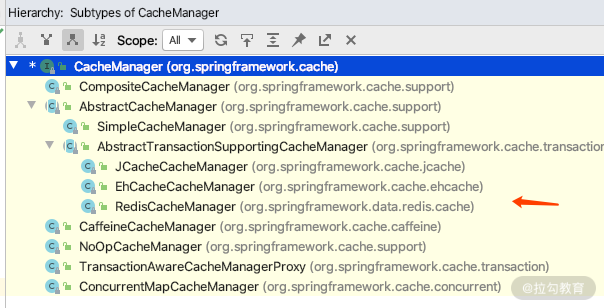
其中,所有 CacheManager 是 Spring 提供的各种缓存技术抽象接口,通过它来管理,Spring framework 里面默认实现的 CacheManager 有不同的实现类,redis 默认加载的是 RedisCacheManager,如下图所示。
org.springframework.boot.autoconfigure.cache.RedisCacheConfiguration
它是加载 Cache 的实现者,也是 redis 的实现类,关键源码如下图所示。
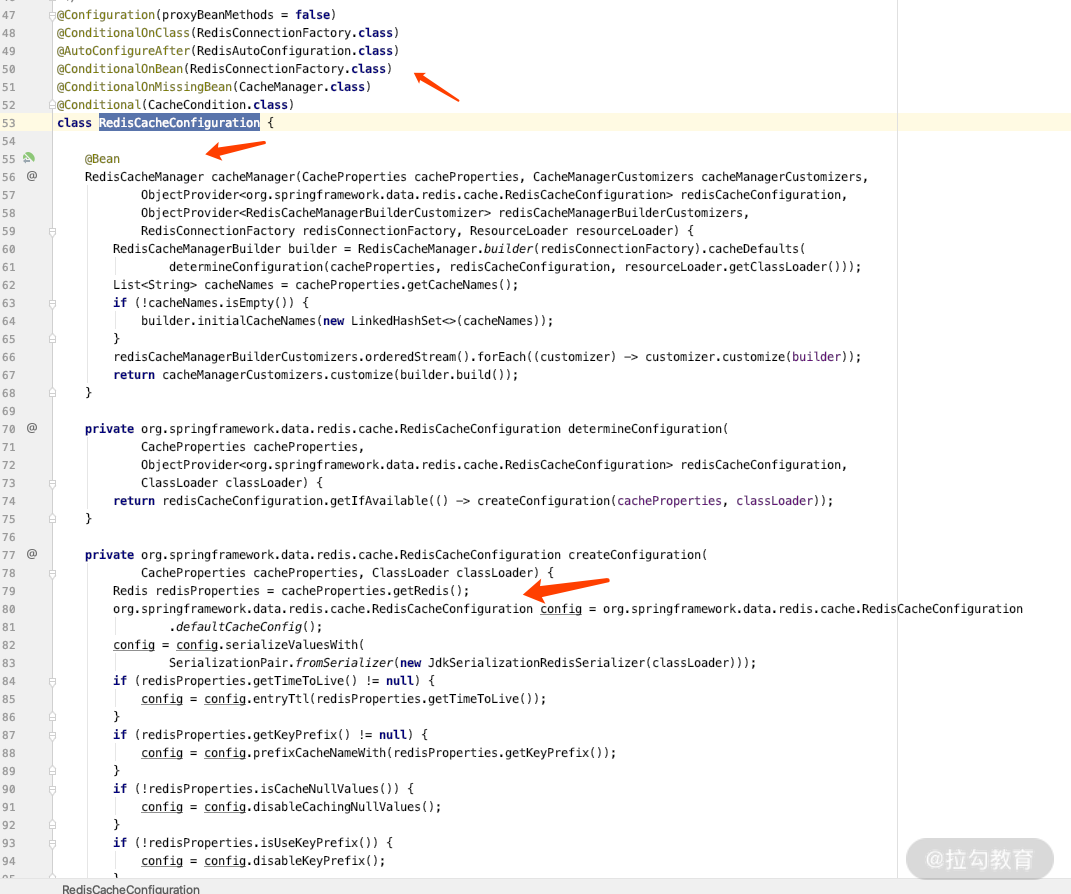
我们可以看得出来,它依赖本身的 Redis 的连接,并且加载了 RedisCacheManager;同时可以看到关于 Cache 和 Redis 的配置有哪些。
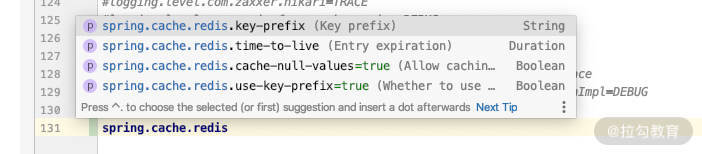
通过 CacheProperties 里面 redis 的配置,我们可以设置“key 的统一前缀、默认过期时间、是否缓存 null 值、是否使用前缀”这四个配置。
通过这几个主要的类,相信你已经对 Spring Cache 有了简单的了解,下面我们看一下在实际工作中有哪些最佳实践可以提供参考。
Spring Cache 结合 Redis 使用的最佳实践
不同 cache 的 name 在 redis 里面配置不同的过期时间
默认情况下所有 redis 的 cache 过期时间是一样的,实际工作中一般需要自定义不同 cache 的 name 的过期时间,我们这里 cache 的 name 就是指 @Cacheable 里面 value 属性对应的值。主要步骤如下。
第一步:自定义一个配置文件,用来指定不同的 cacheName 对应的过期时间不一样。代码如下所示。
@Getter
@Setter
@ConfigurationProperties(prefix = "spring.cache.redis")
/**
 * 改善一下cacheName的最佳实践方法,目前主要用不同的cache name不同的过期时间,可以扩展
 */
public class MyCacheProperties {
    private HashMap<String, Duration> cacheNameConfig;
}
第二步:通过自定义类 MyRedisCacheManagerBuilderCustomizer 实现 RedisCacheManagerBuilderCustomizer 里面的 customize 方法,用来指定不同的 name 采用不同的 RedisCacheConfiguration,从而达到设置不同的过期时间的效果。代码如下所示。
/**
 * 这个依赖spring boot 2.2 以上版本才有效
 */
public class MyRedisCacheManagerBuilderCustomizer implements RedisCacheManagerBuilderCustomizer {
    private MyCacheProperties myCacheProperties;
    private RedisCacheConfiguration redisCacheConfiguration;
    public MyRedisCacheManagerBuilderCustomizer(MyCacheProperties myCacheProperties, RedisCacheConfiguration redisCacheConfiguration) {
        this.myCacheProperties = myCacheProperties;
        this.redisCacheConfiguration = redisCacheConfiguration;
    }
    /**
     * 利用默认配置的只需要在这里加就可以了
     * spring.cache.cache-names=abc,def,userlist2,user3
     * 下面是不同的cache-name可以配置不同的过期时间,yaml也支持,如果以后还有其他属性扩展可以改这里
     * spring.cache.redis.cache-name-config.user2=2h
     * spring.cache.redis.cache-name-config.def=2m
     * @param builder
     */
    @Override
    public void customize(RedisCacheManager.RedisCacheManagerBuilder builder) {
        if (ObjectUtils.isEmpty(myCacheProperties.getCacheNameConfig())) {
            return;
        }
        Map<String, RedisCacheConfiguration> cacheConfigurations = myCacheProperties.getCacheNameConfig().entrySet().stream()
                .collect(Collectors
                        .toMap(e->e.getKey(),v->builder
                                .getCacheConfigurationFor(v.getKey())
                                .orElse(RedisCacheConfiguration.defaultCacheConfig().serializeValuesWith(redisCacheConfiguration.getValueSerializationPair()))
                                .entryTtl(v.getValue())));
        builder.withInitialCacheConfigurations(cacheConfigurations);
    }
}
第三步:在 CacheConfiguation 里面把我们自定义的 CacheManagerCustomize 加载进去即可,代码如下。
@EnableCaching
@Configuration
@EnableConfigurationProperties(value = {MyCacheProperties.class,CacheProperties.class})
@AutoConfigureAfter({CacheAutoConfiguration.class})
public class CacheConfiguration {
    /**
     * 支持不同的cache name有不同的缓存时间的配置
     *
     * @param myCacheProperties
     * @param redisCacheConfiguration
     * @return
     */
    @Bean
    @ConditionalOnMissingBean(name = "myRedisCacheManagerBuilderCustomizer")
    @ConditionalOnClass(RedisCacheManagerBuilderCustomizer.class)
    public MyRedisCacheManagerBuilderCustomizer myRedisCacheManagerBuilderCustomizer(MyCacheProperties myCacheProperties, RedisCacheConfiguration redisCacheConfiguration) {
        return new MyRedisCacheManagerBuilderCustomizer(myCacheProperties,redisCacheConfiguration);
    }
}
第四步:使用的时候非常简单,只需要在 application.properties 里面做如下配置即可。
# 设置默认的过期时间是20分钟
spring.cache.redis.time-to-live=20m
# 设置我们刚才的例子 @Cacheable(value="userInfo")5分钟过期
spring.cache.redis.cache-name-config.userInfo=5m
# 设置 room的cache1小时过期
spring.cache.redis.cache-name-config.room=1h
自定义 KeyGenerator 实现,redis 的 key 自定义拼接规则
假如我们不喜欢默认的 cache 生成的 key 的 string 规则,那么可以自定义。我们创建 MyRedisCachingConfigurerSupport 集成 CachingConfigurerSupport 即可,代码如下。
@Component
@Log4j2
public class MyRedisCachingConfigurerSupport extends CachingConfigurerSupport {
    @Override
    public KeyGenerator keyGenerator() {
        return getKeyGenerator();
    }
    /**
     * 覆盖默认的redis key的生成规则,变成"方法名:参数:参数"
     * @return
     */
    public static KeyGenerator getKeyGenerator() {
        return (target, method, params) -> {
            StringBuilder key = new StringBuilder();
            key.append(ClassUtils.getQualifiedMethodName(method));
            for (Object obc : params) {
                key.append(":").append(obc);
            }
            return key.toString();
        };
    }
}
当发生 cache 和 redis 的操作异常时,我们不希望阻碍主流程,打印一个关键日志即可
只需要在 MyRedisCachingConfigurerSupport 里面再实现父类的 errorHandler 即可,代码变成了如下模样。
@Log4j2
public class MyRedisCachingConfigurerSupport extends CachingConfigurerSupport {
    @Override
    public KeyGenerator keyGenerator() {
        return getKeyGenerator();
    }
    /**
     * 覆盖默认的redis key的生成规则,变成"方法名:参数:参数"
     * @return
     */
    public static KeyGenerator getKeyGenerator() {
        return (target, method, params) -> {
            StringBuilder key = new StringBuilder();
            key.append(ClassUtils.getQualifiedMethodName(method));
            for (Object obc : params) {
                key.append(":").append(obc);
            }
            return key.toString();
        };
    }
    /**
     * 覆盖默认异常处理方法,不抛异常,改打印error日志
     *
     * @return
     */
    @Override
    public CacheErrorHandler errorHandler() {
        return new CacheErrorHandler() {
            @Override
            public void handleCacheGetError(RuntimeException exception, Cache cache, Object key) {
                log.error(String.format("Spring cache GET error:cache=%s,key=%s", cache, key), exception);
            }
            @Override
            public void handleCachePutError(RuntimeException exception, Cache cache, Object key, Object value) {
                log.error(String.format("Spring cache PUT error:cache=%s,key=%s", cache, key), exception);
            }
            @Override
            public void handleCacheEvictError(RuntimeException exception, Cache cache, Object key) {
                log.error(String.format("Spring cache EVICT error:cache=%s,key=%s", cache, key), exception);
            }
            @Override
            public void handleCacheClearError(RuntimeException exception, Cache cache) {
                log.error(String.format("Spring cache CLEAR error:cache=%s", cache), exception);
            }
        };
    }
}
改变默认的 cache 里面 redis 的 value 序列化方式
默认有可能是 JDK 序列化方式,所以一般我们看不懂 redis 里面的值,那么就可以把序列化方式改成 JSON 格式,只需要在 CacheConfiguration 里面增加默认的 RedisCacheConfiguration 配置即可,完整的 CacheConfiguration 变成如下代码所示的样子。
@EnableCaching
@Configuration
@EnableConfigurationProperties(value = {MyCacheProperties.class,CacheProperties.class})
@AutoConfigureAfter({CacheAutoConfiguration.class})
public class CacheConfiguration {
    /**
     * 支持不同的cache name有不同的缓存时间的配置
     *
     * @param myCacheProperties
     * @param redisCacheConfiguration
     * @return
     */
    @Bean
    @ConditionalOnMissingBean(name = "myRedisCacheManagerBuilderCustomizer")
    @ConditionalOnClass(RedisCacheManagerBuilderCustomizer.class)
    public MyRedisCacheManagerBuilderCustomizer myRedisCacheManagerBuilderCustomizer(MyCacheProperties myCacheProperties, RedisCacheConfiguration redisCacheConfiguration) {
        return new MyRedisCacheManagerBuilderCustomizer(myCacheProperties,redisCacheConfiguration);
    }
    /**
     * cache异常不抛异常,只打印error日志
     *
     * @return
     */
    @Bean
    @ConditionalOnMissingBean(name = "myRedisCachingConfigurerSupport")
    public MyRedisCachingConfigurerSupport myRedisCachingConfigurerSupport() {
        return new MyRedisCachingConfigurerSupport();
    }
    /**
     * 依赖默认的ObjectMapper,实现普通的json序列化
     * @param defaultObjectMapper
     * @return
     */
    @Bean(name = "genericJackson2JsonRedisSerializer")
    @ConditionalOnMissingBean(name = "genericJackson2JsonRedisSerializer")
    public GenericJackson2JsonRedisSerializer genericJackson2JsonRedisSerializer(ObjectMapper defaultObjectMapper) {
        ObjectMapper objectMapper = defaultObjectMapper.copy();
        objectMapper.registerModule(new Hibernate5Module().enable(REPLACE_PERSISTENT_COLLECTIONS)); //支持JPA的实体的json的序列化
        objectMapper.configure(MapperFeature.SORT_PROPERTIES_ALPHABETICALLY, true);//培训
        objectMapper.deactivateDefaultTyping(); //关闭 defaultType,不需要关心reids里面是否为对象的类型
        return new GenericJackson2JsonRedisSerializer(objectMapper);
    }
    /**
     * 覆盖 RedisCacheConfiguration,只是修改serializeValues with jackson
     *
     * @param cacheProperties
     * @return
     */
    @Bean
    @ConditionalOnMissingBean(name = "jacksonRedisCacheConfiguration")
    public RedisCacheConfiguration jacksonRedisCacheConfiguration(CacheProperties cacheProperties,
                                                                  GenericJackson2JsonRedisSerializer genericJackson2JsonRedisSerializer) {
        CacheProperties.Redis redisProperties = cacheProperties.getRedis();
        RedisCacheConfiguration config = RedisCacheConfiguration
                .defaultCacheConfig();
        config = config.serializeValuesWith(RedisSerializationContext.SerializationPair.fromSerializer(genericJackson2JsonRedisSerializer));//修改的关键所在,指定Jackson2JsonRedisSerializer的方式
        if (redisProperties.getTimeToLive() != null) {
            config = config.entryTtl(redisProperties.getTimeToLive());
        }
        if (redisProperties.getKeyPrefix() != null) {
            config = config.prefixCacheNameWith(redisProperties.getKeyPrefix());
        }
        if (!redisProperties.isCacheNullValues()) {
            config = config.disableCachingNullValues();
        }
        if (!redisProperties.isUseKeyPrefix()) {
            config = config.disableKeyPrefix();
        }
        return config;
    }
}
总结
以上就是本讲的内容了,这一讲的目的是帮助你打开思路,了解 Spring Data 的生态体系。那么由于篇幅有限,我介绍的 Cache、Redis、JPA 只是这三个项目里的冰山一角,你在实际工作中可以根据实际的应用场景,想想它们各自的职责是什么,让它们发挥各自的特长,而不是依赖于 Hibernate 功能的强大,为了用而去用,这样会让代码的可读性和复杂度提高很多,就会遇到各种各样的问题,导致觉得 Hibernate 太难,或者不可控。
其实大多数时候是我们的思路不对,其实万事万物皆有优势和劣势,我们要抛弃其劣势,充分利用各个框架的优势,发挥各自的特长。如果你觉得本专栏对你有帮助,就动动手指分享吧,下一讲我们来聊聊 Spring Data Rest 的相关话题,到时见。
点击下方链接查看源码(不定时更新)
https://github.com/zhangzhenhuajack/spring-boot-guide/tree/master/spring-data/spring-data-jpa


 1645
1645


 被折叠的 条评论
为什么被折叠?
被折叠的 条评论
为什么被折叠?
 到【灌水乐园】发言


