


文章目录
Context意为上下文或者场景,是一个应用程序环境信息的接口。
从某种意义上,它就是一个万能接口百宝箱,譬如我们启动Acitivity需要Instruction,启动Service需要ActivityManagerNative,获取pack需要PMS
如果让程序员自己去和这些东西打交道简直太麻烦了,那么能不能我写个百宝箱的接口,只要是常用的操作我就丢里边,然后它的实现类统一去和那些其他乱七八糟的东西打交道呢?
这就是Context
当然,针对不同的持有者,需要有不同的创建方式,也就是说Context的实现类中会存有持有者的信息
一、 Context 接口的方法
Context是个抽象类,不管,会有实现的
通过它我们可以获取应用程序的资源和类(包括应用级别操作,如启动Activity,发广播,接受Intent等)
- 获取类的
- Resources getResources()
- 构造函数时,通过LoadApk类拿到并持有
- AssetManager getAssets()
- 实现是使用getResources().getAssets();
- PackageManager getPackageManager();
- 直接通过ActivityThread.getPackageManager();拿到
- ContentResolver getContentResolver()
- 构建函数时,通过new ApplicationContentResolver(this, mainThread, user);实例化
- Looper getMainLooper()
- 构建函数时,传入了MainThread, 通过此获取
- Context getApplicationContext()
- mPackageInfo.getApplication() : mMainThread.getApplication(); 通过LoadApk或者ActivityThread获取
- ClassLoader getClassLoader()
- mPackageInfo.getClassLoader() : ClassLoader.getSystemClassLoader();
- 通过LoadApk或者直接获取PathClassLoader
- String getPackageName()
- SharedPreferences getSharedPreferences(String name, int mode)
- File[] getExternalCacheDirs()
- File getCacheDir()
- Resources getResources()
- 四大组件
- 启动Activity
- 借助ActivityManagerNative.getDefault().startActivityAsUser
- 借助mMainThread.getInstrumentation().execStartActivitiesAsUser
- 持有了ActivityThread对象
- 启动和停止Service
- 借助ActivityManagerNative.getDefault().startService
- 发送广播消息(Intent) 和 注册广播消息(Intent)接收者
- 借助ActivityManagerNative.getDefault().broadcastIntent
- 借助 ActivityManagerNative.getDefault().registerReceiver
- 启动Activity
- 其他
- 权限
- ActivityManagerNative.getDefault().checkPermission
- 权限
/** 应用程序环境的全局信息的接口。
* 它是一个抽象类,它的执行被Android系统所提供。
* 它允许获取以应用为特征的资源和类型,是一个统领一些资源(应用程序环境变量等)的上下文。
*/
public abstract class Context {

}
- 获取类的
	// 获取应用程序包的AssetManager实例
	public abstract AssetManager getAssets();
	// 获取应用程序包的Resources实例
	public abstract Resources getResources();
	// 获取PackageManager实例,以查看全局package信息
	public abstract PackageManager getPackageManager();
	// 获取应用程序包的ContentResolver实例
	public abstract ContentResolver getContentResolver();
	// 它返回当前进程的主线程的Looper,此线程分发调用给应用组件(activities, services等)
	public abstract Looper getMainLooper();
	// 返回当前进程的单实例全局Application对象的Context
	public abstract Context getApplicationContext();
	// 返回一个可用于获取包中类信息的class loader
	public abstract ClassLoader getClassLoader();
	// 返回应用程序包名
	public abstract String getPackageName();
	// 返回应用程序信息
	public abstract ApplicationInfo getApplicationInfo();
	// 根据文件名获取SharedPreferences
	public abstract SharedPreferences getSharedPreferences(String name,
	int mode);
	// 其根目录为: Environment.getExternalStorageDirectory()
	public abstract File getExternalFilesDir(String type);
	// 返回应用程序obb文件路径
	public abstract File getObbDir();
	// 返回系统级service
	public abstract Object getSystemService(String name);


	// 从string表中获取本地化的、格式化的字符序列
	public final CharSequence getText(int resId) {
			return getResources().getText(resId);
	}
	// 从string表中获取本地化的字符串
	public final String getString(int resId) {
	return getResources().getString(resId);
	}
	public final String getString(int resId, Object... formatArgs) {
			return getResources().getString(resId, formatArgs);
	}
- 四大组件类的
	// 启动一个新的activity
	public abstract void startActivity(Intent intent);
	// 启动一个新的activity
	public void startActivityAsUser(Intent intent, UserHandle user) {
	throw new RuntimeException("Not implemented. Must override in a subclass.");
	}
	// 启动一个新的activity
	// intent: 将被启动的activity的描述信息
	// options: 描述activity将如何被启动
	public abstract void startActivity(Intent intent, Bundle options);
	// 启动多个新的activity
	public abstract void startActivities(Intent[] intents);
	// 启动多个新的activity
	public abstract void startActivities(Intent[] intents, Bundle options);

	// 广播一个intent给所有感兴趣的接收者,异步机制
	public abstract void sendBroadcast(Intent intent);
	// 广播一个intent给所有感兴趣的接收者,异步机制
	public abstract void sendBroadcast(Intent intent,String receiverPermission);
	//发送有序广播
	public abstract void sendOrderedBroadcast(Intent intent,String receiverPermission);
	public abstract void sendOrderedBroadcast(Intent intent,
	String receiverPermission, BroadcastReceiver resultReceiver,
	Handler scheduler, int initialCode, String initialData,
	Bundle initialExtras);
	public abstract void sendBroadcastAsUser(Intent intent, UserHandle user);
	public abstract void sendBroadcastAsUser(Intent intent, UserHandle user,
	String receiverPermission);
	// 注册一个BroadcastReceiver,且它将在主activity线程中运行
	public abstract Intent registerReceiver(BroadcastReceiver receiver,
	IntentFilter filter);
	//取消注册BroadcastReceiver
	public abstract Intent registerReceiver(BroadcastReceiver receiver,
	IntentFilter filter, String broadcastPermission, Handler scheduler);
	public abstract void unregisterReceiver(BroadcastReceiver receiver);

	// 请求启动一个application service
	public abstract ComponentName startService(Intent service);
	// 请求停止一个application service
	public abstract boolean stopService(Intent service);
	// 连接一个应用服务,它定义了application和service间的依赖关系
	public abstract boolean bindService(Intent service, ServiceConnection conn,
	int flags);
	// 断开一个应用服务,当服务重新开始时,将不再接收到调用,
	// 且服务允许随时停止
	public abstract void unbindService(ServiceConnection conn);
- 其他类
	//检查权限
	public abstract int checkPermission(String permission, int pid, int uid);

	// 返回一个新的与application name对应的Context对象
	public abstract Context createPackageContext(String packageName,
	int flags) throws PackageManager.NameNotFoundException;

	// 返回基于当前Context对象的新对象,其资源与display相匹配
	public abstract Context createDisplayContext(Display display);

}
二、Context 应用场景
在开发中我们经常会使用Context,它的使用场景总的来说分为两大类,它们分别是:
- 使用Context调用方法,比如:启动Activity、访问资源、调用系统级服务等。
- 调用方法时传入Context,比如:弹出Toast、创建Dialog等。
因为Context的具体能力是由ContextImpl类去实现的,所以在绝大多数场景下,Activity、Service和Application这三种类型的Context都是可以通用的。
不过有几种场景比较特殊:
- 启动Activity
- 出于安全原因的考虑,Android是不允许Activity或Dialog凭空出现的,一个Activity的启动必须要建立在另一个Activity的基础之上,也就是以此形成的返回栈
- 弹出Dialog。。
- Dialog则必须在一个Activity上面弹出(除非是System Alert类型的Dialog),因此在这种场景下,我们只能使用Activity类型的Context,否则将会出错
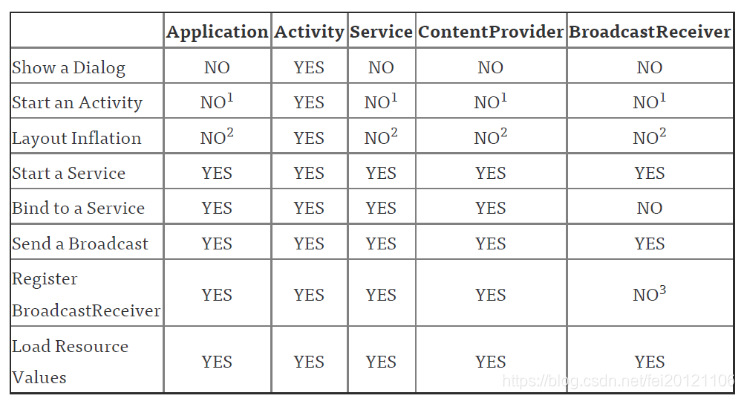
【Context的应用场景图】
大家注意看到有一些NO上添加了一些数字,其实这些从能力上来说是YES,但是为什么说是NO呢?下面一个一个解释:
- 数字1:启动Activity在这些类中是可以的,但是需要创建一个新的task。一般情况不推荐。
- 数字2:在这些类中去layout inflate是合法的,但是会使用系统默认的主题样式,如果你自定义了某些样式可能不会被使用。
- 数字3:在receiver为null时允许,在4.2或以上的版本中,用于获取黏性广播的当前值。(可以无视)
实际上,只要把握住一点,凡是跟UI相关的,都应该使用Activity做为Context来处理;其他的一些操作,Service,Activity,Application等实例都可以
三、一个应用的Context个数
APP Context总数 = Application数(1) + Activity数(Customer) + Service数(Customer);
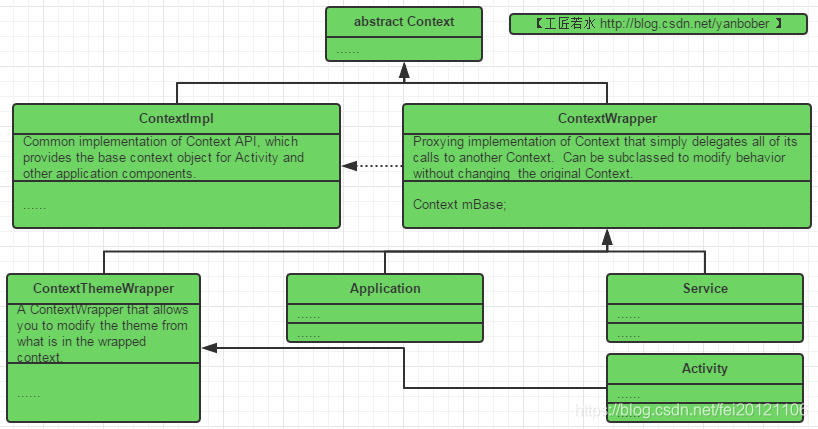
Context是一个抽象类,它的内部定义了很多方法以及静态常量,它的具体实现类为ContextImpl。
和Context相关联的类,除了ContextImpl还有ContextWrapper、ContextThemeWrapper和Activity等等,下面给出Context的关系图。
[一个应用的Context个数]
从图中我们可以看出:
- ContextImpl和ContextWrapper继承自Context
- ContextImpl 实现了Context类的所有API。
- ContextWrapper内部包含有Context类型的mBase对象,mBase具体指向的是ContextImpl
- ContextImpl提供了很多功能,但是外界需要使用并拓展ContextImpl的功能,因此设计上使用了装饰模式,ContextWrapper是装饰类,它对ContextImpl进行包装,ContextWrapper主要是起了方法传递作用,ContextWrapper中几乎所有的方法实现都是调用ContextImpl的相应方法来实现的
- ContextThemeWrapper、Service和Application都继承自ContextWrapper,这样他们都可以通过mBase来使用Context的方法,同时它们也是装饰类,在ContextWrapper的基础上又添加了不同的功能
- ContextThemeWrapper中包含和主题相关的方法(比如: getTheme方法),因此,需要主题的Activity继承ContextThemeWrapper,而不需要主题的Service则继承ContextWrapper
3.1 ContextImpl
实现了Context类的所有API。
class ContextImpl extends Context {

    //所有Application程序公用一个mPackageInfo对象
    /*package*/
    ActivityThread.PackageInfo mPackageInfo;

    private Context mOuterContext;

    ......
}
3.1.1 构造函数ContextImpl.createAppContext
- ContextImpl.createAppContext(ActivityThread mainThread, LoadedApk packageInfo));
- 持有
- ActivityThread mMainThread;
- LoadedApk mPackageInfo;
- ApplicationContentResolver mContentResolver;
- ResourcesManager mResourcesManager;
- Resources mResources;
class ContextImpl extends Context {
 private static ArrayMap<String, ArrayMap<String, SharedPreferencesImpl>> sSharedPrefs;

    final ActivityThread mMainThread;
    final LoadedApk mPackageInfo;

    private final IBinder mActivityToken;

    private final UserHandle mUser;

    private final ApplicationContentResolver mContentResolver;

    private final String mBasePackageName;
    private final String mOpPackageName;

    private final ResourcesManager mResourcesManager;
    private final Resources mResources;
    private final Display mDisplay; // may be null if default display
    private final DisplayAdjustments mDisplayAdjustments = new DisplayAdjustments();
    private final Configuration mOverrideConfiguration;

    private final boolean mRestricted;

    private Context mOuterContext;
    private int mThemeResource = 0;
    private Resources.Theme mTheme = null;
    private PackageManager mPackageManager;
    private Context mReceiverRestrictedContext = null;


  static ContextImpl createAppContext(ActivityThread mainThread, LoadedApk packageInfo) {
          if (packageInfo == null) throw new IllegalArgumentException("packageInfo");
           return new ContextImpl(null, mainThread,
                packageInfo, null, null, 0, null, null, Display.INVALID_DISPLAY);
       }

  private ContextImpl(ContextImpl container, ActivityThread mainThread,
                            LoadedApk packageInfo, IBinder activityToken, UserHandle user, int flags,
                            Display display, Configuration overrideConfiguration, int createDisplayWithId) {
            mOuterContext = this;

	        mMainThread = mainThread;
	        mActivityToken = activityToken;
	        mRestricted = restricted;

			mPackageInfo = packageInfo;
	        mResourcesManager = ResourcesManager.getInstance();
	        mDisplay = display;

            //...
            //从LoadApk创建Resources 实例
            Resources resources = packageInfo.getResources(mainThread);
            //...
            mResources = resources;
            //...

			mContentResolver = new ApplicationContentResolver(this, mainThread, user);
        }
}
3.1.2 注册各种服务,持有远程服务对象
    private static final HashMap<String, ServiceFetcher> SYSTEM_SERVICE_MAP =
            new HashMap<String, ServiceFetcher>();

    @Override
    public Object getSystemService(String name) {
        ServiceFetcher fetcher = SYSTEM_SERVICE_MAP.get(name);
        return fetcher == null ? null : fetcher.getService(this);
    }

    private static int sNextPerContextServiceCacheIndex = 0;
    private static void registerService(String serviceName, ServiceFetcher fetcher) {
        if (!(fetcher instanceof StaticServiceFetcher)) {
            fetcher.mContextCacheIndex = sNextPerContextServiceCacheIndex++;
        }
        SYSTEM_SERVICE_MAP.put(serviceName, fetcher);
    }

 static {
		 registerService(ACTIVITY_SERVICE, new ServiceFetcher() {
                public Object createService(ContextImpl ctx) {
                    return new ActivityManager(ctx.getOuterContext(), ctx.mMainThread.getHandler());
                }});

		registerService(CLIPBOARD_SERVICE, new ServiceFetcher() {
                public Object createService(ContextImpl ctx) {
                    return new ClipboardManager(ctx.getOuterContext(),
                            ctx.mMainThread.getHandler());
                }});
}
3.1.3 获取实例类的
- Resources getResources()
	- 构造函数时,通过LoadApk类拿到并持有
-  AssetManager getAssets()
	- 实现是使用getResources().getAssets();
-  PackageManager getPackageManager();
	- 直接通过ActivityThread.getPackageManager();拿到
- ContentResolver getContentResolver()
	- 构建函数时,通过new ApplicationContentResolver(this, mainThread, user);实例化
- Looper getMainLooper()
	- 构建函数时,传入了MainThread, 通过此获取
- Context getApplicationContext()
	- mPackageInfo.getApplication() : mMainThread.getApplication(); 通过LoadApk或者ActivityThread获取
- ClassLoader getClassLoader()
	- 通过LoadApk或者直接获取PathClassLoader
-  String getPackageName()
- SharedPreferences getSharedPreferences(String name, int mode)
-  File[] getExternalCacheDirs()
-  File getCacheDir()
 	@Override
    public Resources getResources() {
        return mResources;
    }
	@Override
    public AssetManager getAssets() {
        return getResources().getAssets();
    }
    @Override
    public PackageManager getPackageManager() {
        if (mPackageManager != null) {
            return mPackageManager;
        }
        IPackageManager pm = ActivityThread.getPackageManager();
        if (pm != null) {
            // Doesn't matter if we make more than one instance.
            return (mPackageManager = new ApplicationPackageManager(this, pm));
        }
        return null;
    }
     @Override
    public ContentResolver getContentResolver() {
        return mContentResolver;
    }
    @Override
    public Looper getMainLooper() {
        return mMainThread.getLooper();
    }
    @Override
    public Context getApplicationContext() {
        return (mPackageInfo != null) ?
                mPackageInfo.getApplication() : mMainThread.getApplication();
    }
       @Override
    public ClassLoader getClassLoader() {
        return mPackageInfo != null ?
                mPackageInfo.getClassLoader() : ClassLoader.getSystemClassLoader();
    }

    @Override
    public String getPackageName() {
        if (mPackageInfo != null) {
            return mPackageInfo.getPackageName();
        }
        // No mPackageInfo means this is a Context for the system itself,
        // and this here is its name.
        return "android";
    }
    @Override
    public SharedPreferences getSharedPreferences(String name, int mode)
		 SharedPreferencesImpl sp;
        synchronized (ContextImpl.class) {
            if (sSharedPrefs == null) {
                sSharedPrefs = new ArrayMap<String, ArrayMap<String, SharedPreferencesImpl>>();
            }
			...
		}
	}
	  @Override
    public File[] getExternalCacheDirs() {
        synchronized (mSync) {
            if (mExternalCacheDirs == null) {
                mExternalCacheDirs = Environment.buildExternalStorageAppCacheDirs(getPackageName());
            }

            // Create dirs if needed
            return ensureDirsExistOrFilter(mExternalCacheDirs);
        }
    }
     @Override
    public File getCacheDir() {
        synchronized (mSync) {
            if (mCacheDir == null) {
                mCacheDir = new File(getDataDirFile(), "cache");
            }
            return createFilesDirLocked(mCacheDir);
        }
    }
3.1.4 四大组件
- 启动Activity
- 借助ActivityManagerNative.getDefault().startActivityAsUser
- 借助mMainThread.getInstrumentation().execStartActivitiesAsUser
- 持有了ActivityThread对象
- 启动和停止Service
- 借助ActivityManagerNative.getDefault().startService
- 发送广播消息(Intent) 和 注册广播消息(Intent)接收者
- 借助ActivityManagerNative.getDefault().broadcastIntent
- 借助 ActivityManagerNative.getDefault().registerReceiver
	// 启动一个新的activity
	public abstract void startActivity(Intent intent);
	// 启动一个新的activity
	public void startActivityAsUser(Intent intent, UserHandle user) {
	throw new RuntimeException("Not implemented. Must override in a subclass.");
	}
	// 启动一个新的activity
	// intent: 将被启动的activity的描述信息
	// options: 描述activity将如何被启动
	public abstract void startActivity(Intent intent, Bundle options);
	// 启动多个新的activity
	public abstract void startActivities(Intent[] intents);
	// 启动多个新的activity
	public abstract void startActivities(Intent[] intents, Bundle options);

	// 广播一个intent给所有感兴趣的接收者,异步机制
	public abstract void sendBroadcast(Intent intent);
	// 广播一个intent给所有感兴趣的接收者,异步机制
	public abstract void sendBroadcast(Intent intent,String receiverPermission);
	//发送有序广播
	public abstract void sendOrderedBroadcast(Intent intent,String receiverPermission);
	public abstract void sendOrderedBroadcast(Intent intent,
	String receiverPermission, BroadcastReceiver resultReceiver,
	Handler scheduler, int initialCode, String initialData,
	Bundle initialExtras);
	public abstract void sendBroadcastAsUser(Intent intent, UserHandle user);
	public abstract void sendBroadcastAsUser(Intent intent, UserHandle user,
	String receiverPermission);
	// 注册一个BroadcastReceiver,且它将在主activity线程中运行
	public abstract Intent registerReceiver(BroadcastReceiver receiver,
	IntentFilter filter);
	//取消注册BroadcastReceiver
	public abstract Intent registerReceiver(BroadcastReceiver receiver,
	IntentFilter filter, String broadcastPermission, Handler scheduler);
	public abstract void unregisterReceiver(BroadcastReceiver receiver);

	// 请求启动一个application service
	public abstract ComponentName startService(Intent service);
	// 请求停止一个application service
	public abstract boolean stopService(Intent service);
	// 连接一个应用服务,它定义了application和service间的依赖关系
	public abstract boolean bindService(Intent service, ServiceConnection conn,
	int flags);
	// 断开一个应用服务,当服务重新开始时,将不再接收到调用,
	// 且服务允许随时停止
	public abstract void unbindService(ServiceConnection conn);
3.1.5 其他
- 权限管理checkPermission
- 借助ActivityManagerNative.getDefault().checkPermission实现
   @Override
    public int checkPermission(String permission, int pid, int uid) {
        if (permission == null) {
            throw new IllegalArgumentException("permission is null");
        }

        try {
            return ActivityManagerNative.getDefault().checkPermission(
                    permission, pid, uid);
        } catch (RemoteException e) {
            return PackageManager.PERMISSION_DENIED;
        }
    }
3.2 ContextWrapper
ContextImpl的代理,该类的构造函数包含了一个真正的Context(ContextImpl对象)引用,ContextImpl的装饰者模式
public class ContextWrapper extends Context {

    //该属性指向一个ContextIml实例,一般在创建Application、Service、Activity时赋值
    Context mBase;

    public ContextWrapper(Context base) {
        mBase = base;
    }

    /**
     * 创建Application、Service、Activity,会调用该方法给mBase属性赋值
     */
    protected void attachBaseContext(Context base) {
        if (mBase != null) {
            throw new IllegalStateException("Base context already set");
        }
        mBase = base;
    }
    ......
}
3.2.1 ContextThemeWrapper
该类内部包含了主题Theme相关的接口,即android:theme属性指定的。
/**
 * A ContextWrapper that allows you to modify the theme from what is in the
 * wrapped context.
 */
public class ContextThemeWrapper extends ContextWrapper {
   //该属性指向一个ContextIml实例,一般在创建Application、Service、Activity时赋值

     private Context mBase;
    //mBase赋值方式同样有一下两种
     public ContextThemeWrapper(Context base, int themeres) {
            super(base);
            mBase = base;
            mThemeResource = themeres;
     }

     @Override
     protected void attachBaseContext(Context newBase) {
            super.attachBaseContext(newBase);
            mBase = newBase;
     }
}
3.2.2 Activity、Service、Application类的继承关系
public class Activity extends ContextThemeWrapper
        implements LayoutInflater.Factory2,
        Window.Callback, KeyEvent.Callback,
        OnCreateContextMenuListener, ComponentCallbacks2,
        Window.OnWindowDismissedCallback {
    ......
}


public abstract class Service extends ContextWrapper implements ComponentCallbacks2 {
    ......
}

public class Application extends ContextWrapper implements ComponentCallbacks2 {
    ......
}
四、Context 如何获取
ContextWrapper 和 Contextlmpl 不是同一个对象,这个也就是很多getContext()的差异处,,,虽然他们的最终使用是一致的, 因为ContextWrapper使用了装饰器模式,内部函数都委托Contextlmpl处理
通常我们想要获取Context对象,主要有以下四种方法
- Activity.this 返回当前的Activity实例,如果是UI控件需要使用Activity作为Context对象,但是默认的Toast实际上使用ApplicationContext也可以。
- Activity.getApplicationContext,获取当前Activity所在的(应用)进程的Context对象,通常我们使用Context对象时,要优先考虑这个全局的进程Context。
- ContextWrapper.getBaseContext():用来获取一个ContextWrapper进行装饰之前的Context,可以使用这个方法,这个方法在实际开发中使用并不多,也不建议使用。
- View.getContext,返回的是View对应的Infalte构建时的Context , 也就是当前View对象的Context对象,通常是当前正在展示的Activity对象。
public class MyActivity extends Activity {
    Context mContext;
    public void method() {

        mContext = this; //获取当前Activity的上下文,如果需要绑定Activity的生命周期,使用它

        mContext=MyActivity.this;//获取当前MyActivity的上下文,不方便使用this的时候推荐使用这种方式

        //调用Activity.getApplicationContext()
        mContext = getApplicationContext();//获取当前Application的上下文,如果需要绑定应用的生命周期,使用它

        //Activity.getApplication()
        mContext = getApplication();//获取当前Application的上下文,

        //调用ContextWrapper.getBaseContext()
        mContext = getBaseContext();//从上下文A内上下文访问上下文A,不建议使用,如果需要,推荐使用XxxClass.this直接指出上下文
    }
}


public class MyView extends View {
    Context mContext;
    public void method() {

        //调用View.getContext()
        mContext = getContext(); //获取这个View运行所在地的上下文
    }
}
4.1 Activity.this 和 getBaseContext()的区别
- this和getBaseContext()
- this:代表当前,在Activity当中就是代表当前的Activity,换句话说就是Activity.this在Activity当中可以缩写为this。Activity.this的context 返回当前activity的上下文,属于activity ,activity 摧毁他就摧毁。
- getBaseContext() 返回由构造函数指定或setBaseContext()设置的上下文。
4.2 getApplicationContext()和getApplication()
- 共同点
- 返回得是同一个Application对象
- 区别
- getApplicationContext()在 ContextWrapper 的实现,
- 是Interface Context的抽象方法,因此只要有上下文的地方都可以调用该函数
- 内部使用mBase.getApplicationContext();触发 Contextlmpl 的getApplicationContext。 并最终返回LoadApkInfo中的mApplication.
- 因为LoadApk中的application是单个的,意味着,在当前app的任意位置使用这个函数得到的是同一个Application
- getApplicationContext()在 ContextWrapper 的实现,
- getApplication()在Activity和Service中实现
- 返回的是Activity和Service的成员变量
- 只能在Activity和Service里使用,指向的是Application对象。 这个对象是在attach时传入的Application对象
- 因为Application也是Context的一个子类,所以getApplication()可以被用来指向Context。
Log.i("dyl", "getApplication is = " + myApp);
Log.i("dyl", "getApplicationContext is = " + appContext);
通过上面的代码,打印得出两者的内存地址都是相同的,看来它们是同一个对象。
其实这个结果也很好理解,因为前面已经说过了,Application本身就是一个Context,所以这里获取getApplicationContext()得到的结果就是Application本身的实例。
那么问题来了,既然这两个方法得到的结果都是相同的,那么Android为什么要提供两个功能重复的方法呢?
实际上这两个方法在作用域上有比较大的区别:
- getApplication()方法的语义性非常强,一看就知道是用来获取Application实例的
** 但是这个方法只有在Activity和Service中才能调用的到。那么也许在绝大多数情况下我们都是在Activity或者Service中使用Application的** - 如果在一些其它的场景,比如BroadcastReceiver中也想获得Application的实例,这时就可以借助getApplicationContext()方法了
我们来看下源码的分析。
getApplicationContext方法的实现在ContextWrapper中,如下所示。
//frameworks/base/core/java/android/content/ContextWrapper.java
@Override
public Context getApplicationContext() {
    return mBase.getApplicationContext();
}

//mBase指的是ContextImpl,我们来查看 ContextImpl的getApplicationContext方法:
//frameworks/base/core/java/android/app/ContextImpl.java
@Override
public Context getApplicationContext() {
	//如果LoadedApk不为null,则调用LoadedApk的getApplication方法,否则调用AvtivityThread的getApplication方法。
	// 由于应用程序这时已经启动,因此LoadedApk不会为null,则会调用LoadedApk的getApplication方法:
    return (mPackageInfo != null) ?
            mPackageInfo.getApplication() : mMainThread.getApplication();
}

//这里的mApplication在下文LoadedApk的makeApplication方法的注释5处被赋值
Application getApplication() {
     return mApplication;
 }
五、创建Context的套路
5.1 时机
- ActivityThread#schedulexxx 譬如 scheduleLaunchActivity
- ActivityThread#sendMessage
- ActivityThread#handleMessage
- ActivityThread#handlexxx
- ActivityThread#performxxx
- 然后会有 四大组件的创建 和 Context的创建及其绑定过程
5.2 套路
Activity、Service、Application组件都是这个套路
- 通过ClassLoader加载 四大组件 对应的Class
- 通过反射构建 四大组件实例
- 实例化 Contextlmpl 并绑定 组件实例
- 通过 Contextlmpl 的静态方法 创建 实例,要求传入 LoadedApk 和 ActivityThread对象
- 调用 Contextlmpl#setOutContext(四大组件实例),实现 Contextlmpl 对组件实例的绑定
- 触发四大组件的attach方法,传入Application、ActivityThread等
- 内部调用 ContextWrapper 的attachBaseContext方法,将真正的Contextlmpl赋值给当前的组件的mBase(组件继承ContextWrapper)
说是四大组件,其实广播和provider都没有继承ContextWrapper,但是思路基本是一致的
- 广播直接获取Application,并将其再次封装一层做ReceiverRestrictedContext然后传给 Receiver的onReceiver(context, intent)函数
五、Activity的Context创建过程

【Activity中ContextImpl实例化】
- 通过startActivity启动一个新的Activity—>回调ActivityThread的handleLaunchActivity()方法—>内部会调用performLaunchActivity()方法
- performLaunchActivity()方法—> 反射构建Activity对象—>调用createBaseContextForActivity(xx,xx)方法
- createBaseContextForActivity(xx,xx )中创建了ContextImpl对象,并且调用了contextImpl的setOuterContext(activity),将当前的Activity对象赋值给了内部成员变量mOuterContext
- 所以到了这一步,ContextImpl类关联了Activity
- 最后通过调用Activity.attach( xx,xx,·····)方法,将createBaseContextForActivity返回的ContextImpl对象传入到ContextWrapper类的mBase变量
- 这样,ContextWrapper类的成员mBase就被实例化l
源码分析:
- 【入口】:ActivityThread是应用程序进程的核心类,它的内部类ApplicationThread会调用scheduleLaunchActivity方法来启动Activity
@Override
public final void scheduleLaunchActivity(Intent intent, IBinder token, int ident,
        ActivityInfo info, Configuration curConfig, Configuration overrideConfig,
        CompatibilityInfo compatInfo, String referrer, IVoiceInteractor voiceInteractor,
        int procState, Bundle state, PersistableBundle persistentState,
        List<ResultInfo> pendingResults, List<ReferrerIntent> pendingNewIntents,
        boolean notResumed, boolean isForward, ProfilerInfo profilerInfo) {
        updateProcessState(procState, false);
        ActivityClientRecord r = new ActivityClientRecord();
        r.token = token;
        ...
        sendMessage(H.LAUNCH_ACTIVITY, r);
}
- 【步骤1】scheduleLaunchActivity方法会将启动Activity的参数封装成ActivityClientRecord ,sendMessage方法向H类发送类型为LAUNCH_ACTIVITY的消息,并将ActivityClientRecord 传递过去。
- sendMessage方法的目的是将启动Activity的逻辑放在主线程中的消息队列中,这样启动Activity的逻辑就会在主线程中执行
- 【步骤2】H类的handleMessage方法中会对LAUNCH_ACTIVITY类型的消息进行处理,其中调用了handleLaunchActivity方法,而handleLaunchActivity方法中又调用performLaunchActivity方法
- 启动流程一文中我们已经讲过
private Activity performLaunchActivity(ActivityClientRecord r, Intent customIntent) {
      ...
      Activity activity = null;
      try {
          java.lang.ClassLoader cl = r.packageInfo.getClassLoader();
          activity = mInstrumentation.newActivity(
                  cl, component.getClassName(), r.intent);//【1】
           ...
          }
      } catch (Exception e) {
         ...
      }

      try {
        ...
          if (activity != null) {
              Context appContext = createBaseContextForActivity(r, activity);//【2】
              ...
              /**
              *【3】
              */
              activity.attach(appContext, this, getInstrumentation(), r.token,
                      r.ident, app, r.intent, r.activityInfo, title, r.parent,
                      r.embeddedID, r.lastNonConfigurationInstances, config,
                      r.referrer, r.voiceInteractor, window);
              ...
              if (r.isPersistable()) {
                  mInstrumentation.callActivityOnCreate(activity, r.state, r.persistentState);//【4】
              } else {
                  mInstrumentation.callActivityOnCreate(activity, r.state);
              }
             ...
      }

      return activity;
  }
- 【步骤3】performLaunchActivity
- 注释1处用来创建Activity的实例
- 注释2处通过createBaseContextForActivity方法用来创建Activity的ContextImpl
- 将ContextImpl传入注释3处的activity的attach方法中
- 注释4处Instrumentation的callActivityOnCreate方法中会调用Activity的onCreate方法。
private Context createBaseContextForActivity(ActivityClientRecord r, final Activity activity) {
      ...
      ContextImpl appContext = ContextImpl.createActivityContext(
              this, r.packageInfo, r.token, displayId, r.overrideConfig);//1
      appContext.setOuterContext(activity);//2
      Context baseContext = appContext;
      ...
      return baseContext;
  }
- 【步骤3.2】createBaseContextForActivity(xx,xx )中创建了ContextImpl对象,并且调用了contextImpl的setOuterContext(activity),将当前的Activity对象赋值给了内部成员变量mOuterContext
- 在注释1处调用ContextImpl的createActivityContext方法来创建ContextImpl
- 注释2处调用了ContextImpl的setOuterContext方法,将此前创建的Activity 实例赋值给ContextImpl的成员变量mOuterContext,这样ContextImpl也可以访问Activity的变量和方法
final void attach(Context context, ActivityThread aThread,
           Instrumentation instr, IBinder token, int ident,
           Application application, Intent intent, ActivityInfo info,
           CharSequence title, Activity parent, String id,
           NonConfigurationInstances lastNonConfigurationInstances,
           Configuration config, String referrer, IVoiceInteractor voiceInteractor,
           Window window) {
       attachBaseContext(context);//1
       mFragments.attachHost(null /*parent*/);
       mWindow = new PhoneWindow(this, window);//2
       mWindow.setWindowControllerCallback(this);
       mWindow.setCallback(this);//3
       mWindow.setOnWindowDismissedCallback(this);
       ...
       mWindow.setWindowManager(
               (WindowManager)context.getSystemService(Context.WINDOW_SERVICE),
               mToken, mComponent.flattenToString(),
               (info.flags & ActivityInfo.FLAG_HARDWARE_ACCELERATED) != 0);//4
       if (mParent != null) {
           mWindow.setContainer(mParent.getWindow());
       }
       mWindowManager = mWindow.getWindowManager();//5
       mCurrentConfig = config;
   }
- 【步骤3.3】
- 在注释1处调用了ContextThemeWrapper的attachBaseContext方法
- attachBaseContext方法接着调用ContextThemeWrapper的父类ContextWrapper的attachBaseContext方法
- 将context赋值给ContextWrapper的成员变量mBase。这样ContextWrapper的功能就可以交由ContextImpl处理
- 在注释2处创建PhoneWindow,它代表应用程序窗口。PhoneWindow在运行中会间接触发很多事件,比如点击事件、菜单弹出、屏幕焦点变化等事件,这些事件需要转发给与PhoneWindow关联的Actvity,转发操作通过Window.Callback接口实现,Actvity实现了这个接口
- 在注释3处将当前Activity通过Window的setCallback方法传递给PhoneWindow。
- 注释4处给PhoneWindow设置WindowManager
- 在注释5处获取WindowManager并赋值给Activity的成员变量mWindowManager ,这样在Activity中就可以通过getWindowManager方法来获取WindowManager。
- 在注释1处调用了ContextThemeWrapper的attachBaseContext方法
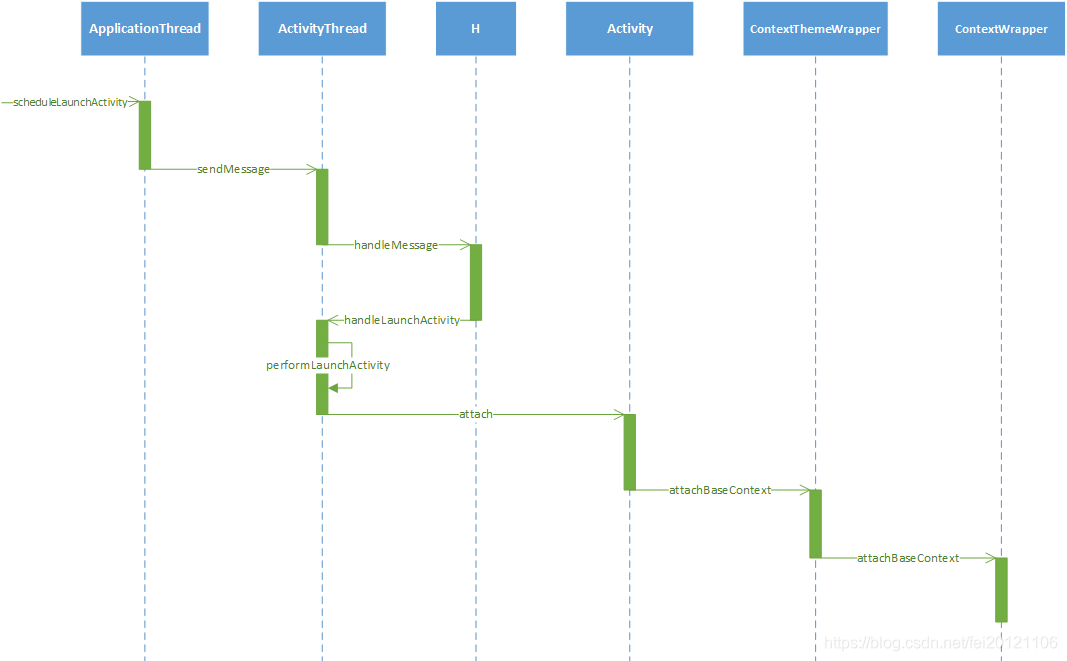
【ActivityThread到ContextWrapper的调用时序图】
六、Service的Context创建过程
Service的Context创建过程与Activity的Context创建过程类似,也是在Service的启动过程中被创建
- 通过startService启动一个新的Activity—>回调ActivityThread的handleCreateService()方法
- 反射构建Service实例
- 创建了ContextImpl对象,并赋值mOuterContext,产生关联。
- 调用Service.attach方法,将ContextImpl对象传入到ContextWrapper类的mBase变量
源码分析:
- 【入口】ActivityThread的内部类ApplicationThread会调用scheduleCreateService方法来启动Service
public final void scheduleCreateService(IBinder token,
         ServiceInfo info, CompatibilityInfo compatInfo, int processState) {
     ...
     sendMessage(H.CREATE_SERVICE, s);
 }
- 【步骤1】sendMessage方法向H类发送CREATE_SERVICE类型的消息,H类的handleMessage方法中会对CREATE_SERVICE类型的消息进行处理,其中调用了handleCreateService方法
- 在注释1处创建了ContextImpl
- 并将该ContextImpl传入注释2处service的attach方法中
private void handleCreateService(CreateServiceData data) {
		LoadedApk packageInfo = getPackageInfoNoCheck(
                data.info.applicationInfo, data.compatInfo);
        Service service = null;
        try {
            java.lang.ClassLoader cl = packageInfo.getClassLoader();
            service = (Service) cl.loadClass(data.info.name).newInstance();
        } catch (Exception e) {
            if (!mInstrumentation.onException(service, e)) {
                throw new RuntimeException(
                    "Unable to instantiate service " + data.info.name
                    + ": " + e.toString(), e);
            }
        }
     ...
       try {
           if (localLOGV) Slog.v(TAG, "Creating service " + data.info.name);
           ContextImpl context = ContextImpl.createAppContext(this, packageInfo);//【1】
           context.setOuterContext(service);
           Application app = packageInfo.makeApplication(false, mInstrumentation);
           service.attach(context, this, data.info.name, data.token, app,
                   ActivityManagerNative.getDefault());//【2】
           service.onCreate();
         ...
       } catch (Exception e) {
         ...
       }
   }
七、Application Context的创建过程
看到这里,基本你已经发现了ContextImpl实例化基本都会遇到的步骤:
- 在ActivityThread线程回调中创建ContextImpl对象,并把自身赋值给内部的mOuterContext对象,产生关联
- 最后经过里面一系列的方法传递,调用相应的attach,将ContextImpl对象传入到ContextWrapper类的mBase变量
Application Context的创建过程也是类似的:
- 一个APP以后每次重新启动时都会首先创建Application对象(每个APP都有一个唯一的全局Application对象,与整个APP的生命周期相同)
- 创建Application—>回调ActivityThread的handleBindApplication()方法
- 调用该方法中的LoadedApk类的makeApplication方法创建ContextImpl对象,,并赋值mOuterContext,产生关联。
- 中间还有一系列的attach传递
- 最后调用Application类的attach方法,ContextImpl对象传入到ContextWrapper类的mBase变量
7.1 Activity启动
- 【入口】ActivityThread启动Activity。ActivityThread作为应用程序进程的核心类,它会调用它的内部类ApplicationThread的scheduleLaunchActivity方法来启动Activity,如下所示。
private class ApplicationThread extends ApplicationThreadNative {
 ...
   @Override
    public final void scheduleLaunchActivity(Intent intent, IBinder token, int ident,
            ActivityInfo info, Configuration curConfig, Configuration overrideConfig,
            CompatibilityInfo compatInfo, String referrer, IVoiceInteractor voiceInteractor,
            int procState, Bundle state, PersistableBundle persistentState,
            List<ResultInfo> pendingResults, List<ReferrerIntent> pendingNewIntents,
            boolean notResumed, boolean isForward, ProfilerInfo profilerInfo) {
            updateProcessState(procState, false);
            ActivityClientRecord r = new ActivityClientRecord();
            ...
            sendMessage(H.LAUNCH_ACTIVITY, r);
    }
 ...
}
- 【步骤1】在ApplicationThread的scheduleLaunchActivity方法中向H类发送LAUNCH_ACTIVITY类型的消息,目的是将启动Activity的逻辑放在主线程中的消息队列中,这样启动Activity的逻辑会在主线程中执行。
我们接着查看H类的handleMessage方法对LAUNCH_ACTIVITY类型的消息的处理
private class H extends Handler {
      public static final int LAUNCH_ACTIVITY         = 100;
...
public void handleMessage(Message msg) {
          if (DEBUG_MESSAGES) Slog.v(TAG, ">>> handling: " + codeToString(msg.what));
          switch (msg.what) {
              case LAUNCH_ACTIVITY: {
                  Trace.traceBegin(Trace.TRACE_TAG_ACTIVITY_MANAGER, "activityStart");
                  final ActivityClientRecord r = (ActivityClientRecord) msg.obj;
                  r.packageInfo = getPackageInfoNoCheck(
                          r.activityInfo.applicationInfo, r.compatInfo);//1
                  handleLaunchActivity(r, null, "LAUNCH_ACTIVITY");//2
                  Trace.traceEnd(Trace.TRACE_TAG_ACTIVITY_MANAGER);
              } break;

            ...
}
- 【步骤2】H继承自Handler ,是ActivityThread的内部类。
- 在注释1处通过getPackageInfoNoCheck方法获得LoadedApk类型的对象,并将该对象赋值给ActivityClientRecord 的成员变量packageInfo LoadedApk用来描述已加载的APK文件。
- 注意,此处的package通过getPackageInfoNoCheck(data.appInfo, data.compatInfo);构建,其实和Application中一样
- 在注释2处调用handleLaunchActivity方法
private void handleLaunchActivity(ActivityClientRecord r, Intent customIntent, String reason) {
    ...
     Activity a = performLaunchActivity(r, customIntent);
    ...
 }
- 【步骤3】performLaunchActivity方法
private Activity performLaunchActivity(ActivityClientRecord r, Intent customIntent) {
...
    try {
        Application app = r.packageInfo.makeApplication(false, mInstrumentation);
       ...
    }
    ...
    return activity;
}
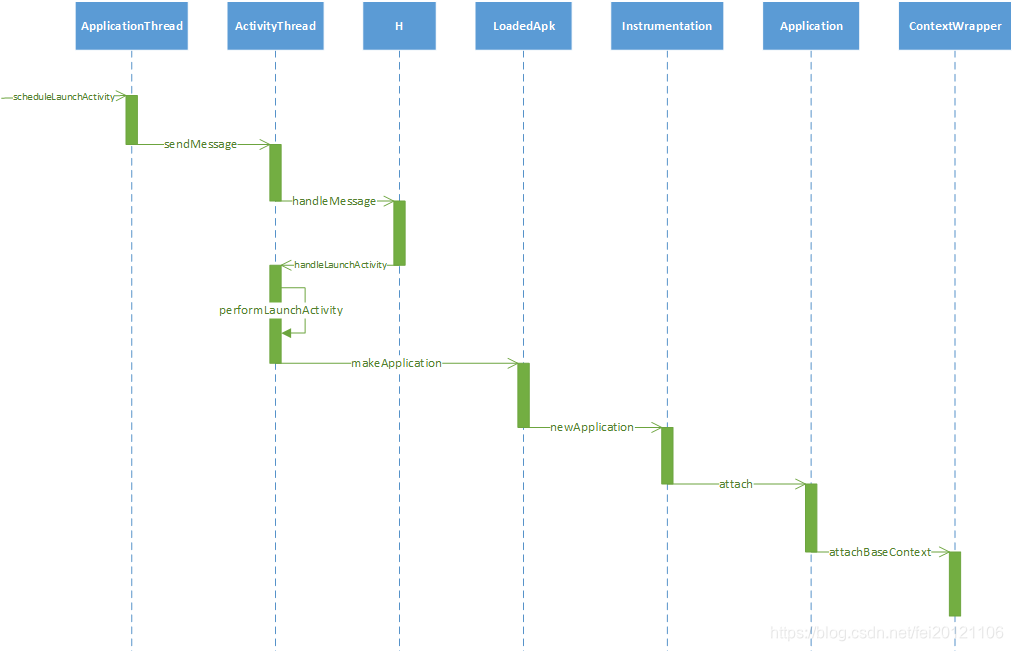
【Application Context创建过程的时序图】
7.2 Application的另一种实例化
- Launcher APP处理点击,会调用到AMS。ActivityManagerService发送BIND_APPLICATION消息致ActivityThread,ActivityThread.handleBindApplication中调用了LoadedApk.makeApplication方法
- LoadedApk.makeApplication方法创建了ContextImpl实例,并作为参数调用Instrumentation.newApplication方法
- Instrumentation.newApplication方法完成Application实例创建,并在application.attach方法完成Application实例与ContextImpl的关联
代码分析:
- 注意此处,同样的获取了LoadApk对象getPackageInfoNoCheck(data.appInfo, data.compatInfo);
public final class ActivityThread {
    private void handleBindApplication(AppBindData data) {
           // ......
           // 获取应用信息LoadedApk
          data.info = getPackageInfoNoCheck(data.appInfo, data.compatInfo);
           // 实例化Application
          Application app = data.info.makeApplication(data.restrictedBackupMode, null);
          mInitialApplication = app;
    }
}
7.3 LoadedApk的makeApplication方法生成Application对象
Loadedapk的makeApplication,有mApplication实例了就直接返回,没有的话才新建
- 【步骤4】这里ActivityClientRecord 的成员变量packageInfo是LoadedApk类型的,我们接着来查看LoadedApk的makeApplication方法
- 注释1处如果mApplication不为null则返回mApplication,这里假设是第一次启动应用程序,因此mApplication为null。
- 在注释2处通过ContextImpl的createAppContext方法来创建ContextImpl。
- 注释3处的代码用来创建Application,在Instrumentation的newApplication方法中传入了ClassLoader类型的对象以及注释2处创建的ContextImpl 。
- 在注释4处将Application赋值给ContextImpl的Context类型的成员变量mOuterContext。
- 注释5处将Application赋值给LoadedApk的成员变量mApplication,在Application Context的获取过程中我们会再次用到mApplication
public Application makeApplication(boolean forceDefaultAppClass,
        Instrumentation instrumentation) {
    if (mApplication != null) {//1
        return mApplication;
    }
    ...
    try {
      ...
       java.lang.ClassLoader cl = getClassLoader();
      ...
        ContextImpl appContext = ContextImpl.createAppContext(mActivityThread, this);//【2】
        app = mActivityThread.mInstrumentation.newApplication(
                cl, appClass, appContext);//【3】
        appContext.setOuterContext(app);//4
    } catch (Exception e) {
       ...
    }
    mActivityThread.mAllApplications.add(app);
    mApplication = app;//5
    ...
    return app;
}
7.3.1 构建上下文 ContextImpl.createAppContext(ActivityThread mainThread, LoadedApk packageInfo));
 class ContextImpl extends Context {
  static ContextImpl createAppContext(ActivityThread mainThread, LoadedApk packageInfo) {
          if (packageInfo == null) throw new IllegalArgumentException("packageInfo");
           return new ContextImpl(null, mainThread,
                packageInfo, null, null, 0, null, null, Display.INVALID_DISPLAY);
       }
  private ContextImpl(ContextImpl container, ActivityThread mainThread,
                            LoadedApk packageInfo, IBinder activityToken, UserHandle user, int flags,
                            Display display, Configuration overrideConfiguration, int createDisplayWithId) {
            //...
            //从LoadApk创建Resources 实例
            Resources resources = packageInfo.getResources(mainThread);
            //...
            mResources = resources;
            //...
        }
}
7.3.2 Instrumentation#newApplication构建和绑定上下文
- 【步骤4.3】newApplication
- 注释1处通过反射来创建Application,并调用了Application的attach方法,并将ContextImpl传进去
public class Instrumentation {

    //LoadedApk.makeApplication会调用
    public Application newApplication(ClassLoader cl, String className, Context context)
            throws InstantiationException, IllegalAccessException,
            ClassNotFoundException {
        return newApplication(cl.loadClass(className), context);
    }

   //Application在这里被创建
   static public Application newApplication(Class<?> clazz, Context context)
            throws InstantiationException, IllegalAccessException,
            ClassNotFoundException {
        Application app = (Application)clazz.newInstance();
        app.attach(context);
        return app;
    }
}
- Application的attach方法
- 调用了attachBaseContext方法,和context关联
    //Application的attach方法调用了attachBaseContext方法,和context关联了,这里的context就是ContextImpl实例,我们往下看
    /* package */ final void attach(Context context) {
        attachBaseContext(context);
        mLoadedApk = ContextImpl.getImpl(context).mPackageInfo;
    }
- ContextWrapper#attachBaseContext
    //ContextWrapper的attachBaseContext方法关联了mBase,这里的mBase就是ContextImpl实例,我们往下看
    protected void attachBaseContext(Context base) {
        if (mBase != null) {
            throw new IllegalStateException("Base context already set");
        }
        mBase = base;
    }
八、BroadcastReceiver与mBase关联
广播接收器,分动态注册和静态注册。
-
动态注册很简单,在调用 Context.registerReceiver 动态注册 BroadcastReceiver 时,会生成一个 ReceiverDispatcher 会持有这个 Context ,这样当有广播分发到它时,调用 onReceiver 方法就可以把 Context 传递过去了。当然,这也是为什么不用的时候要 unregisterReceiver 取消注册,不然这个 Context 就泄漏了哦。
-
静态注册时,在分发的时候最终调用的是 ActivityThread.handleReceiver ,这个方法直接通过 ClassLoader 去创建一个 BroadcastReceiver 的对象,而传递给 onReceiver 方法的 Context 则是通过 context.getReceiverRestrictedContext() 生成的一个以 Application 为 mBase 的 ContextWrapper。注意这边的 Context 不是 Application
广播接收器没有创建Contextlmpl, 而是使用了application这个全局的内部contextlmpl对象,同时把这个application对象再次封装到ReceiverRestrictedContext然后传给 Receiver的onReceiver(context, intent)函数
Broadcast与Service类似,Broadcast.onReceive在ActivityThread.handleReceiver调用。
 private void handleReceiver(ReceiverData data) {

        //......
        BroadcastReceiver receiver;
        try {
            java.lang.ClassLoader cl = packageInfo.getClassLoader();
            data.intent.setExtrasClassLoader(cl);
            data.intent.prepareToEnterProcess();
            data.setExtrasClassLoader(cl);
            receiver = (BroadcastReceiver)cl.loadClass(component).newInstance();
        } catch (Exception e) {
            //......
        }

            //......
            ContextImpl context = (ContextImpl)app.getBaseContext();
            sCurrentBroadcastIntent.set(data.intent);
            receiver.setPendingResult(data);

            //receiver.onReceive传入的是ContextImpl.getReceiverRestrictedContext返回对象
            receiver.onReceive(context.getReceiverRestrictedContext(),
                    data.intent);
        //......
    }
- ContextImpl.getReceiverRestrictedContext
 final Context getReceiverRestrictedContext() {
        if (mReceiverRestrictedContext != null) {
            return mReceiverRestrictedContext;
        }
        return mReceiverRestrictedContext = new ReceiverRestrictedContext(getOuterContext());
    }
ReceiverRestrictedContext也是继承ContextWrapper,其mBase是Application。
九、 ContentProvider 里的 Context
ContentProvider 本身不是 Context ,但是它有一个成员变量 mContext ,是通过构造函数传入的。那么这个问题就变成了,ContentProvider 什么时候创建。应用创建 Application 是通过调用 ActivityThread.handleBindApplication 方法,这个方法的相关流程有:
- handlebindApplication
- 创建 Application
- 初始化 Application 的 Context
- 调用 installContentProviders(app, providers) 并传入刚创建好的 Application 来创建 ContentProvider
- 调用 Application.onCreate
- mInstrumentation.onCreate(data.instrumentationArgs);
- mInstrumentation.callApplicationOnCreate(app);
得出结论,ContentProvider 的 Context 是在 Applicaiton 创建之后,但是 onCreate 方法调用之前初始化的
 private void installContentProviders(
            Context context, List<ProviderInfo> providers) {
        final ArrayList<IActivityManager.ContentProviderHolder> results =
            new ArrayList<IActivityManager.ContentProviderHolder>();

        for (ProviderInfo cpi : providers) {
            if (DEBUG_PROVIDER) {
                StringBuilder buf = new StringBuilder(128);
                buf.append("Pub ");
                buf.append(cpi.authority);
                buf.append(": ");
                buf.append(cpi.name);
                Log.i(TAG, buf.toString());
            }
            IActivityManager.ContentProviderHolder cph = installProvider(context, null, cpi,
                    false /*noisy*/, true /*noReleaseNeeded*/, true /*stable*/);
            if (cph != null) {
                cph.noReleaseNeeded = true;
                results.add(cph);
            }
        }

        try {
            ActivityManagerNative.getDefault().publishContentProviders(
                getApplicationThread(), results);
        } catch (RemoteException ex) {
        }
    }
private IActivityManager.ContentProviderHolder installProvider(Context context,
            IActivityManager.ContentProviderHolder holder, ProviderInfo info,
            boolean noisy, boolean noReleaseNeeded, boolean stable) {

			Context c = null;
            ApplicationInfo ai = info.applicationInfo;
             if (context.getPackageName().equals(ai.packageName)) {
                c = context;
            } else if (mInitialApplication != null &&
                    mInitialApplication.getPackageName().equals(ai.packageName)) {
                c = mInitialApplication;
            } else {
                try {
                    c = context.createPackageContext(ai.packageName,
                            Context.CONTEXT_INCLUDE_CODE);
                } catch (PackageManager.NameNotFoundException e) {
                    // Ignore
                }
            }

}
问答
Android 有哪些类型的 Context ,它们有什么区别
- 应用里有 Activity 、Service、Application 这些 Context ,我们先说说它们的共同点,它们都是 ContextWrapper 的子类,而 ContextWrapper 的成员变量 mBase 可以用来存放系统实现的 ContextImpl,这样我们在调用如 Activity 的 Context 方法时,都是通过静态代理的方式最终调用到 ContextImpl 的方法。我们调用 ContextWrapper 的 getBaseContext 方法就能拿到 ContextImpl 的实例
- 再说它们的不同点,它们有各自不同的生命周期;在功能上,只有 Activity 显示界面,正因为如此,Activity 继承的是 ContextThemeWrapper 提供一些关于主题,界面显示的能力,间接继承了 ContextWrapper ;而 Applicaiton 、Service 都是直接继承 ContextWrapper ,所以我们要记住一点,凡是跟 UI 有关的,都应该用 Activity 作为 Context 来处理,否则要么会报错,要么 UI 会使用系统默认的主题。
在 Activity 里,this 和 getBaseContext 有什么区别
this 呢,指的就是 Activity 本身的这个实例,而 getBaseContext ,是 Activity 间接继承的 ContextWrapper 的一个方法,用来返回系统提供的 ContextImpl 对象
ContextImpl 实例是什么时候生成的,在 Activity 的 onCreate 里能拿到这个实例吗
Activity 真正开始启动是从 ActivityThread.performLaunchActivity 开始的,这个方法做了这些事:
- 通过 ClassLoader 去加载目标 Activity 的类,从而创建 对象
- 从 packageInfo 里获取 Application 对象
- 调用 createBaseContextForActivity 方法去创建 ContextImpl
- 调用 activity.attach ( contextImpl , application) 这个方法就把 Activity 和 Application 以及 ContextImpl 关联起来了,就是上面结论里说的时机一样
- 最后调用 activity.onCreate 生命周期回调
通过以上的分析,我们知道了 Activity 是先创建类,再初始化 Context ,最后调用 onCreate , 从而得出问题的答案。不仅 Activity 是这样, Application 、Service 里的 Context 初始化也都是这样的。


 480
480


 被折叠的 条评论
为什么被折叠?
被折叠的 条评论
为什么被折叠?
 到【灌水乐园】发言


