


★ListView控件的使用
ListView这个的使用在Android开发里面是很常用的,下面我会用一个例子来讲解这个控件的使用方法。
在这里我也会讲到ListView的监听器的使用。
我相信对于大家用到的很多app中都会用到ListView这个控件,比如最常见的微信和qq聊天的界面就是用了这个控件,下面我用了一个简单的例子来说明ListView的用法。
首先我们来看一下app最后的效果:


在上面的三幅图中我们可以看见图1是有个格子的图形,每格都有一个人的名字和ip,名字在左边,ip在右边,在图2中点击了张三下面就有一个我是0号的Toast信息提示,图3点击了李四,就有个我是1号的Toast信息提示。
大概功能我们都了解了,下面我们就开始编写程序吧!
布局文件:
<?xml version="1.0" encoding="utf-8"?>
<LinearLayout xmlns:android="http://schemas.android.com/apk/res/android"
    android:orientation="vertical"
    android:layout_width="match_parent"
    android:layout_height="match_parent">
    <LinearLayout
        android:orientation="vertical"
        android:layout_width="fill_parent"
        android:layout_height="wrap_content">
    <ListView
        android:id="@+id/android:list"
        android:layout_width="fill_parent"
        android:layout_height="wrap_content"
        android:scrollbars="vertical"
        android:drawSelectorOnTop="false"
        >
    </ListView>
</LinearLayout>
</LinearLayout>然后我们还要创建一个布局文件是设置ListView的,还记得上面的名字在左边,ip在右边吗?这里我们就要用一个布局文件来调整。
ListView布局文件:
<?xml version="1.0" encoding="utf-8"?>
<LinearLayout xmlns:android="http://schemas.android.com/apk/res/android"
    android:layout_width="fill_parent"
    android:layout_height="fill_parent"
    android:paddingBottom="10dp"
    android:paddingLeft="10dp"
    android:paddingTop="10dp"
    android:paddingRight="10dp"
    android:orientation="horizontal"
    >
    <TextView
        android:id="@+id/user_name"
        android:layout_width="180dip"
        android:layout_height="30dip"
        android:textSize="10pt"
        />
    <TextView
        android:id="@+id/user_ip"
        android:gravity="right"
        android:textSize="10pt"
        android:layout_width="180dip"
        android:layout_height="30dip" />

</LinearLayout>然后我们来看一下java代码:
package com.example.zhangrenjie.listview;

import android.app.ListActivity;
import android.os.Bundle;
import android.view.View;
import android.widget.SimpleAdapter;
import android.widget.Toast;
import java.util.ArrayList;
import java.util.HashMap;

public class ListView extends ListActivity {
    @Override
    protected void onCreate(Bundle savedInstanceState) {
        super.onCreate(savedInstanceState);
        setContentView(R.layout.listview);
        ArrayList<HashMap<String, String>> list = new ArrayList<>();
        HashMap<String, String> map1 = new HashMap<>();
        HashMap<String, String> map2 = new HashMap<>();
        HashMap<String, String> map3 = new HashMap<>();
        map1.put("user_name", "张三");
        map1.put("user_ip", "192.168.1.001");
        map2.put("user_name", "李四");
        map2.put("user_ip", "192.168.1.002");
        map3.put("user_name", "王五");
        map3.put("user_ip", "192.168.1.003");
        list.add(map1);
        list.add(map2);
        list.add(map3);
        SimpleAdapter listAdapter = new SimpleAdapter(this, list, R.layout.map,
new String[]{"user_name", "user_ip"},
                new int[]{R.id.user_name, R.id.user_ip});
        setListAdapter(listAdapter);
    }

    @Override
    protected void onListItemClick(android.widget.ListView l, View v, int position, long id) {
        super.onListItemClick(l, v, position, id);
        Toast.makeText(this, "我是"+id+"号", Toast.LENGTH_SHORT).show();
    }
}
ArrayList<HashMap<String, String>> list = new ArrayList<>(); 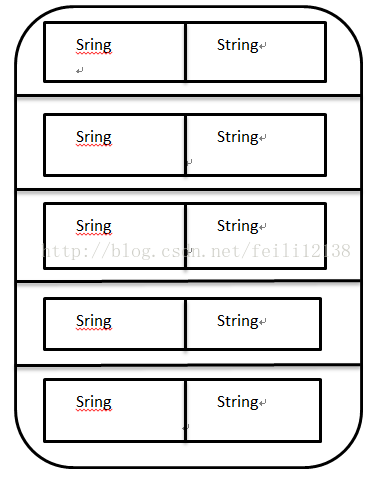
从这幅图4来看吧!这里一共有五排,每排里面都有个HashMap,就像上面图4中的小长方形,而这个HashMap中装的是一个键值对,这里根据我们的要求是两个String类型的键值对,一个是姓名,一个是ip,当然如果我们在LsitView的布局文件中添加一个ImageView一个TextView,我们还能实现没排都有个图片和文字信息,这样说大家应该都懂了吧!然后我们继续吧!
        HashMap<String, String> map1 = new HashMap<>();
        HashMap<String, String> map2 = new HashMap<>();
        HashMap<String, String> map3 = new HashMap<>();
map1.put("user_name", "张三");
        map1.put("user_ip", "192.168.1.001");
        map2.put("user_name", "李四");
        map2.put("user_ip", "192.168.1.002");
        map3.put("user_name", "王五");
        map3.put("user_ip", "192.168.1.003");
        list.add(map1);
        list.add(map2);
        list.add(map3);
SimpleAdapter listAdapter = new SimpleAdapter(this, list, R.layout.map,
new String[]{"user_name", "user_ip"},
                new int[]{R.id.user_name, R.id.user_ip});
        setListAdapter(listAdapter);
    }
然后这里这个SimpleAdapter是适配器,如果大家不知道可以切百度下,Listview都会用到适配器,这里定义一个适配器(这里用到的适配器是SimpleAdapter还有很多适配器),然后里面的参数,this关键字就不用说了吧!代表这个Activity,然后是list,就是ListView的对象,然后就是ListView布局文件,还记得我们编写了一个ListView的布局文件吧!,然后下面两个参数就是键值对,最后调用setListAdpter()方法启动适配器。
@Override
protected voidonListItemClick(android.widget.ListView l, View v, int position, long id) {
super.onListItemClick(l, v, position, id);
Toast.makeText(this, "我是"+id+"号", Toast.LENGTH_SHORT).show();
}
这个最后的代码就是ListView的监听器,里面的参数最主要的是id,每列都有一个id,而且这个id就像数组的一样是从0开始计算的。
好了这样我就讲完了,我们下次再会


 被折叠的 条评论
为什么被折叠?
被折叠的 条评论
为什么被折叠?
 到【灌水乐园】发言


