


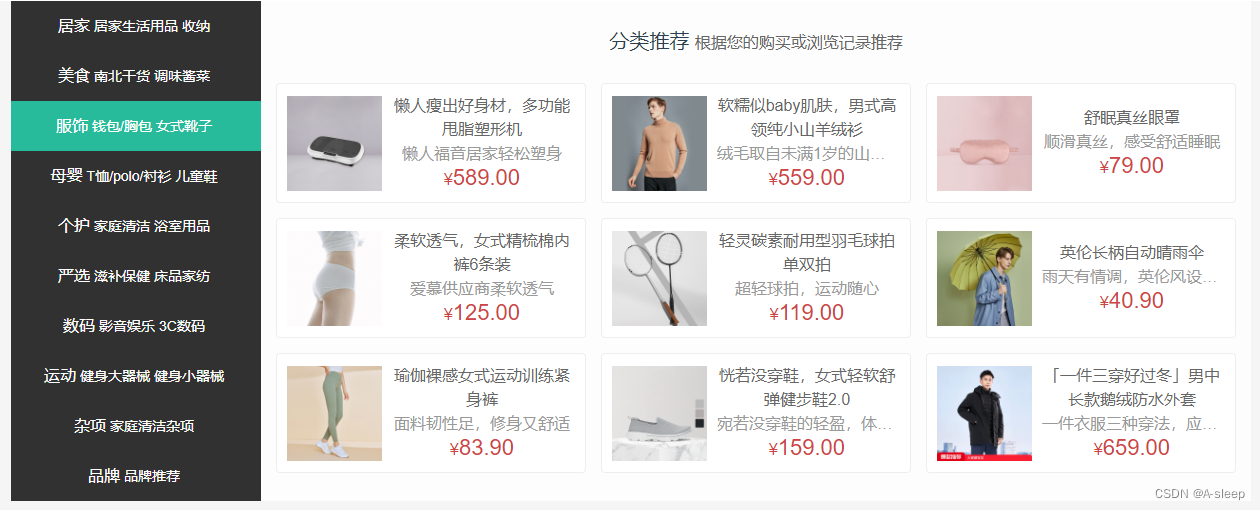
弹层显示样式1
1.先将左侧样式写
<template>
  <div class='home-category'>
    <ul class="menu">
      <li v-for="i in 10" :key="i">
        <RouterLink to="/">居家</RouterLink>
        <RouterLink to="/">洗漱</RouterLink>
        <RouterLink to="/">清洁</RouterLink>
		//留着存放弹层位置
		<div class="layer"></div>
      </li>
    </ul>
  </div>
</template>

<script>
export default {
  name: 'HomeCategory'
}
</script>

<style scoped lang='less'>
.home-category {
  width: 250px;
  height: 500px;
  background: rgba(0,0,0,0.8);
  position: relative;
  z-index: 99;
  .menu {
    li {
      height: 50px;
      line-height: 50px;
      &:hover {
        background: @xtxColor;
      }
      a {
        margin-right: 4px;
        color: #fff;
        &:first-child {
          font-size: 16px;
        }
      }
    }
  }
}
</style>

2.然后渲染左侧数据
<template>
  <div class='home-category'>
    <ul class="menu">
      <li v-for="item in menuList" :key="item.id">
        <RouterLink :to="`/category/${item.id}`">{{item.name}}</RouterLink>
        <template v-if="item.children">
          <RouterLink
            v-for="sub in item.children"
            :key="sub.id"
            :to="`/category/sub/${sub.id}`">
            {{sub.name}}
          </RouterLink>
        </template>
      </li>
    </ul>
  </div>
</template>

<script>
import { useStore } from 'vuex'
import { reactive, computed } from 'vue'
export default {
  name: 'HomeCategory',
  // 1. 获取vuex的一级分类,并且只需要两个二级分类
  // 2. 需要在组件内部,定义一个品牌数据
  // 3. 根据vuex的分类数据和组件中定义品牌数据,得到左侧分类完整数据(9分类+1品牌)数组
  // 4. 进行渲染即可
  setup () {
    const brand = reactive({
      id: 'brand',
      name: '品牌',
      children: [{ id: 'brand-chilren', name: '品牌推荐' }]
    })
    const store = useStore()
    //setup函数里使用Vuex里的数据  需要使用计算属性
    const menuList = computed(() => {
      const list = store.state.category.list.map(item => {
        return {
          id: item.id,
          name: item.name,
          // 防止初始化没有children的时候调用slice函数报错
          children: item.children && item.children.slice(0, 2)
        }
      })
      list.push(brand)
      return list
    })
    return { menuList }
  }
}
</script>

<style scoped lang='less'>
.home-category {
  width: 250px;
  height: 500px;
  background: rgba(0,0,0,0.8);
  position: relative;
  z-index: 99;
  .menu {
    li {
      padding-left: 40px;
      height: 50px;
      line-height: 50px;
      &:hover {
        background: @xtxColor;
      }
      a {
        margin-right: 4px;
        color: #fff;
        &:first-child {
          font-size: 16px;
        }
      }
    }
  }
}
</style>
3.接着写弹层样式
思路:
1.先写固定样式
2.写好之后 将样式隐藏
3.鼠标经过li 的时候 layer显示
<!-- 弹层 -->
    <div class="layer">
      <h4>分类推荐 <small>根据您的购买或浏览记录推荐</small></h4>
      <ul>
        <li v-for="i in 9" :key="i">
          <RouterLink to="/">
            <img src="https://yanxuan-item.nosdn.127.net/5a115da8f2f6489d8c71925de69fe7b8.png" alt="">
            <div class="info">
              <p class="name ellipsis-2">【定金购】严选零食大礼包(12件)</p>
              <p class="desc ellipsis">超值组合装,满足馋嘴欲</p>
              <p class="price"><i>¥</i>100.00</p>
            </div>
          </RouterLink>
        </li>
      </ul>
    </div>
//嵌套在上放的li中
  .layer {
    width: 990px;
    height: 500px;
    background: rgba(255,255,255,0.8);
    position: absolute;
    left: 250px;
    top: 0;
    display: none;
    padding: 0 15px;
    h4 {
      font-size: 20px;
      font-weight: normal;
      line-height: 80px;
      small {
        font-size: 16px;
        color: #666;
      }
    }
    ul {
      display: flex;
      flex-wrap: wrap;
      li {
        width: 310px;
        height: 120px;
        margin-right: 15px;
        margin-bottom: 15px;
        border: 1px solid #eee;
        border-radius: 4px;
        background: #fff;
        &:nth-child(3n) {
          margin-right: 0;
        }
        a {
          display: flex;
          width: 100%;
          height: 100%;
          align-items: center;
          padding: 10px;
          &:hover {
            background: #e3f9f4;
          }
          img {
              width: 95px;
              height: 95px;
          }
          .info {
            padding-left: 10px;
            line-height: 24px;
		    width: 190px;
            .name {
              font-size: 16px;
              color: #666;
            }
            .desc {
              color: #999;
            }
            .price {
              font-size: 22px;
              color: @priceColor;
              i {
                font-size: 16px;
              }
            }
          }
        }
      }
    }
  }
  &:hover {
    .layer {
      display: block;
    }
  }
4.渲染弹层数据
定义一个数据记录当前鼠标经过分类的ID,使用计算属性得到当前的分类推荐商品数据
    <ul class="menu">
+      <li v-for="item in menuList" :key="item.id" @mouseenter="categoryId=item.id">
import { useStore } from 'vuex'
import { reactive, computed, ref } from 'vue'
export default {
  name: 'HomeCategory',
  setup () {
  	// 组织所有数据逻辑
  	// 1. 获取vuex的一级分类,并且只需要两个二级分类
  	// 2. 需要在组件内部,定义一个品牌数据
  	// 3. 根据vuex的分类数据和组件中定义品牌数据,得到左侧分类完整数据(9分类+1品牌)数组
  	// 4. 进行渲染即可
    const brand = reactive({
      id: 'brand',
      name: '品牌',
      children: [{ id: 'brand-chilren', name: '品牌推荐' }]
    })
    const store = useStore()
    const menuList = computed(() {
      const list = store.state.category.list.map(item => {
        return {
          id: item.id,
          name: item.name,
          // 防止初始化没有children的时候调用slice函数报错
          children: item.children && item.children.slice(0, 2),
+          goods: item.goods
        }
      })
      list.push(brand)
      return list
    })
    // 上方定义鼠标移入li 事件  将移入的商品id赋值给categoryId
    // 通过计算属性获取到 vux存放的数据 并找出对应的菜单栏
+    const categoryId = ref(null)
+    const currCategory = computed(()=>{
+      return menuList.value.find(item => item.id === category.value)
+    })
+    return { menuList, categoryId, currCategory }
  }
}
    <!-- 弹层 -->
    <div class="layer">
      <h4>分类推荐 <small>根据您的购买或浏览记录推荐</small></h4>
      <ul v-if="currCategory && currCategory.goods && currCategory.goods.length">
        <li v-for="item in currCategory.goods" :key="item.id">
          <RouterLink to="/">
            <img :src="item.picture" alt="">
            <div class="info">
              <p class="name ellipsis-2">{{item.name}}</p>
              <p class="desc ellipsis">{{item.desc}}</p>
              <p class="price"><i>¥</i>{{item.price}}</p>
            </div>
          </RouterLink>
        </li>
      </ul>
  </div>
弹层显示2
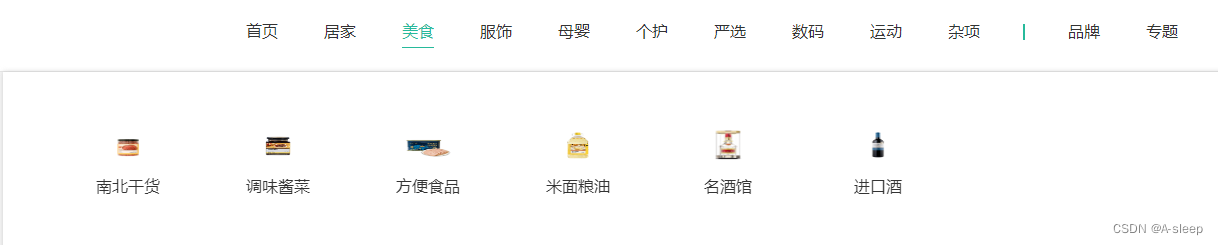
@/components/app-header-nav
<template>
  <ul class="app-header-nav">
    <li class="home"><RouterLink to="/">首页</RouterLink></li>
    <li v-for="item in list" :key="item.id">
      <a href="#">{{item.name}}</a>
      <!-- 弹层 -->
      <div class="layer">
        <ul>
          <li v-for="sub in item.children" :key="sub.id">
            <RouterLink to="/">
              <img :src="sub.picture" alt="">
              <p>{{sub.name}}</p>
            </RouterLink>
          </li>
        </ul>
      </div>
    </li>
  </ul>
</template>

<script >
import { useStore } from 'vuex'
import { computed } from 'vue'
export default {
  name: 'AppHeaderNav',
  setup () {
    const store = useStore()
    const list = computed(() => {
      return store.state.category.list
    })
    return { list }
  }
}
</script>

<style scoped lang='less'>
.app-header-nav {
  width: 820px;
  display: flex;
  justify-content: space-around;
  padding-left: 40px;
  position: relative;
  z-index: 998;
  li {
    margin-right: 40px;
    width: 38px;
    text-align: center;
    a {
      font-size: 16px;
      line-height: 32px;
      height: 32px;
      display: inline-block;
    }
    // 鼠标移入li
    &:hover {
      // 子选择器 改变a标签的颜色 只对直接子级生效
    >a {
        color: @xtxColor;
        border-bottom: 1px solid @xtxColor;
      }
      // 子选择器 设置layer高度且不透明
    > .layer {
        height: 182px;
        opacity: 1;
      }
    }
  }
}
// 固定样式
.layer {
  width: 1240px;
  background-color: #fff;
  position: absolute;
  left: -200px;
  top: 56px;
  height: 0;
  overflow: hidden;
  // 主要部分 设透明度为0  做过渡效果   鼠标移入li的时候 设置为不透明
  opacity: 0;
  box-shadow: 0 0 5px #ccc;
  transition: all .2s .1s;
  ul {
    display: flex;
    flex-wrap: wrap;
    padding: 20px 70px;
    align-items: center;
    height: 182px;
    li {
      width: 110px;
      text-align: center;
      img {
        width: 60px;
        height: 60px;
      }
      p {
        padding-top: 10px;
      }
      &:hover {
        p {
          color: @xtxColor;
        }
      }
    }
  }
}
</style>
@/components/app-header-sticky (吸顶效果)
<template>
<!-- 吸顶组件 -->
  <div class="app-header-sticky" :class="{show:y>=78}">
    <div class="container" v-show="y>=78">
      <RouterLink class="logo" to="/" />
      <AppHeaderNav />
      <div class="right">
        <RouterLink to="/" >品牌</RouterLink>
        <RouterLink to="/" >专题</RouterLink>
      </div>
    </div>
  </div>
</template>

<script>
import AppHeaderNav from '@/components/app-header-nav'
import { onMounted, ref } from 'vue'
export default {
  name: 'AppHeaderSticky',
  components: { AppHeaderNav },
  setup () {
    const y = ref(0)
    onMounted(() => {
      window.onscroll = () => {
        const scrollTop = document.documentElement.scrollTop
        y.value = scrollTop
      }
    })
    return { y }
  }
}

</script>
<style scoped lang='less'>
.app-header-sticky {
  width: 100%;
  height: 80px;
  position: fixed;
  left: 0;
  top: 0;
  z-index: 999;
  background-color: #fff;
  border-bottom: 1px solid #e4e4e4;
  transform: translateY(-100%);
  opacity: 0;
  &.show {
    transition: all 0.3s linear;
    transform: none;
    opacity: 1;
  }
  .container {
    display: flex;
    align-items: center;
  }
  .logo {
    width: 200px;
    height: 80px;
    background-size: 160px auto;
  }
  .right {
    width: 220px;
    display: flex;
    text-align: center;
    padding-left: 40px;
    border-left: 2px solid @xtxColor;
    a {
      width: 38px;
      margin-right: 40px;
      font-size: 16px;
      line-height: 1;
      &:hover {
        color: @xtxColor;
      }
    }
  }
}
</style>


 1万+
1万+


 被折叠的 条评论
为什么被折叠?
被折叠的 条评论
为什么被折叠?
 到【灌水乐园】发言


