来源: Python数据之道 (ID:PyDataLab)作者:阳哥
01写在前面
最近几个月,我在微信视频号「价值前瞻」和「Python数据之道」发布了一些视频,有不少同学问到这些视频是怎么做的,用什么工具制作的。
在文章 用 python 制作高逼格的数学动画 中,我跟大家介绍了 Manim 这个视频制作工具,以及以及案例演示。
不少同学觉得这个工具不错,问到有没有完整的使用教程或者相关书籍。据我所知,目前应该是没有专门的书籍来介绍这个工具的。至于教程,不同版本的Manim有一部分文档,其中 Manim社区版的文档相对而言要完善些。
本次,我将基于 Manim社区版(Manim Community)给大家分享Manim入门的第一部分,基础形状的使用。
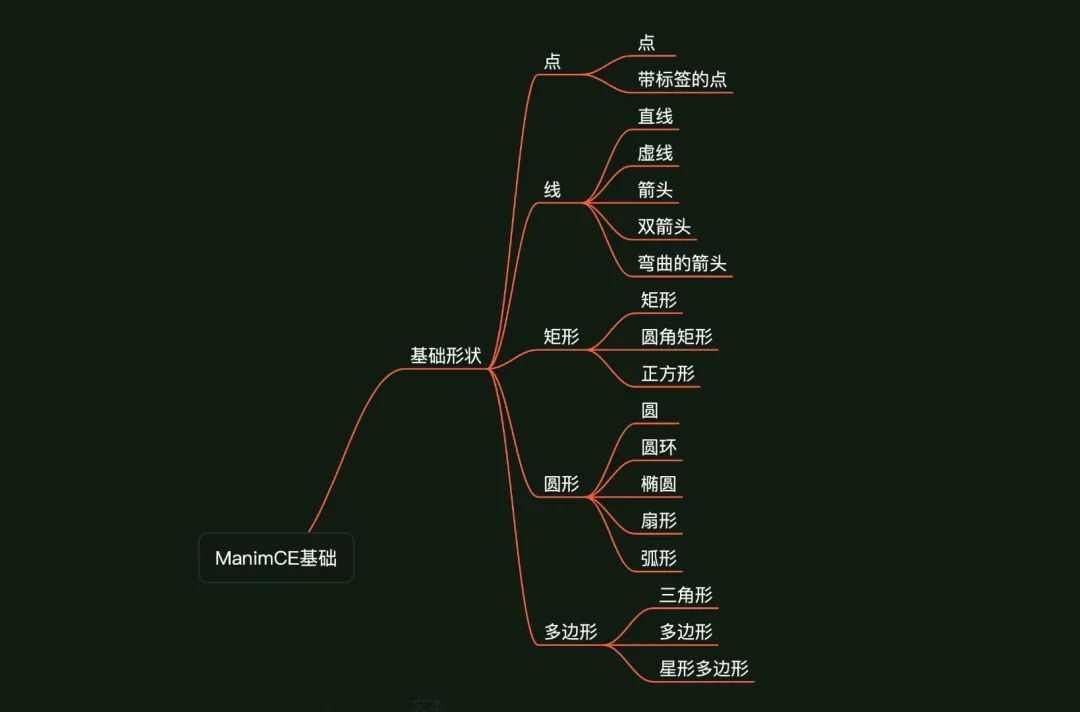
本次使用的版本为 Manim Community v0.14.0,文中介绍的基础形状如下:
02Manim的安装与运行
安装
如何安装社区版Manim,参见下面的官方链接:
https://docs.manim.community/en/stable/installation.html
如何运行 Manim
用 Manim 绘制图形,首先需要引入 Manim 库,然后将需要绘制的内容封装到一个 类(class) 里面。
社区版的导入代码如下:
from manim import *对于 编辑好的程序文件( XXXX.py 文件),需要在同一个文件夹下运行命令来运行程序,命令格式如下:
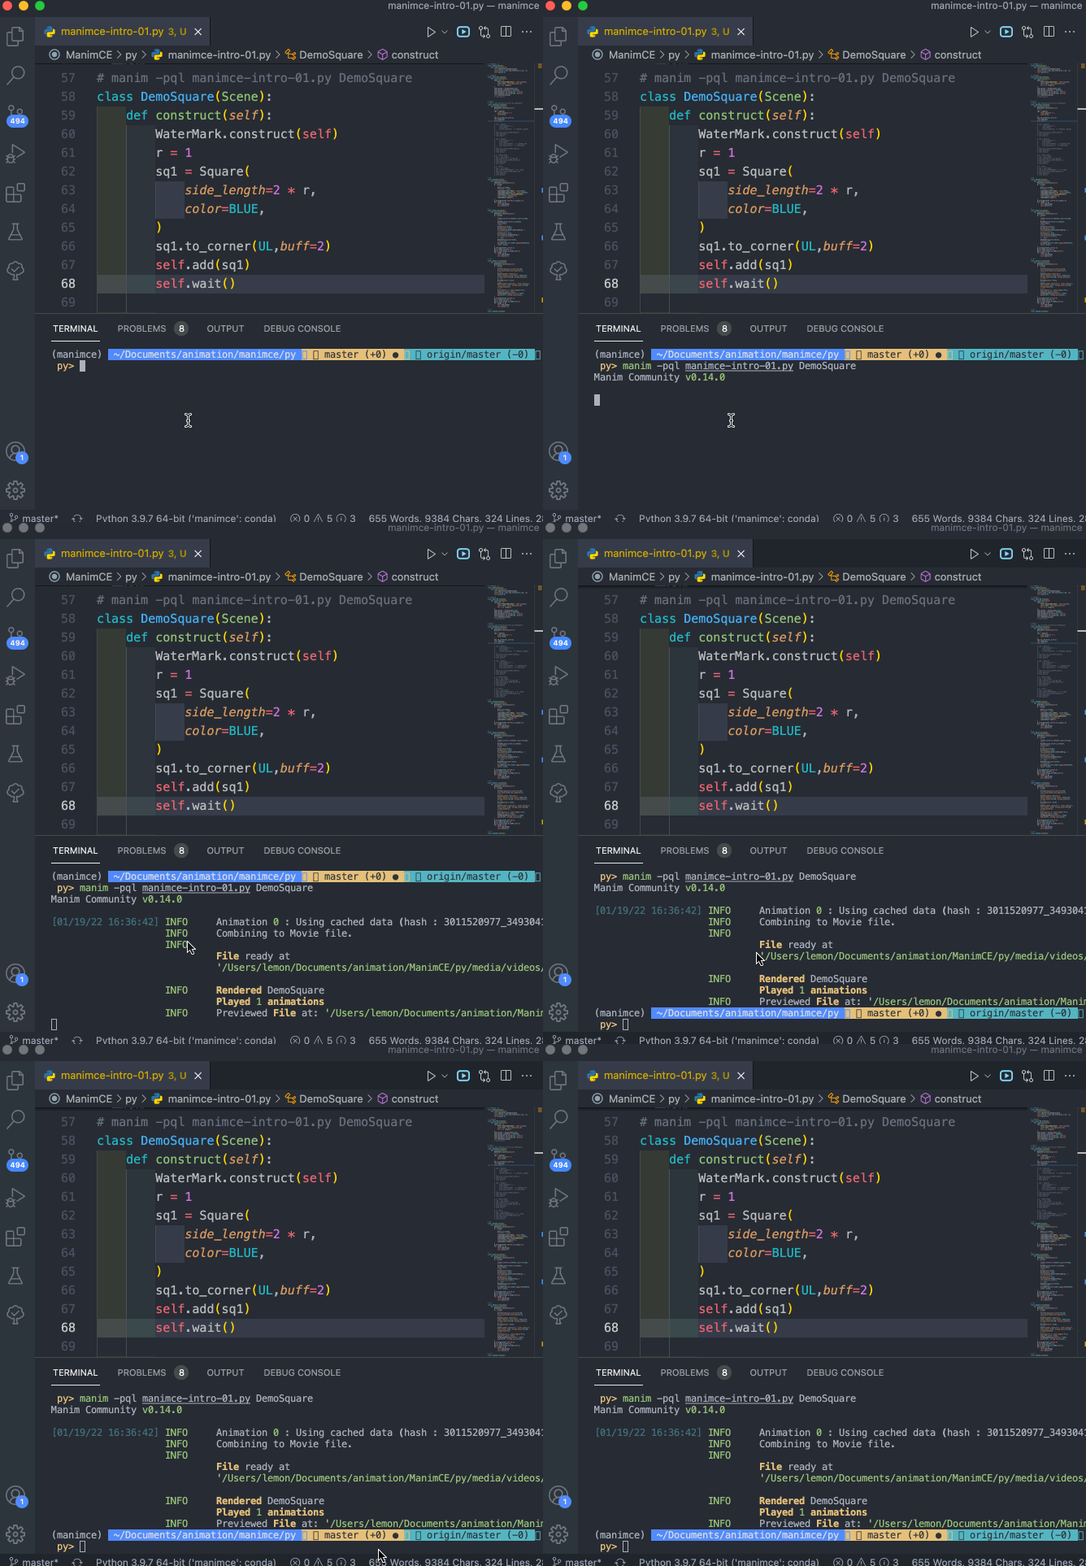
manim -pql XXXX.py DemoSquare上面的命令行中:
manim是社区版Manim运行程序的主要标志用语;p表示程序运行后会进行预览(图片或视频);ql表示低质量(quality low), 其他的选项有-ql,-qm,-qh,-qk, 分别表示 低质量、正常质量、高质量、4K质量;XXXX.py是py代码文件;DemoSquare 是 py代码文件中的一个类;
演示过程录屏如下:
命令行中,还有其他许多参数可以设置,可以通过社区版的支持文档来进一步了解:
https://docs.manim.community/en/stable/tutorials/configuration.html#command-line-arguments
03Manim 的基础形状介绍
通用属性
Manim 中基础形状有些属性和方法,对于大部分形状是通用的,因此在介绍具体的形状之前,在这里通过 正方形 来讲解下形状的基础用法。
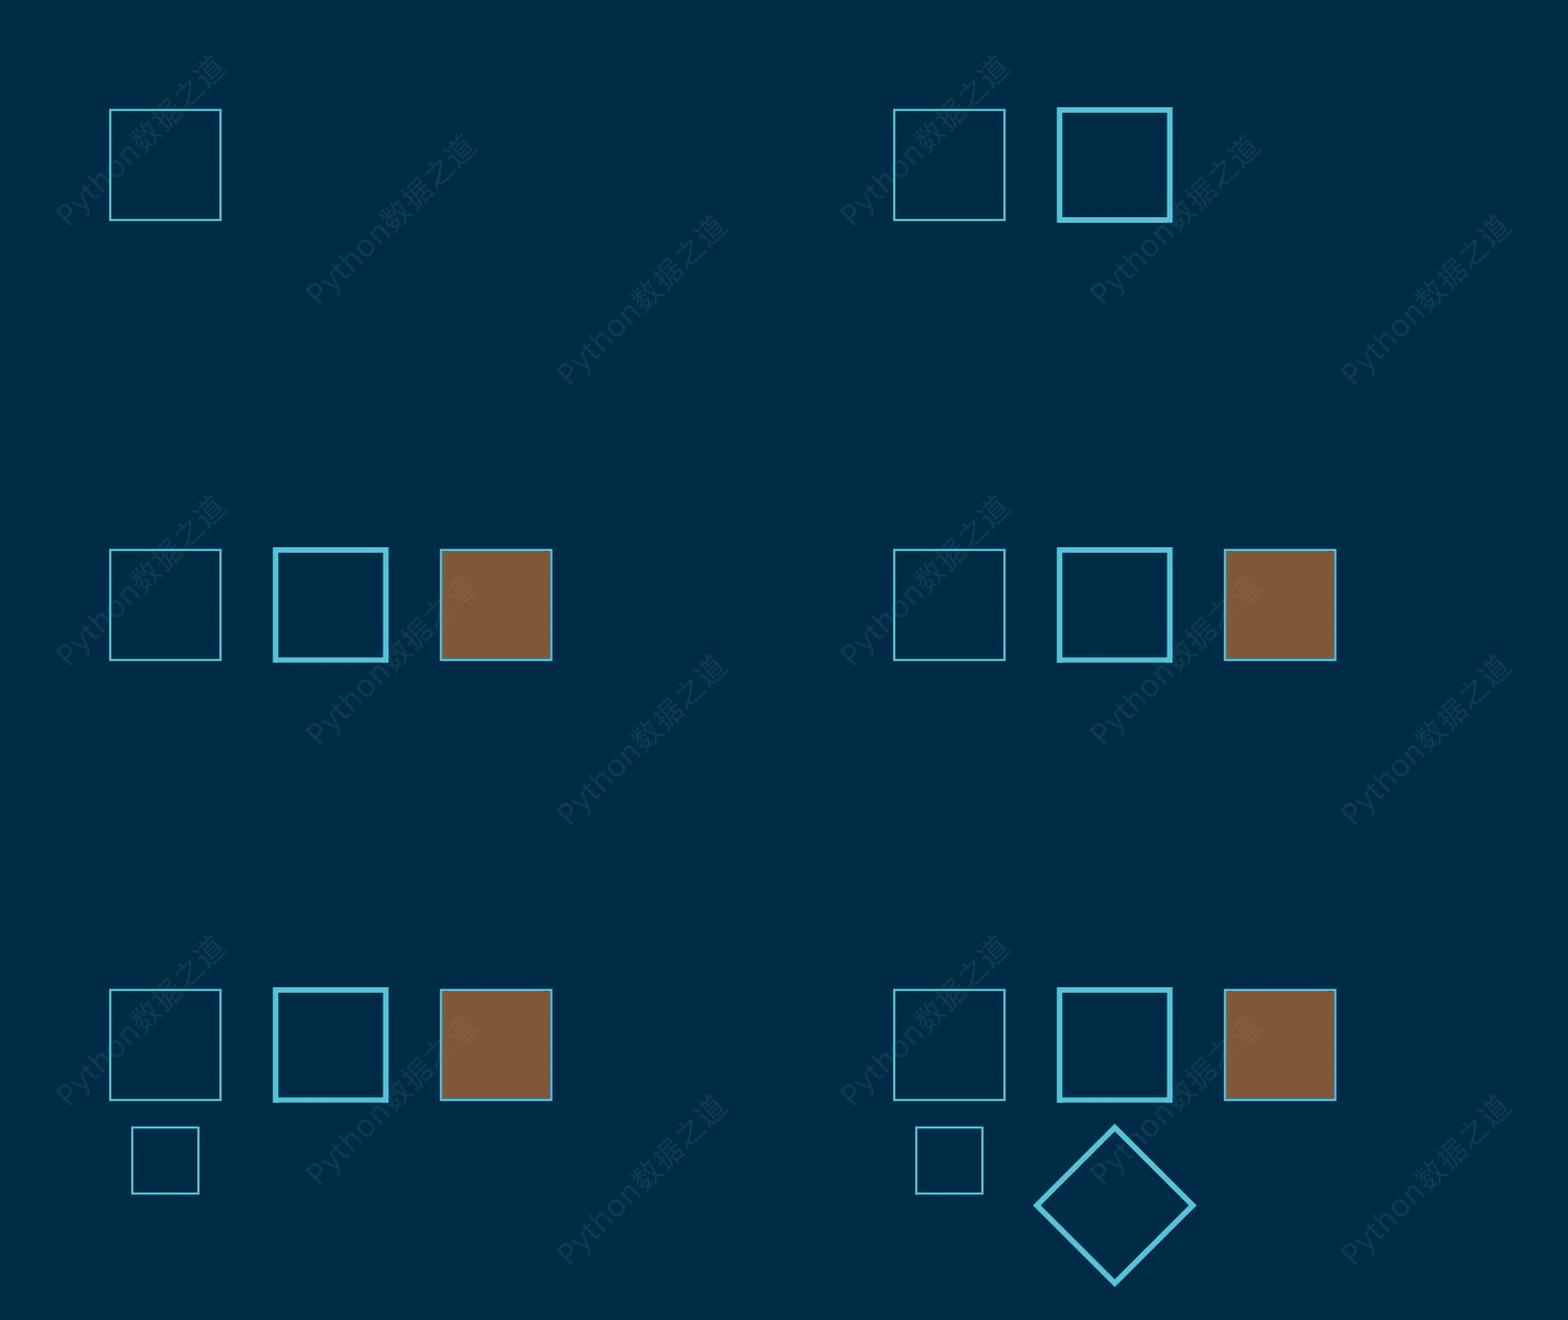
在下面的案例中,实现了对正方形的边框颜色设置、线宽度设置、填充颜色、旋转、大小变换等。
# manim -pql manimce-intro-01.py DemoSquare
class DemoSquare(Scene):
    def construct(self):
        WaterMark.construct(self)
        r = 1
        sq1 = Square(
            side_length=2 * r,
            color=BLUE,
        )
        sq1.to_corner(UL,buff=2)
        self.add(sq1)
        self.wait()

        sq2 = Square(
            side_length=2 * r,
            color=BLUE,
            stroke_width=10,  # 设置边框线的粗细
        )
        sq2.next_to(sq1,RIGHT,buff=1)
        self.add(sq2)
        self.wait()

        sq3 = Square(
            side_length=2 * r,
            color=BLUE,
            fill_color=ORANGE,  # 设置填充颜色
            fill_opacity=0.5,  # 设置透明度
        )
        sq3.next_to(sq2,RIGHT,buff=1)
        self.add(sq3)
        self.wait()

        # 形状大小变换
        sq4 = sq1.copy()
        sq4.scale(0.6) # 缩小到 60%
        sq4.next_to(sq1,DOWN,buff=0.5)
        self.add(sq4)
        self.wait()

        # 形状旋转
        sq5 = sq2.copy()
        sq5.rotate(45*DEGREES)  # 旋转45度
        sq5.next_to(sq2,DOWN,buff=0.5)
        self.add(sq5)
        self.wait()
演示效果如下:
点
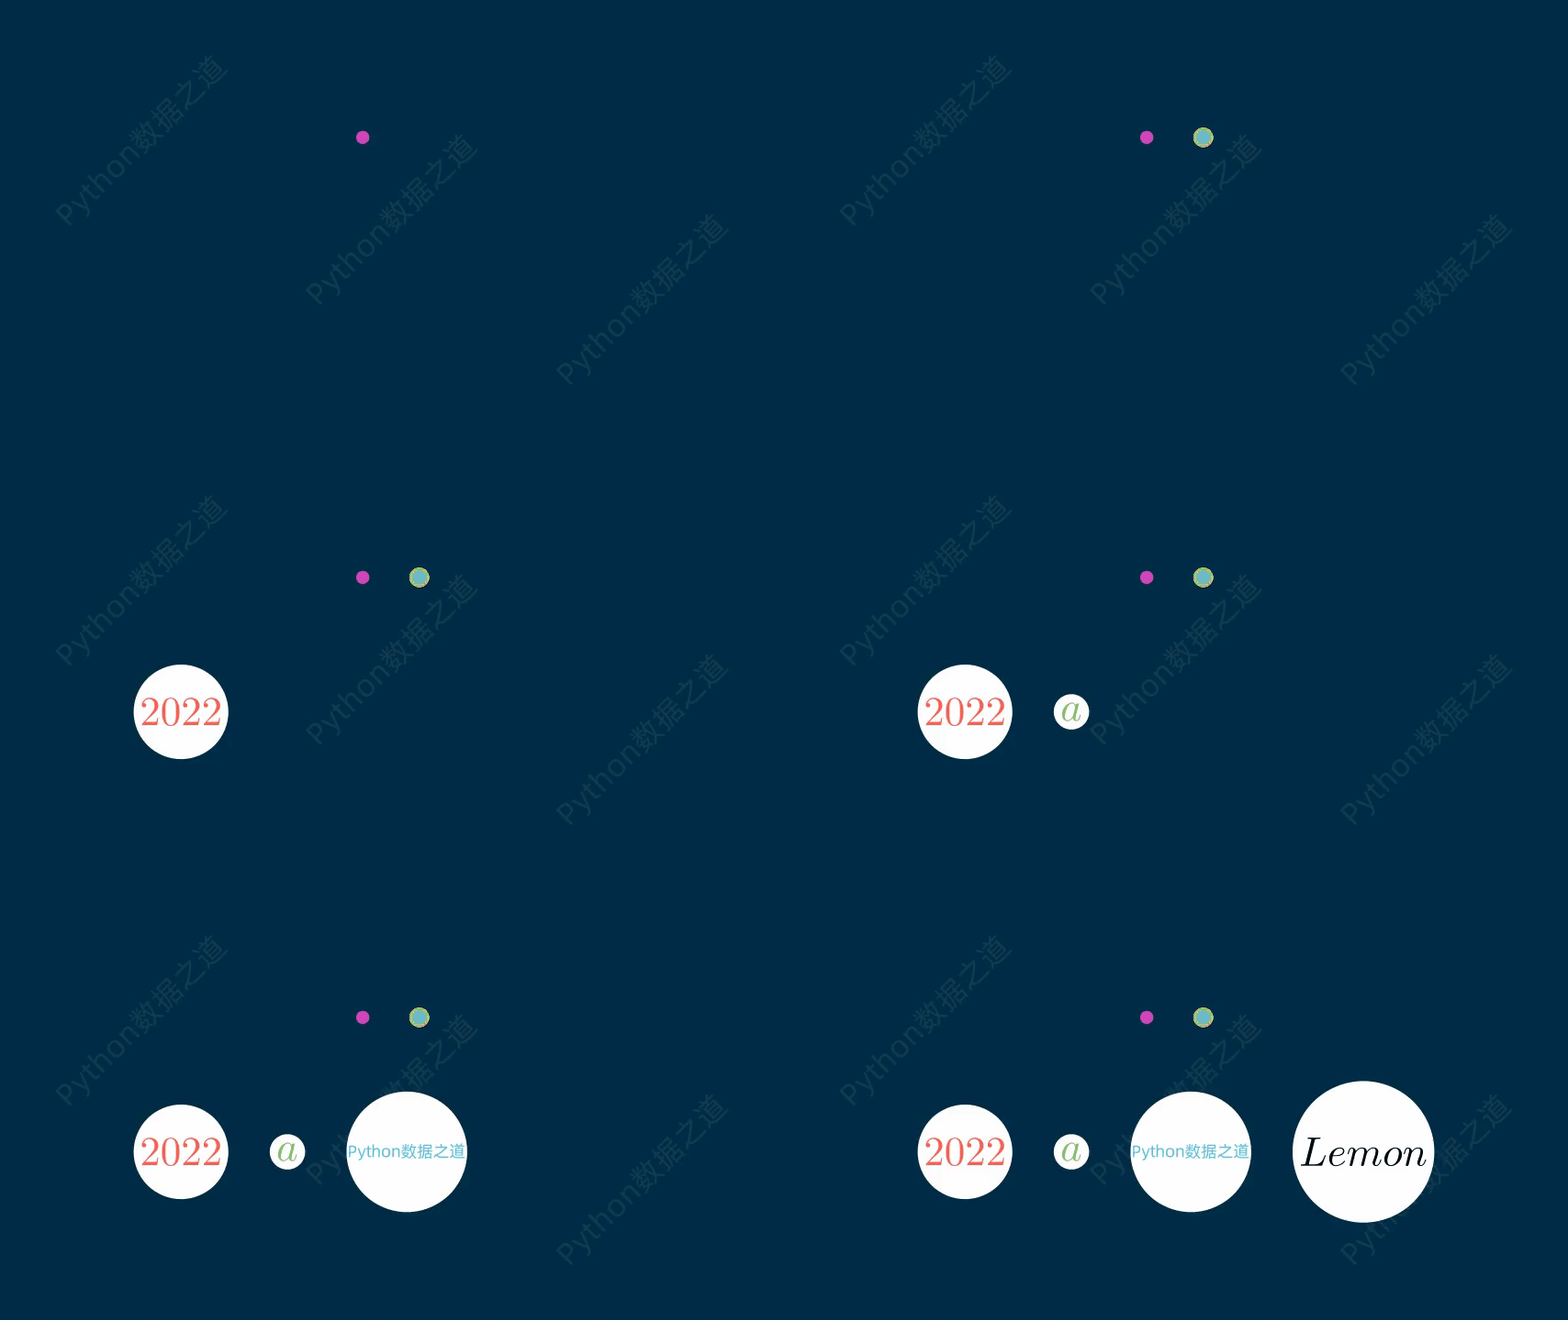
对于 点 , manim 中目前有几种不一样的形状可以来展示,包括:
Dot
AnnotationDot
LabeledDot
class DemoDot(Scene):
    def construct(self):
        WaterMark.construct(self)
        g = Group(
            # 点
            Dot(color=PINK),
            AnnotationDot(stroke_color=YELLOW, fill_color=BLUE,fill_opacity=1),
            # 带文字标签的点
            LabeledDot(Tex("2022", color=RED)),
            LabeledDot(MathTex("a", color=GREEN)),
            LabeledDot(Text("Python数据之道", color=BLUE)).scale(0.3),
            LabeledDot("Lemon"),
        )
        g.arrange(RIGHT,buff=0.5).scale(1.5)
        g[:2].move_to(UP*1.5)
        g[2:].next_to(g[:2],DOWN,buff=1)
        for shape in g:
            self.add(shape)
            self.wait(0.5)
演示效果如下:
线
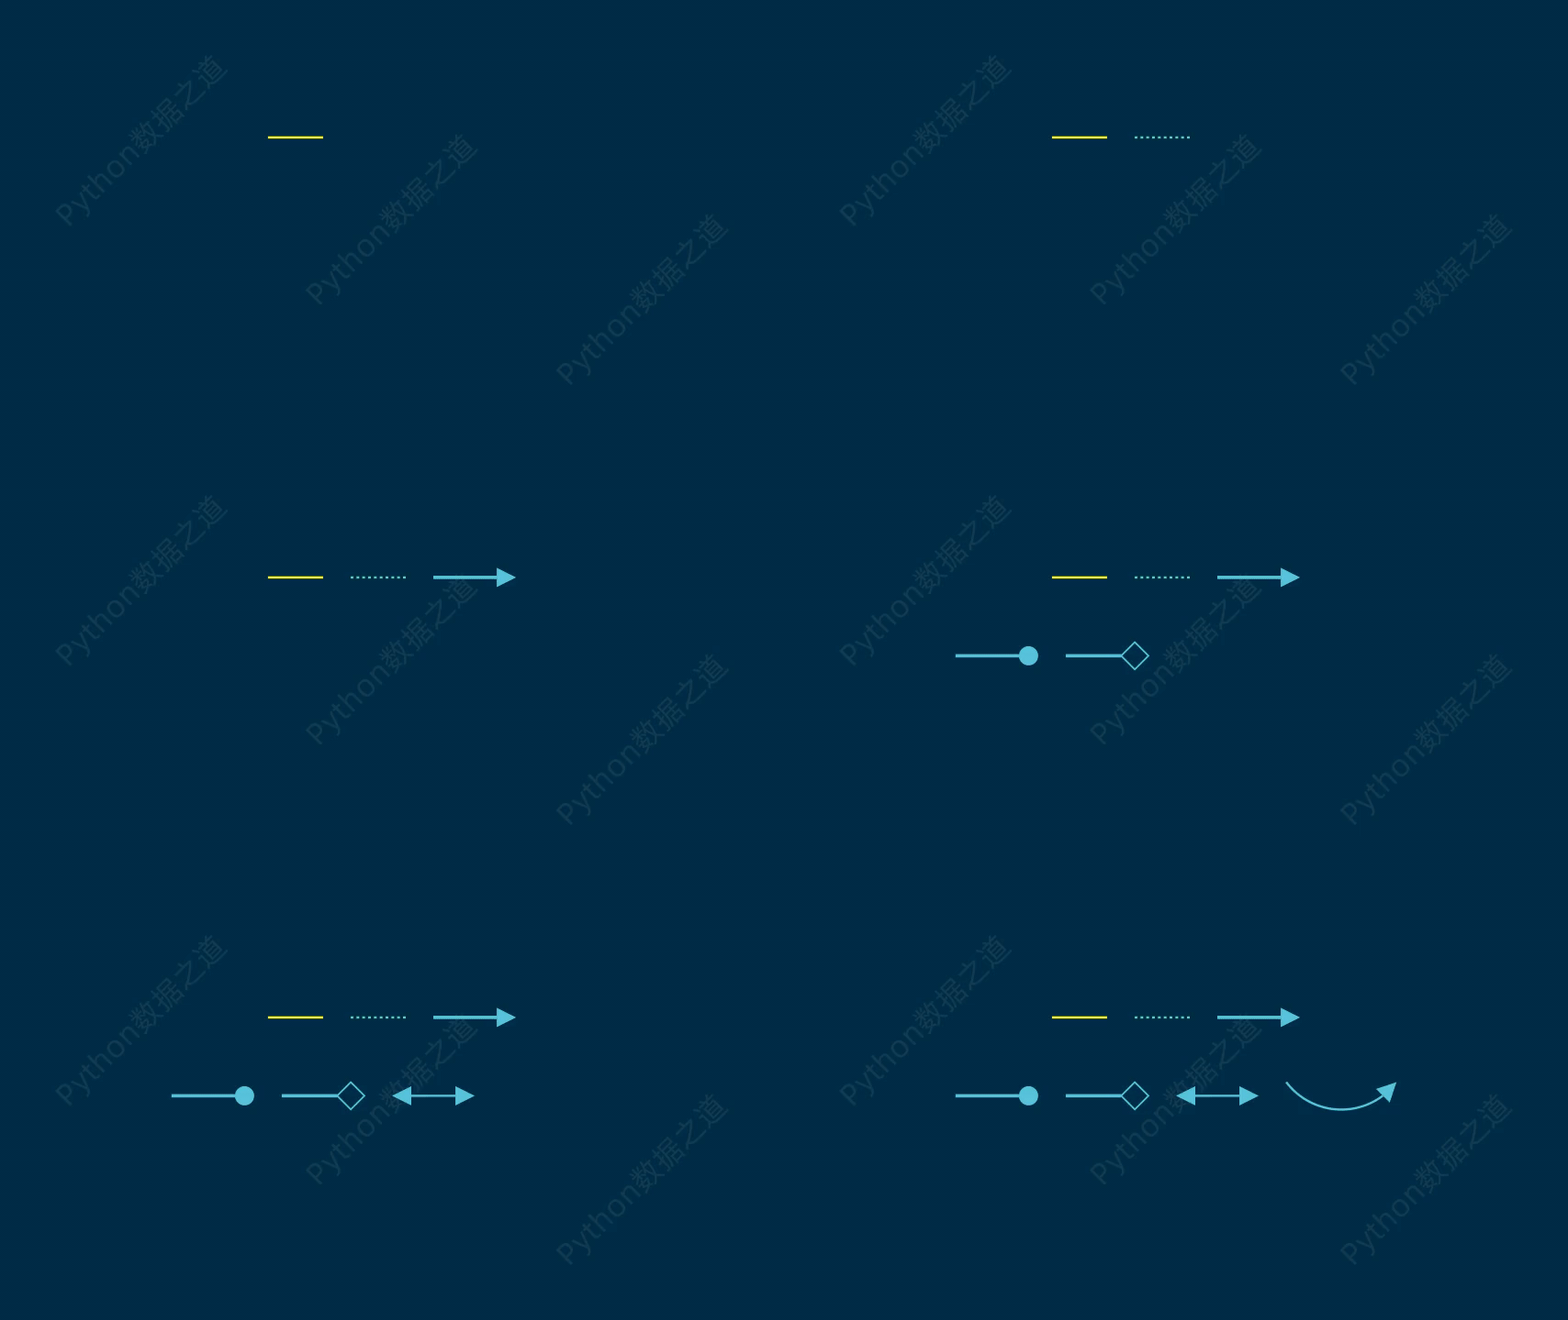
在这里,线 的形状,包括 直线、虚线、箭头、双箭头、弯曲的箭头等,如下:
Line
DashedLine
Arrow
DoubleArrow
CurvedArrow
class DemoLine(Scene):
    def construct(self):
        WaterMark.construct(self)
        g = Group(
            # 线
            Line(0.5*LEFT,0.5*RIGHT,color=YELLOW),
            # 虚线
            DashedLine(0.5*LEFT,0.5*RIGHT,color=TEAL),
            # 箭头
            Arrow(color=BLUE),
            Arrow(color= BLUE, tip_shape=ArrowCircleFilledTip), #  ArrowCircleTip
            Arrow(color= BLUE, tip_shape=ArrowSquareTip),# ArrowSquareFilledTip
            # 双箭头
            DoubleArrow(color=BLUE),
            # 弯曲的箭头
            CurvedArrow(LEFT,RIGHT,angle=90*DEGREES,color= BLUE),
        )
        g.arrange(RIGHT,buff=0.5)
        g[:3].move_to(UP*1.5)
        g[3:].next_to(g[:3],DOWN,buff=1)
        for shape in g:
            self.add(shape)
            self.wait(0.5)
演示效果如下:
圆形
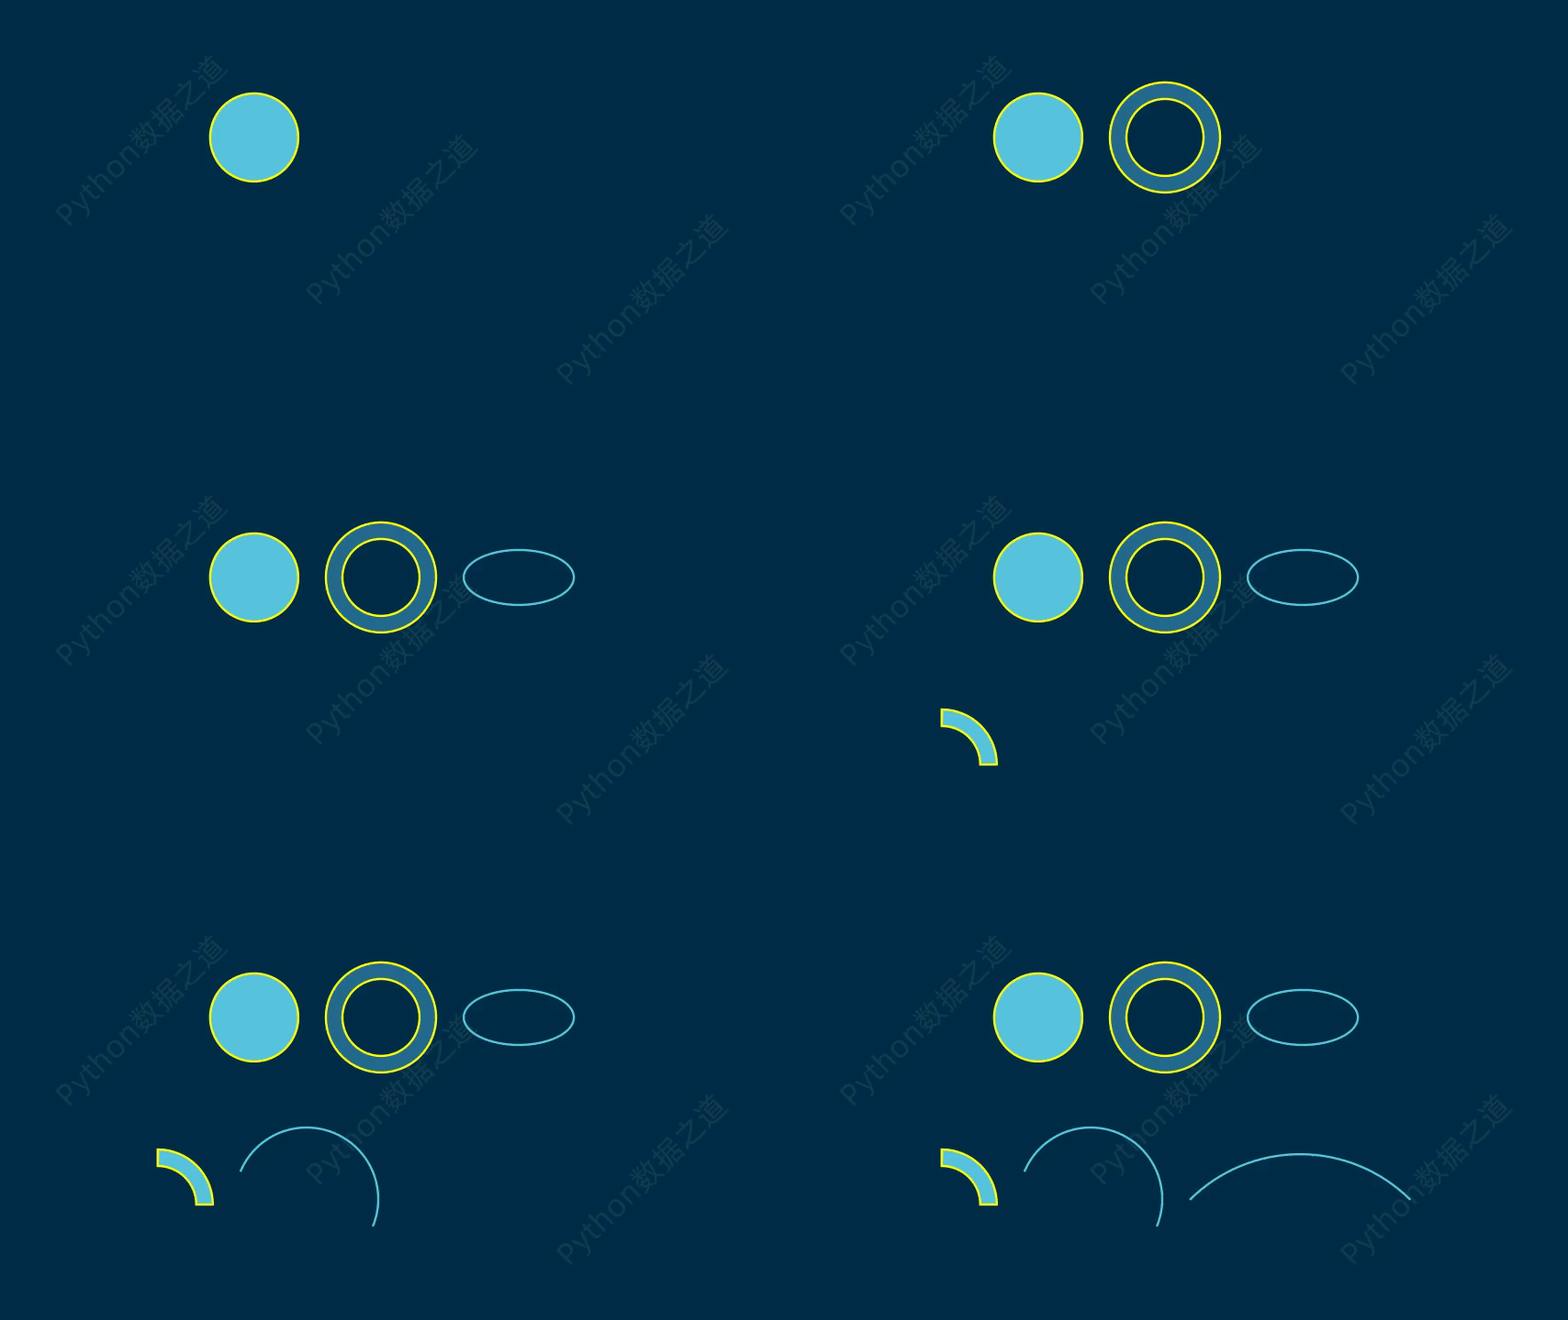
圆形包括 圆、圆环、扇形、椭圆、弧形等,如下:
Circle
Annulus
Ellipse
Sector
Arc
ArcBetweenPoints
class DemoCircle(Scene):
    def construct(self):
        WaterMark.construct(self)
        g = Group(
            # 圆形
            Circle(radius=0.8,color=YELLOW,fill_color=BLUE,fill_opacity=1),
            # 圆环
            Annulus(inner_radius=0.7, outer_radius=1,fill_color= DARK_BLUE, stroke_color=YELLOW, stroke_width=4),
            # 椭圆
            Ellipse(color= BLUE),
            # 扇形
            Sector(inner_radius=0.7, outer_radius=1,fill_color= BLUE, stroke_color=YELLOW, stroke_width=4),
            # 弧形
            Arc(radius=1.3, start_angle=-PI/8, angle=PI,color= BLUE),
            ArcBetweenPoints(start=2 * RIGHT, end=2*LEFT, stroke_color=BLUE) ,
        )
        g.arrange(RIGHT,buff=0.5)
        g[:3].move_to(UP*1.5)
        g[3:].next_to(g[:3],DOWN,buff=1)
        for shape in g:
            self.add(shape)
            self.wait(0.5)
演示效果如下:
下面的这个视频,就是基于 扇形(Sector)来制作的。
矩形
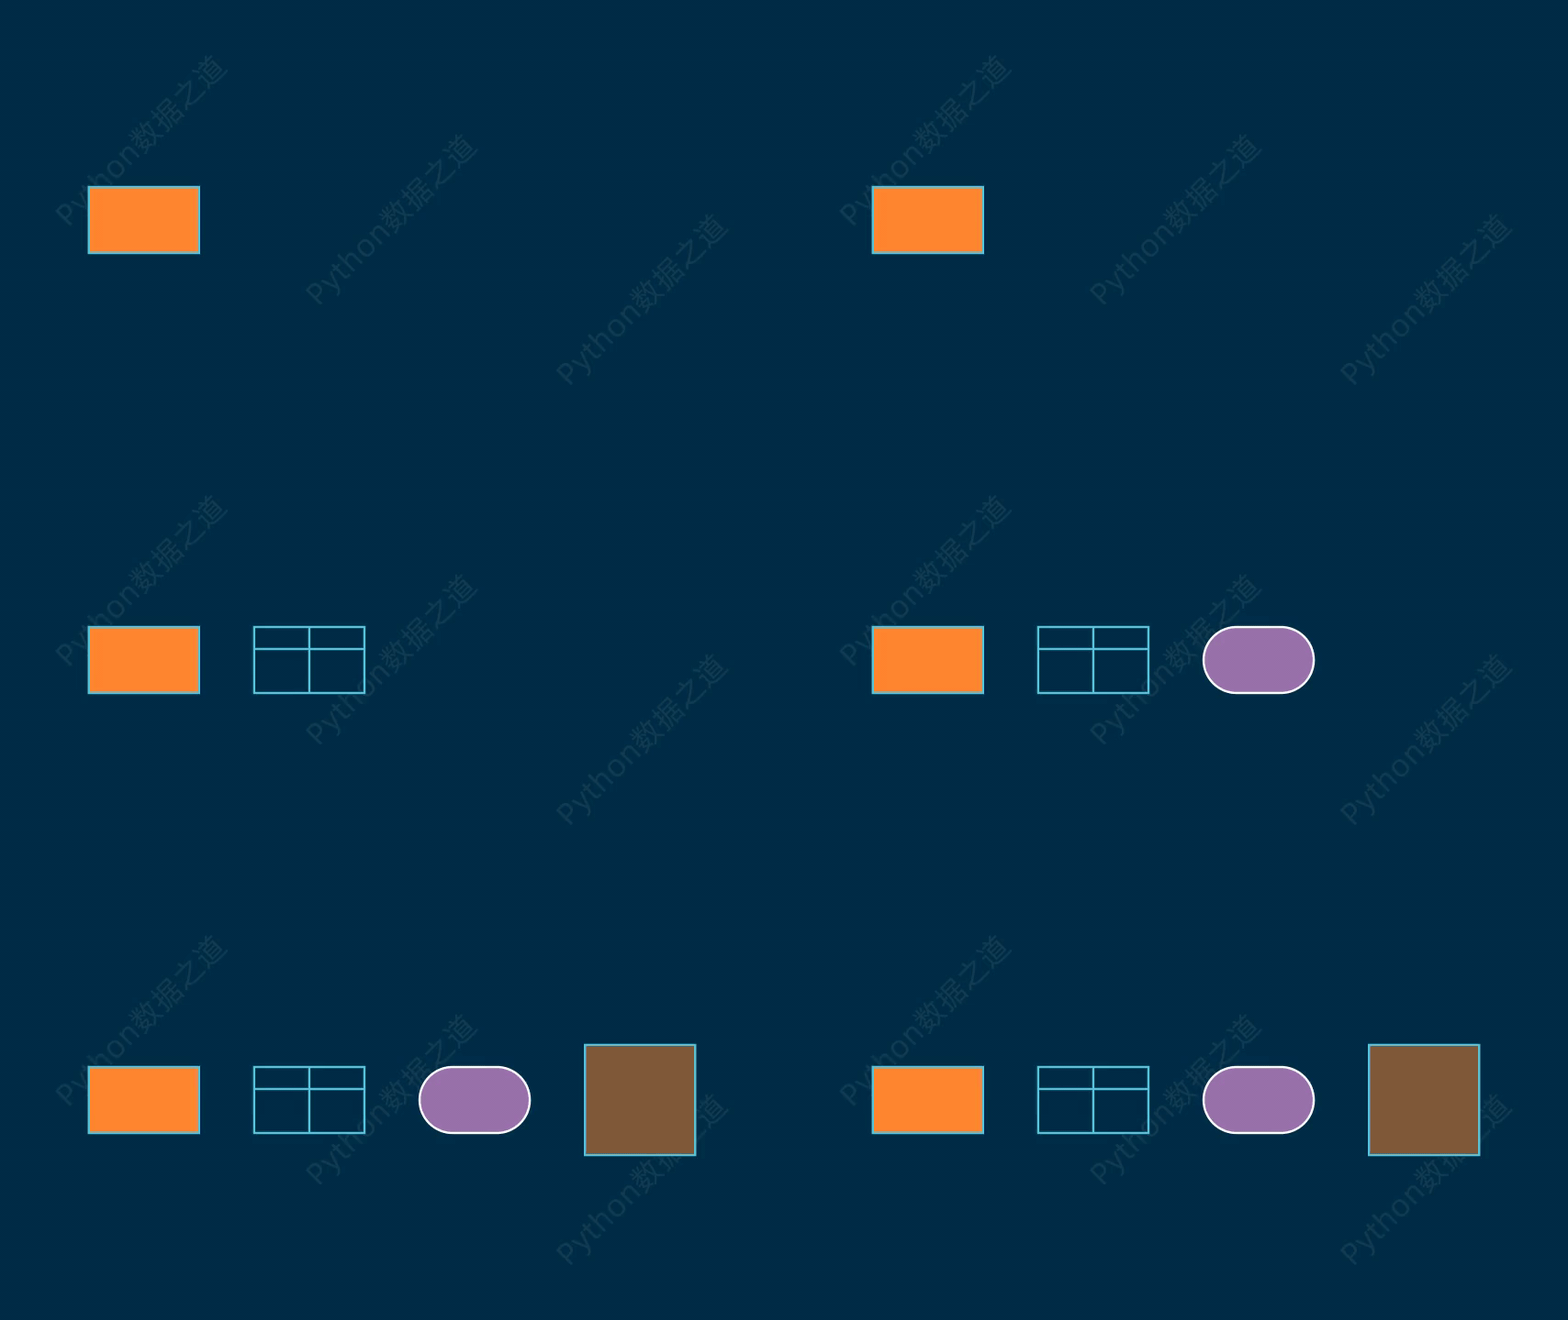
矩形类的形状,是咱们经常使用到的一类图形,在 manim 中包括:
Rectangle
RoundedRectangle
Square
class DemoRect(Scene):
    def construct(self):
        WaterMark.construct(self)
        g = Group(
            # 矩形
            Rectangle(width=1,height=0.6,color=BLUE,fill_color=ORANGE,fill_opacity=1),
            Rectangle(width=1,height=0.6,color=BLUE,grid_xstep=0.5,grid_ystep=0.2),
            # 圆角矩形
            RoundedRectangle(corner_radius=0.3,width=1,height=0.6,fill_color=PURPLE,fill_opacity=1),
            # 正方形
            Square(
            side_length=1,
            color=BLUE,
            fill_color=ORANGE,  # 设置填充颜色
            fill_opacity=0.5,  # 设置透明度
            ),
        )
        g.arrange(RIGHT,buff=0.5).scale(2)
        for shape in g:
            self.add(shape)
            self.wait(0.5)
演示效果如下:
多边形
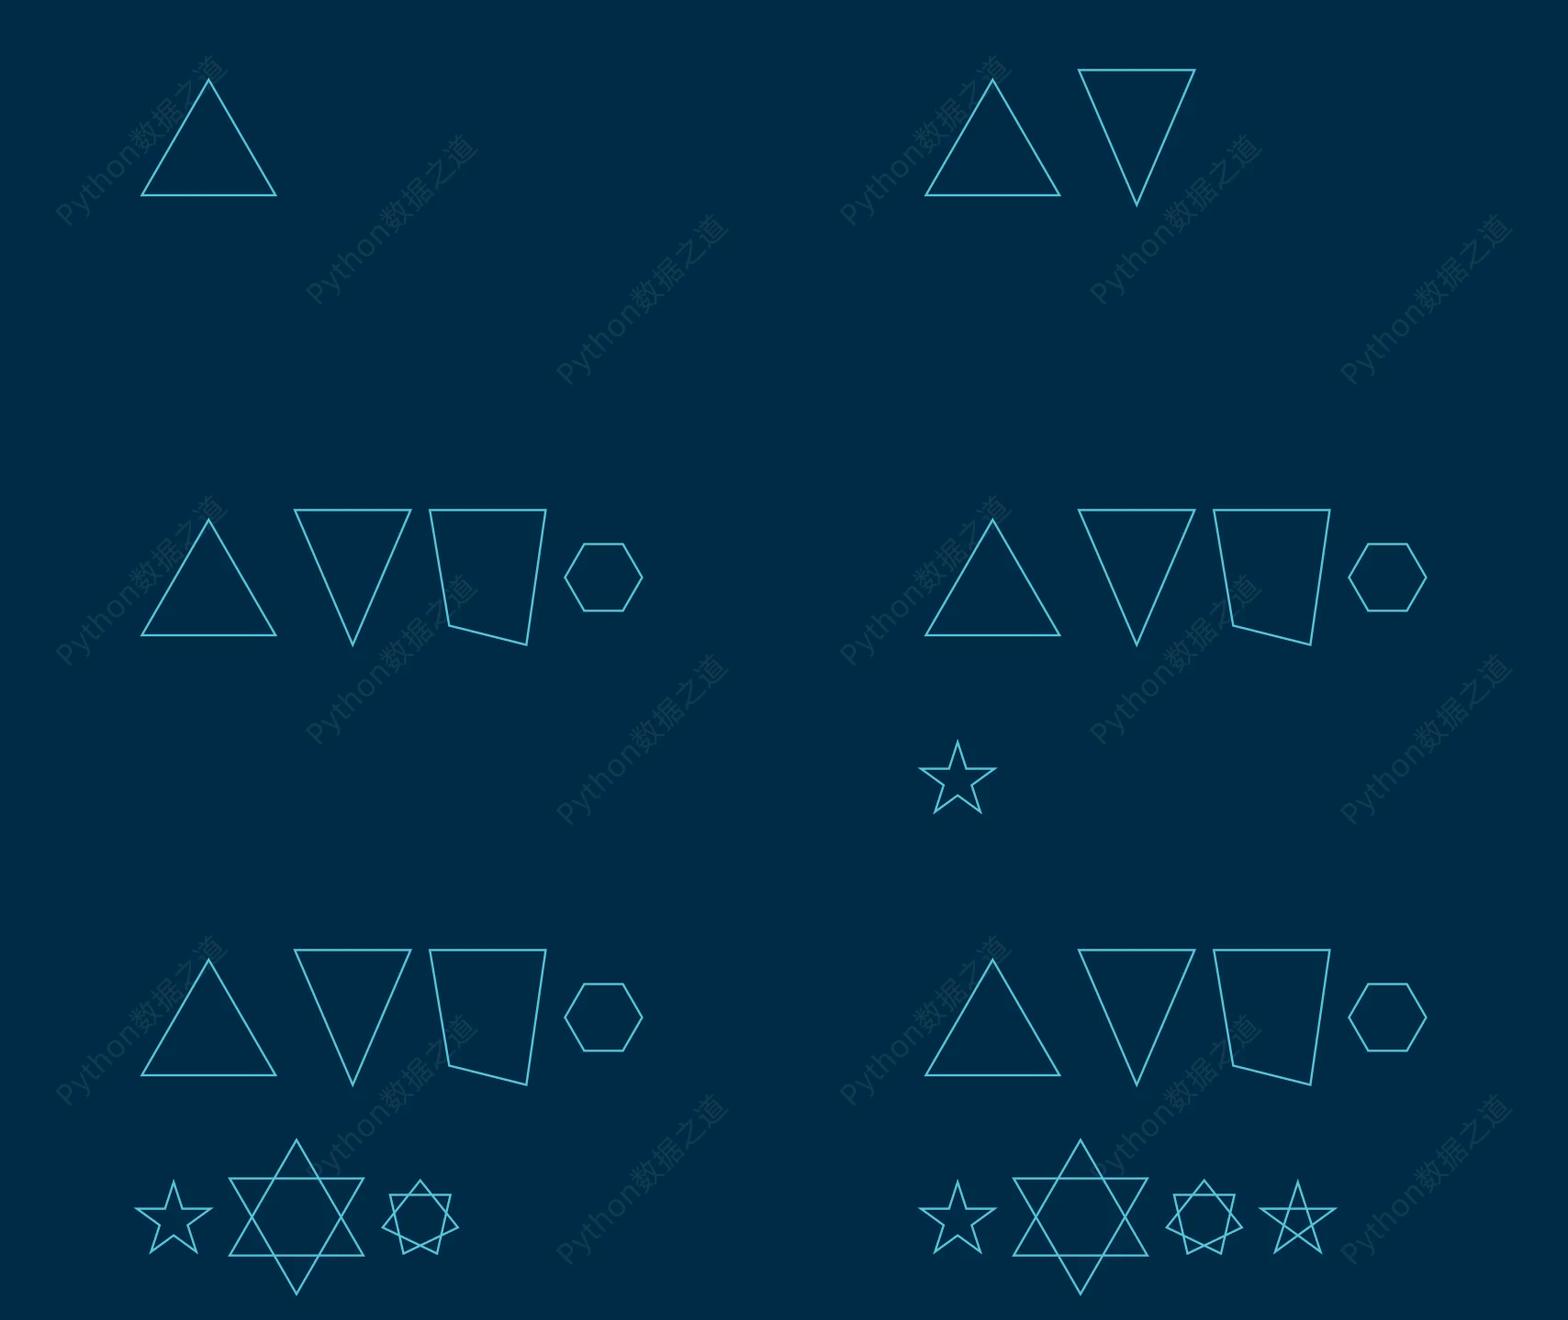
多边形性,相对来说要复杂些,主要是需要设置边缘点的位置,在manim中有多种方式来表示多边形,包括:
Triangle
Polygon
RegularPolygon
Star
Polygram
RegularPolygram
class DemoPolygon(Scene):
    def construct(self):
        WaterMark.construct(self)
        g = Group(
            # 正三角形
            Triangle(radius=2,color=BLUE),
            # 三角形
            Polygon([-5, 1.5, 0], [-2, 1.5, 0], [-3.5, -2, 0]),
            # 多边形
            Polygon([-5, 1.5, 0], [-2, 1.5, 0], [-2.5, -2, 0], [-4.5, -1.5, 0]),
            #正多边形
            RegularPolygon(n=6,color=BLUE),
            # 星型
            Star(color=BLUE),
            #多边形
            Polygram(
                [[0, 2, 0], [-np.sqrt(3), -1, 0], [np.sqrt(3), -1, 0]],
                [[-np.sqrt(3), 1, 0], [0, -2, 0], [np.sqrt(3), 1, 0]],),
            RegularPolygram(num_vertices = 7),
            RegularPolygram(5, radius=1),
        )
        g.arrange(RIGHT,buff=0.5).scale(0.7)
        g[:4].move_to(UP*1.5)
        g[4:].next_to(g[:3],DOWN,buff=1)
        for shape in g:
            self.add(shape)
            self.wait(0.5)
演示效果如下:
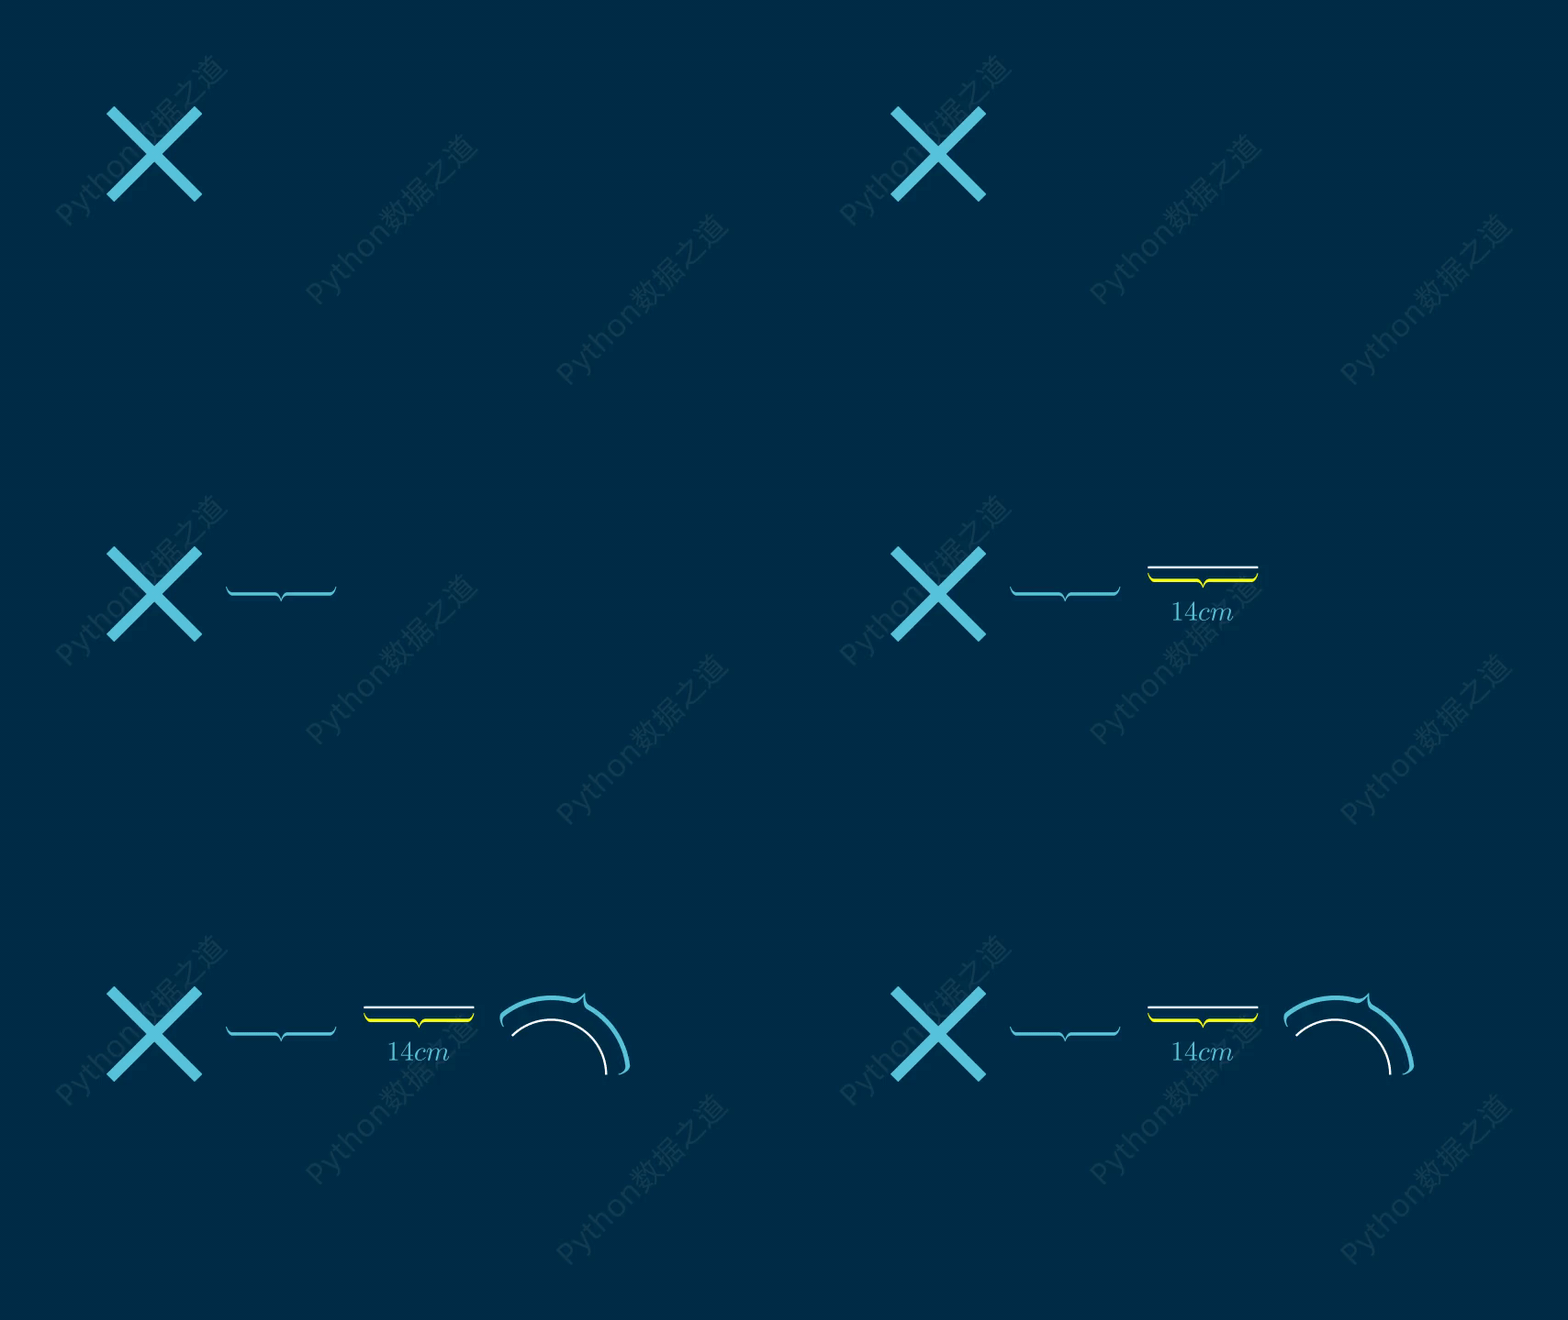
符号
在manim 中,也经常会用到 大括号等形状,如下:
class DemoCross(Scene):
    def construct(self):
        WaterMark.construct(self)

        # 十字叉
        cross = Cross(stroke_color = BLUE,stroke_width=20).scale(0.8)
        cross.to_corner(UL,buff=2)
        self.add(cross)
        self.wait(0.5)
        # 大括号
        br1 = Brace(Line(LEFT,RIGHT),color= BLUE)
        br1.next_to(cross,RIGHT,buff=0.5)
        self.add(br1)
        self.wait(0.5)

        # 带文字的大括号
        line=Line(LEFT,RIGHT)
        br2= BraceLabel(line, text= "14cm", color= YELLOW, buff=0.1)
        br2.submobjects[1].set_color(BLUE)
        self.add(VGroup(line,br2).next_to(br1,RIGHT,buff=0.5))
        self.wait(0.5)

        # 带弧度的大括号
        arc = Arc(radius=1,start_angle=0,angle=3*PI/4)
        br3 = ArcBrace(arc).set_color(BLUE)
        self.add(VGroup(arc,br3).next_to(VGroup(line,br2),RIGHT,buff=0.5))
        # self.add(arc,br3)
        self.wait(0.5)
演示效果如下:
04小结
相对而言,manim 中的基础形状,还是比较齐全的,在这些基础形状的基础上,自己可以进一步来组合其他的形状。
大家读完顺手点下右下角的 “在看” ,就是最大的鼓励和支持了。
往期精彩回顾


适合初学者入门人工智能的路线及资料下载(图文+视频)机器学习入门系列下载中国大学慕课《机器学习》(黄海广主讲)机器学习及深度学习笔记等资料打印《统计学习方法》的代码复现专辑
AI基础下载机器学习交流qq群955171419,加入微信群请扫码:


 545
545

 被折叠的 条评论
为什么被折叠?


