


随着技术的发展,ASP.NET Core MVC也推出了好长时间,经过不断的版本更新迭代,已经越来越完善,本系列文章主要讲解ASP.NET Core MVC开发B/S系统过程中所涉及到的相关内容,适用于初学者,在校毕业生,或其他想从事ASP.NET Core MVC 系统开发的人员。 经过前几篇文章的讲解,初步了解ASP.NET Core MVC项目创建,启动运行,以及命名约定,创建控制器,视图,模型,接收参数,传递数据,路由,页面布局,wwwroot和客户端库等内容,今天继续讲解ASP.NET Core MVC 中Razor语法等相关内容,仅供学习分享使用。

Razor视图
在ASP.NET Core MVC项目中,默认创建的视图,都是以cshtml为后缀的Razor视图。
基于 Razor 的视图模板:
- 具有
.cshtml文件扩展名。 - 提供一种巧妙的方法来使用 C# 创建 HTML 输出。
添加Razor视图
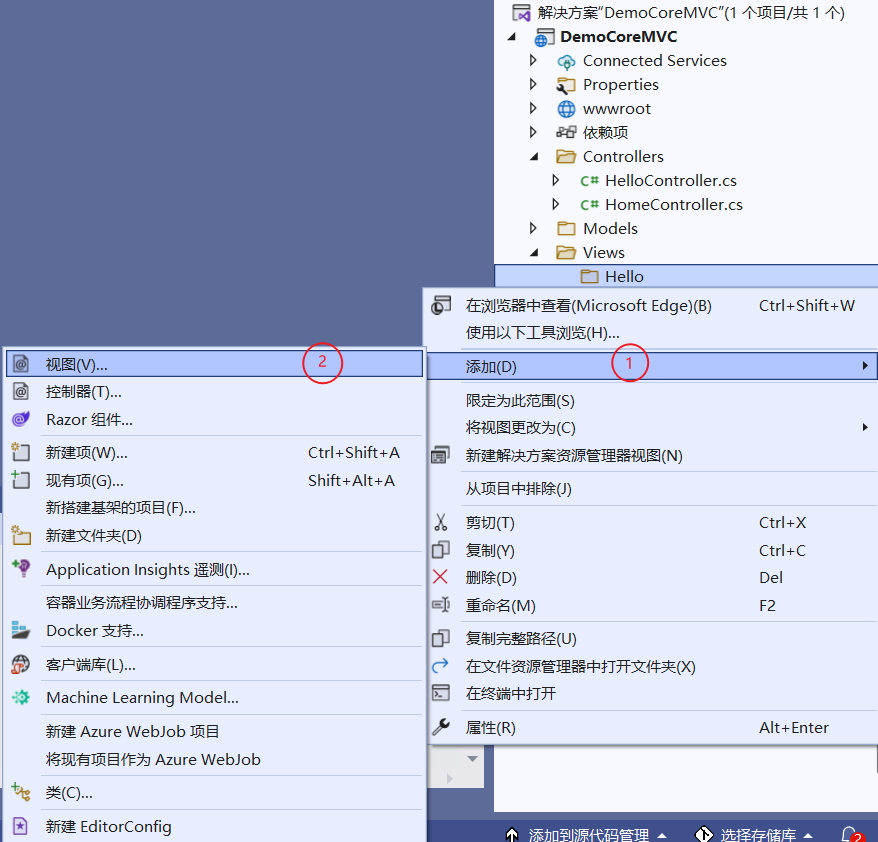
在项目中添加视图,可以通过在控制器中的Action上右键进行添加对应视图,也可以通过在Views中创建目录,然后目录上右键添加视图,如下所示:
打开添加视图对话框,选择Razor视图,点击【添加】按钮,如下所示:

输入视图名称,如Index,点击【添加】按钮,模板可根据具体需要是否添加,如下所示:

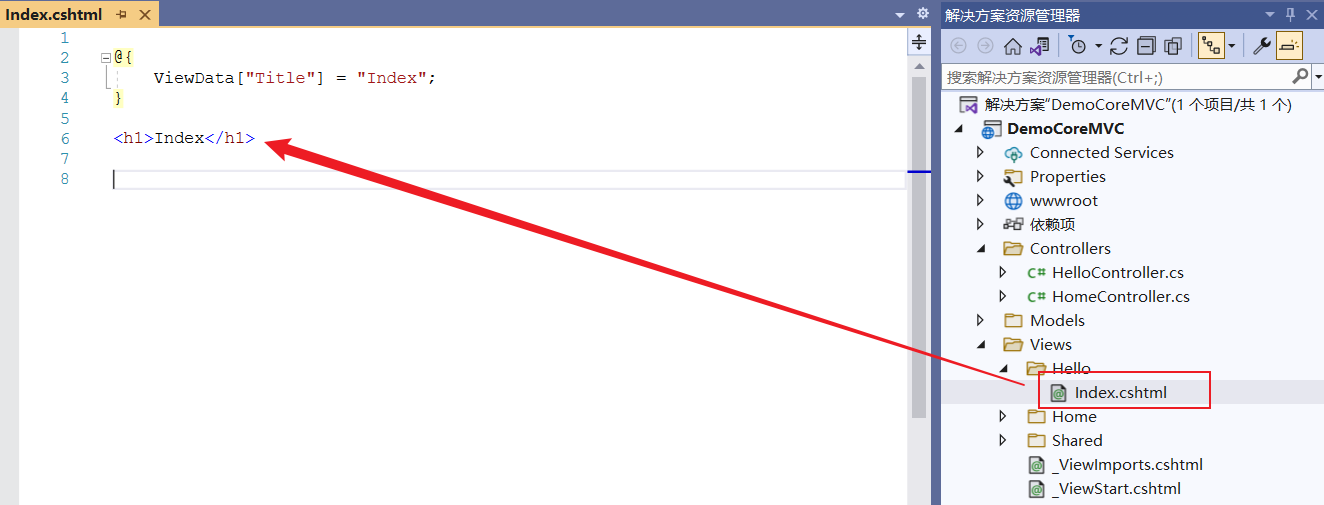
经过以上步骤后,即可添加视图成功,如下所示:
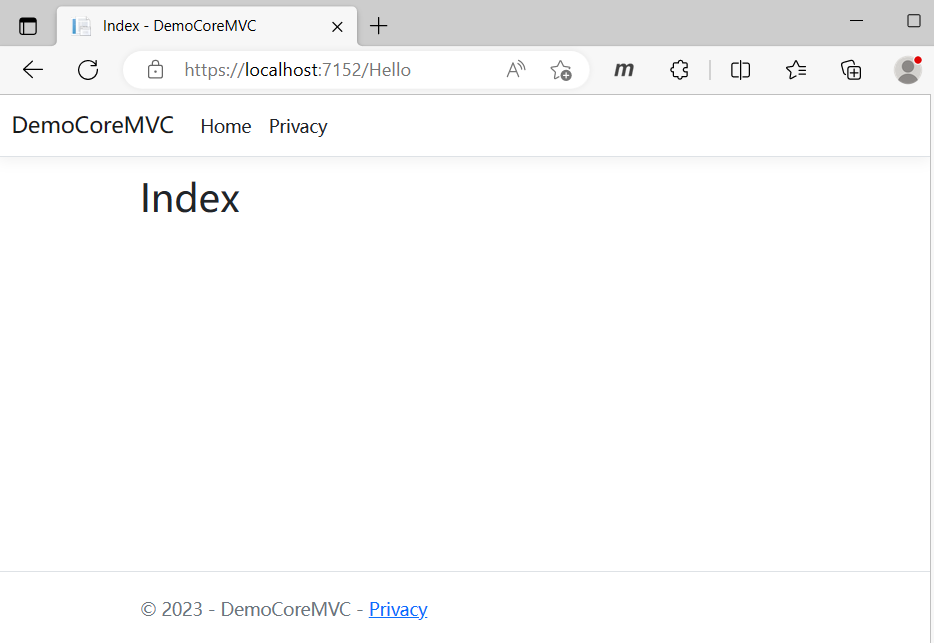
默认视图效果如下所示:
Razor介绍
Razor 是一种标记语法,用于将基于 .NET 的代码嵌入网页中。 Razor 语法由 Razor 标记、C# 和 HTML 组成。 包含 Razor 的文件通常具有 .cshtml 文件扩展名。 从 Razor 标记呈现 HTML 与从 HTML 文件呈现 HTML 没有什么不同。
Razor语法
Razor 支持 C#,并使用 @ 符号从 HTML 转换为 C#。 Razor 计算 C# 表达式,并将它们呈现在 HTML 输出中。当符号 @ 后跟 Razor 保留关键字时,它将转换为 Razor特定于 的标记。 否则会转换为纯 HTML。不过凡事总有特例,如包含在email中的@符号将不会被当成转换字符,而是直接显示。
<a href="mailto:Alan.hsiang@qq.com">Alan.hsiang@qq.com</a>隐式Razor表达式
隐式 Razor 表达式以 @ 开头,后跟 C# 代码。
<p>今天是:@DateTime.Now</p>
<p>昨天是:@DateTime.Now.AddDays(-1)</p>
隐式表达式不能包含空格,但 C# await 关键字除外。 如果该 C# 语句具有明确的结束标记,则可以混用空格:
@{
    ViewData["Title"] = "Index";

    async Task<string> DoSomething(string left,string right)
    {
        return left + right;

    }
}


<h1>Index</h1>
<p>@await DoSomething("hello", "world")</p>
隐式表达式不能包含 C# 泛型,因为括号 (<>) 内的字符会被解释为 HTML 标记。 以下代码无效:
@{
    ViewData["Title"] = "Index";

    string? GenericMethod<T>(T t)
    {
        return t?.ToString();
    }
}


<h1>Index</h1>
<!--不能使用泛型-->
<p>@GenericMethod<int>(0)</p>注意:泛型方法调用必须包装在 显式 Razor 表达式 或 Razor 代码块中。
显式Razor表达式
显式 Razor 表达式由 @ 符号和一对小括号组成,将计算 @() 括号中的所有内容,并将其呈现到输出中。 若要进行一些计算,可使用以下 Razor 标记:
@{
    ViewData["Title"] = "Index";

    int a=1,b=2,c=3,d=4;
}


<h1>Index</h1>
<!--显式Razor表达式-->
<p>@(a+b+c+d)</p>
<!--隐式Razor表达式-->
<p>@a+b+c+d</p>
在上述例子中,显示Razor表达式和隐式Razor表达式在页面显示的效果是不同的,如下所示:

另外在隐式Razor表达式中,不支持泛型,在显示Razor表达式中是支持泛型的。如下所示:
<p>@(GenericMethod<int>(10))</p>表达式编码
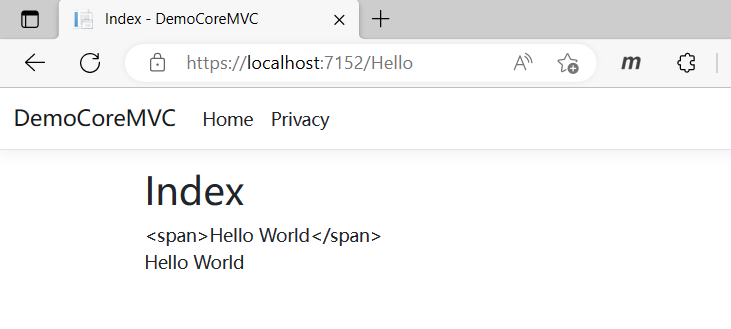
通过Razor表达式进行输出时,有时并不能达到想要效果,如下所示:
<!--输出原生标签并进行转义-->
<div>@("<span>Hello World</span>")</div>
<!--输入标签中的内容-->
<div>@Html.Raw("<span>Hello World</span>")</div>
在页面上输出结果如下所示:
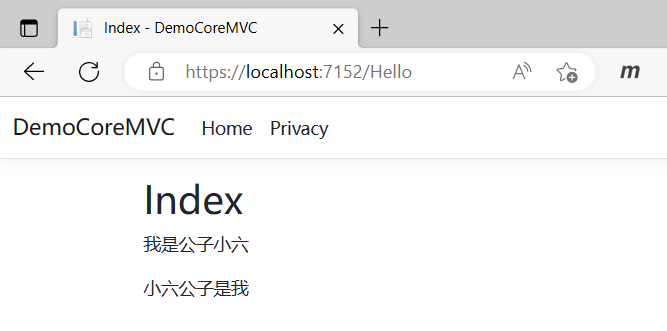
Razor代码块
Razor 代码块以 @ 开始,并括在 {} 中。 代码块内的 C# 代码不会呈现,这点与表达式不同。 一个视图中的代码块和表达式共享相同的作用域并按顺序进行定义:
@{
    var quote = "我是公子小六";
}

<p>@quote</p>

@{
    quote = "小六公子是我";
}

<p>@quote</p>
在页面输出 如下所示:
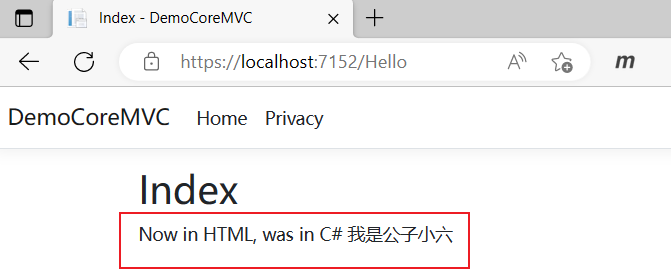
隐式转换
代码块中的默认语言是 C#,但 Razor 页面可以转换回 HTML:
@{
    var name = "我是公子小六";
    <p>Now in HTML, was in C# @name</p>
}
显式行转换
要在代码块内以 HTML 形式呈现整个行的其余内容,请使用 @: 语法:
@for (var i = 0; i < students.Length; i++)
{
    var student = students[i];
    @:student: @student.Name
}
如果代码中没有 @:,会生成 Razor 运行时错误。
Razor 文件中多余的 @ 字符可能会导致代码块中后面的语句发生编译器错误。 这些额外的 @ 编译器错误:
- 可能难以理解,因为实际错误发生在报告的错误之前。
- 在将多个隐式表达式和显式表达式合并到单个代码块后很常见。
控制结构
控制结构是对代码块的扩展。 代码块的各个方面(转换为标记、内联 C#)同样适用于以下结构:
条件控制语句
条件 @if, else if, else,如下所示:
@{
    int value = 10;
}

@if (value % 2 == 0)
{
    <p>The value was even.</p>
}
else if (value >= 1337)
{
    <p>The value is large.</p>
}
else
{
    <p>The value is odd and small.</p>
}
以下标记展示如何使用 switch 语句:
@switch (value)
{
    case 1:
        <p>The value is 1!</p>
        break;
    case 1337:
        <p>Your number is 1337!</p>
        break;
    default:
        <p>Your number wasn't 1 or 1337.</p>
        break;
}
循环控制
循环 @for, @foreach, @while, and @do while
@for循环
@{
    var students = new Student[]
    {
        new Student(){Id=1,Name="公"},
        new Student(){Id=2,Name="子"},
        new Student(){Id=3,Name="小"},
        new Student(){Id=4,Name="六"},
    };
}
@for (var i = 0; i < students.Length; i++)
{
    var student = students[i];
    <div>
        <span>Id: @student.Id</span>
        <span>Name: @student.Name</span>
    </div>
}
@foreach循环
@foreach (var student in students)
{
    <div>
        <span>Id: @student.Id</span>
        <span>Name: @student.Name</span>
    </div>
}
@while循环
@{ var i = 0; }
@while (i < students.Length)
{
    var student = students[i];
    <div>
        <span>Id: @student.Id</span>
        <span>Name: @student.Name</span>
    </div>
    i++;
}
@do while循环
@{ var i = 0; }
@do
{
    var student = students[i];
    <div>
        <span>Id: @student.Id</span>
        <span>Name: @student.Name</span>
    </div>

    i++;
} while (i < students.Length);
以上4种循环方式实现的效果都是一样的,如下所示:
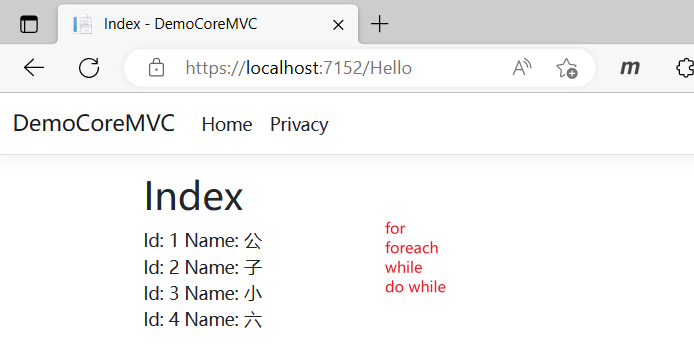
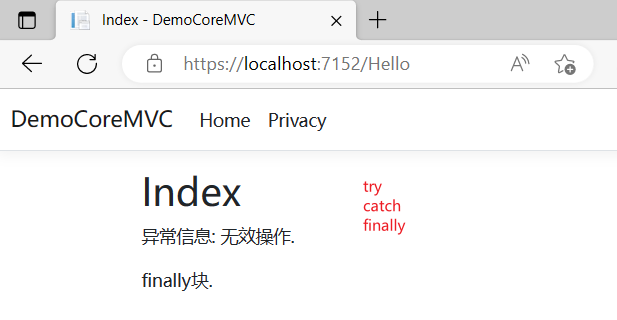
异常捕获
@try, catch, finally,异常处理与 C# 类似:
@try
{
    throw new InvalidOperationException("无效操作.");
}
catch (Exception ex)
{
    <p>异常信息: @ex.Message</p>
}
finally
{
    <p>finally块.</p>
}
在页面上输出如下内容:
Razor注释
Razor 支持 C# 和 HTML 注释:
@{
    /* C# comment */
    // Another C# comment
}
<!-- HTML comment -->
@*
    @{
        /* C# comment */
        // Another C# comment
    }
    <!-- HTML comment -->
*@
在呈现网页之前,服务器会删除 Razor 注释。 Razor 使用 @* *@ 来分隔注释。 以上代码第3段已被注释禁止,因此服务器不呈现任何标记。
Razor保留关键字
Razor 关键字
pagenamespacefunctionsinheritsmodelsectionhelper(ASP.NET Core 当前不支持)
Razor 关键字使用 @(Razor Keyword) 进行转义(例如,@(functions))。
C# Razor 关键字
do whiledefaultforforeachifelselockswitch casetrycatchfinallyusing
C# Razor 关键字必须使用 @(@C# Razor Keyword) 进行双转义(例如,@(@case))。 第一个 @ 对 Razor 分析程序转义。 第二个 @ 对 C# 分析器转义。
Razor 未使用的保留关键字
class
以上就是ASP.NET Core MVC 从入门到精通之Razor语法简介的主要内容,关于其他Razor语法内容,可参考文档:
参考文档:https://learn.microsoft.com/zh-cn/aspnet/core/mvc/views/razor?view=aspnetcore-7.0


 976
976


 被折叠的 条评论
为什么被折叠?
被折叠的 条评论
为什么被折叠?
 到【灌水乐园】发言


