


参考资料
- Spring系列第25篇:@Value【用法、数据来源、动态刷新】
- 【基础系列】SpringBoot配置信息之配置刷新
- 【基础系列】SpringBoot之自定义配置源的使用姿势
- 【基础系列】SpringBoot应用篇@Value注解支持配置自动刷新能力扩展
- Spring Boot 中动态更新 @Value 配置
一. 应用场景
⏹在SpringBoot工程中,我们一般会将一些配置信息放到application.properties配置文件中,
然后创建一个配置类通过@value注解读取配置文件中的配置信息后,进行各种业务处理。
⏹但是有的情况下我们需要对配置信息进行更改,但是更改之后就需要重启一次项目,
影响客户使用。
⏹我们可以将配置信息存放到数据库中,但是每使用一次配置信息就要去数据库查询显然也不合适。
🤔@Value注解所对应的数据源来自项目的Environment中,我们可以将数据库或其他文件中的数据,加载到项目的Environment中,然后@Value注解就可以动态获取到配置信息了。
二. 前期准备
⏹模拟获取数据库(其他存储介质: 配置文件,redis等)中的配置数据
import java.util.HashMap;
import java.util.Map;
import java.util.UUID;

public class DbUtil {

	// 从数据库获取邮件的用户名信息
    public static Map<String, Object> getMailInfoFromDb() {

    	// 模拟从数据库或者其他存储介质中获取到的用户名信息
    	String username = UUID.randomUUID().toString().substring(0, 6);

        Map<String, Object> result = new HashMap<>();
        // 此处的"mail.username" 对应 @Value("${mail.username}")
        result.put("mail.username", username);
        return result;
    }
}
⏹配置类
- @RefreshScope是我们自定义的注解,用来动态的从项目的
Environment中更新@Value所对应的值。 application.properties中的配置信息最终会被读取到项目的Environment中,但是还有其他方式向Environment中手动放入值,${mail.username}的值来源于我们自己手动放入Environment中的值。
import org.springframework.beans.factory.annotation.Value;
import org.springframework.context.annotation.Configuration;

import lombok.Data;

/**
 * 邮件配置信息
 */
@Configuration
@RefreshScope
@Data
public class MailConfig {

    @Value("${mail.username}")
    private String username;
}
⏹前台页面
<!DOCTYPE html>
<html lang="en" xmlns:th="http://www.thymeleaf.org">
<head>
    <meta charset="UTF-8">
    <meta name="viewport" content="width=device-width, initial-scale=1.0">
    <title>@value注解动态刷新</title>
</head>
<body>
    <button id="btn1">点击发送请求,动态刷新@value注解</button>
</body>
<script th:src="@{/js/public/jquery-3.6.0.min.js}"></script>
<script th:inline="javascript">

	$("#btn1").click(function() {

	    $.ajax({
	        url: "/test03/updateValue",
	        type: 'POST',
	        data: JSON.stringify(null),
	        contentType: 'application/json;charset=utf-8',
	        success: function (data, status, xhr) {
	            console.log(data);
	        }
	    });
	});
</script>
</html>
三. 实现Scope接口,创建自定义作用域类
import org.springframework.beans.factory.ObjectFactory;
import org.springframework.beans.factory.config.Scope;
import java.util.concurrent.ConcurrentHashMap;

public class BeanRefreshScope implements Scope {

    public static final String SCOPE_REFRESH = "refresh";

    private static final BeanRefreshScope INSTANCE = new BeanRefreshScope();

    // 用此map来缓存bean
    private ConcurrentHashMap<String, Object> beanMap = new ConcurrentHashMap<>();

    // 禁止实例化
    private BeanRefreshScope() {
    }

    public static BeanRefreshScope getInstance() {
        return INSTANCE;
    }

    // 清理当前实例缓存的map
    public static void clean() {
        INSTANCE.beanMap.clear();
    }

    @Override
    public Object get(String name, ObjectFactory<?> objectFactory) {

        Object bean = beanMap.get(name);
        if (bean == null) {
            bean = objectFactory.getObject();
            beanMap.put(name, bean);
        }

        return bean;
    }

	@Override
	public Object remove(String name) {
		return beanMap.remove(name);
	}

	@Override
	public void registerDestructionCallback(String name, Runnable callback) {
	}

	@Override
	public Object resolveContextualObject(String key) {
		return null;
	}

	@Override
	public String getConversationId() {
		return null;
	}

}
四. 创建自定义作用域注解
import org.springframework.context.annotation.Scope;
import org.springframework.context.annotation.ScopedProxyMode;

import java.lang.annotation.*;

@Target({ElementType.TYPE, ElementType.METHOD})
@Retention(RetentionPolicy.RUNTIME)
// 使用自定义作用域
@Scope(BeanRefreshScope.SCOPE_REFRESH)
@Documented
public @interface RefreshScope {

    ScopedProxyMode proxyMode() default ScopedProxyMode.TARGET_CLASS;
}
五. 刷新配置类的工具类
@Value注解所对应的值来源于项目的Environment中,也就是来源于ConfigurableEnvironment中。- 每当需要更新配置的时候,调用我们自定义的
refreshMailPropertySource方法,从各种存储介质中获取最新的配置信息存储到项目的Environment中。
import org.springframework.beans.factory.annotation.Autowired;
// import org.springframework.context.support.GenericApplicationContext;
import org.springframework.core.env.ConfigurableEnvironment;
import org.springframework.core.env.MapPropertySource;
import org.springframework.core.env.MutablePropertySources;
import org.springframework.stereotype.Component;

import java.util.Map;

@Component
public class RefreshConfigUtil {

	// 获取环境配置对象
	@Autowired
	private ConfigurableEnvironment environment;

	private final static String MAIL_CONFIG_NAMW = "mail_config";

	// @Autowired
	// private GenericApplicationContext context;

    /**
     * 模拟改变数据库中的配置信息
     */
    public void updateDbConfigInfo() {

        // 更新context中的mailPropertySource配置信息
        this.refreshMailPropertySource();

        // 清空BeanRefreshScope中所有bean的缓存
        BeanRefreshScope.getInstance();
        BeanRefreshScope.clean();
    }

    public void refreshMailPropertySource() {

        /**
         * @Value中的数据源来源于Spring的「org.springframework.core.env.PropertySource」中
         * 此处为获取项目中的全部@Value相关的数据
         */
        MutablePropertySources propertySources = environment.getPropertySources();
        propertySources.forEach(System.out::println);

        // 模拟从数据库中获取配置信息
        Map<String, Object> mailInfoFromDb = DbUtil.getMailInfoFromDb();

        // 将数据库查询到的配置信息放到MapPropertySource中(MapPropertySource类是spring提供的一个类,是PropertySource的子类)
        MapPropertySource mailPropertySource = new MapPropertySource(MAIL_CONFIG_NAMW, mailInfoFromDb);
        // 将配置信息放入 环境配置对象中
        propertySources.addLast(mailPropertySource);
    }

}
六. 配置类加载
- 实现了
CommandLineRunner接口,在项目启动的时候调用一次run方法。 - 将自定义作用域 和 存储介质中的数据添加到项目中。
import org.springframework.beans.factory.annotation.Autowired;
import org.springframework.beans.factory.config.ConfigurableListableBeanFactory;
import org.springframework.boot.CommandLineRunner;
import org.springframework.stereotype.Component;

@Component
public class ConfigLoad implements CommandLineRunner {

	@Autowired
	private ConfigurableListableBeanFactory beanFactory;

	@Autowired
	private RefreshConfigUtil refreshConfigUtil;

	@Override
	public void run(String... args) throws Exception {

		// 将我们自定义的作用域添加到Bean工厂中
		beanFactory.registerScope(BeanRefreshScope.SCOPE_REFRESH, BeanRefreshScope.getInstance());
		// 将从存储介质中获取到的数据添加到项目的Environment中。
		refreshConfigUtil.refreshMailPropertySource();
	}

}
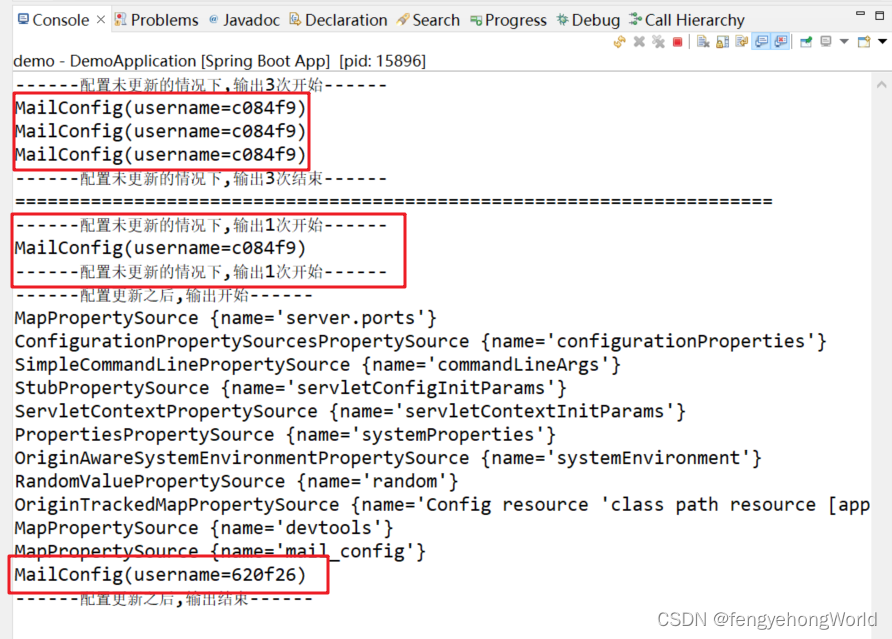
七. 测试
- 进入测试页面的时候,获取3次配置类
- 在测试页面点击更新按钮的时候,更新配置类之后,打印配置类,观察配置信息的变化。
import java.util.concurrent.TimeUnit;

import org.springframework.beans.factory.annotation.Autowired;
import org.springframework.context.support.GenericApplicationContext;
import org.springframework.stereotype.Controller;
import org.springframework.web.bind.annotation.GetMapping;
import org.springframework.web.bind.annotation.PostMapping;
import org.springframework.web.bind.annotation.RequestBody;
import org.springframework.web.bind.annotation.RequestMapping;
import org.springframework.web.bind.annotation.ResponseBody;
import org.springframework.web.servlet.ModelAndView;

@Controller
@RequestMapping("/test03")
public class Test03Controller {

	@Autowired
	private GenericApplicationContext context;

	@Autowired
	private RefreshConfigUtil refreshConfigUtil;

	@Autowired
	private MailConfig mailConfig;

	@GetMapping("/init")
	public ModelAndView init() throws InterruptedException {

	    System.out.println("------配置未更新的情况下,输出3次开始------");
	    for (int i = 0; i < 3; i++) {
	        System.out.println(mailConfig);
	        TimeUnit.MILLISECONDS.sleep(200);
	    }
	    System.out.println("------配置未更新的情况下,输出3次结束------");

	    System.out.println("======================================================================");

		ModelAndView modelAndView = new ModelAndView();
		modelAndView.setViewName("test03");
		return modelAndView;
	}

	@PostMapping("/updateValue")
	@ResponseBody
	public void updateValue(@RequestBody Test03Form form) throws Exception {

		System.out.println("------配置未更新的情况下,输出1次开始------");
		MailConfig mailInfo = context.getBean(MailConfig.class);
		System.out.println(mailInfo);
		System.out.println("------配置未更新的情况下,输出1次开始------");

		System.out.println("------配置更新之后,输出开始------");
		refreshConfigUtil.updateDbConfigInfo();
		System.out.println(mailInfo);
		System.out.println("------配置更新之后,输出结束------");
	}

}

注意事项:
本文只是进行了相关实践,相关原理请参照参考资料。
特别是参考资料1的文章。


 3143
3143


 被折叠的 条评论
为什么被折叠?
被折叠的 条评论
为什么被折叠?
 到【灌水乐园】发言


