


1、为什么要调用C程序
python语言的优点很多,当然也有缺点,由于是解释形脚本语言,所以它的执行程序的效率没有C语言快,操作系统硬件相关的操作接口程序都是C程序接口,所以对于一些特殊的应用与操作就要调用C语言程序来实现。
2、调用方法
python调用C语言可以使用ctypes模块来实现,ctypes模块可以直接加载c语言的动态库文件,window系统下是.dll文件, linux系统下是.so文件。本文通过一个示例来实现python调用c程序的过程,同时使用python语言对要调用的c程序进行二次封装而变成python程序。
3. ctypes的使用
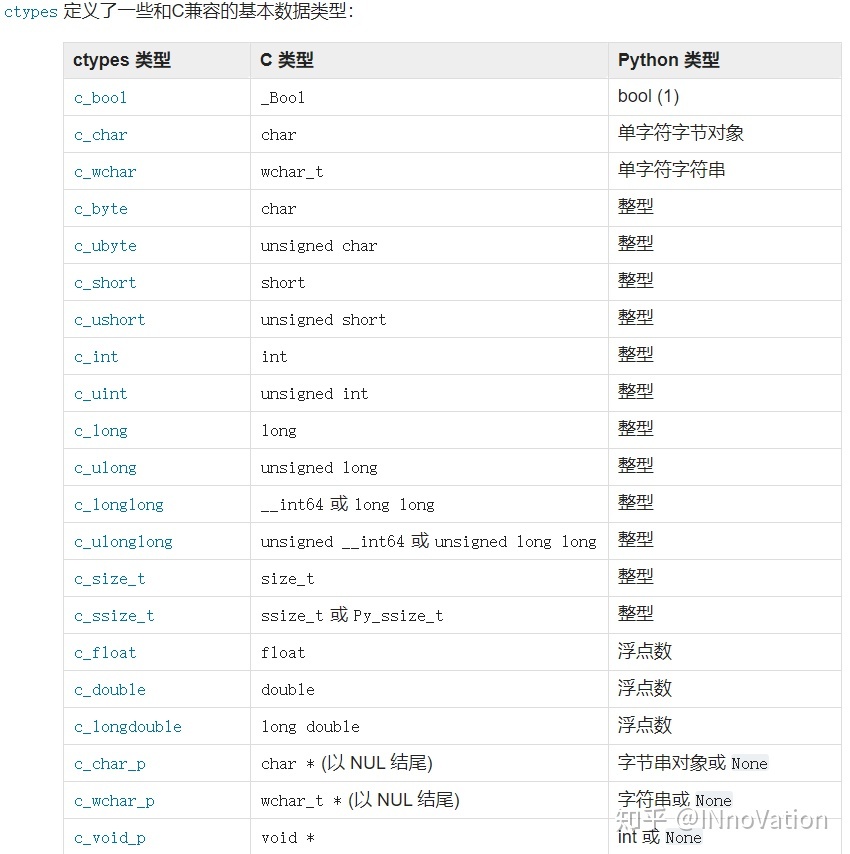
(1)C语言中基础的数据类型
这部分的使用比较简单,直接使用ctypes内置的方法创建对象即可,ctypes提供的方法和C语言对应的数据类型如下表:当在python调用c程序时向c程序中要传入相对应的数据类型时使用。
(2)使用方法:
# -*- coding: utf-8 -*-
from ctypes import *

# 字符,仅接受one character bytes, bytearray or integer
char_type = c_char(b"a")
# 字节
byte_type = c_char(1)
# 字符串
string_type = c_wchar_p("abc")
# 整型
int_type = c_int(2)
# 直接打印输出的是对象信息,获取值需要使用value方法
print(char_type, byte_type, int_type)
print(char_type.value, byte_type.value, string_type.value, int_type.value)
输出:
c_char(b'a') c_char(b'\x01') c_int(2)
b'a' b'\x01' abc 2
2)数组类型
数组的创建和C语言的类似,给定数据类型和长度即可,如下:
# 数组
# 定义类型
char_array = c_char * 3
# 初始化
char_array_obj = char_array(b"a", b"b", 2)
# 打印只能打印数组对象的信息
print(char_array_obj)
# 打印值通过value方法
print(char_array_obj.value)
输出:
< main.c_char_Array_3 object at 0x7f2252e6dc20>
b'ab\x02'
也可以在创建的时候直接进行初始化,如下:
int_array = (c_int * 3)(1, 2, 3)
for i in int_array:
    print(i)

char_array_2 = (c_char * 3)(1, 2, 3)
print(char_array_2.value)
输出:
1
2
3
b'\x01\x02\x03'
这里需要注意,通过value方法获取值只适用于字符数组,其他类型如print(int_array.value)的使用会报错:
AttributeError: 'c_int_Array_3' object has no attribute 'value'
(3)指针类型
ctypes提供了pointer()和POINTER()两种方法创建指针,区别在于:
pointer()用于将对象转化为指针,如下:
# 指针类型
int_obj = c_int(3)
int_p = pointer(int_obj)
print(int_p)
# 使用contents方法访问指针
print(int_p.contents)
# 获取指针指向的值
print(int_p[0])
输出:
<__main__.LP_c_int object at 0x7fddbcb1de60>
c_int(3)
3
POINTER()用于定义某个类型的指针,如下:
# 指针类型
int_p = POINTER(c_int)
# 实例化
int_obj = c_int(4)
int_p_obj = int_p(int_obj)
print(int_p_obj)
print(int_p_obj.contents)
print(int_p_obj[0])
输出:
<__main__.LP_c_int object at 0x7f47df7f79e0>
c_int(4)
4
如果弄错了初始化的方式会报错,POINTER()如下:
# 指针类型
int_p = POINTER(c_int)
# 实例化
int_obj = c_int(4)
int_p_obj = POINTER(int_obj)
报错:
TypeError: must be a ctypes type
pointer()如下:
# 指针类型
int_p = pointer(c_int)
报错:
TypeError: _type_ must have storage info
- 创建空指针的方式
null_ptr = POINTER(c_int)()
print(bool(null_ptr))
输出:
False
- 指针类型的转换
ctypes提供cast()方法将一个ctypes实例转换为指向另一个ctypes数据类型的指针,cast()接受两个参数,一个是ctypes对象,它是或可以转换成某种类型的指针,另一个是ctypes指针类型。它返回第二个参数的一个实例,该实例引用与第一个参数相同的内存块。
int_p = pointer(c_int(4))
print(int_p)

char_p_type = POINTER(c_char)
print(char_p_type)

cast_type = cast(int_p, char_p_type)
print(cast_type)
输出:
<__main__.LP_c_int object at 0x7f43e2fcc9e0>
<class 'ctypes.LP_c_char'>
<ctypes.LP_c_char object at 0x7f43e2fcc950>
(4)结构体类型
结构体类型的实现,结构和联合必须派生自ctypes模块中定义的结构和联合基类。每个子类必须 定义一个_fields_属性,_fields_必须是一个二元组列表,包含字段名和字段类型。_pack_属性 决定结构体的字节对齐方式,默认是4字节对齐,创建时使用_pack_=1可以指定1字节对齐。比如初始化student_t的方法如下,特别需要注意的是字段名不能和python关键字重名,不然会报错:
# -*- coding: utf-8 -*-
from ctypes import *

# 学生信息如下
stu_info = [("class", "A"),
            ("grade", 90),
            ("array", [1, 2, 3]),
            ("point", 4)]

# 创建结构提类
class Student(Structure):
    _fields_ = [("class", c_char),
            ("grade", c_int),
            ("array", c_long * 3),
            ("point", POINTER(c_int))]

print("sizeof Student: ", sizeof(Student))

# 实例化
long_array = c_long * 3
long_array_obj = long_array(1, 2, 3)
int_p = pointer(c_int(4))
stu_info_value = [c_char(b"A"), c_int(90), long_array_obj, int_p]

stu_obj = Student(*stu_info_value)
# 这样打印报错,因为字段名和python关键字class重名了,这是需要特别注意的点
# print("stu info:", stu_obj.class, stu_obj.grade, stu_obj.array[0], stu_obj.point[0])
print("stu info:", stu_obj.grade, stu_obj.array[0], stu_obj.point[0])
输出:
sizeof Student: 40
stu info: 90 1 4
如果把_pack_改为1,则输出:
sizeof Student: 37
stu info: 90 1 4
(5)嵌套结构体
嵌套结构体的使用需要创建基础结构体的类型,然后将基础结构体的类型作为嵌套结构体 的成员,注意基础结构体所属字段的字段类型是基础结构体的类名,如下:
# 创建类型, nest_stu字段的类型为基础结构体的类名
class NestStudent(Structure):
    _fields_ = [("rank", c_char),
                ("nest_stu", Student)]

# 实例化
nest_stu_info_list = [c_char(b"M"), stu_obj]
nest_stu_obj = NestStudent(*nest_stu_info_list)

print("nest stu info: ", nest_stu_obj.rank, "basic stu info: ", nest_stu_obj.nest_stu.grade)
输出:
nest stu info: b'M' basic stu info: 90
(6)结构体数组
结构体数组与普通数组的创建类似,需要提前创建结构体的类型,然后使用struct type * array_length 的方法创建数组。
# 结构体数组
# 创建结构体数组类型
stu_array = Student * 2
# 用Student类的对象实例化结构体数组
stu_array_obj = stu_array(stu_obj, stu_obj)

# 增加结构体数组成员
class NestStudent(Structure):
    _fields_ = [("rank", c_char),
                ("nest_stu", Student),
                ("strct_array", Student * 2)]

# 实例化
nest_stu_info_list = [c_char(b"M"), stu_obj, stu_array_obj]
nest_stu_obj = NestStudent(*nest_stu_info_list)

# 打印结构体数组第二个索引的grade字段的信息
print("stu struct array info: ", nest_stu_obj.strct_array[1].grade, nest_stu_obj.strct_array[1].array[0])
输出:
stu struct array info: 90 1
(7)结构体指针
首先创建结构体,然后使用ctype的指针方法包装为指针。
# 结构体指针
# # 创建结构体数组类型
stu_array = Student * 2
# # 用Student类的对象实例化结构体数组
stu_array_obj = stu_array(stu_obj, stu_obj)
# 曾接结构体指针成员,注意使用类型初始化指针是POINTER()
class NestStudent(Structure):
    _fields_ = [("rank", c_char),
                ("nest_stu", Student),
                ("strct_array", Student * 2),
                ("strct_point", POINTER(Student))]

# 实例化,对Student的对象包装为指针使用pointer()
nest_stu_info_list = [c_char(b"M"), stu_obj, stu_array_obj, pointer(stu_obj)]
nest_stu_obj = NestStudent(*nest_stu_info_list)

# 结构体指针指向Student的对象
print("stu struct point info: ", nest_stu_obj.strct_point.contents)
# 访问Student对象的成员
print("stu struct point info: ", nest_stu_obj.strct_point.contents.grade)
输出:
stu struct point info: <__main__.Student object at 0x7f8d80e70200> # 结构体指针指向的对象信息
stu struct point info: 90 # Student结构体grade成员
(8)结构体指针数组
创建结构体指针数组的顺序为先创建结构体,然后包装为指针,最后再创建数组,用结构体指针去实例化数组。
# 结构体指针数组
# 创建结构体数组类型
stu_array = Student * 2
# # 用Student类的对象实例化结构体数组
stu_array_obj = stu_array(stu_obj, stu_obj)
# 创建结构体指针数组
stu_p_array = POINTER(Student) * 2
# 使用pointer()初始化
stu_p_array_obj = stu_p_array(pointer(stu_obj), pointer(stu_obj))
# 曾接结构体指针成员,注意使用类型初始化指针是POINTER()
class NestStudent(Structure):
    _fields_ = [("rank", c_char),
                ("nest_stu", Student),
                ("strct_array", Student * 2),
                ("strct_point", POINTER(Student)),
                ("strct_point_array", POINTER(Student) * 2)]

# 实例化,对Student的对象包装为指针使用pointer()
nest_stu_info_list = [c_char(b"M"), stu_obj, stu_array_obj, pointer(stu_obj), stu_p_array_obj]
nest_stu_obj = NestStudent(*nest_stu_info_list)

# 数组第二索引为结构体指针
print(nest_stu_obj.strct_point_array[1])
# 指针指向Student的对象
print(nest_stu_obj.strct_point_array[1].contents)
# Student对象的grade字段
print(nest_stu_obj.strct_point_array[1].contents.grade)
输出:
<__main__.LP_Student object at 0x7f3f9a8e6200>
<__main__.Student object at 0x7f3f9a8e6290>
90
4、python调用C程序实操
本文的操作全部基于linux系统中进行。首先编写一个c程序文件Cpa.c,并且编译生成so文件。程序文件内容如下:
#include "CPa_CortexMx.h"

/*
   初始化
 in:  pCtx  a容器指针
      pKey  主密钥 8字节
      IV  IV 8字节
 out: pCtx
 return : 0 成功
          others 失败
*/
int  CPaIni(CPa_context  *pCtx, unsigned char *pIV, unsigned char *pKey )
{
    uint32_t i = 0;

    for(i = 0; i < 8; i++)
    {
        pCtx->iv[i] = pIV[i];
    }

    for(i = 0; i < RoundCPa; i++)
    {
        pCtx->sk[i] = i + pKey[i % 8];
    }

    return 0;
}

/*
    加密
 in:  pCtx     a容器指针
      pData    待加密数据指针
      DataLen  待加密数据长度
 out: pCipher    密文
      *CipherLen 密文长度
 return : >0  密文长度
          others 失败
*/
int  CPa_Encrypt(CPa_context *pCtx, unsigned char *pData, unsigned int  DataLen,unsigned char *pCipher,unsigned int *CipherLen)
{
    uint32_t i = 0;

    for(i = 0; i < DataLen; i++)
    {
        pCipher[i] = pData[i] + pCtx->sk[i%sizeof(pCtx->sk)];

    }
    *CipherLen = DataLen;

    return 0;
}
头文件中定义结构体,如下:
#ifndef _H_CPA_CORTEXMx_
#define _H_CPA_CORTEXMx_
#include <stdio.h>
#include <stdint.h>


#ifndef u8i
#define  u8i unsigned char
#endif

#ifndef u32i
#define  u32i uint32_t
#endif


#define RoundCPa 24


typedef struct
{
    u32i  sk[RoundCPa];
    unsigned char iv[8];

}
CPa_context;

/*
1。 更新密钥
 in:  pCtx  a容器指针
      pKey  主密钥 8字节
 out: pCtx  a容器中的轮密钥
 return : null
*/
void UpdateRk(CPa_context  *pCtx,unsigned char *pKey);
/*
2。 更新IV
 in:  pCtx  a容器指针
      IV  IV 8字节
 out: pCtx  a容器中的IV
 return : null
*/
void UpdateIV(CPa_context  *pCtx,unsigned char *pIV);

/*
4。 初始化
 in:  pCtx  a容器指针
      pKey  主密钥 8字节
      IV  IV 8字节
 out: pCtx
 return : 0 成功
          others 失败
*/
int  CPaIni(CPa_context  *pCtx, unsigned char *pIV, unsigned char *pKey );
/*
4。 加密
 in:  pCtx     a容器指针
      pData    待加密数据指针
      DataLen  待加密数据长度
 out: pCipher    密文
      *CipherLen 密文长度
 return : >0  密文长度
          others 失败
*/
int  CPa_Encrypt(CPa_context *pCtx, unsigned char *pData, unsigned int  DataLen,unsigned char *pCipher,unsigned int *CipherLen);
/*
4。 解密
 in:  pCtx     a容器指针
      pCipher  待解密数据指针
      CipherLen  待解密数据长度
 out: pData    解密数据指针
      *DataLen 解密数据长度
 return : >0  解密数据长度
          others 失败
*/
#define  CPa_Decrypt CPa_Encrypt


#endif
把Cpa.c, CPa_CortexMx.h文件放在linux系统下进行编译,即执行命令gcc -o CPa.so -shared -fPIC CPa.c -I ./
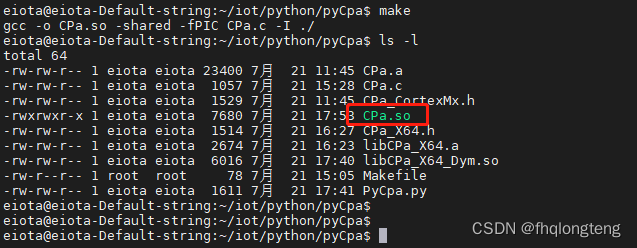
可以看到生成了CPa.so文件。下面需要编写PyCpa.py文件来对加密库进行调用。
通过Cpa.c文件中可以知,调用其中的函数CPaIni(CPa_context *pCtx, unsigned char *pIV, unsigned char *pKey ),需要输入结构体指针和2个字符数组指针,因些在python程序中要定义对应的数据类型, 字符数组对应的python中的数据结构是bytes类型的,结构体pCtx要使用ctypes中结构体来定义出来。
CPa_context 结构体中包含有24个长度的整形数组和8个长度的字符数据。因些python中要使用定义同样结构的类来表示。代码如下,定义出来。
#define the CPa context struct
class CPa_context(Structure):
    _fields_ = [
    ("sk", c_uint * 24),
    ("iv", c_char * 8)
    ]
结构体指针可以通过pointer取类CPa_context来获取,
#实例化一个类,表示一个结构体
cpa = CPa_context()
#取指针
pcpa = pointer(cpa)
解决了数据类型的对应关系后,剩下的就是对c程序进行python封装了,即定义一个类,类中完成初始化和相关c程序的调用程序接口。如下代码所示。
# /usr/bin/python3.8
from ctypes import *
import ctypes

#define the CPa context struct
class CPa_context(Structure):
    _fields_ = [
    ("sk", c_uint * 24),
    ("iv", c_char * 8)
    ]


#封装一下c语言的加密库的接口为python程序接口
class CPa_python:
    def __init__(self, iv, key):
        self.cpa_so = ctypes.cdll.LoadLibrary("./CPa.so")
        self.cpa = CPa_context()
        self.pcpa = pointer(self.cpa)
        self.cpa_so.CPaIni(self.pcpa, iv, key)
    #encrypt data
    def cpa_encrypt(self, input):
        out_num = c_uint(0)
        pout_num = pointer(out_num)
        self.cpa_so.CPa_Encrypt(self.pcpa, input, len(input), input, pout_num)
        return input
    #decrypt data
    def cpa_decrypt(self, input):
        out_num = c_uint(0)
        pout_num = pointer(out_num)
        self.cpa_so.CPa_Encrypt(self.pcpa, input, len(input), input, pout_num)
        return input


#实例化一个CPa python类
cpa_python = CPa_python(bytes([1,1,1,1,0,0,0,0]), bytes([2,3,4,5,6,7,8,9]))
print("encrypt data",cpa_python.cpa_encrypt(bytes([1,2,3,4,5])))
到这里已经对C程序函数完成了封装,执行一下程序可以看到输出结果。


 9万+
9万+


 被折叠的 条评论
为什么被折叠?
被折叠的 条评论
为什么被折叠?
 到【灌水乐园】发言


