


个人登录增加验证码校验:
- 描述: 在个人登录页面上添加验证码字段,以提高安全性,防止恶意登录和自动化攻击。
- 规划:
- 在登录表单中添加验证码输入字段。
- 集成第三方验证码库,如 django-simple-captcha 或 django-recaptcha。
- 后端验证用户输入的验证码是否正确,如果正确则允许登录,否则提示验证码错误。
技术实现步骤
步骤 1: 安装验证码库
选择并安装一个验证码库,比如 django-simple-captcha。你可以通过 pip 来安装:
pip install django-simple-captcha
步骤 2: 配置 django-simple-captcha
在你的 settings.py 文件中添加 captcha 到已安装的应用程序中:
INSTALLED_APPS = [
    # 其它已安装的应用
    'captcha',
]
步骤 3: 创建验证码表单字段
在你的表单类中添加验证码字段。假设你已经有一个登录表单 LoginForm,现在你需要扩展它:
from django import forms
from captcha.fields import CaptchaField

class LoginForm(forms.Form):
    username = forms.CharField(max_length=150)
    password = forms.CharField(widget=forms.PasswordInput)
    captcha = CaptchaField()  # 添加验证码字段
步骤 4: 更新登录视图
在你的视图中处理验证码的验证。如果使用类视图,可以这样做:
from django.shortcuts import render, redirect
from django.contrib.auth import authenticate, login
from django.views import View
from .forms import LoginForm

class LoginView(View):
    def get(self, request):
        form = LoginForm()
        return render(request, 'login.html', {'form': form})

    def post(self, request):
        form = LoginForm(request.POST)
        if form.is_valid():
            username = form.cleaned_data.get('username')
            password = form.cleaned_data.get('password')
            user = authenticate(request, username=username, password=password)
            if user is not None:
                login(request, user)
                return redirect('home')
            else:
                form.add_error(None, 'Invalid username or password')
        return render(request, 'login.html', {'form': form})
步骤 5: 更新模板
在login.html模板中显示验证码字段。
{% load static %}
<!DOCTYPE html>
<html lang="en">
<head>
    <meta charset="UTF-8">
    <meta name="viewport" content="width=device-width, initial-scale=1.0">
    <title>Login</title>
    <link rel="stylesheet" href="{% static 'blog/css/post_list.css' %}">
</head>
<body>
    <h2>Login</h2>
    <form method="post">
        {% csrf_token %}
        {{ form.as_p }}
        <button type="submit">Login</button>
    </form>
</body>
</html>
步骤 6: 配置 URL
确保你的 urls.py 文件中包含验证码的URL配置:
from django.urls import path
from .views import LoginView
from captcha.urls import urlpatterns as captcha_urls

urlpatterns = [
    path('login/', LoginView.as_view(), name='login'),
]

urlpatterns += captcha_urls
步骤 7: 测试
在本地开发环境中测试你的登录功能,确保验证码正确显示和验证:
-
运行开发服务器:
python manage.py runserver -
在浏览器中访问登录页面,输入用户名、密码和验证码,确认一切工作正常。
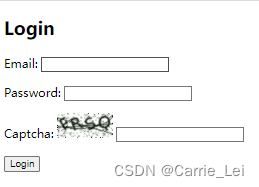
结果:
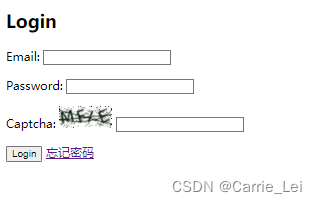
步骤 8: 增加点击验证码自动更新
在login.html页面增加js代码,用来实现点击验证码自动更新。
<script>
    // 当点击验证码图片时,刷新验证码
    $('.captcha').click(function () {
            $.getJSON('/captcha/refresh/',function (result) {
                $('.captcha').attr('src',result['image_url']);
                $('#id_captcha_0').val(result['key']);
            });
        });
</script>


 905
905

 被折叠的 条评论
为什么被折叠?
被折叠的 条评论
为什么被折叠?
 到【灌水乐园】发言


