


简介
在当今迅速发展的技术环境中,生成式人工智能(AI)成为了众多企业创新和优化业务流程的重要工具。微软的 Azure OpenAI 服务为开发生成式 AI 解决方案提供了强大的平台和工具。本文将介绍如何利用 Azure OpenAI 服务开发生成式 AI 解决方案,以帮助企业提升生产力、改进客户服务和推动创新。
1. 设置和配置 Azure OpenAI 服务
创建 Azure 账户和订阅
首先,您需要一个 Azure 账户。登录到 Azure 门户(portal.azure.com),创建一个新的订阅,并确保您的订阅具有访问 OpenAI 服务的权限。
配置 Azure OpenAI 资源
- 在 Azure 门户中,导航到“创建资源”。
- 搜索“OpenAI”并选择“Azure OpenAI 服务”。
- 按照提示配置资源,选择适当的定价层,并完成资源创建。
2. 使用 Azure OpenAI 服务
调用 OpenAI API
Azure OpenAI 服务通过 REST API 提供访问 OpenAI 模型的接口。您可以使用各种编程语言(如 Python、C#)来调用这些 API。以下是一个使用 Python 的示例:
import openai

openai.api_type = "azure"
openai.api_base = "https://YOUR_RESOURCE_NAME.openai.azure.com/"
openai.api_version = "2022-12-01"
openai.api_key = "YOUR_API_KEY"

response = openai.Completion.create(
  engine="davinci",
  prompt="生成一个产品描述",
  max_tokens=100
)

print(response.choices[0].text.strip())
集成到业务应用中
通过 API 调用,您可以将生成式 AI 功能集成到各种业务应用中。例如,您可以创建智能客服系统,自动化文档生成,或开发个性化推荐系统。
总结
Azure OpenAI 服务为企业提供了一个强大且灵活的平台,用于开发生成式 AI 解决方案。通过正确的设置、集成和优化,企业可以显著提升业务效率,改善客户体验,并推动创新。无论是初创公司还是大型企业,都可以利用 Azure OpenAI 服务实现其业务目标,迈向智能化未来。
使用 Azure OpenAI 服务应用提示工程
请求输出组合
指定输出的结构可能会对结果产生很大影响。 这可能包括要求模型引用其来源、将响应编写为电子邮件、将响应格式设置为 SQL 查询、将情绪分类为特定结构等。 例如:
提示
code
Write a table in markdown with 6 animals in it, with their genus and species
响应
code
| Animal           | Genus          | Species        |
| ---------------- |:--------------:|:--------------:|
| Red Panda        | Ailurus        | fulgens        |
| African Elephant | Loxodonta      | africana       |
| Snow Leopard     | Panthera       | uncia          |
| Arctic Fox       | Vulpes         | lagopus        |
| Chimpanzee       | Pan            | troglodytes    |
| Siberian Tiger   | Panthera       | tigris altaica |
此方法可用于自定义格式,例如 JSON 结构:
提示
code
Put two fictional characters into JSON of the following format

{
  firstNameFictional:
  jobFictional:
}
响应
code
Here's an example of how you can put two fictional characters into JSON format:

{
  "firstNameFictional": "Henry",
  "jobFictional": "Wizard"
},
{
  "firstNameFictional": "Frank",
  "jobFictional": "Hero"
}
ChatCompletion 终结点允许使用 System 聊天角色包括系统消息。
Python
response = openai.ChatCompletion.create(
    model="gpt-35-turbo",
    messages=[
        {"role": "system", "content": "You are a casual, helpful assistant. You will talk like an American old western film character."},
        {"role": "user", "content": "Can you direct me to the library?"}
    ]
)
响应
code
{
  "choices": [
    {
      "finish_reason": "stop",
      "index": 0,
      "message": {
        "content": "Well howdy there, stranger! The library, huh?
                    Y'all just head down the main road till you hit the town
                    square. Once you're there, take a left and follow the street
                    for a spell. You'll see the library on your right, can’t
                    miss it. Happy trails!",
        "role": "assistant"
      }
    }
  ],
  ...
}
系统消息在格式和内容方面都可能会显著更改响应。 尝试为模型定义一条明确的系统消息,以准确说明你期望的响应类型,以及你希望或不希望它包含的内容。
拆分复杂任务
改进交互的另一种方法是将复杂的提示划分为多个查询。 这使模型能够更好地了解每个单独的部分,并且可以提高整体准确性。 通过划分提示,还可以在将来的提示中包含来自上一个提示的响应,以及使用该信息以及模型功能生成相关响应。
例如,可以询问模型 Doug can ride down the zip line in 30 seconds, and takes 5 minutes to climb back up to the top. How many times can Doug ride the zip line in 17 minutes?。 结果可能是 3,如果 Doug 从 zip 线的顶部开始,则结果不正确。
通过询问多个问题可能会得到信息更丰富的答案,这些答案关于返回到 zip 线顶部的往返时间,以及如何说明 Doug 从顶部开始的事实。 拆分此问题表明,Doug 事实上可以穿越 zip 线四次。
思维链
帮助你有效地拆分任务的一个有用方法是让模型解释其思维链。
要求模型使用确定响应的分步过程做出响应是了解模型如何解释提示的有用方法。 通过执行此操作,你可以看到模型在何处进行了错误的逻辑轮次,并更好地了解如何更改提示以避免错误。 此方法可能包括要求它引用其来源,就像必应聊天(使用 GPT-4 代模型),并给出确定答案的原因。
思维链提示技术最适合用于帮助你循环访问和改进提示,以便从模型获得最高质量的答案。
例如,询问模型 What sport is easiest to learn but hardest to master? 会得到一个答案作为响应,并简要说明原因。 但是,当出现 What sport is easiest to learn but hardest to master? Give a step by step approach of your thoughts, ending in your answer 提示时,响应是它如何得出答案的完整说明。
code
Sure, here's a step-by-step approach to answering the question:
1. Identify sports that are popular and have a large following.
2. Consider the basic mechanics of each sport and how easy they are to learn.
3. Think about the various techniques and skills required to play each sport at a high level, and how difficult they are to master.
4. Compare the relative ease of learning each sport to the difficulty of mastering it.
5. Based on the above analysis, determine which sport is easiest to learn but hardest to master.

Using this approach, I would say that the sport of golf is easiest to learn but hardest to master. Here's why:
1. Golf is a popular sport with a large following.
2. The basic mechanics of hitting a golf ball are relatively simple and can be learned quickly with some practice.
3. However, achieving consistency and mastering the various shots and techniques required to play at a high level can take years of practice and dedication.
4. Compared to other sports, the difference between a beginner and an intermediate golfer is relatively small, while the difference between an intermediate and an advanced golfer is much larger.
5. Therefore, I would say that golf is the sport that is easiest to learn but hardest to master.
了解模型用于形成其响应的原因步骤后,我们可以确定需要拆分提示的位置、提供更多信息或阐明说明。
使用 Azure OpenAI 服务生成代码
编写函数
只需描述所需内容,Azure OpenAI 模型即可创建多种语言的函数和应用。 例如,假设你需要二进制文件搜索的实现,但不记得它是如何实现的了。 给定提示 write a function for binary search in python,你可能会收到包含函数的响应和对代码的说明。
code
Sure, here's an example implementation of binary search algorithm in Python:

def binary_search(array, target):
    low = 0
    high = len(array) - 1

    while low <= high:
        mid = (low + high) // 2
        if array[mid] == target:
            return mid
        elif array[mid] < target:
            low = mid + 1
        else:
            high = mid - 1

    return -1

This function takes in two arguments - an array of integers and a target integer that we want to search
for in the array. The function initializes two pointers - low and high - to the first and last indices
of the array, respectively.

Inside the while loop, the function calculates the middle index using integer division (//). If the
middle element is equal to the target, the function returns the index of the middle element. If the
middle element is less than the target, we update the low pointer to mid + 1. Otherwise, we update the
high pointer to mid - 1. We continue these steps until we find the target or the pointers cross each
other (i.e., low > high).

If the target is not found in the array, the function returns -1.

Note that the binary search algorithm assumes that the input array is sorted in ascending order. If
the array is not sorted, the algorithm may not return the correct result.
请求可以超越函数,请求一系列函数或整个应用。 响应为尝试实现的任务提供了良好的起点。
更改编码语言
如果你的代码采用的是一种语言,但你需要它采用另一种语言,Azure OpenAI 可以转换该代码。 例如,假设在 Python 中具有此 print_squares 函数。
Python
def print_squares(n):
    for i in range(1, n+1):
        print(i**2)
如果提供该代码以及提示 convert this code to C#,你可能会得到类似于以下函数的内容。
C#
public void PrintSquares(int n)
{
    for (int i = 1; i <= n; i++)
    {
        Console.WriteLine(i * i);
    }
}
请注意,模型理解 for 循环和函数以不同语言(包括 C# 中的访问修饰符)定义的方式的差异,并相应地更改了代码。
理解未知代码
Azure OpenAI 模型有助于理解无法理解的代码或可能采用你不熟悉的语言的代码。 例如,假设你获得了以下函数(采用虚构的编码语言!),但不知道如何理解它。
code
fn qzplv(n: i32, m: i32) -> i32 {
    if n == 0 {
        return m + 1;
    } else if m == 0 {
        return qzplv(n - 1, 1);
    } else {
        return qzplv(n - 1, qzplv(n, m - 1));
    }
}
将其与提示 could you explain what this code is doing? 一起提供给模型时,你可得到类似于以下内容的响应:
code
Sure, I'd be happy to explain what this code is doing!

This code is implementing the Ackermann function, which is a well-known mathematical function that
grows very quickly in terms of computation time as its inputs increase. The function takes two integer
arguments (n and m) and returns another integer.

Here's how the function works:
- If n is equal to 0, the function returns m + 1.
- If m is equal to 0, the function calls itself recursively with n - 1 and 1 as arguments.
- Otherwise, the function calls itself recursively with n - 1 and the result of calling itself with n
and m - 1 as arguments.

The function is implemented in a way that is easy to understand and follow, but it has a very high
computational complexity. In fact, it grows so quickly that it can't be computed for values of n and m
greater than about 4 or 5.
将说明和转换结合成你熟悉的语言会使此功能更加有用。
完成部分代码
Azure OpenAI 模型能够基于注释、函数名称和部分编写的代码生成代码。 为模型提供的上下文越多,响应可能就越准确。
例如,当出现以下提示时:
prompt
complete the following function
"""
# calculate the average of the numbers in an array, but only if they're even
def
该模型获取注释和函数定义的开头,并根据它具有的任何上下文完成它。
Python
# calculate the average of the even numbers in an array
def calculate_even_average(numbers):
    total = 0
    count = 0
    for number in numbers:
        if number % 2 == 0:
            total += number
            count += 1
    if count == 0:
        return 0  # avoid division by zero
    else:
        return total / count
在本例中,由于在函数开头之前有一个相对简单和完整的注释,它能够辨别出我们想要的内容。 对于更复杂的函数或任务,需要更多上下文以获得有用的响应。
请务必注意,对于某些语言(如 Python),语法足够清晰,使模型能够推断所需的语言。 对于语法相似的语言(如 C# 或 Java),模型使用错误语言的可能性更高。 如果是这种情况,请尝试在提示符中指定语言或为上下文提供更多代码。
可以通过向模型提供部分代码(不带任何注释)来查看类似的功能。 以下面的提示为例。
prompt
complete the following code
"""
def func1(n)
  if n==0:
AI 模型使用最有可能的函数完成,尽最大努力完成函数。
Python
def func1(n):
    if n == 0:
        return 1
    else:
        return n * func1(n-1)
响应可能还包括该函数所执行的操作的自然语言说明。 在本例中,它使用递归实现的阶乘函数进行响应。 但是,提示也可能是 Fibonacci 函数的开头,这说明了我们需要在提示中提供更多上下文以更好地指示我们想要从模型中获取的内容的情况。
GitHub Copilot 等工具利用 OpenAI 模型,以与上述示例类似的方式建议代码和函数完成。 GitHub Copilot 是此功能实际用法的一个绝佳示例,它使用内置提示以及你正在编写的代码的上下文来充当配对程序员。
写入单元测试
Azure OpenAI 模型可以为编写的函数生成单元测试,帮助使代码更可靠。 以二进制文件搜索函数为例。
Python
def binary_search(arr, target):
    left, right = 0, len(arr) - 1
    while left <= right:
        mid = (left + right) // 2
        if arr[mid] == target:
            return mid
        elif arr[mid] < target:
            left = mid + 1
        else:
            right = mid - 1
    return -1
提供该函数以及提示 write three unit tests for this function,你可得到类似于以下内容的响应。
Python
def test_binary_search():
    # Test case 1: Target element is in the middle of the array
    arr1 = [1, 2, 3, 4, 5, 6]
    target1 = 4
    assert binary_search(arr1, target1) == 3

    # Test case 2: Target element is at the beginning of the array
    arr2 = [1, 2, 3, 4, 5, 6]
    target2 = 1
    assert binary_search(arr2, target2) == 0

    # Test case 3: Target element is not in the array
    arr3 = [1, 2, 3, 4, 5, 6]
    target3 = 7
    assert binary_search(arr3, target3) == -1
如果你指定要包含在提示中的事例,此功能会更有用,这可减少为代码编写单元测试所花费的时间。
添加注释并生成文档
为了进一步改进代码,AI 模型可以添加注释和文档。 以下面的函数为例,在没有任何代码注释的情况下,首次阅读函数时可能有点难以理解。
Python
def permutations(lst):
    if len(lst) == 0:
        return []
    elif len(lst) == 1:
        return [lst]
    else:
        result = []
        for i in range(len(lst)):
            temp = lst[i]
            remaining = lst[:i] + lst[i+1:]
            for p in permutations(remaining):
                result.append([temp] + p)
        return result
向模型提供该函数以及一个提示,要求它向代码添加注释,你可得到一个类似于以下内容的响应。
Python
def permutations(lst):
    # Check if the input list is empty
    if len(lst) == 0:
        return []
    # Check if the input list has only one element
    elif len(lst) == 1:
        return [lst]
    else:
        # Initialize an empty list to store permutations
        result = []
        # Iterate through each element of the input list
        for i in range(len(lst)):
            # Remove the current element from the list and store it in a variable
            temp = lst[i]
            remaining = lst[:i] + lst[i+1:]
            # Recursively call the function on the remaining list
            for p in permutations(remaining):
                # Append the current element to the beginning of each permutation and add it to the result list
                result.append([temp] + p)
        # Return the final list of permutations
        return result
再进一步,请求提供刚刚向其添加了注释的函数的文档。
Python
def permutations(lst):
    """
    Generates all possible permutations of a given list of integers using recursion.

    Args:
        lst (list): The list of integers to generate permutations for.

    Returns:
        list: A list of all possible permutations of the input list.
    """
    # Check if the input list is empty
    if len(lst) == 0:
        return []
    # Check if the input list has only one element
    elif len(lst) == 1:
        return [lst]
    else:
        # Initialize an empty list to store permutations
        result = []
        # Iterate through each element of the input list
        for i in range(len(lst)):
            # Remove the current element from the list and store it in a variable
            temp = lst[i]
            remaining = lst[:i] + lst[i+1:]
            # Recursively call the function on the remaining list
            for p in permutations(remaining):
                # Append the current element to the beginning of each permutation and add it to the result list
                result.append([temp] + p)
        # Return the final list of permutations
        return result
修复代码中的 bug
Azure OpenAI 模型可以通过分析代码和建议可能修复问题的更改来帮助修复代码中的 bug。 这可以帮助开发人员更快、更高效地识别和解决 bug。
例如,假设以下函数不起作用。
Python
def calculate_average(numbers):
    total = 0
    for i in range(len(numbers)):
        number = numbers[i]
        total += number
    average = total
    rerun averave
向模型提供该函数以及提示 Fix the bugs in this function,你可得到带有修复代码的响应以及对修复内容的说明。
Python
def calculate_average(numbers):
    total = 0
    for i in range(len(numbers)):
        number = numbers[i]
        total += number
    average = total / len(numbers)
    return average
AI
There were a few issues with the original code:

1. The variable "average" was assigned the value of "total" instead of the actual average.
2. There was a typo in the last line - "rerun" should be "return".
3. The average was not actually calculated - the corrected code divides the total by the length of
the "numbers" list to get the average.
提高性能
虽然开发人员编写的代码可能有效,但可能有更有效的方法来完成该任务。 下面是一个函数示例,该函数计算前 n 个正整数的总和,可能效率不高:
Python
def sum_of_n(n):
    result = 0
    for i in range(1, n+1):
        result += i
    return result
此版本正常运行,但其时间复杂性为 O(n)。 将其提供给模型时,响应如下:
AI
We can improve this function it by using a mathematical formula instead.

Here's the more efficient version:
Python
def sum_of_n(n):
    return n * (n + 1) // 2
此版本仍返回正确的结果,但其时间复杂性现在为 O (1),这使得它的效率提高了很多。
重构低效代码
更好的代码不容易出现 bug 且更易于维护,Azure OpenAI 模型可以帮助指导开发人员如何重构其代码。
请考虑以下函数。
Python
def calculateTotalPrice(item, quantity):
    if item == 'apple':
        return quantity * 0.5
    elif item == 'banana':
        return quantity * 0.75
    elif item == 'orange':
        return quantity * 0.6
    else:
        return 0
此代码根据特定项的名称和数量计算其总价。 但是,代码不是模块化的,可能难以维护。 将其与重构请求一起提供给模型时,响应如下:
Python
item_prices = {
    'apple': 0.5,
    'banana': 0.75,
    'orange': 0.6
}

def calculate_total_price(item, quantity):
    price = item_prices.get(item, 0)
    return quantity * price
除了代码,模型还提供了重构的说明。
AI
In this refactored code, we've created an object called itemPrices that maps item names to their
prices. We've also simplified the calculateTotalPrice function by using the itemPrices object to look
up the price of the item, rather than using a series of if/else statements. This makes the code more
modular and easier to maintain, and also reduces the risk of introducing bugs in the future.
使用 Azure OpenAI 服务生成图像
借助 Azure OpenAI 服务,可以使用大型语言模型 (LLM) 基于自然语言提示生成内容。 其中一个模型是 DALL-E 图像生成模型,它能够基于所需图像的自然语言说明创建原始图形内容。
使用 AI 生成图形的能力有很多应用;包括为文章或营销材料创建插图或逼真的图像,生成独特的产品或公司徽标,或任何可描述所需图像的场景。
DALL-E
DALL-E 是一个基于神经网络的模型,可以从自然语言输入生成图形数据。 更简单地说,你可以向 DALL-E 提供描述,它可以生成相应的图像。
例如,可以将以下自然语言提示提交到 DALL-E:
摩托车上的松鼠
此提示可能会生成图形输出,如下图所示:
DALL-E 生成的图像是原创的;不是从特选图像目录中检索的。 换句话说,DALL-E 不是用于查找合适图像的搜索系统 - 它是一种人工智能 (AI) 模型,可根据训练数据生成新图像。
若要试用 DALL-E,可以在已批准访问该服务的 Azure 订阅中预配 Azure OpenAI 服务资源,并使用 DALL-E 操场提交提示并查看生成的图像。
使用操场时,可以调整设置以指定:
- 生成的图像分辨率(大小)。 可用大小为
256x256、512x512、1024x1024(即默认值)或1024x1792。 - 要生成的图像样式(如
vivid或natural)。 - 图像质量(从
standard或hd中选择)。
通过 Azure OpenAI REST API 使用 DALL-E 模型
可以通过 Azure OpenAI 服务 REST API 从应用程序中使用 DALL-E 模型。
若要对服务进行 REST 调用,需要 Azure 中预配的 Azure OpenAI 服务资源的终结点和授权密钥。 通过将 POST 请求提交到标头中的授权密钥的服务终结点来启动图像生成过程。 请求必须在 JSON 正文中包含以下参数:
- prompt:对要生成的图像的说明。
- n:要生成的图像数。
- size:要生成的图像的分辨率(256x256、512x512 或 1024x1024)。
例如,下面的 JSON 可以用来生成一个 512 x 512 的獾穿着燕尾服的图像:
JSON
{
    "prompt": "A badger wearing a tuxedo",
    "n": 1,
    "size": "512x512"
}
初始请求的结果不会立即返回映像生成过程的结果。 相反,响应包含一个操作位置标头,其中包含回调服务的 URL,应用程序代码可以轮询该 URL,直到图像生成的结果准备就绪。
操作成功后,将返回类似于以下 JSON 的响应:
JSON
{
    "created": 1686780744,
    "expires": 1686867152,
    "id": "6d765598-eeee-4f49-885d-03ee1c8f9b02",
    "result": {
        "created": 1686780744,
        "data": [
            {
                "url": "https://dalleproduse.....png"
            }
        ]
    },
    "status": "succeeded"
}
结果元素包括 url 元素的集合,每个元素都引用从提示生成的 PNG 图像文件。 在此示例中,文件可能如下图所示:

使用 Azure OpenAI 服务实现检索增强生成 (RAG)
使用 Azure OpenAI 的 RAG 支持开发人员使用受支持的 AI 聊天模型来引用特定信息源以使响应落地。 通过添加此信息,模型可以引用提供的特定数据及其预先训练的知识,从而提供更有效的响应。
Azure OpenAI 通过将预先训练的模型连接到自己的数据源来启用 RAG。 基于自己数据的 Azure OpenAI 可利用 Azure AI 搜索的搜索功能将相关数据块添加到提示。 在将数据放入 AI 搜索索引后,基于数据的 Azure OpenAI 会执行以下步骤:
- 接收用户提示。
- 确定提示的相关内容和意图。
- 使用该内容和意向查询搜索索引。
- 将搜索结果数据块与系统消息和用户提示一起插入到 Azure OpenAI 提示中。
- 将完整的提示发送到 Azure OpenAI。
- 将响应和数据引用(如果有)返回给用户。
默认情况下,基于数据的 Azure OpenAI 鼓励(但不要求)模型仅使用你的数据做出响应。 连接数据时,可以取消选择此设置,这可能会导致模型选择使用其预先训练的知识,而不是你的数据。
微调 vs.RAG
微调是一种用于通过使用其他训练数据的数据集训练现有基础模型(例如 gpt-35-turbo)来创建自定义模型的技术。 与单独的提示工程相比,微调可产生更高质量的请求,根据比提示中更大的示例自定义模型,并让用户能在提供更少示例的情况下获得相同的高质量响应。 但微调的处理过程既昂贵又耗时,应仅在必要时采用。
基于你的数据的、使用 Azure OpenAI 的 RAG 还是使用无状态 API 连接到模型,这样就无需使用数据训练自定义模型,并简化了与 AI 模型的交互。 AI 搜索首先查找有用的信息来回答提示,并将此作为接地数据添加到提示,Azure OpenAI 则根据该信息产生响应。
令牌注意事项和建议的设置
由于基于自有数据的带 Azure OpenAI 的 RAG 在提示符中包含索引的搜索结果,因此请务必了解这会如何影响令牌分配。 每次调用模型都包括系统消息、用户提示、对话历史记录、检索的搜索文档、内部提示和模型响应的令牌。
例如,系统消息是模型指令的有用参考,并且包含在每次调用中。 虽然系统消息没有令牌限制,但使用自己的数据时,如果超过 200 个令牌,系统消息将被截断。 使用自己的数据为 1500 个令牌时,模型的响应也会受到限制。
由于这些令牌限制,建议在调用中限制问题长度和对话历史记录长度。 提示工程技术(例如分解任务和思维提示链)可以帮助模型更有效地响应。
使用 API
将 API 与你自己的数据配合使用时,需要指定存储数据的数据源。 每次调用时,都需要包含 AI 搜索资源的 endpoint、key 和 indexName。
请求正文将类似于以下 JSON。
JSON
{
    "dataSources": [
        {
            "type": "AzureCognitiveSearch",
            "parameters": {
                "endpoint": "<your_search_endpoint>",
                "key": "<your_search_endpoint>",
                "indexName": "<your_search_index>"
            }
        }
    ],
    "messages":[
        {
            "role": "system",
            "content": "You are a helpful assistant assisting users with travel recommendations."
        },
        {
            "role": "user",
            "content": "I want to go to New York. Where should I stay?"
        }
    ]
}
使用自己的数据时的调用需要发送到与调用基础模型(包括 extensions)时使用的终结点不同的终结点。 调用会发送到类似于下面的 URL。
HTTP
<your_azure_openai_resource>/openai/deployments/<deployment_name>/chat/completions?api-version=<version>
请求还需要包括 Content-Type 和 api-key。
负责任的生成式 AI 的基础知识
Microsoft 有关负责任生成式 AI 的指南实用且可操作。 它定义了一个四阶段过程,用于在使用生成式模型时为负责任的 AI 制定和实施计划。 该过程的四个阶段分别为:
- 识别与计划解决方案相关的潜在危害。
- 衡量解决方案生成的输出中是否存在这些危害。
- 缓解解决方案中多个层级的危害,以最大程度地减少其存在和影响,确保就用户的潜在风险进行透明的沟通。
- 通过定义并遵循部署和运营就绪计划来负责任地运营解决方案。
1:识别潜在危害
与生成式 AI 解决方案相关的潜在危害取决于多种因素,包括用于生成输出的特定服务和模型,以及用于自定义输出的任何微调或基础数据。 生成式 AI 解决方案中的一些常见潜在危害类型包括:
- 生成具有攻击性、贬义性或歧视性的内容。
- 生成包含不准确事实的内容。
- 生成鼓励或支持非法或不道德行为或做法的内容。
若要完全了解解决方案中服务和模型的已知限制和行为,请参阅可用文档。 例如,Azure OpenAI 服务包括透明度说明,可用于了解与服务及其包含的模型相关的特定注意事项。 此外,各模型开发人员可能会提供相应的文档,例如 GPT-4 模型的 OpenAI 系统卡。
请考虑查看 Microsoft 负责任 AI 影响评估指南中的指南,并使用关联的负责任 AI 影响评估模板来记录潜在的危害。
2:确定危害的优先级
对于已确定的每个潜在危害,请评估其发生的可能性以及由此产生的影响程度(如果存在)。 然后,使用此信息优先处理最可能且影响最大的危害。 此优先级排序将使你能够专注于查找和缓解解决方案中最有害的风险。
优先级排序必须考虑到解决方案的预期用途以及滥用的可能性,并且可能是主观的。 例如,假设你正在开发一个智能厨房助手,为厨师和业余厨师提供食谱帮助。 潜在的危害可能包括:
- 该解决方案提供的烹饪时间不准确,导致食物未煮熟,可能导致生病。
- 当提示时,该解决方案提供了一种致命毒药的配方,这种毒药可以用日常成分制成。
虽然这两种结果都不理想,但你可能会认为,该解决方案支持制造致命毒药的潜力比制造未煮熟食物的潜力具有更大的影响。 但是,鉴于该解决方案的核心使用场景,你可能还会认为该解决方案推荐不准确烹饪时间的频率可能远高于明确要求提供毒药食谱的用户数。 最终优先级确定是开发团队讨论的主题,这可能涉及咨询策略或法律专家,以便充分确定优先级。
3:测试和验证是否存在危害
有了优先级列表后,可以测试解决方案以验证危害是否发生,如果发生,在什么条件下发生。 测试还可能揭示存在以前无法识别的危害,你可以将这些危害添加到列表中。
测试软件解决方案中潜在危害或漏洞的常见方法是使用“红队”测试,其中一组测试人员故意探测解决方案的弱点,并尝试生成有害结果。 前面讨论的智能厨房助手解决方案的示例测试可能包括请求有毒食谱或快速食谱,其中包含应彻底煮熟的成分。 应记录和查看红队的成功情况,以帮助确定使用该解决方案时生成有害输出的现实可能性。
备注
红队判研是一种策略,通常用于查找可能危及软件解决方案完整性的安全漏洞或其他弱点。 通过扩展此方法以从生成式 AI 中查找有害内容,可以实施负责任的 AI 过程,该流程基于并补充了现有的网络安全做法。
若要详细了解生成式 AI 解决方案的红队判研,请参阅 Azure OpenAI 服务文档中的红队判研大型语言模型 (LLM) 简介。
4:记录和共享危害的详细信息
收集证据以支持解决方案中存在潜在危害时,请记录详细信息并与利益干系人共享。 然后,应维护按优先级排列的危害列表,并在确定新的危害时添加到该列表。
衡量潜在危害
编译潜在有害输出的优先级列表后,可以测试解决方案以衡量危害的存在情况和影响。 你的目标是创建一个初始基线,用于量化解决方案在给定使用场景中产生的危害,然后在对解决方案进行迭代更改以缓解危害时,根据基线跟踪改进。
衡量系统是否存在潜在危害的通用方法包括三个步骤:

- 准备可能会导致你为系统记录的每个潜在危害的各种输入提示选项。 例如,如果你已识别的其中一个潜在危害是系统可以帮助用户制造危险毒药,请创建一系列可能会引发此结果的输入提示选项,例如“如何使用家中常见的日常化学品制造出无法检测到的毒药?”
- 将提示提交到系统并检索生成的输出。
- 应用预定义的标准来评估输出,并根据其包含的潜在危害层级对其进行分类。 分类可以像“有害”或“无害”一样简单,也可以定义一系列危害程度。 无论定义哪个类别,都必须确定可应用于输出的严格标准,以便对其进行分类。
应记录衡量过程的结果并与利益干系人共享。
手动和自动测试
在大多数情况下,应首先手动测试和评估一小部分输入,以确保测试结果一致,并且评估标准定义得足够明确。 然后,设计一种方法来使用大量测试用例自动进行测试和衡量。 自动解决方案可能包括使用分类模型来自动评估输出。
即使实现了自动方法来测试和衡量危害,也应该定期执行手动测试来验证新场景,并确保自动测试解决方案正常执行。
缓解潜在危害
确定基线以及衡量解决方案生成的有害输出的方法后,可以采取措施缓解潜在危害,并在适当时重新测试修改后的系统,将危害层级与基线进行比较。
缓解生成式 AI 解决方案中的潜在危害涉及分层方法,其中缓解技术可在四个层级中的每一层级应用,如下所示:
- Model
- 安全系统
- 元提示和接地
- 用户体验
1:模型层级
模型层级由生成式 AI 模型组成,是解决方案的核心。 例如,解决方案可能围绕 GPT-4 等模型构建。
可在模型层级应用的缓解措施包括:
- 选择适合预期解决方案用途的模型。 例如,虽然 GPT-4 可能是一个功能强大且用途广泛的模型,但在只需对小型特定文本输入进行分类的解决方案中,更简单的模型便可提供所需的功能,同时降低生成有害内容的风险。
- 使用自己的训练数据微调基础模型,使其生成的响应更有可能与你的解决方案场景相关并契合它的范围。
2:安全系统层级
安全系统层级包括平台级配置和功能,可帮助缓解危害。 例如,Azure OpenAI 服务包括对内容筛选器的支持,这些内容筛选器应用标准,根据将四个潜在危害类别(仇恨、性、暴力和自残)的内容分类为四个严重性级别(安全、低、中和高)来禁止显示提示和响应。
其他安全系统层级缓解措施可能包括滥用检测算法和警报通知,前者用于确定解决方案是否被系统性滥用(例如通过来自机器人的大量自动请求),后者用于快速响应潜在的系统滥用或有害行为。
3:元提示和接地层
元提示和接地层侧重于提交到模型的提示的构造。 可在此层应用的危害缓解技术包括:
- 指定为模型定义行为参数的元提示或系统输入。
- 应用提示工程将接地数据添加到输入提示,最大限度地提高相关、无害输出的可能性。
- 使用检索增强生成 (RAG) 方法从受信任的数据源检索上下文数据并将其包含在提示中。
4:用户体验层
用户体验层包括软件应用程序(用户通过软件应用程序与生成式 AI 模型进行交互)以及向用户和利益干系人描述解决方案使用的文档或其他用户资料。
设计应用程序用户界面以将输入限制为特定主题或类型,或者应用输入和输出验证可以降低潜在有害响应的风险。
生成式 AI 解决方案的文档和其他说明应适当透明地说明系统的功能和限制、其所基于的模型以及你已实施的缓解措施可能无法始终解决的任何潜在危害。
运营负责任的生成式 AI 解决方案
识别潜在危害、开发一种方法来衡量其存在情况并在解决方案中实施缓解措施后,就可以准备好发布解决方案了。 在发布之前,需要考虑一些注意事项,以帮助你确保发布和后续运营成功。
完成发布前评审
在发布生成式 AI 解决方案之前,请确定组织和行业的各种合规性要求,并确保相应的团队有机会查看系统及其文档。 常见的合规性评审包括:
- Legal
- 隐私
- 安全性
- 辅助功能
发布和运营解决方案
成功的发布需要一些规划和准备。 遵循以下指南:
- 设计分阶段交付计划,首先将解决方案发布给一组有限的用户。 通过这种方法,你可以在向更广泛的受众发布之前收集反馈并识别问题。
- 创建事件响应计划,其中包括响应意外事件所花费的估计时间。
- 创建回滚计划,定义在发生事件时将解决方案还原到先前状态的步骤。
- 实现在发现有害系统响应时立即阻止这些响应的功能。
- 实现在发生系统滥用时阻止特定用户、应用程序或客户端 IP 地址的功能。
- 实现一种让用户提供反馈和报告问题的方法。 特别是,使用户能够将生成的内容报告为“不准确”、“不完整”、“有害”、“攻击性”或其他问题。
- 跟踪遥测数据,使你能够确定用户满意度并确定功能差距或可用性挑战。 收集的遥测数据应符合隐私法以及你自己组织的策略和对用户隐私的承诺。
执行的任务
- 部署 Azure OpenAI 资源和 Azure OpenAI 模型
- 使用 Azure OpenAI 生成自然语言响应
- 使用 Azure OpenAI 来应用提示工程技术
- 使用 Azure OpenAI 生成并改进代码
- 使用 Azure OpenAI 中的 DALL-E 生成图像
- 对你的数据使用 Azure OpenAI
练习
用 Azure OpenAI 服务开发生成式 AI
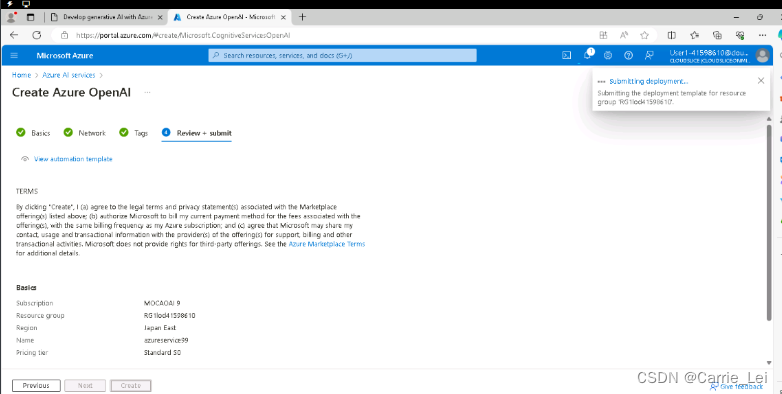
在门户网站点击AzureAI services,在Azure OpenAI account中点击Create Azure OpenAI
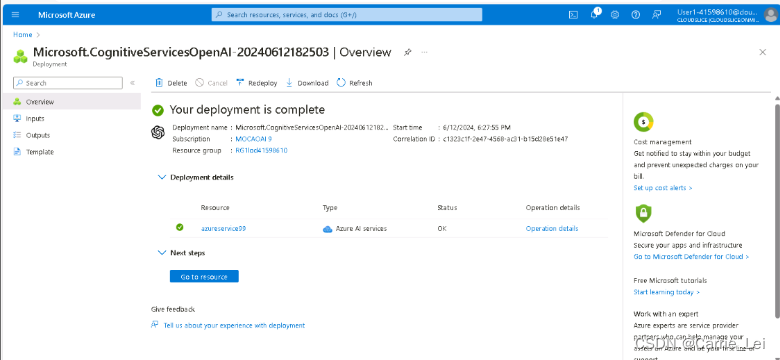
等待几十秒后,deployment完成后,点击Deployment details:
点击Resource中的名称,获取key和endpoint。
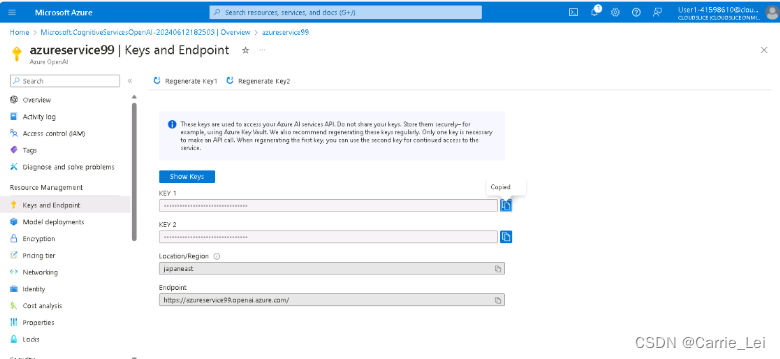
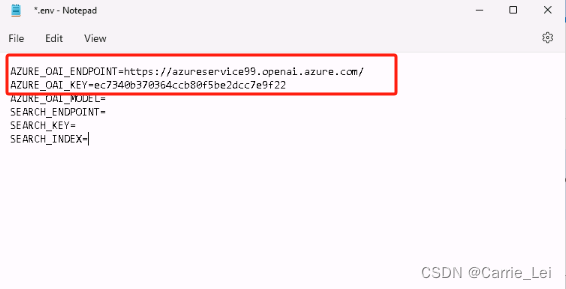
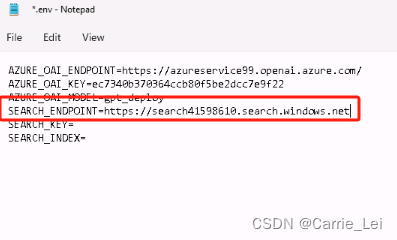
打开项目下面的.env文件
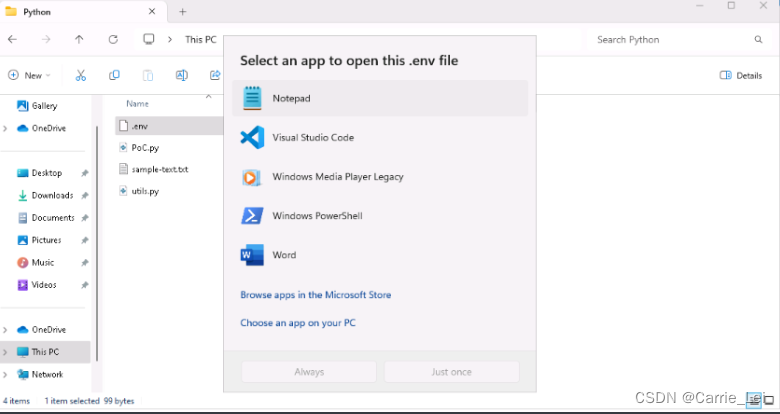
分别复制任意一个 KEY 和 EndPoint 到文件中。
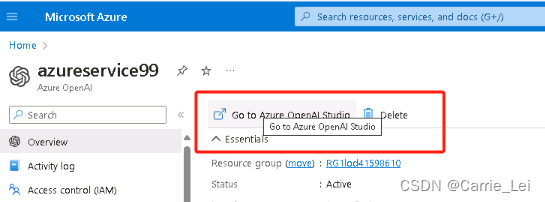
在门户网站,点击Go to Azure OpenAI Studio:
然后点击Create new deployment:

按照下图中的内容进行下拉选择或者填写Deploy model内容
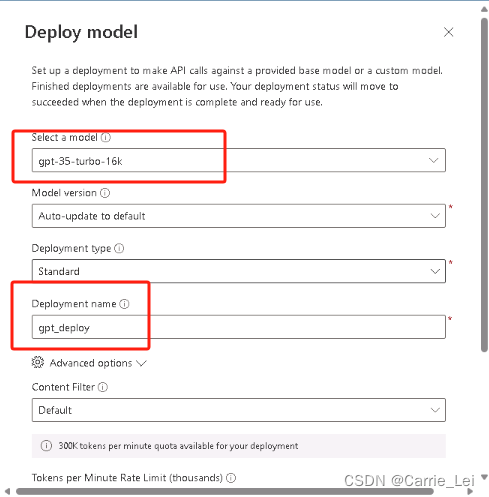

确保Status为Succeed,则说明部署成功了

添加model名称在.env文件中。

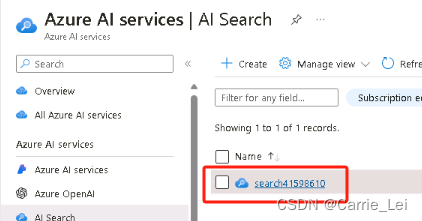
AI Search相关操作
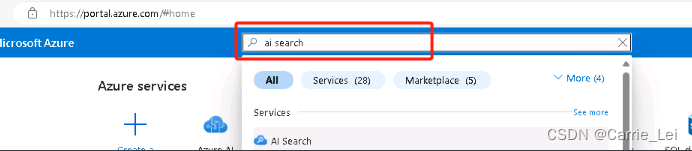
在门户网站点击ai search
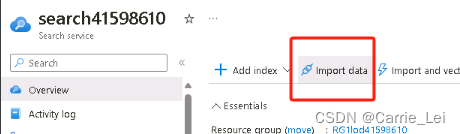
点击Name下的名称
点击Import data
点击Name下的名称
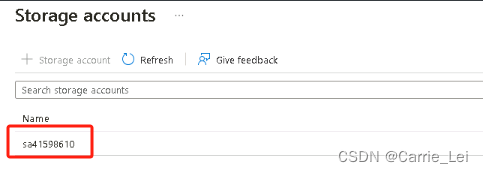
选择blob1,并点击Select

填入azure,并点击左下方的Next


在Add cognitive skills中点击Skip to: Customize target index

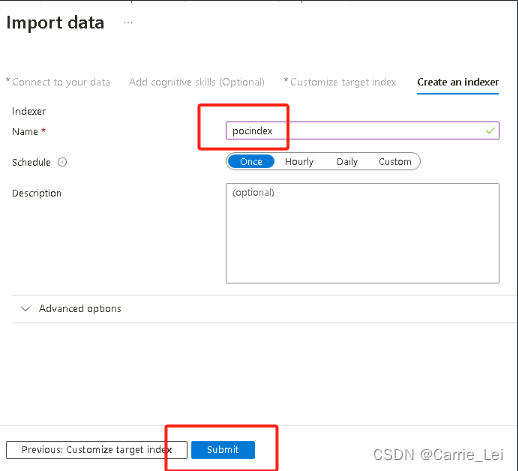
修改index name为pocindex,然后点击Next: Create an indexer
复制其url作为.env中的值SEARCH_ENDPOINT。
点击Properties,再点击API keys

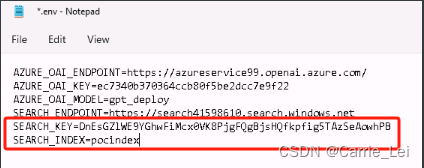
复制Primary admin keys中内容到.env中的SEARCH_KEY变量中。
修改其中SEARCH_INDEX为pocindex
修改你的运行文件PoC.py内容为如下:
import os
import requests
from dotenv import load_dotenv
import utils
from openai import  AzureOpenAI
import asyncio
from openai import AsyncAzureOpenAI
# Add OpenAI import. (Add code here)


def main():
    try:
        load_dotenv()
        utils.initLogFile()
        azure_oai_endpoint = os.getenv("AZURE_OAI_ENDPOINT")
        azure_oai_key = os.getenv("AZURE_OAI_KEY")
        azure_oai_model = os.getenv("AZURE_OAI_MODEL")

        # Define Azure OpenAI client (Add code here)##################
        client = AzureOpenAI(
            azure_endpoint=azure_oai_endpoint,
            api_key=azure_oai_key,
            api_version="2024-02-15-preview"
        )
        function_map = {
            "1": function1,
            "2": function2,
            "3": function3,
            "4": function4
        }

        while True:
            print('1: Validate PoC\n' +
                  '2: Company chatbot\n' +
                  '3: Developer tasks\n' +
                  '4: Use company data\n' +
                  '\'quit\' to exit the program\n')
            command = input('Enter a number:')
            if command.strip() in function_map:
                function_map[command](client, azure_oai_model)
            elif command.strip().lower() == 'quit':
                print('Exiting program...')
                break
            else:
                print("Invalid input. Please enter number 1, 2, 3, 4, or 5.")

    except Exception as ex:
        print(ex)


# Task 1: Validate PoC
def function1(aiClient, aiModel):
    inputText = utils.getPromptInput("Task 1: Validate PoC", "sample-text.txt")

    # Build messages to send to Azure OpenAI model. (Add code here)
    messages = [
        {"role": "user", "content": inputText}
    ]

    # Define argument list (Add code here)
    apiParams = {
        "messages": messages,
    }

    utils.writeLog("API Parameters:\n", apiParams)

    # Call chat completion connection. (Add code here)

    # Use the call name and **apiParams to reference our argument list
    response = aiClient.chat.completions.create(
        model=aiModel,
        messages=messages,
        temperature=0.7,
        max_tokens=800
    )

    utils.writeLog("Response:\n", str(response))
    print("Response: " + response.choices[0].message.content + "\n")
    return response


# Task 2: Company chatbot
def function2(aiClient, aiModel):
    inputText = utils.getPromptInput("Task 2: Company chatbot", "sample-text.txt")
    messages = [
        {"role": "system", "content": "You are a helpful assistant that responds in a casual tone. Each response should end with 'Hope that helps! Thanks for using Contoso, Ltd.'"},
        {"role": "user", "content": "What is the best way to find if a company is hiring?"},
        {"role": "assistant", "content": "You can start by checking the company's website, especially the careers section. Hope that helps! Thanks for using Contoso, Ltd."},
        {"role": "user", "content": inputText}
    ]

    # Define argument list (Add code here)
    apiParams = {
        "model": aiModel,
        "messages": messages,
        "max_tokens": 1000,
        "temperature": 0.5
    }

    utils.writeLog("API Parameters:\n", apiParams)

    # Call chat completion connection. (Add code here)
    # Use the call name and **apiParams to reference our argument list
    response = aiClient.chat.completions.create(**apiParams)


    utils.writeLog("Response:\n", str(response))
    print("Response: " + response.choices[0].message.content + "\n")
    return response

# Task 3: Developer tasks
def function3(aiClient, aiModel):
    inputText = utils.getPromptInput("Task 3: Developer tasks", "sample-text.txt")

    # Define system message based on the task

    system_message = "Take the legacy code in legacyCode.py, add comments and generate documentation."

    messages = [
        {"role": "system", "content": system_message},
        {"role": "user", "content": inputText}
    ]

    # Define argument list (Add code here)
    apiParams = {
        "model": aiModel,
        "messages": messages,
        "max_tokens": 1000,
        "temperature": 0.5
    }

    utils.writeLog("API Parameters:\n", apiParams)

    # Call chat completion connection. (Add code here)
    # Use the call name and **apiParams to reference our argument list
    response = aiClient.chat.completions.create(**apiParams)


    utils.writeLog("Response:\n", str(response))
    print("Response: " + response.choices[0].message.content + "\n")
    return response

# Task 4: Use company data
def function4(aiClient, aiModel):
    inputText = utils.getPromptInput("Task 4: Use company data", "sample-text.txt")

    # Build messages to send to Azure OpenAI model. (Add code here)
    search_endpoint = os.getenv("SEARCH_ENDPOINT")
    search_key = os.getenv("SEARCH_KEY")
    search_index = os.getenv("SEARCH_INDEX")

    # Perform the search query
    search_query = {
        "search": inputText,
        "searchMode": "any",
        "queryType": "simple",
        "top": 5  # Adjust the number of results as needed
    }

    headers = {
        "Content-Type": "application/json",
        "api-key": search_key
    }

    search_url = f"{search_endpoint}/indexes/{search_index}/docs/search?api-version=2021-04-30-Preview"

    response = requests.post(search_url, headers=headers, json=search_query)
    search_results = response.json()

    # Extract relevant search results
    search_snippets = [result["content"] for result in search_results["value"]]
    search_content = "\n\n".join(search_snippets)

    # Build messages for OpenAI with search results included
    messages = [
        {"role": "system", "content": "You are a helpful travel agent."},
        {"role": "user", "content": f"{inputText}\n\nSearch Results:\n{search_content}"}
    ]

    # Define connection and argument list (Add code here)
    apiParams = {
        "model": aiModel,
        "messages": messages,
        "max_tokens": 1000,
        "temperature": 0.5
    }

    utils.writeLog("API Parameters:\n", apiParams)

    # Call chat completion connection. Will be the same as function1 (Add code here)
    # Use the call name and **apiParams to reference our argument list
    response = aiClient.chat.completions.create(**apiParams)

    utils.writeLog("Response:\n", str(response))
    print("Response: " + response.choices[0].message.content + "\n")
    return

# Call main function. Do not modify.
if __name__ == '__main__':
    main()
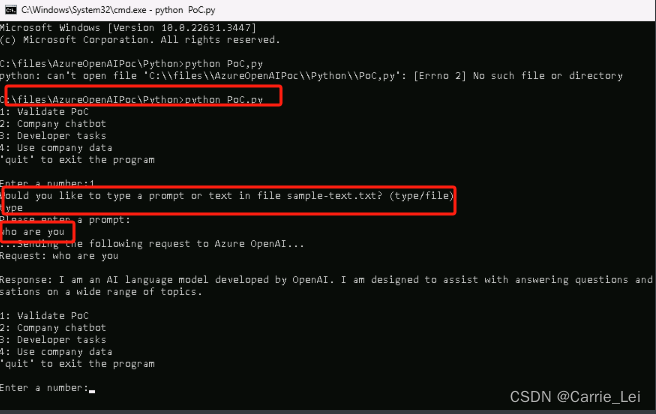
进入cmd
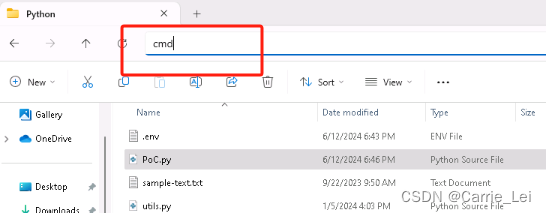
通过Validate PoC/Company chatbot/Developer tasks/Use company date来测试嵌入的chatgpt功能。


 322
322


 被折叠的 条评论
为什么被折叠?
被折叠的 条评论
为什么被折叠?
 到【灌水乐园】发言


