


Qt5 学习之路及嵌入式开发教程18:Qt5主窗口---字体字号状态栏
这次任务要完成Qt5主窗口的界面设计第五部分:字体字号状态栏功能实现
无法用控件完成,只能用代码完成。
步骤:
1、在mainwidow.h中添加代码
#include <QSpinBox>
#include <QFontComboBox>
在类定义内:
private:
    QLabel           *fLabCurFile;
    QProgressBar     *progressBar1;
    QSpinBox         *spinFontSize;
    QFontComboBox    *comboFont;

    void             iniUI();
添加槽函数:
private slots:
    void on_spinBoxFontSize_valueChanged(int aFontSize);
    void on_comboFont_currentIndexChanged(const QString &arg1);
2、在mainwindow.cpp中变量初始化、功能实现
变量和函数初始化:
void MainWindow::iniUI()
{
    fLabCurFile = new QLabel;
    fLabCurFile->setMinimumWidth(150);
    fLabCurFile->setText("当前文件:");
    ui->statusBar->addWidget(fLabCurFile);

    progressBar1 = new QProgressBar;
    progressBar1->setMaximumWidth(200);
    progressBar1->setMinimum(5);
    progressBar1->setMaximum(50);
    progressBar1->setValue(ui->textEdit->font().pointSize());
    ui->statusBar->addWidget(progressBar1);

    spinFontSize = new QSpinBox;
    spinFontSize->setMinimum(5);
    spinFontSize->setMaximum(50);
    spinFontSize->setValue(ui->textEdit->font().pointSize());
    spinFontSize->setMinimumWidth(50);
    ui->toolBar->addSeparator();

    QLabel   *lb_1 = new QLabel("字号 ");
    QFont ft("Microsoft YaHei", 11);
    lb_1->setFont(ft);
    ui->toolBar->addWidget(lb_1);
    ui->toolBar->addWidget(spinFontSize);

    ui->toolBar->addSeparator();

    QLabel   *lb_2 = new QLabel(" 字体  ");
    QFont ft2("Microsoft YaHei", 11);
    lb_2->setFont(ft2);
    ui->toolBar->addWidget(lb_2);
    comboFont = new QFontComboBox;
    comboFont->setMinimumWidth(100);
    ui->toolBar->addWidget(comboFont);

    setCentralWidget(ui->textEdit);
}
在ui->setupUi(this);下一行添加
iniUI();
槽函数:
connect(spinFontSize,SIGNAL(valueChanged(int)),this,SLOT(on_spinBoxFontSize_valueChanged(int)));


connect(comboFont,SIGNAL(currentIndexChanged(QString)),this,SLOT(on_comboFont_currentIndexChanged(QString)));
功能实现:
void MainWindow::on_spinBoxFontSize_valueChanged(int aFontSize)
{
    QTextCharFormat     fmt;
    fmt.setFontPointSize(aFontSize);
    ui->textEdit->mergeCurrentCharFormat(fmt);
    progressBar1->setValue(aFontSize);
}

void MainWindow::on_comboFont_currentIndexChanged(const QString &arg1)
{
    QTextCharFormat     fmt;
    fmt.setFontFamily(arg1);
    ui->textEdit->mergeCurrentCharFormat(fmt);
}
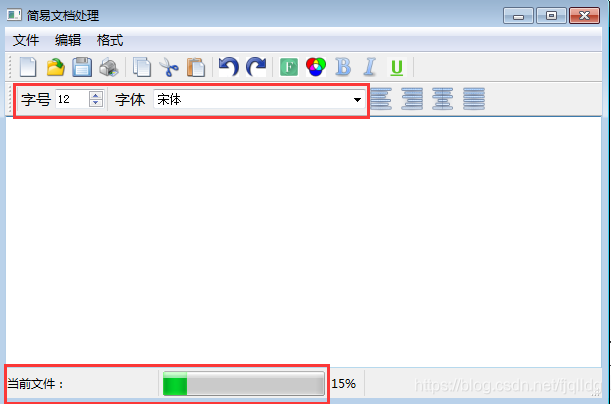
3、运行结果:
添加格式刷部分
定义变量及函数部分
1、在头文件中添加
    //格式刷初始化
    void initalFormatBrush();

    //重写事件过滤器,实现点击松开改格式
    bool eventFilter(QObject* obj,QEvent* e);
2、定义格式刷变量
private:

    QAction         *actionFormatBursh; //格式刷


    QTextCharFormat brushCharFormat;    //格式刷储存的字体
3、定义槽函数
private slots:
    //格式刷
    void showFormatBrush();
初始化及函数实现部分
1、构建函数内
    //注册ui->textEdit 事件过滤器  如果要监听QTextEdit 控件的鼠标事件,在
    //ui->textEdit->installEventFilter(this);
    ui->textEdit->viewport()->installEventFilter(this);


    //格式刷初始化
    initalFormatBrush();
2、功能部分
/************格式初始化****************/
void MainWindow::initalFormatBrush()
{
    //设置分割线
    ui->toolBar_2->addSeparator();
    //格式刷
    actionFormatBursh=new QAction(QIcon(":/formatBrush.png"),"格式刷");
    ui->toolBar_2->addAction(actionFormatBursh);

    connect(actionFormatBursh,&QAction::triggered,this,&MainWindow::showFormatBrush);
}
//重写事件过滤器,实现点击松开改格式
bool MainWindow::eventFilter(QObject *obj, QEvent *e)
{
if(obj==ui->textEdit->viewport()){
if(actionFormatBursh->isCheckable()){
//触发格式效果
//鼠标点击,获取该光标处字体信息
if(e->type()==QEvent::MouseButtonPress){
//qDebug()<<"按下";
QMouseEvent* ev=static_cast<QMouseEvent*>(e);
if(ev->button()==Qt::LeftButton){
QTextCursor textCursor=ui->textEdit->textCursor();
this->brushCharFormat = textCursor.charFormat();
//qDebug()<<this->brushCharFormat.fontPointSize();
}
}
//鼠标释放更改字体
if(e->type()==QEvent::MouseButtonRelease){
//qDebug()<<this->brushCharFormat.fontPointSize();
//qDebug()<<"释放";
QMouseEvent* ev=static_cast<QMouseEvent*>(e);
if(ev->button()==Qt::LeftButton){
ui->textEdit->setCurrentCharFormat(brushCharFormat);
showFormatBrush();
}
}
}
}
return QObject::eventFilter(obj,e);
}void MainWindow::showFormatBrush()
{
if(!actionFormatBursh->isCheckable()){
actionFormatBursh->setCheckable(true);
actionFormatBursh->setChecked(true);
QCursor cursor;
QPixmap pixmap(":/cursorBrush.png");
QSize picSize(26,26);
QPixmap scaledPixmap = pixmap.scaled(picSize, Qt::KeepAspectRatio);//按比例缩放
cursor=QCursor(scaledPixmap);
ui->textEdit->viewport()->setCursor(cursor);
}else{
actionFormatBursh->setCheckable(false);
actionFormatBursh->setChecked(false);
ui->textEdit->viewport()->setCursor(QCursor(Qt::ArrowCursor));
}
}功能演示:


 1170
1170


 被折叠的 条评论
为什么被折叠?
被折叠的 条评论
为什么被折叠?
 到【灌水乐园】发言


