


1 启动 VNC 服务 vncserver
2 查看服务是否已经启动 ps -ef | grep vnc4
VNC远程桌面到linux,提示connection refused(10061)解决办法
- 确认server端的VNC服务开启,service vncserver start,检测状态时ok的
- 使用vncserver命令,确认vnc服务已经启动
- ps -ef | grep vnc,来查看不是已经开启多个vnc连接。
- 如果有多个vnc连接,使用vncserver kill :x(x为连接的序号)来结束掉已经开启的vnc连接
- 在客户端上重新用客户端连接主机,在ip后面接上端口号
Linux上VNC 启动和关闭 ( 解决 Ubuntu16.04 sncserver连接出现Timed out waiting for a response from the computer)
整体思路:
查看vncserver端口 是否开启
(手动kill vncserver进程有坑~~~,有时再次开启时 需要一些额外操作,解决办法在2中,)
0, 重设密码
root@ubuntu:~# vncpasswd
Password:
Verify:
root@ubuntu:~#
1,启动和kill vncserver
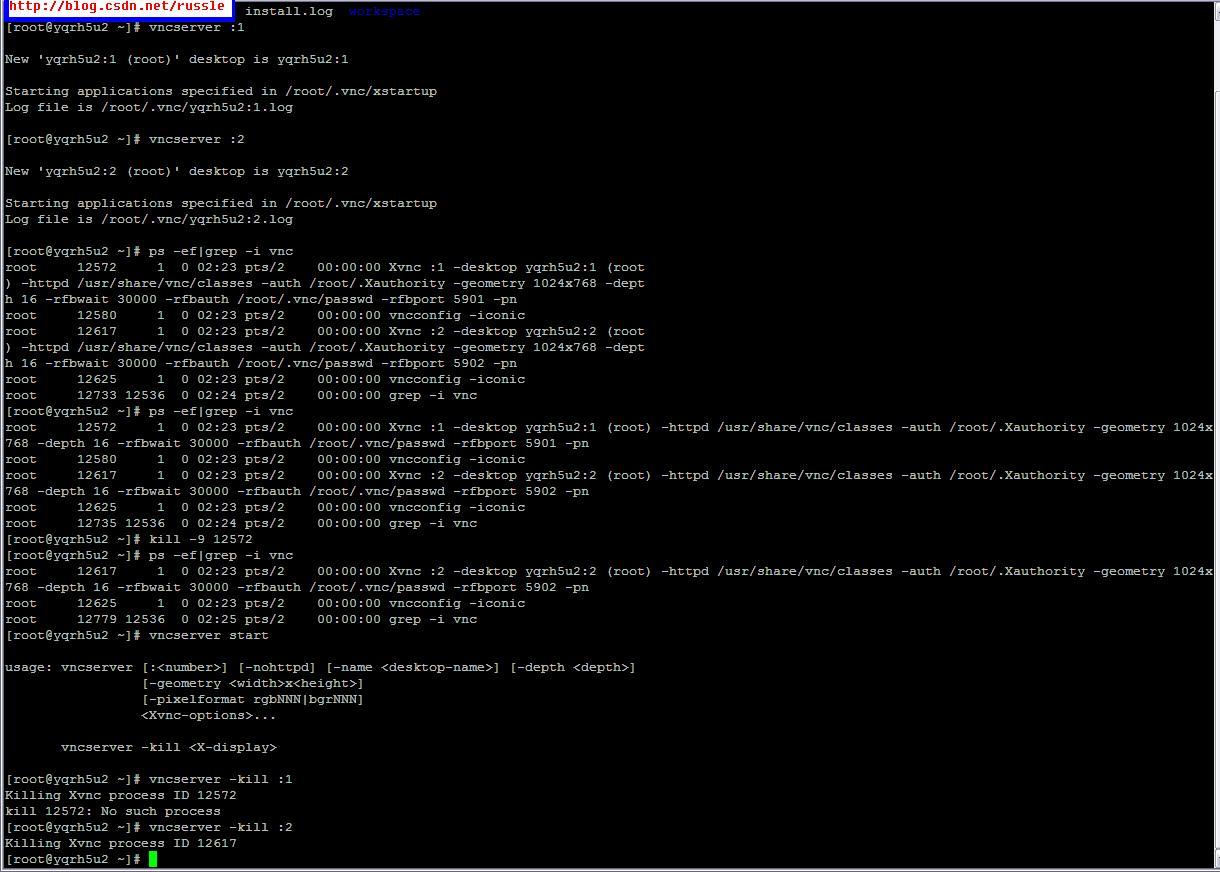
[root@yqrh5u2 ~]# vncserver :1
New 'yqrh5u2:1 (root)' desktop is yqrh5u2:1
Starting applications specified in /root/.vnc/xstartup
Log file is /root/.vnc/yqrh5u2:1.log
[root@yqrh5u2 ~]# vncserver :2
New 'yqrh5u2:2 (root)' desktop is yqrh5u2:2
Starting applications specified in /root/.vnc/xstartup
Log file is /root/.vnc/yqrh5u2:2.log
启动时设置分辨率:root@ubuntu:~# vncserver :1 -geometry 1920x1080
[root@yqrh5u2 ~]# ps -ef|grep -i vnc
root 12572 1 0 02:23 pts/2 00:00:00 Xvnc :1 -desktop yqrh5u2:1 (root) -httpd /usr/share/vnc/classes -auth /root/.Xauthority -geometry 1024x768 -depth 16 -rfbwait 30000 -rfbauth /root/.vnc/passwd -rfbport 5901 -pn
root 12580 1 0 02:23 pts/2 00:00:00 vncconfig -iconic
root 12617 1 0 02:23 pts/2 00:00:00 Xvnc :2 -desktop yqrh5u2:2 (root) -httpd /usr/share/vnc/classes -auth /root/.Xauthority -geometry 1024x768 -depth 16 -rfbwait 30000 -rfbauth /root/.vnc/passwd -rfbport 5902 -pn
root 12625 1 0 02:23 pts/2 00:00:00 vncconfig -iconic
root 12735 12536 0 02:24 pts/2 00:00:00 grep -i vnc
手动kill :1, :1的pid是12572,并验证:1确实已经被kill
[root@yqrh5u2 ~]# kill -9 12572
[root@yqrh5u2 ~]# ps -ef|grep -i vnc
root 12617 1 0 02:23 pts/2 00:00:00 Xvnc :2 -desktop yqrh5u2:2 (root) -httpd /usr/share/vnc/classes -auth /root/.Xauthority -geometry 1024x768 -depth 16 -rfbwait 30000 -rfbauth /root/.vnc/passwd -rfbport 5902 -pn
root 12625 1 0 02:23 pts/2 00:00:00 vncconfig -iconic
root 12779 12536 0 02:25 pts/2 00:00:00 grep -i vnc
通过vncserver kill :1,:2,这是最好的方法,推荐使用
[root@yqrh5u2 ~]# vncserver -kill :1
Killing Xvnc process ID 12572
kill 12572: No such process
[root@yqrh5u2 ~]# vncserver -kill :2
Killing Xvnc process ID 12617
[root@yqrh5u2 ~]# ls /root/.vnc/
passwd xstartup yqrh5u2:1.log yqrh5u2:2.log
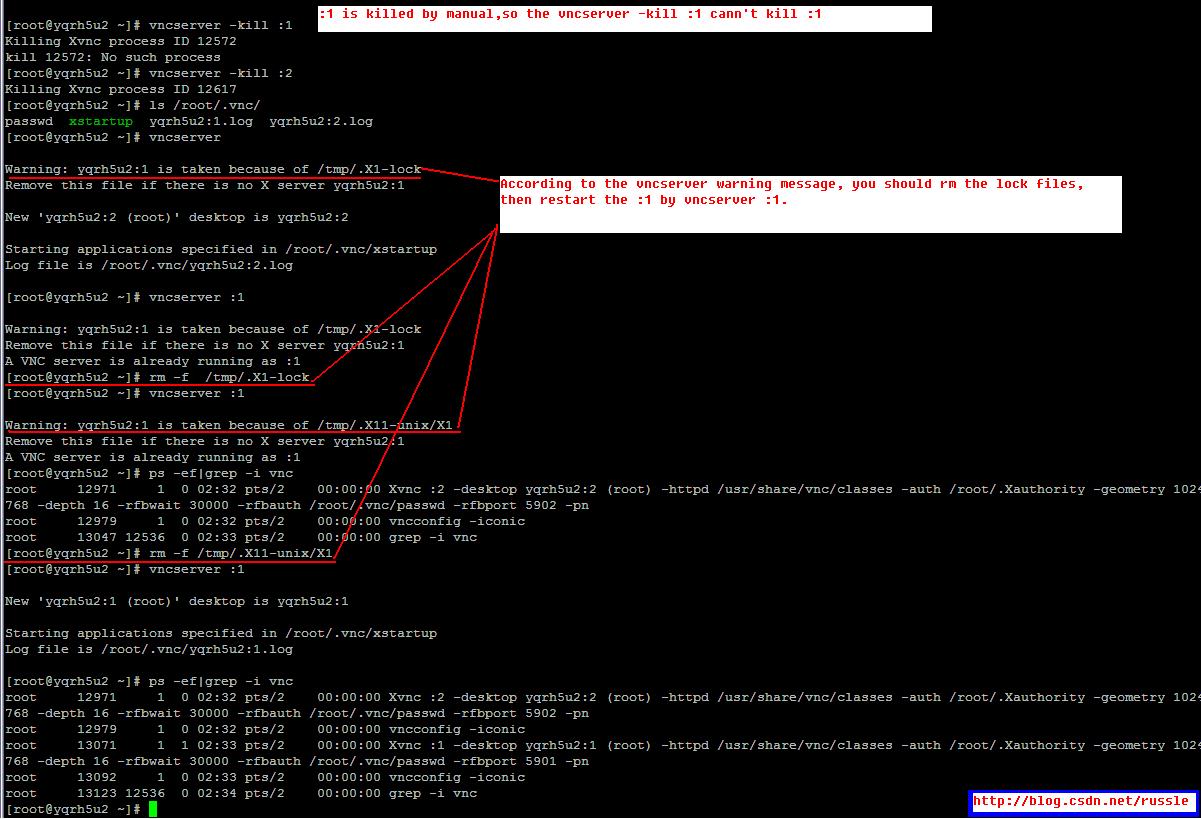
2,重新启动一个手动kill的vncserver,
因为是手动自己删除的,所以要再删除一下被lock的文件,才可以重新启动,如图所示
[root@yqrh5u2 ~]# vncserver
Warning: yqrh5u2:1 is taken because of /tmp/.X1-lock
Remove this file if there is no X server yqrh5u2:1
New 'yqrh5u2:2 (root)' desktop is yqrh5u2:2
Starting applications specified in /root/.vnc/xstartup
Log file is /root/.vnc/yqrh5u2:2.log
[root@yqrh5u2 ~]# vncserver :1
Warning: yqrh5u2:1 is taken because of /tmp/.X1-lock
Remove this file if there is no X server yqrh5u2:1
A VNC server is already running as :1
[root@yqrh5u2 ~]# rm -f /tmp/.X1-lock
[root@yqrh5u2 ~]# vncserver :1
Warning: yqrh5u2:1 is taken because of /tmp/.X11-unix/X1
Remove this file if there is no X server yqrh5u2:1
A VNC server is already running as :1
[root@yqrh5u2 ~]# ps -ef|grep -i vnc
root 12971 1 0 02:32 pts/2 00:00:00 Xvnc :2 -desktop yqrh5u2:2 (root) -httpd /usr/share/vnc/classes -auth /root/.Xauthority -geometry 1024x768 -depth 16 -rfbwait 30000 -rfbauth /root/.vnc/passwd -rfbport 5902 -pn
root 12979 1 0 02:32 pts/2 00:00:00 vncconfig -iconic
root 13047 12536 0 02:33 pts/2 00:00:00 grep -i vnc
[root@yqrh5u2 ~]# rm -f /tmp/.X11-unix/X1
[root@yqrh5u2 ~]# vncserver :1
New 'yqrh5u2:1 (root)' desktop is yqrh5u2:1
Starting applications specified in /root/.vnc/xstartup
Log file is /root/.vnc/yqrh5u2:1.log
[root@yqrh5u2 ~]# ps -ef|grep -i vnc
root 12971 1 0 02:32 pts/2 00:00:00 Xvnc :2 -desktop yqrh5u2:2 (root) -httpd /usr/share/vnc/classes -auth /root/.Xauthority -geometry 1024x768 -depth 16 -rfbwait 30000 -rfbauth /root/.vnc/passwd -rfbport 5902 -pn
root 12979 1 0 02:32 pts/2 00:00:00 vncconfig -iconic
root 13071 1 1 02:33 pts/2 00:00:00 Xvnc :1 -desktop yqrh5u2:1 (root) -httpd /usr/share/vnc/classes -auth /root/.Xauthority -geometry 1024x768 -depth 16 -rfbwait 30000 -rfbauth /root/.vnc/passwd -rfbport 5901 -pn
root 13092 1 0 02:33 pts/2 00:00:00 vncconfig -iconic
root 13123 12536 0 02:34 pts/2 00:00:00 grep -i vnc
[root@yqrh5u2 ~]#
https://blog.csdn.net/frank_ldw/article/details/84819343
ubuntu系统下配置VNC服务操作步骤(VNCserver)
VNC:VNC (Virtual Network Console)是虚拟网络控制台的缩写。它 是一款优秀的远程控制工具软件,由著名的 AT&T 的欧洲研究实验室开发的。VNC 是在基于 UNIX 和 Linux 操作系统的免费的开源软件,远程控制能力强大,高效实用,其性能可以和 Windows 和 MAC 中的任何远程控制软件媲美。 在 Linux 中,VNC 包括以下四个命令:vncserver,vncviewer,vncpasswd,和 vncconnect。大多数情况下用户只需要其中的两个命令:vncserver 和 vncviewer。
百度百科:https://baike.baidu.com/item/VNC/2906305?fr=aladdin
步骤:
-
使用apt-cache search vncserver命令搜索可以用来安装vncserver的软件包,这里选用vnc4server安装vnc
-
使用apt-get install vnc4server命令安装vncserver,输入y并回车
-
输入vncserver,初次启动的时候需要设置初始密码
-
会在root根目录下面生成配置文件/root/.vnc/xstartup,编辑该配置文件
vi /root/.vnc/xstartup
-
替换为如下内容(step4 全部替换)
#!/bin/sh
export XKL_XMODMAP_DISABLE=1
unset SESSION_MANAGER
unset DBUS_SESSION_BUS_ADDRESS
gnome-panel &
gnome-settings-daemon &
metacity &
nautilus &
gnome-terminal &
-
安装gnome
apt-get install gnome-panel gnome-settings-daemon metacity nautilus gnome-terminal
-
重启ubuntu操作系统,启动vncserver服务,用ip:5901输入密码就能进行访问了
-
vncserver服务启动command:vncserver
-
在vncclient端输入IP:5901连接就行了


 3725
3725

 被折叠的 条评论
为什么被折叠?
被折叠的 条评论
为什么被折叠?
 到【灌水乐园】发言


