


准备工作
-
IP规划
共需6台服务器,3master+2node+1client
○ 10.x.x.110 k8s-master1
○ 10.x.x.111 k8s-master2
○ 10.x.x.112 k8s-master3
○ 10.x.x.113 k8s-node1
○ 10.x.x.114 k8s-node2
○ 10.x.x.115 k8s-client
10.5.6.120 k8s-master 这个是master的vip -
修改主机名(所有节点)
hostnamectl set-hostname <hostname> 如:hostnamectl set-hostname k8s-master1 -
修改hosts文件
cat << EOF >> /etc/hosts复制粘贴以下内容
10.x.x.110 k8s-master1 10.x.x.111 k8s-master2 10.x.x.112 k8s-master3 10.x.x.113 k8s-node1 10.x.x.114 k8s-node2 10.x.x.115 k8s-client EOF -
安装常用基础包vim,wget,yum-utils,device-mapper-persistent-data,lvm2,bash-completion
yum install -y vim wget yum-utils device-mapper-persistent-data lvm2 bash-completion source /etc/profile.d/bash_completion.sh -
关闭防火墙
systemctl stop firewalld systemctl disable firewalld -
将SELINUX=enforcing修改成SELINUX=disabled
setenforce 0 sed -i 's/SELINUX=.*/SELINUX=disabled/g' /etc/selinux/config -
关闭swap文件
swapoff -a sed -i.bak '/swap/s/^/#/' /etc/fstab -
免密登陆
-
在第一个节点执行:
ssh-keygen -t rsa回车回车到结束
-
秘钥同步至其他节点
ssh-copy-id -i /root/.ssh/id_rsa.pub root@<其他节点> -
免密登陆测试
第一个节点执行
ssh <其他节点的ip>
ssh <其他节点的hostname>
-
安装docker(所有节点)
方法略
安装keepalived(3台master节点)
-
安装
yum -y install keepalived -
修改配置文件
配置文件路径:/etc/keepalived/keepalived.conf
master1配置文件内容:! Configuration File for keepalived global_defs { router_id master1 } vrrp_instance VI_1 { state MASTER interface ens160 virtual_router_id 51 priority 102 advert_int 1 authentication { auth_type PASS auth_pass 1111 } virtual_ipaddress { 10.5.6.120 } }master2配置文件内容:
! Configuration File for keepalived
global_defs {
   router_id master2
}
vrrp_instance VI_1 {
    state BACKUP
    interface ens160
    virtual_router_id 51
    priority 101
    advert_int 1
    authentication {
        auth_type PASS
        auth_pass 1111
    }
    virtual_ipaddress {
        10.5.6.120
    }
}
master3配置文件内容:
! Configuration File for keepalived global_defs { router_id master3 } vrrp_instance VI_1 { state BACKUP interface ens160 virtual_router_id 51 priority 100 advert_int 1 authentication { auth_type PASS auth_pass 1111 } virtual_ipaddress { 10.5.6.120 } }- 然后启动并开机自启动keepalived
service keepalived start && systemctl enable keepalived - 查看vip是否生效
ip a
- 然后启动并开机自启动keepalived
k8s安装前的准备工作(所有节点)
-
内核参数修改
cat <<EOF > /etc/sysctl.d/k8s.conf复制粘贴以下内容:
net.bridge.bridge-nf-call-ip6tables = 1
net.bridge.bridge-nf-call-iptables = 1
EOF
然后执行:
sysctl -p /etc/sysctl.d/k8s.conf -
修改Cgroup Driver
说明:修改cgroupdriver是为了消除告警:[WARNING IsDockerSystemdCheck]: detected "cgroupfs" as the Docker cgroup driver. The recommended driver is "systemd". Please follow the guide at https://kubernetes.io/docs/setup/cri/ -
新增"exec-opts": [“native.cgroupdriver=systemd”]
vim /etc/docker/daemon.json内容如下:
{ "registry-mirrors": ["https://v16stybc.mirror.aliyuncs.com"], "exec-opts": ["native.cgroupdriver=systemd"] } -
重新加载docker
systemctl daemon-reload && systemctl restart docker -
设置kubernetes源
还是因为中国特色网络,官方仓库无法使用,我们需要使用阿里源的仓库:cat <<EOF > /etc/yum.repos.d/kubernetes.repo复制粘贴以下内容:
[kubernetes]
name=Kubernetes
baseurl=https://mirrors.aliyun.com/kubernetes/yum/repos/kubernetes-el7-x86_64/
enabled=1
gpgcheck=1
repo_gpgcheck=1
gpgkey=https://mirrors.aliyun.com/kubernetes/yum/doc/yum-key.gpg https://mirrors.aliyun.com/kubernetes/yum/doc/rpm-package-key.gpg
EOF
然后,执行:
yum clean all && yum -y makecache
安装k8s(所有节点)
-
安装k8s组件
查看一下版本:yum list kubelet --showduplicates | sort -r安装
yum install -y kubelet-1.16.4 kubeadm-1.16.4 kubectl-1.16.4 -
启动kubelet并设置开机启动
systemctl enable kubelet && systemctl start kubelet -
kubelet命令补全
echo "source <(kubectl completion bash)" >> ~/.bash_profile source .bash_profile -
编辑下载镜像的脚本
vi image.sh
内容如下:#!/bin/bash url=registry.cn-hangzhou.aliyuncs.com/loong576 version=v1.16.4 images=(`kubeadm config images list --kubernetes-version=$version|awk -F '/' '{print $2}'`) for imagename in ${images[@]} ; do docker pull $url/$imagename docker tag $url/$imagename k8s.gcr.io/$imagename docker rmi -f $url/$imagename done -
执行脚本image.sh
chmod u+x image.sh
./image.sh
初始化Master(仅在master1节点执行)
-
创建kubeadm-config.yaml文件
内容如下:apiVersion: kubeadm.k8s.io/v1beta2 kind: ClusterConfiguration kubernetesVersion: v1.16.4 apiServer: certSANs: #填写所有kube-apiserver节点的hostname、IP、VIP - k8s-master1 - k8s-master2 - k8s-master3 - k8s-node1 - k8s-node2 - 10.x.x.110 - 10.x.x.111 - 10.x.x.112 - 10.x.x.113 - 10.x.x.114 - 10.x.x.120 controlPlaneEndpoint: "10.5.6.120:6443" networking: podSubnet: "10.244.0.0/16" -
初始化
kubeadm init --config=kubeadm-config.yaml执行后,会显示以下内容:(只截取最后的一部分)
	[bootstrap-token] configured RBAC rules to allow the csrapprover controller automatically approve CSRs from a Node Bootstrap Token
	[bootstrap-token] configured RBAC rules to allow certificate rotation for all node client certificates in the cluster
	[bootstrap-token] Creating the "cluster-info" ConfigMap in the "kube-public" namespace
	[addons] Applied essential addon: CoreDNS
	[addons] Applied essential addon: kube-proxy

	Your Kubernetes control-plane has initialized successfully!

	To start using your cluster, you need to run the following as a regular user:

	  mkdir -p $HOME/.kube
	  sudo cp -i /etc/kubernetes/admin.conf $HOME/.kube/config
	  sudo chown $(id -u):$(id -g) $HOME/.kube/config

	You should now deploy a pod network to the cluster.
	Run "kubectl apply -f [podnetwork].yaml" with one of the options listed at:
	  https://kubernetes.io/docs/concepts/cluster-administration/addons/

	You can now join any number of control-plane nodes by copying certificate authorities
	and service account keys on each node and then running the following as root:

	  kubeadm join 10.5.6.120:6443 --token zqzg3y.721luyto6duvql0i \
	    --discovery-token-ca-cert-hash sha256:15cffc00cab1551056c5bfacd3c13628060be2a9f9d268edc9b188d19b9cbc23 \
	    --control-plane

	Then you can join any number of worker nodes by running the following on each as root:

	kubeadm join 10.5.6.120:6443 --token zqzg3y.721luyto6duvql0i \
   --discovery-token-ca-cert-hash sha256:15cffc00cab1551056c5bfacd3c13628060be2a9f9d268edc9b188d19b9cbc23
如果初始化失败,可执行kubeadm reset后重新初始化
kubeadm reset rm -rf $HOME/.kube/config -
加载环境变量
# echo "export KUBECONFIG=/etc/kubernetes/admin.conf" >> ~/.bash_profilesource .bash_profile -
安装pod网络
kubectl apply -f https://raw.githubusercontent.com/coreos/flannel/2140ac876ef134e0ed5af15c65e414cf26827915/Documentation/kube-flannel.yml注意:由于国内网络垃圾,需要修改hosts文件,添加dns解析。去www.ipaddress.com上查看raw.githubusercontenet.com的真实ip。
control plane节点加入集群
-
在master01上运行脚本cert-main-master.sh,将证书分发至master02和master03
vi cert-main-master.shcert-main-master.sh内容如下:
USER=root # customizable
CONTROL_PLANE_IPS="10.5.6.111 10.5.6.112"
for host in ${CONTROL_PLANE_IPS}; do
    scp /etc/kubernetes/pki/ca.crt "${USER}"@$host:
    scp /etc/kubernetes/pki/ca.key "${USER}"@$host:
    scp /etc/kubernetes/pki/sa.key "${USER}"@$host:
    scp /etc/kubernetes/pki/sa.pub "${USER}"@$host:
    scp /etc/kubernetes/pki/front-proxy-ca.crt "${USER}"@$host:
    scp /etc/kubernetes/pki/front-proxy-ca.key "${USER}"@$host:
    scp /etc/kubernetes/pki/etcd/ca.crt "${USER}"@$host:etcd-ca.crt
    # Quote this line if you are using external etcd
    scp /etc/kubernetes/pki/etcd/ca.key "${USER}"@$host:etcd-ca.key
done
执行脚本:
chmod u+x cert-main-master.sh ./cert-main-master.sh -
在master02上运行脚本cert-other-master.sh,将证书移至指定目录
vi cert-other-master.sh内容如下:
USER=root # customizable
mkdir -p /etc/kubernetes/pki/etcd
mv /${USER}/ca.crt /etc/kubernetes/pki/
mv /${USER}/ca.key /etc/kubernetes/pki/
mv /${USER}/sa.pub /etc/kubernetes/pki/
mv /${USER}/sa.key /etc/kubernetes/pki/
mv /${USER}/front-proxy-ca.crt /etc/kubernetes/pki/
mv /${USER}/front-proxy-ca.key /etc/kubernetes/pki/
mv /${USER}/etcd-ca.crt /etc/kubernetes/pki/etcd/ca.crt
# Quote this line if you are using external etcd
mv /${USER}/etcd-ca.key /etc/kubernetes/pki/etcd/ca.key
执行脚本
chmod u+x cert-other-master.sh ./cert-other-master.sh -
在master03上也运行脚本cert-other-master.sh
代码略 -
在master01节点执行:
查看令牌
bash kubeadm token list
如果,发现之前初始化时的令牌已过期,就需要生成新的令牌:kubeadm token create内容为:mvffkl.66vjzkkibm2uv9ri
-
生成新的加密串
openssl x509 -pubkey -in /etc/kubernetes/pki/ca.crt | openssl rsa -pubin -outform der 2>/dev/null | openssl dgst -sha256内容为:15cffc00cab1551056c5bfacd3c13628060be2a9f9d268edc9b188d19b9cbc23
-
master02加入集群(在master02上执行)
kubeadm join 10.5.6.120:6443 --token mvffkl.66vjzkkibm2uv9ri \
    --discovery-token-ca-cert-hash sha256:15cffc00cab1551056c5bfacd3c13628060be2a9f9d268edc9b188d19b9cbc23 \
    --control-plane
成功执行后,有以下提示(只截取最后面的一部分)

-
master03加入集群(在master03上执行)
操作与上面的一样,这里略。 -
为了在master02和master03上也能执行kubectl命令,master02和master03加载环境变量(以下3条命令分别在master02,master03上执行)
scp k8s-master1:/etc/kubernetes/admin.conf /etc/kubernetes/ echo "export KUBECONFIG=/etc/kubernetes/admin.conf" >> ~/.bash_profile source .bash_profile -
集群节点查看
kubectl get nodes

所有control plane节点处于ready状态,```bash kubectl get pod -o wide -n kube-system ``` 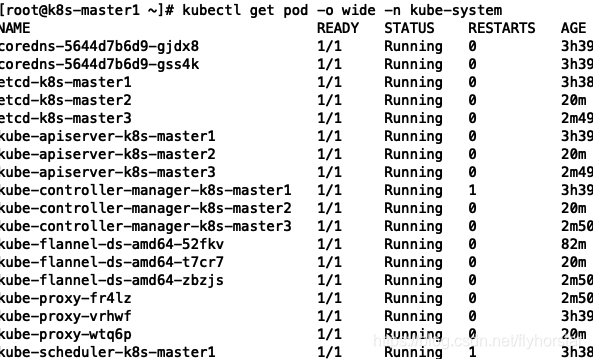 所有的系统组件也正常。
node节点加入集群
-
分别在2个node节点执行
kubeadm join 10.x.x.120:6443 --token mvffkl.66vjzkkibm2uv9ri \
--discovery-token-ca-cert-hash sha256:15cffc00cab1551056c5bfacd3c13628060be2a9f9d268edc9b188d19b9cbc23
成功执行后,有以下显示:

-
再查看一下集群节点
kubectl get nodesNAME STATUS ROLES AGE VERSION master01 Ready master 33m v1.16.4 master02 Ready master 9m24s v1.16.4 master03 Ready master 8m11s v1.16.4 work01 Ready <none> 54s v1.16.4 work02 NotReady <none> 9s v1.16.4 work03 NotReady <none> 4s v1.16.4
client配置
mkdir -p /etc/kubernetes
scp 10.x.x.110:/etc/kubernetes/admin.conf /etc/kubernetes/
echo "export KUBECONFIG=/etc/kubernetes/admin.conf" >> ~/.bash_profile
source .bash_profile
kubectl get nodes
kubectl get cs
kubectl get po -o wide -n kube-system


 2803
2803

 被折叠的 条评论
为什么被折叠?
被折叠的 条评论
为什么被折叠?
 到【灌水乐园】发言


