


1、Spring AOP拦截器调用实现
Spring Aop的实现以JdkDynamicAopProxy为例,它分为三个明显的阶段,如下时序图所示:
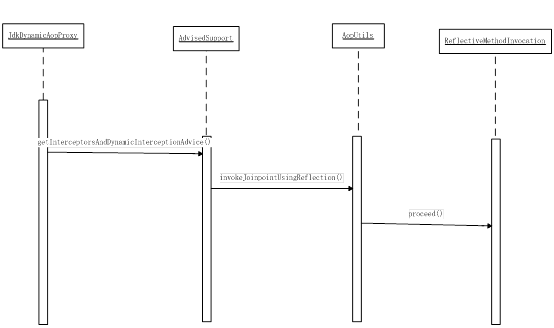
首先获得切面及通知器链,如果该链为空,说明并没有配置相应的切面及通知器,那么就直接调用对象的实际处理方法,即是invokeJoinpointUsingReflection;接下来就是切面通知器链不为空,那么直接按照该链直接处理下去。
JdkDynamicAopProxy的invoke方法主要代码如下,这个过程就是上面时序图阐述的三个步骤:
target = targetSource.getTarget();
			if (target != null) {
				targetClass = target.getClass();
			}

			// Get the interception chain for this method.
			List<Object> chain = this.advised.getInterceptorsAndDynamicInterceptionAdvice(method, targetClass);

			// Check whether we have any advice. If we don't, we can fallback on direct
			// reflective invocation of the target, and avoid creating a MethodInvocation.
			if (chain.isEmpty()) {
				// We can skip creating a MethodInvocation: just invoke the target directly
				// Note that the final invoker must be an InvokerInterceptor so we know it does
				// nothing but a reflective operation on the target, and no hot swapping or fancy proxying.
				retVal = AopUtils.invokeJoinpointUsingReflection(target, method, args);
			}
			else {
				// We need to create a method invocation...
				invocation = new ReflectiveMethodInvocation(proxy, target, method, args, targetClass, chain);
				// Proceed to the joinpoint through the interceptor chain.
				retVal = invocation.proceed();
			}
接下来看下第一步骤的获取切面及通知器逻辑。
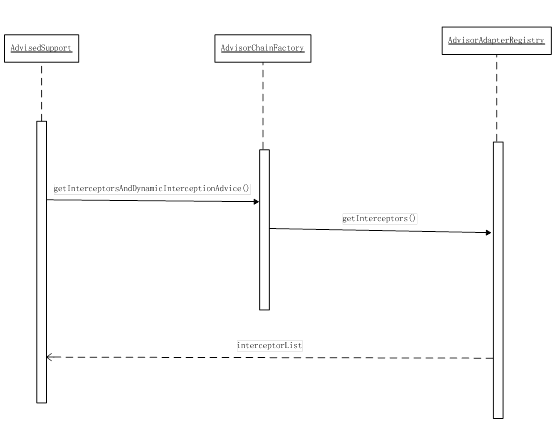
这个过程需要说明两个问题,一个是关于AdvisorAdapterRegistry获取Interceptors的过程,另外一个就是advisor是如何获取的?
首先说明一下advisor从何而来?
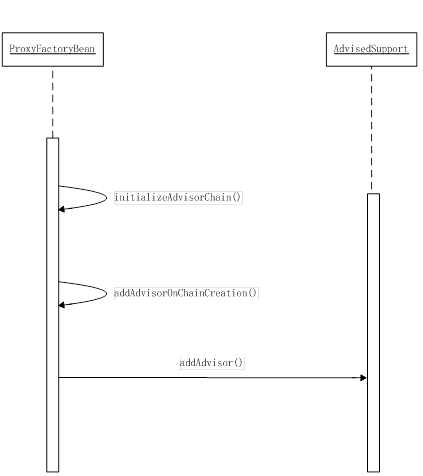
这个图能很明确的说明advisor的来源,而在上一个时序图中的getInterceptors里面所使用到的advisor就是这里设置进去的,它使用了config.getAdvisors(),这里的config就是一个advised的接口,实际上就是advisedSupport。
关于Interceptors的获取,主要是使用了AdvisorAdapterRegistry来处理的,如下代码所示:
MethodInterceptor[] interceptors =registry.getInterceptors(advisor);
registry .getInterceptors的具体实现如下:
public MethodInterceptor[] getInterceptors(Advisor advisor) throws UnknownAdviceTypeException {
		List<MethodInterceptor> interceptors = new ArrayList<MethodInterceptor>(3);
		Advice advice = advisor.getAdvice();
		if (advice instanceof MethodInterceptor) {
			interceptors.add((MethodInterceptor) advice);
		}
		for (AdvisorAdapter adapter : this.adapters) {
			if (adapter.supportsAdvice(advice)) {
				interceptors.add(adapter.getInterceptor(advisor));
			}
		}
		if (interceptors.isEmpty()) {
			throw new UnknownAdviceTypeException(advisor.getAdvice());
		}
		return interceptors.toArray(new MethodInterceptor[interceptors.size()]);
	}
首先添加添加所传递过来的advisor里面带有的MethodInterceptor,再添加默认的几个MethodInterceptor,这几个默认的MethodInterceptor如下代码所示:
public DefaultAdvisorAdapterRegistry() {
		registerAdvisorAdapter(new MethodBeforeAdviceAdapter());
		registerAdvisorAdapter(new AfterReturningAdviceAdapter());
		registerAdvisorAdapter(new ThrowsAdviceAdapter());
	}
这个就是我们熟悉的三个advice。在这个getInterceptors的实现过程中是一个比较典型的适配器模式的实现,这个后续会说明。
上面已经获取了Interceptors,而具体调用的入口就是aop调用三个步骤中的第三步,即是MethodInvocation. proceed(),这个方法的实现是在类ReflectiveMethodInvocation里面,具体可以先看一个这个proceed()的实现。如下:
public Object proceed() throws Throwable {
		//	We start with an index of -1 and increment early.
		if (this.currentInterceptorIndex == this.interceptorsAndDynamicMethodMatchers.size() - 1) {
			return invokeJoinpoint();
		}

		Object interceptorOrInterceptionAdvice =
				this.interceptorsAndDynamicMethodMatchers.get(++this.currentInterceptorIndex);
		if (interceptorOrInterceptionAdvice instanceof InterceptorAndDynamicMethodMatcher) {
			// Evaluate dynamic method matcher here: static part will already have
			// been evaluated and found to match.
			InterceptorAndDynamicMethodMatcher dm =
					(InterceptorAndDynamicMethodMatcher) interceptorOrInterceptionAdvice;
			if (dm.methodMatcher.matches(this.method, this.targetClass, this.arguments)) {
				return dm.interceptor.invoke(this);
			}
			else {
				// Dynamic matching failed.
				// Skip this interceptor and invoke the next in the chain.
				return proceed();
			}
		}
		else {
			// It's an interceptor, so we just invoke it: The pointcut will have
			// been evaluated statically before this object was constructed.
			return ((MethodInterceptor) interceptorOrInterceptionAdvice).invoke(this);
		}
	}
代码很简短,首先就是判断这个拦截器链是否已经处理完成,如果完成就调用invokeJoinpoint(),实际上就是对目标方法的调用。接下来就是逐个对拦截器进行回调处理(invoke()),当然在回调处理之前需要判断目标对象以及设定的拦截方法是否匹配。如果不匹配就继续递归调用下一个链条处理器。
对于拦截器的具体调用,以MethodBeforeAdviceInterceptor为例说明一下:
public Object invoke(MethodInvocation mi) throws Throwable {
		this.advice.before(mi.getMethod(), mi.getArguments(), mi.getThis() );
		return mi.proceed();
	}
先处理通知器的before定义处理,接下来进行方法实际调用处理。
2、拦截器实现使用的设计模式
getInterceptors的实现上面已经说了采用的是适配器模式,先看下适配器模式的一个uml实现:

getInterceptors里面的adpter就是各类的AdvisorAdapter例如MethodBeforeAdviceAdapter,adaptee就是各类的advice例如MethodBeforeAdvice,而对应的request就是getInterceptors().
模式总结:
优点:
1、通过适配器,客户端可以调用同一接口,因而对客户端来说是透明的。这样做更简单、更直接、更紧凑。
2、复用了现存的类,解决了现存类和复用环境要求不一致的问题。
3、将目标类和适配者类解耦,通过引入一个适配器类重用现有的适配者类,而无需修改原有代码。
4、一个对象适配器可以把多个不同的适配者类适配到同一个目标,也就是说,同一个适配器可以把适配者类和它的子类都适配到目标接口。
缺点
1、 对于对象适配器来说,更换适配器的实现过程比较复杂。


 890
890

 被折叠的 条评论
为什么被折叠?
被折叠的 条评论
为什么被折叠?
 到【灌水乐园】发言


