


Android实践之简易天气(二)
上一篇 Android实践之简易天气(一)已经拿到了服务器端的数据并进行了解析。按照计划,这次就是设计界面并把拿到的数据更新到界面。
界面设计
设计天气状态界面的设计
都是一些比较基础的,就不需要讲解什么了,相信有点界面基础的一看就懂了,就直接粘贴代码吧。作者:fnhfire_7030
<?xml version="1.0" encoding="utf-8"?>
<android.support.v4.widget.SwipeRefreshLayout xmlns:android="http://schemas.android.com/apk/res/android"
                                              xmlns:app="http://schemas.android.com/apk/res-auto"
                                              xmlns:tools="http://schemas.android.com/tools"
                                              android:id="@+id/swipe"
                                              android:layout_width="match_parent"
                                              android:layout_height="wrap_content">

    <ScrollView
        android:id="@+id/scrollView"
        android:layout_width="match_parent"
        android:layout_height="match_parent"
        app:layout_behavior="@string/appbar_scrolling_view_behavior"
        tools:context=".MainActivity"
        tools:showIn="@layout/activity_main">

        <LinearLayout
            android:layout_width="match_parent"
            android:layout_height="wrap_content"
            android:orientation="vertical"
            android:paddingLeft="5dp"
            android:paddingRight="5dp"
            android:paddingTop="5dp"
            tools:context="com.wf.myndkdemo.MainActivity">

            <RelativeLayout
                android:layout_width="match_parent"
                android:layout_height="wrap_content">

                <RadioButton
                    android:layout_width="wrap_content"
                    android:layout_height="wrap_content"
                    android:button="@null"
                    android:drawableLeft="@mipmap/ic_location_normal"
                    android:text="@string/location"
                    android:textColor="@color/white"/>

                <TextView
                    android:layout_width="wrap_content"
                    android:layout_height="wrap_content"
                    android:layout_alignParentEnd="true"
                    android:layout_alignParentRight="true"
                    android:text="@string/srcfrom"
                    android:textColor="@color/gray"/>
            </RelativeLayout>

            <com.baidu.apistore.sdk.customfont.CustomFontsTextView
                android:id="@+id/tmp"
                android:layout_width="wrap_content"
                android:layout_height="wrap_content"
                android:layout_gravity="center"
                android:paddingLeft="40dp"
                android:paddingTop="100dp"
                android:text="@string/tmp"
                android:textColor="@color/white"
                android:textSize="80sp"/>

            <com.baidu.apistore.sdk.customfont.CustomFontsTextView
                android:id="@+id/wea"
                android:layout_width="wrap_content"
                android:layout_height="wrap_content"
                android:layout_gravity="center"
                android:paddingTop="5dp"
                android:text="@string/weather"
                android:textColor="@color/white"
                android:textSize="24sp"/>

            <LinearLayout
                android:layout_width="wrap_content"
                android:layout_height="wrap_content"
                android:orientation="horizontal">

                <TextView
                    android:layout_width="wrap_content"
                    android:layout_height="wrap_content"
                    android:background="@drawable/shape_bg"
                    android:text="@string/pm"
                    android:textColor="@color/center"
                    android:textSize="15sp"/>

                <TextView
                    android:id="@+id/pm"
                    android:layout_width="wrap_content"
                    android:layout_height="wrap_content"
                    android:paddingLeft="5dp"
                    android:text="50"
                    android:textColor="@color/white"
                    android:textSize="16sp"/>

            </LinearLayout>


            <ImageView
                android:layout_width="match_parent"
                android:layout_height="1dp"
                android:layout_marginTop="10dp"
                android:background="@color/gray"/>

            <include layout="@layout/layoutweekweather"/>

            <include layout="@layout/layout_txt"/>
        </LinearLayout>
    </ScrollView>

</android.support.v4.widget.SwipeRefreshLayout>
大家一定发现了SwipeRefreshLayout 了吧,对,这里用到了下拉刷新,我这里用的是系统自带的下拉刷新,当然你也可以选择比较有名的第三方控件PullToRefresh这个控件里面的功能就比较多了,里面具体的功能你可以自己去发现。
你们一定也发现了上面的布局中包含了include了吧!就是下面这些
<include layout="@layout/layoutweekweather"/>

<include layout="@layout/layout_txt"/>聪明的你,一定知道这是在这个布局里面又添加了另外的两个布局,这两个布局分别是,一周的天气数据和今天的体感指数。作者:fnhfire_7030
一周的天气数据布局
<?xml version="1.0" encoding="utf-8"?>
<LinearLayout xmlns:android="http://schemas.android.com/apk/res/android"
              android:layout_width="match_parent"
              android:layout_height="wrap_content"
              android:orientation="vertical"
              android:paddingTop="10dp"
    >

    <RelativeLayout
        android:layout_width="match_parent"
        android:layout_height="wrap_content"
        android:layout_marginBottom="5dp"
        android:layout_marginTop="5dp"
        android:orientation="horizontal">

        <TextView
            android:id="@+id/today"
            android:layout_width="wrap_content"
            android:layout_height="wrap_content"
            android:text="@string/today"
            android:textColor="@color/white"
            android:textSize="16sp"
            />

        <TextView
            android:id="@+id/today_tmp1"
            android:layout_width="wrap_content"
            android:layout_height="wrap_content"
            android:layout_alignBaseline="@+id/today"
            android:layout_marginLeft="5dp"
            android:layout_toRightOf="@+id/today"
            android:text="@string/today"
            android:textColor="@color/gray"
            android:textSize="14sp"
            />

        <ImageView
            android:id="@+id/weather_image1"
            android:layout_width="wrap_content"
            android:layout_height="wrap_content"
            android:layout_centerInParent="true"
            android:src="@mipmap/ic_weather_default"/>

        <TextView
            android:id="@+id/wind_det1"
            android:layout_width="wrap_content"
            android:layout_height="wrap_content"
            android:layout_marginRight="5dp"
            android:layout_toLeftOf="@+id/wind_sd1"
            android:text="@string/today"
            android:textColor="@color/white"
            android:textSize="16sp"
            />

        <TextView
            android:id="@+id/wind_sd1"
            android:layout_width="wrap_content"
            android:layout_height="wrap_content"
            android:layout_alignBaseline="@+id/wind_det1"
            android:layout_alignParentEnd="true"
            android:layout_alignParentRight="true"
            android:layout_alignParentTop="true"
            android:text="@string/today"
            android:textColor="@color/gray"
            android:textSize="14sp"/>
    </RelativeLayout>

    <ImageView
        android:layout_width="match_parent"
        android:layout_height="1dp"
        android:background="@color/gray"/>
</LinearLayout>
上面的在LinearLayout 布局内的ImageView 是用来进行作者:fnhfire_7030布局分割的。
体感指数布局
<?xml version="1.0" encoding="utf-8"?>
<LinearLayout xmlns:android="http://schemas.android.com/apk/res/android"
              android:layout_width="match_parent"
              android:layout_height="match_parent"
              android:orientation="vertical">


    <LinearLayout
        android:layout_width="wrap_content"
        android:layout_height="wrap_content"
        android:paddingTop="5dp">

        <TextView
            android:layout_width="wrap_content"
            android:layout_height="wrap_content"
            android:text="@string/combrf"
            android:textColor="@color/white"
            android:textSize="18sp"/>

        <TextView
            android:id="@+id/combrt"
            android:layout_width="wrap_content"
            android:layout_height="wrap_content"
            android:paddingLeft="10dp"
            android:text="@string/combrf"
            android:textColor="@color/white"
            android:textSize="18sp"/>
    </LinearLayout>

    <TextView
        android:id="@+id/comContent"
        android:layout_width="wrap_content"
        android:layout_height="wrap_content"
        android:text="@string/combrf"
        android:textColor="@color/gray"
        android:textSize="14sp"/>

    <ImageView
        android:layout_width="match_parent"
        android:layout_height="1dp"
        android:layout_marginBottom="5dp"
        android:layout_marginTop="5dp"
        android:background="@color/gray"/>

    <LinearLayout
        android:layout_width="wrap_content"
        android:layout_height="wrap_content">

        <TextView
            android:layout_width="wrap_content"
            android:layout_height="wrap_content"
            android:text="@string/cwbrf"
            android:textColor="@color/white"
            android:textSize="18sp"/>

        <TextView
            android:id="@+id/cwbrf"
            android:layout_width="wrap_content"
            android:layout_height="wrap_content"
            android:paddingLeft="10dp"
            android:text="@string/combrf"
            android:textColor="@color/white"
            android:textSize="18sp"/>
    </LinearLayout>

    <TextView
        android:id="@+id/cwContent"
        android:layout_width="wrap_content"
        android:layout_height="wrap_content"
        android:text="@string/cwbrf"
        android:textColor="@color/gray"
        android:textSize="14sp"/>

    <ImageView
        android:layout_width="match_parent"
        android:layout_height="1dp"
        android:layout_marginBottom="5dp"
        android:layout_marginTop="5dp"
        android:background="@color/gray"/>

    <LinearLayout
        android:layout_width="wrap_content"
        android:layout_height="wrap_content">

        <TextView
            android:layout_width="wrap_content"
            android:layout_height="wrap_content"
            android:text="@string/dress_brf"
            android:textColor="@color/white"
            android:textSize="18sp"/>

        <TextView
            android:id="@+id/dress_brf"
            android:layout_width="wrap_content"
            android:layout_height="wrap_content"
            android:paddingLeft="10dp"
            android:text="@string/dress_brf"
            android:textColor="@color/white"
            android:textSize="18sp"/>
    </LinearLayout>

    <TextView
        android:id="@+id/dressContent"
        android:layout_width="wrap_content"
        android:layout_height="wrap_content"
        android:text="@string/dress_brf"
        android:textColor="@color/gray"
        android:textSize="14sp"/>

    <ImageView
        android:layout_width="match_parent"
        android:layout_height="1dp"
        android:layout_marginBottom="5dp"
        android:layout_marginTop="5dp"
        android:background="@color/gray"/>
</LinearLayout>
同样,上面高度为1dp的ImageView 也是分界线。
这里我又增加了一个布局,把这几个布局都包含了进去,具体如下:
<?xml version="1.0" encoding="utf-8"?>
<LinearLayout
    xmlns:android="http://schemas.android.com/apk/res/android"
    android:layout_width="match_parent"
    android:layout_height="match_parent"
    android:id="@+id/content_layout"
    android:background="@drawable/content_bg"
    android:clipToPadding="true"
    android:fitsSystemWindows="true"
    >

    <include layout="@layout/content_main"></include>
</LinearLayout>
因为content_main 里面已经包含了其他的布局,这里直接把content_main 包含进来就可以了。上面的布局中的这两个属性是实现沉浸式状态栏需要的。如下:
    android:clipToPadding="true"
    android:fitsSystemWindows="true"
布局效果图
好了,到这里布局就已经完成了。下面就让大家看看效果吧!
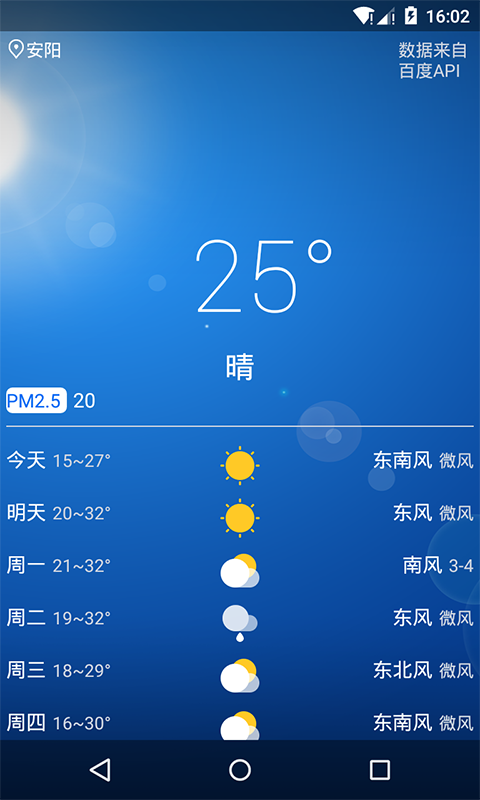
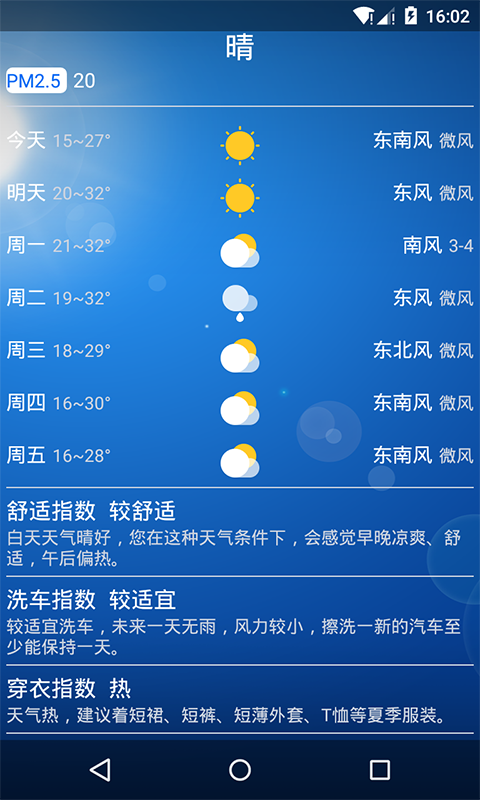
看到这个效果图有没有很熟悉呢!我不会告诉你,我是仿yun os天气界面进行布局设置的,当然里面的图片资源也是来自yun os天气的,毕竟没有专门的UI设计嘛!
本来想把数据更新到界面都放在这里讲的,但是呢,再说的话篇幅就有点长了,就下次吧!作者:fnhfire_7030
这里附上源码地址:GitHub


 2万+
2万+

 被折叠的 条评论
为什么被折叠?
被折叠的 条评论
为什么被折叠?
 到【灌水乐园】发言


