


介绍
单个Agent通常可以在单个域内使用少量工具有效地运行,但即使是使用像 gpt-4 这样强大的模型,它在使用许多工具时也可能效率较低。
处理复杂任务的一种方法是通过“分而治之”的方法:为每个任务或域创建一个专门的Agent,并将任务route给正确的“专家”。
这篇论文(受到论文:AutoGen: Enabling Next-Gen LLM Applications via Multi-Agent Conversation 的启发)展示了使用 LangGraph 实现此目的的一种方法。
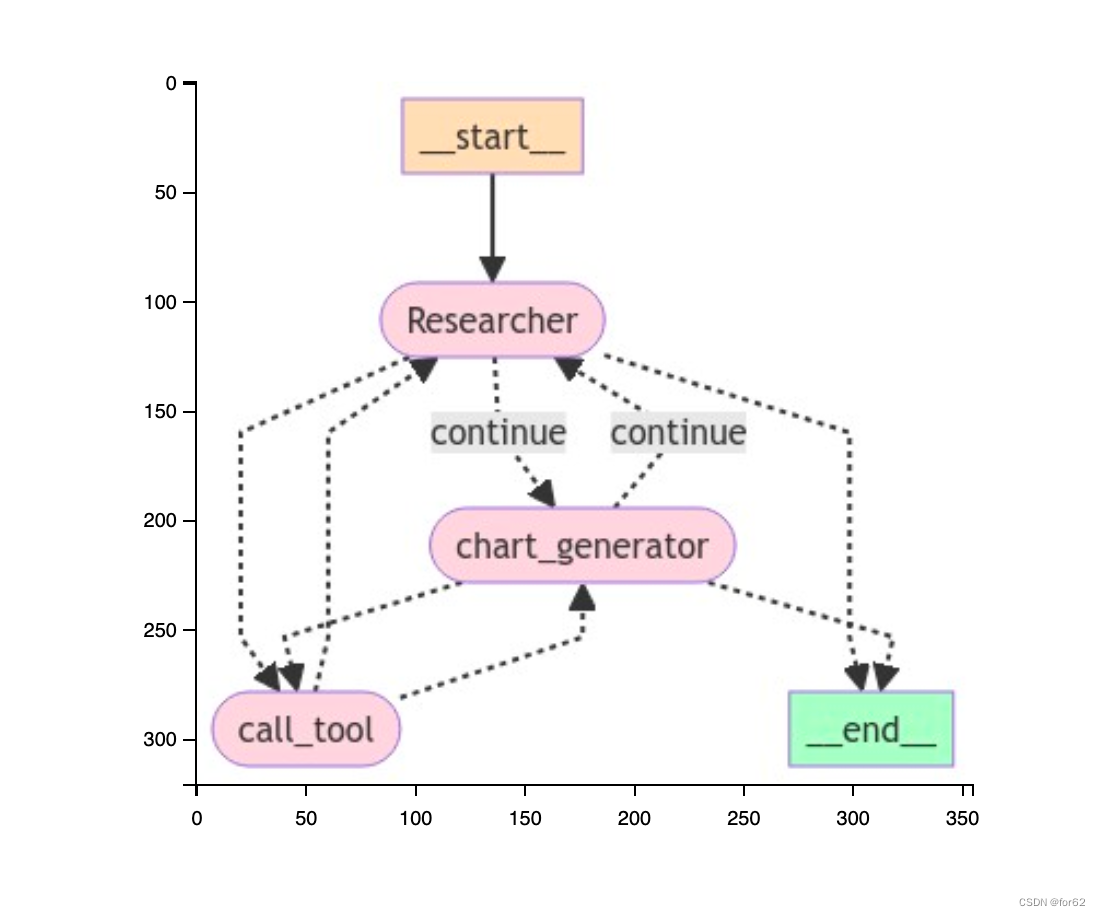
生成的图表将类似于下图:
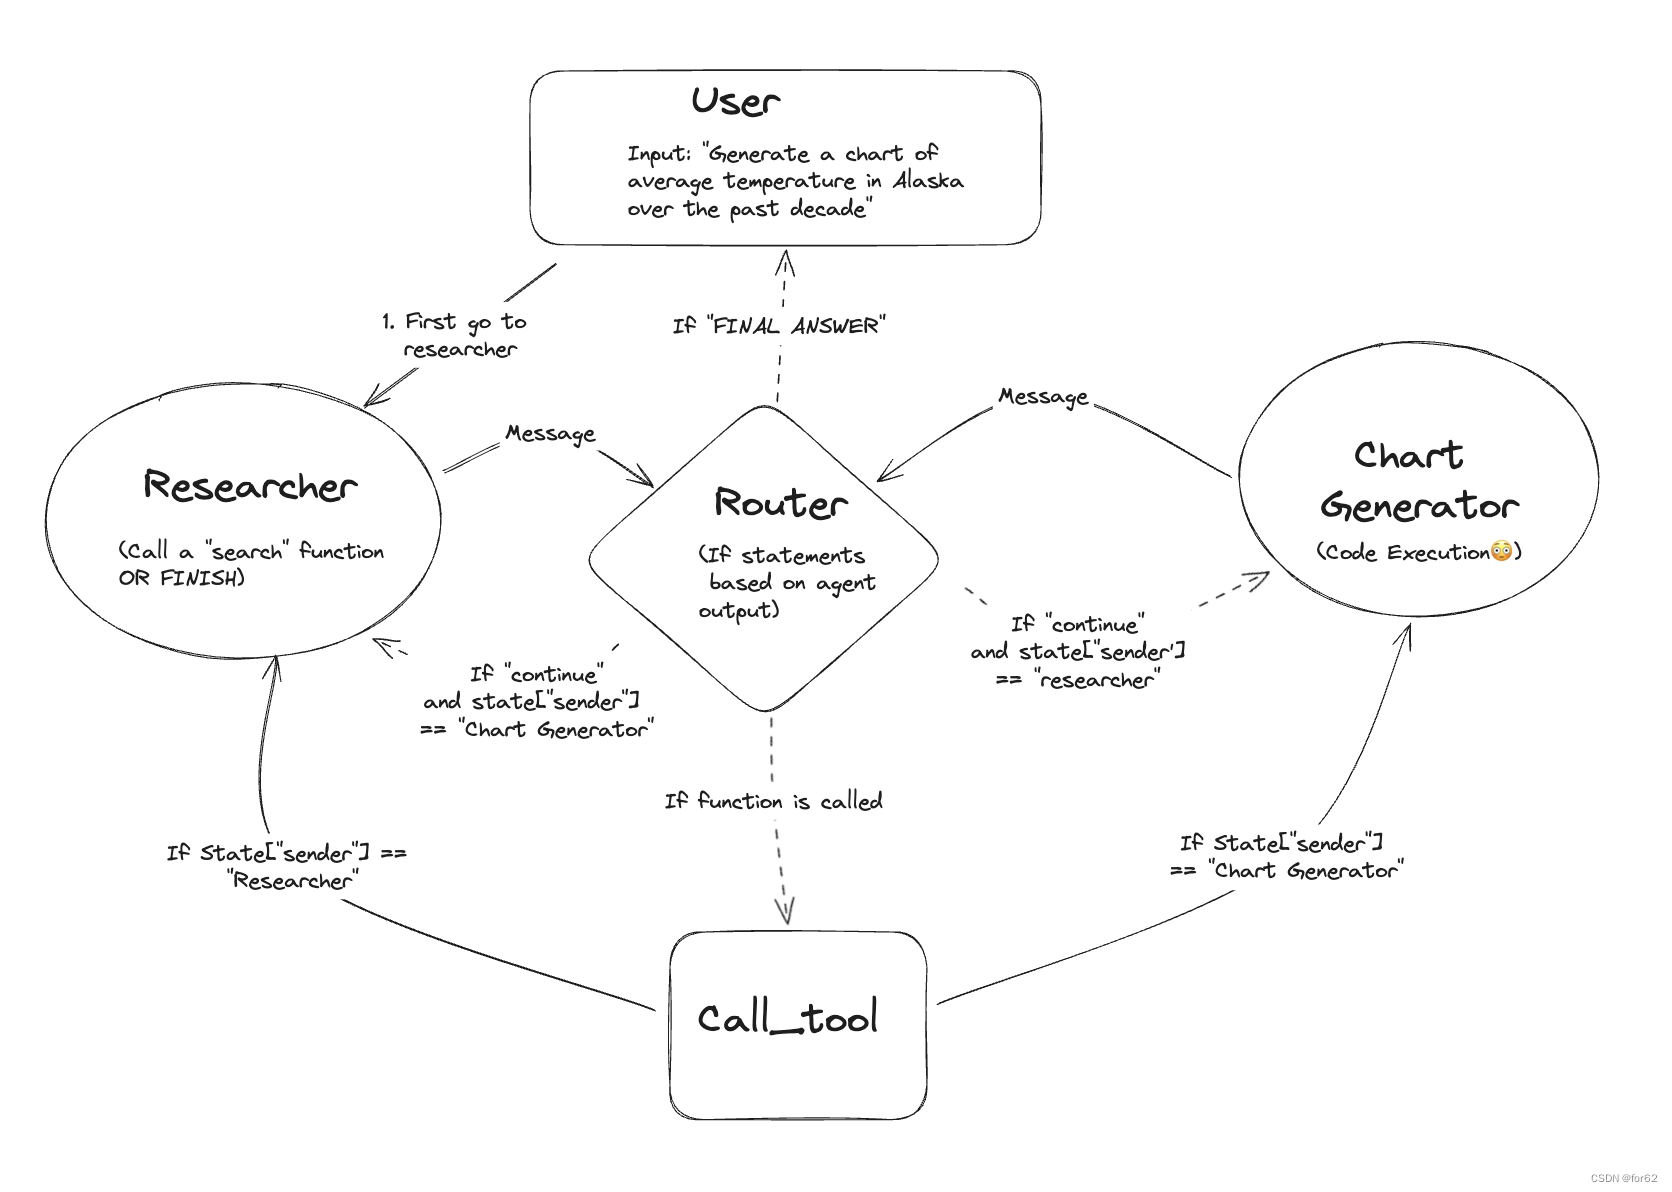
在我们开始之前,请快速注意:本论文和其他Multi-Agent笔记旨在展示如何在LangGraph中实现某些设计模式。如果该模式适合您的需求,我们建议将其与文档中其他地方描述的一些其他基本模式相结合,以获得最佳性能。
# pip install -U langchain langchain_openai langsmith pandas langchain_experimental matplotlib langgraph langchain_core
import getpass
import os


def _set_if_undefined(var: str):
    if not os.environ.get(var):
        os.environ[var] = getpass.getpass(f"Please provide your {var}")


_set_if_undefined("OPENAI_API_KEY")
_set_if_undefined("LANGCHAIN_API_KEY")
_set_if_undefined("TAVILY_API_KEY")

# Optional, add tracing in LangSmith
os.environ["LANGCHAIN_TRACING_V2"] = "true"
os.environ["LANGCHAIN_PROJECT"] = "Multi-agent Collaboration"
创建Agent
以下辅助函数将帮助创建Agent。这些Agent将成为图中的节点。
如果您只想查看图表的外观,可以跳过。
from langchain_core.messages import (
    BaseMessage,
    HumanMessage,
    ToolMessage,
)
from langchain_core.prompts import ChatPromptTemplate, MessagesPlaceholder

from langgraph.graph import END, StateGraph


def create_agent(llm, tools, system_message: str):
    """Create an agent."""
    prompt = ChatPromptTemplate.from_messages(
        [
            (
                "system",
                "你是一个乐于助人的人工智能助手,与其他助手合作。使用提供的工具逐步回答问题。"
                "如果你不能完全回答,那没关系,另一个助手用不同的工具将帮助你完成任务。尽你所能取得进展。"
                "如果你或任何其他助理有最终答案或可交付成果,在你的回答前面加上'FINAL ANSWER',这样团队就知道该停下来了。"
                "你有权访问以下工具:{tool_names}。\n{system_message}",
            ),
            MessagesPlaceholder(variable_name="messages"),
        ]
    )
    # Get a new ChatPromptTemplate with some input variables already filled in.
    prompt = prompt.partial(system_message=system_message)
    prompt = prompt.partial(tool_names=", ".join([tool.name for tool in tools]))
    return prompt | llm.bind_tools(tools)
工具定义
我们将定义一些我们的Agent将来会使用的工具。
import os
from typing import Annotated

from langchain_community.tools.tavily_search import TavilySearchResults
from langchain_core.tools import tool
from langchain_experimental.utilities import PythonREPL

from common.constant import TAVILY_API_KEY

# 提前通过 https://app.tavily.com/home 申请
os.environ["TAVILY_API_KEY"] = TAVILY_API_KEY

tavily_tool = TavilySearchResults(max_results=5)

# Warning: This executes code locally, which can be unsafe when not sandboxed

repl = PythonREPL()


@tool
def python_repl(
    code: Annotated[str, "The python code to execute to generate your chart."],
):
    """Use this to execute python code. If you want to see the output of a value,
    you should print it out with `print(...)`. This is visible to the user."""
    try:
        result = repl.run(code)
    except BaseException as e:
        return f"执行失败. Error: {repr(e)}"
    result_str = f"执行成功:\n```python\n{code}\n```\nStdout: {result}"
    return (
        result_str + "\n\n如果已经完成了所有的人物,返回 'FINAL ANSWER'."
    )
创建graph
现在已经定义了工具并创建了一些辅助函数,我们将创建下面的各个Agent并告诉它们如何使用 LangGraph 相互通信。
定义 State
我们首先定义 state of the graph。这是一个 list of messages,以及追踪最近发件人的key。
import operator
from typing import Annotated, Sequence, TypedDict

from langchain_core.messages import BaseMessage
from langchain_openai import ChatOpenAI


# This defines the object that is passed between each node
# in the graph. We will create different nodes for each agent and tool
class AgentState(TypedDict):
    messages: Annotated[Sequence[BaseMessage], operator.add]
    sender: str
定义Agent Nodes
我们现在需要定义nodes。首先,让我们定义Agent的nodes。
import functools

from langchain_core.messages import AIMessage, ToolMessage
from langchain_openai import ChatOpenAI

from common.common import API_KEY, PROXY_URL
from create_agent import create_agent
from define_tool import tavily_tool, python_repl


# Helper function to create a node for a given agent
def agent_node(state, agent, name):
    result = agent.invoke(state)
    # We convert the agent output into a format that is suitable to append to the global state
    if isinstance(result, ToolMessage):
        pass
    else:
        result = AIMessage(**result.dict(exclude={"type", "name"}), name=name)
    return {
        "messages": [result],
        # Since we have a strict workflow, we can
        # track the sender so we know who to pass to next.
        "sender": name,
    }


llm = ChatOpenAI(model_name="gpt-4o", api_key=API_KEY, base_url=PROXY_URL)

# Research agent and node
research_agent = create_agent(
    llm,
    [tavily_tool],
    system_message="You should provide accurate data for the chart_generator to use.",
)
research_node = functools.partial(agent_node, agent=research_agent, name="Researcher")

# chart_generator
chart_agent = create_agent(
    llm,
    [python_repl],
    system_message="Any charts you display will be visible by the user.",
)
chart_node = functools.partial(agent_node, agent=chart_agent, name="chart_generator")
定义 tool node
我们现在定义一个node来运行tool。
from langgraph.prebuilt import ToolNode
from define_tool import tavily_tool,python_repl

tools = [tavily_tool, python_repl]
tool_node = ToolNode(tools)
定义edge逻辑
我们可以定义一些edge逻辑,根据Agent的结果决定要做什么。
# Either agent can decide to end
from typing import Literal


def router(state) -> Literal["call_tool", "__end__", "continue"]:
    # This is the router
    messages = state["messages"]
    last_message = messages[-1]
    if last_message.tool_calls:
        # The previous agent is invoking a tool
        return "call_tool"
    if "FINAL ANSWER" in last_message.content:
        # Any agent decided the work is done
        return "__end__"
    return "continue"
定义graph
我们现在可以将它们放在一起并定义graph!
from langgraph.graph import StateGraph

from agent_node import research_node, chart_node
from edge_logic import router
from state import AgentState
from tool_node import tool_node
from common.common import show_img
from langgraph.graph import END

workflow = StateGraph(AgentState)

workflow.add_node("Researcher", research_node)
workflow.add_node("chart_generator", chart_node)
workflow.add_node("call_tool", tool_node)

workflow.add_conditional_edges(
    "Researcher",
    router,
    {"continue": "chart_generator", "call_tool": "call_tool", "__end__": END},
)
workflow.add_conditional_edges(
    "chart_generator",
    router,
    {"continue": "Researcher", "call_tool": "call_tool", "__end__": END},
)

workflow.add_conditional_edges(
    "call_tool",
    # Each agent node updates the 'sender' field
    # the tool calling node does not, meaning
    # this edge will route back to the original agent
    # who invoked the tool
    lambda x: x["sender"],
    {
        "Researcher": "Researcher",
        "chart_generator": "chart_generator",
    },
)
workflow.set_entry_point("Researcher")
graph = workflow.compile()

# 绘图
show_img(graph)
说明:这里引入了一个自定义的视图函数,代码如下:
# 绘图
import io

import matplotlib.pyplot as plt
from PIL import Image


def show_img(graph) -> None:
    img_bytes = graph.get_graph().draw_mermaid_png()

    image = Image.open(io.BytesIO(img_bytes))

    # 使用 matplotlib 显示图像
    plt.imshow(image)
    # 关闭坐标轴
    plt.axis('off')
    plt.show()
调用
from langchain_core.messages import HumanMessage

from graph import graph


events = graph.stream(
    {
        "messages": [
            HumanMessage(
                content="获取英国过去5年的GDP,然后画一个折线图。一旦你编码好了,就完成了。"
            )
        ],
    },
    # Maximum number of steps to take in the graph
    {"recursion_limit": 150},
)
for s in events:
    print(s)
    print("----")
reference:
- https://langchain-ai.github.io/langgraph/tutorials/multi_agent/multi-agent-collaboration


 193
193

 被折叠的 条评论
为什么被折叠?
被折叠的 条评论
为什么被折叠?
 到【灌水乐园】发言


