


 本文详述了开发一个名为shell的nginx模块的过程,该模块提供了类似Linux shell的ls, cat, head和tail功能。文章从目标与预备知识开始,讲解了模块代码结构、配置文件、模块开发的各个步骤,包括创建/合并配置结构体、处理指令、注册阶段处理函数等。通过实际操作展示了如何编写和测试模块代码,最后进行了小结并提供了源代码。"
123306008,11791471,C++模板的编译链接问题及解决策略,"['c++', '编译原理', '编程实践', '模板编程']
本文详述了开发一个名为shell的nginx模块的过程,该模块提供了类似Linux shell的ls, cat, head和tail功能。文章从目标与预备知识开始,讲解了模块代码结构、配置文件、模块开发的各个步骤,包括创建/合并配置结构体、处理指令、注册阶段处理函数等。通过实际操作展示了如何编写和测试模块代码,最后进行了小结并提供了源代码。"
123306008,11791471,C++模板的编译链接问题及解决策略,"['c++', '编译原理', '编程实践', '模板编程']
1. 目标与预备知识
本文以开发一个简单nginx模块为例,讲述nginx模块开发的入门知识。此模块名叫shell,顾名思义,它的功能和Linux shell类似;但为了简单起见,我们只提供以下几个指令:
- ls: 列出指定目录下的文件以及子目录;支持三个选项:-l -h -a;
- cat: 输出一个文件的内容(暂不支持多文件,虽然这有点违背cat命令的本意--连接多个文件);没有选项;
- head: 输出一个文件的前n行;支持一个选项:-n,n为正整数;
- tail: 输出一个文件的后n行;支持一个选项:-n,n为正整数;
- 1.a) nginx会回调ngx_module_t::ctx (对于http模块是ngx_http_module_t类型) 中的钩子函数,创建模块的conf结构体。一个模块根据自己所处的层(http, server, location等等)以及自己的需要,决定自己需要那些conf结构体。例如我们的shell module,只需要loc conf,所以就在ngx_module_t.ctx->create_loc_conf()函数中创建了一个ngx_http_shell_loc_conf_t实例。
- 1.b) nginx还会回调ngx_module_t::ctx中的merge函数来合并conf结构体;这是因为一个模块的配置指令可能在不同层级,最终要合并到一起。例如我们的shell module,document_root指令可以出现在server层,也可以出现在location层。nignx在处理server层指令时,把documrent_root的参数存储在server层的conf结构体中;到了location层,就把上层(server层)的documrent_root的参数和下层document_root参数合并,合并方式就是我们定义的merge_loc_conf函数(里面再调用nginx提供的工具函数ngx_conf_merge_str_value,实现下层覆盖上层)。从下面的测试可以看到,nginx启动时,为我们的shell module创建了10个conf (调用了10次create_loc_conf函数,即创建了10个ngx_http_shell_loc_conf_t实例)。看我们的nginx.conf:http层创建了1个;端口为8080的server层创建1个,内部的location创建1个;9090server创建1个,其中的6个location创建6个。并且,nginx对这10个conf进行了9次merge(调用了9次merge_loc_conf函数),应该是最终形成7个最底层(location层)conf实例。
- 2. 处理一个配置块(例如location),先调用每个module的ctx中的钩子函数,create/merge conf,如上所述。然后处理指令,即调用ngx_module_t::commands中的ngx_command_t::set函数。顾名思义,set函数不是对应指令(head,tail,ls,cat)的content handler函数,而是它们的配置函数。例如,我们的shell module,在处理指令"head -8"时,就调用ngx_http_shell_head函数(即head指令的set函数)。这个函数做了一个重要的事情:clcf->handler = ngx_http_shell_handler; 这个函数才是指令的content handler函数,即nginx运行时,处理"curl http://127.0.0.1/shell/head/{filename}"时,调用ngx_http_shell_handler来生成response。
- 3. 此外,我们还为shell module注册了phase handlers。nginx运行时,处理一个请求时,经过不同的阶段时,就会调用不同的phase handler。
2. 模块代码结构
modules/└── ngx_http_shell_module├── config├── ngx_http_shell_module.c├── 其他代码文件
一般情况下,模块的目录为ngx_{module-type}_{module-name}_module;模块入口代码文件为ngx_{module-type}_{module-name}_module.c。除了入口代码文件和其他代码文件之外,还有一个至关重要的文件:config。注意,它和nginx.conf是毫无关系的;这个config文件定义了新增模块的名字,源代码的位置等信息,是为nginx配置、编译和安装服务的;它的内容如下:
ngx_addon_name=ngx_http_shell_module
HTTP_MODULES="$HTTP_MODULES ngx_http_shell_module"
NGX_ADDON_SRCS="$NGX_ADDON_SRCS $ngx_addon_dir/ngx_http_shell_module.c $ngx_addon_dir/file1.c $ngx_addon_dir/file2.c"
假设模块代码已经完成,我们需要重新configure:
        ./configure --prefix=/usr/local/nginx-1.10.0 \
                    --user=nobody                    \
                    --group=nobody                   \
                    --without-select_module          \
                    --without-poll_module            \
                    --with-http_ssl_module           \
                    --add-module=modules/ngx_http_shell_module                <--- 加入我们新增的模块
然后重新编译并安装:
        make
        make install
为了测试方便,我把这些写成一个脚本test.sh:
#!/bin/bash

case "$1" in
    config)
        echo "config"
        ./configure --prefix=/usr/local/nginx-1.10.0 \
                    --user=nobody                    \
                    --group=nobody                   \
                    --without-select_module          \
                    --without-poll_module            \
                    --with-http_ssl_module           \
                    --add-module=modules/ngx_http_shell_module
        exit $?
        ;;
    deploy)
        /usr/local/nginx-1.10.0/sbin/nginx -s stop
        rm -fr /usr/local/nginx-1.10.0/
        make
        make install
        /usr/local/nginx-1.10.0/sbin/nginx
        exit $?
        ;;
    *)
        echo "Usage: $0 config|deploy"
        exit 1
        ;;
esac
若只更新代码时而没有改变代码结构(增加、删除代码文件),只需要重新编译安装:
./test.sh deploy若改变了代码结构,则需要重新configure,并重新编译安装:
./test.sh config
./test.sh deploy
好了,准备工作差不多了,下面开始实际内容:编写模块的代码。
3. 模块开发
3.1 配置文件
user  nobody;
worker_processes  4;

events {
    worker_connections  1024;
}

http {
    include       mime.types;
    default_type  application/octet-stream;

    sendfile        on;
    keepalive_timeout  65;

    server {
        listen       8080;
        server_name  localhost-proxied;
        root /data/upstream1;

        location / {
        }
    }

    server {
        listen       9090;
        server_name  localhost-proxy;

        document_root /home/yuanguo.hyg/workspace;

        location / {
            proxy_pass http://localhost:8080/;
        }

        location ~\.(gif|jpg|png)$ {
            root /data/images;
        }

        location  /shell/ls/ {
            ls -a;
            ls -l;
            ls -h;
        }
        location  /shell/head/ {
            head -8;
        }
        location  /shell/tail/ {
            tail -12;
        }
        location  /shell/cat/ {
            cat;
        }
    }
}
继承前一篇博客点击打开链接,若用户请求.gif或.jpg或.png结尾的文件,则直接从/data/images/目录提供。不同的是,用户可以使用:
http://{server-ip}/shell/{ls|cat|head|tail}/{sub-path}
来查看目录或读取文件内容。{sub-path}的宿主目录由document_root来配置。其他请求仍转发给localhost:8080服务来处理。
举例来说,当用户请求http://192.168.75.138/shell/cat/workspace/test.cpp时,会输出文件/home/workspace/test.cpp的内容;当用户请求http://192.168.75.138/shell/cat/workspace/会列出目录/home/workspace/下的目录和文件。head和tail类似。
当nginx接收到一个http请求时,它通过查找配置文件来把请求映射到一个location,location中配置的指令来处理请求。指令会启动它所在的模块,模块中定义了此指令的handler和filter(本文暂不涉及filter);请求最终由handler来处理。粗略地,可由下图表示(图片来自网络):

3.2 模块配置结构体
模块的配置结构用于存储从配置文件读进来的指令的参数(在本例中,document_root的参数、ls的参数、head和tail的参数)。根据nginx模块开发规则,这个结构命名为:ngx_{module-type}_{module-name}_{main|srv|oc}_conf。其中main、srv和loc分别用于表示同一模块在mian、server和location三层中的配置信息。我们的shell模块只需要loc配置。问题:document_root可以出现在main和server层中,它的参数也可以保存在loc配置中,为什么?
typedef struct
{
  ngx_str_t doc_root;
  ngx_array_t* ls_opts;
  ngx_str_t head_n;
  ngx_str_t tail_n;
} ngx_http_shell_loc_conf_t;
字符串类型的参数doc_root是指令document_root的参数;这个指令可以出现在main、server或location块中。ls_opts是指令ls的参数,它是字符串数组类型(因为我们允许三个字符串作为参数“-l”, "-a", "-h")。head_n和tail_n分别是指令head和tail的参数,它们和linux shell命令head和tail的-n参数类似。在nginx中,字符串通过ngx_str_t来表示;字符串操作也被重新定义,例如:ngx_strlen, ngx_strcmp, ngx_memset, ngx_memcpy等;数组由ngx_array_t表示,它也有一些操作函数,例如:ngx_array_create, ngx_array_init, ngx_array_push, ngx_array_destroy等。
3.3 模块定义
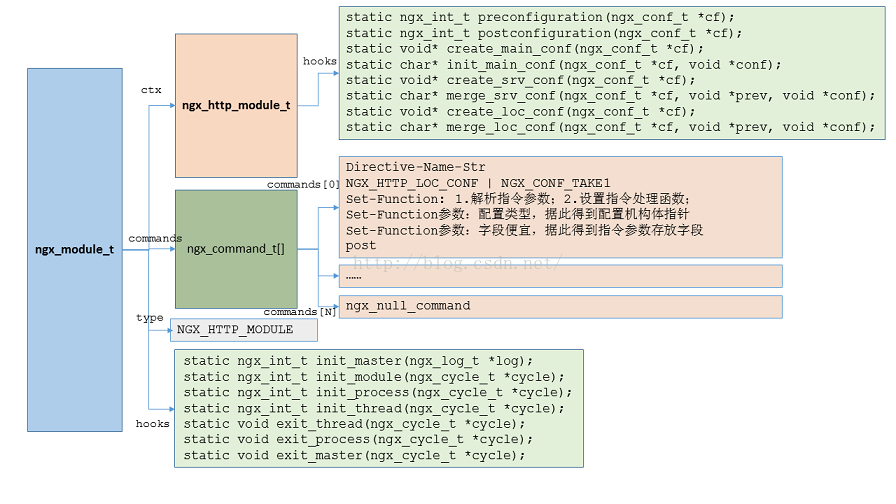
模块是通过如下这么一个结构体定义的。模块的入口文件(ngx_http_shell_module.c)的核心就是定义这么一个结构体,当然这个结构体涉及到其他内嵌结构体和一些钩子函数。
struct ngx_module_s {
    ngx_uint_t            ctx_index;
    ngx_uint_t            index;

    char                 *name;

    ngx_uint_t            spare0;
    ngx_uint_t            spare1;

    ngx_uint_t            version;
    const char           *signature;

    void                 *ctx;
    ngx_command_t        *commands;
    ngx_uint_t            type;

    ngx_int_t           (*init_master)(ngx_log_t *log);

    ngx_int_t           (*init_module)(ngx_cycle_t *cycle);

    ngx_int_t           (*init_process)(ngx_cycle_t *cycle);
    ngx_int_t           (*init_thread)(ngx_cycle_t *cycle);
    void                (*exit_thread)(ngx_cycle_t *cycle);
    void                (*exit_process)(ngx_cycle_t *cycle);

    void                (*exit_master)(ngx_cycle_t *cycle);

    uintptr_t             spare_hook0;
    uintptr_t             spare_hook1;
    uintptr_t             spare_hook2;
    uintptr_t             spare_hook3;
    uintptr_t             spare_hook4;
    uintptr_t             spare_hook5;
    uintptr_t             spare_hook6;
    uintptr_t             spare_hook7;
};
这个结构体就定义了整个模块;按照nginx的命名规则,结构体变量的名字是ngx_{module-type}_{module-name}_module;所以我们的shell模块定义为:
ngx_module_t ngx_http_shell_module =
{
  NGX_MODULE_V1,
  &ngx_http_shell_module_ctx,
  ngx_http_shell_commands,
  NGX_HTTP_MODULE,
  init_master,
  init_module,
  init_process,
  init_thread,
  exit_thread,
  exit_process,
  exit_master,
  NGX_MODULE_V1_PADDING
};
下面几节逐一看其中内嵌的结构体或者钩子函数。
3.4 填充字段
我们暂不关心下面两部分字段:
    ngx_uint_t            ctx_index;
    ngx_uint_t            index;

    char                 *name;

    ngx_uint_t            spare0;
    ngx_uint_t            spare1;

    ngx_uint_t            version;
    const char           *signature;
和
    uintptr_t             spare_hook0;
    uintptr_t             spare_hook1;
    uintptr_t             spare_hook2;
    uintptr_t             spare_hook3;
    uintptr_t             spare_hook4;
    uintptr_t             spare_hook5;
    uintptr_t             spare_hook6;
    uintptr_t             spare_hook7;
在我们定义的ngx_http_shell_module结构体中,这两部分分别由NGX_MODULE_V1和NGX_MODULE_V1_PADDING填充成默认值。
#define NGX_MODULE_V1                                                         \
    NGX_MODULE_UNSET_INDEX, NGX_MODULE_UNSET_INDEX,                           \
    NULL, 0, 0, nginx_version, NGX_MODULE_SIGNATURE

#define NGX_MODULE_V1_PADDING  0, 0, 0, 0, 0, 0, 0, 0
3.5 模块类型
由于我们的shell模块是http模块,所以在ngx_http_shell_module结构体中,ngx_uint_t type被初始化成NGX_HTTP_MODULE。
3.6 初始化和退出钩子函数
    ngx_int_t           (*init_master)(ngx_log_t *log);
    ngx_int_t           (*init_module)(ngx_cycle_t *cycle);
    ngx_int_t           (*init_process)(ngx_cycle_t *cycle);
    ngx_int_t           (*init_thread)(ngx_cycle_t *cycle);
    void                (*exit_thread)(ngx_cycle_t *cycle);
    void                (*exit_process)(ngx_cycle_t *cycle);
    void                (*exit_master)(ngx_cycle_t *cycle);
一般情况下不需要关心这些钩子函数,直接设置成NULL即可。但是,为了搞清楚它们分别在什么时候被调用,我简单的把它们实现为输出一行log。注意这里面没有与init_module对应的exit_module函数,其他三对都是init和exit对应。
static ngx_int_t init_master(ngx_log_t *log)
{
  ngx_log_error(NGX_LOG_ERR, log, 0, "%s", __func__);
  return NGX_OK;
}
static ngx_int_t init_module(ngx_cycle_t *cycle)
{
  ngx_log_error(NGX_LOG_ERR, cycle->log, 0, "%s", __func__);
  return NGX_OK;
}
static ngx_int_t init_process(ngx_cycle_t *cycle)
{
  ngx_log_error(NGX_LOG_ERR, cycle->log, 0, "%s", __func__);
  return NGX_OK;
}
static ngx_int_t init_thread(ngx_cycle_t *cycle)
{
  ngx_log_error(NGX_LOG_ERR, cycle->log, 0, "%s", __func__);
  return NGX_OK;
}
static void exit_thread(ngx_cycle_t *cycle)
{
  ngx_log_error(NGX_LOG_ERR, cycle->log, 0, "%s", __func__);
}
static void exit_process(ngx_cycle_t *cycle)
{
  ngx_log_error(NGX_LOG_ERR, cycle->log, 0, "%s", __func__);
}
static void exit_master(ngx_cycle_t *cycle)
{
  ngx_log_error(NGX_LOG_ERR, cycle->log, 0, "%s", __func__);
}
这样实现之后,在启动nginx时,会在error.log中看见如下log:
# cat /usr/local/nginx-1.10.0/logs/error.log
2016/05/17 18:40:33 [error] 78301#0: init_module
2016/05/17 18:40:33 [error] 78305#0: init_process
2016/05/17 18:40:33 [error] 78306#0: init_process
2016/05/17 18:40:33 [error] 78303#0: init_process
2016/05/17 18:40:33 [error] 78304#0: init_process
init_master没有打印log,这可能是因为master初始化时log模块还未就绪(待确认);init_thread何时调用(待确认);我们配置了4个worker processes(在nginx.conf配置worker_processes),所以init_process被调用4次;
在nginx退出时,可以看见如下log:
# /usr/local/nginx-1.10.0/sbin/nginx -s quit
[root@localhost nginx-1.10.0]# cat /usr/local/nginx-1.10.0/logs/error.log
......
2016/05/17 18:47:25 [notice] 78323#0: signal process started
2016/05/17 18:47:25 [error] 78303#0: exit_process
2016/05/17 18:47:25 [error] 78304#0: exit_process
2016/05/17 18:47:25 [error] 78305#0: exit_process
2016/05/17 18:47:25 [error] 78306#0: exit_process
2016/05/17 18:47:25 [error] 78302#0: exit_master
可见,4个worker processes退出之后master process退出。
3.7 模块的context
模块定义结构体ngx_module_t ngx_http_shell_module中包含模块的context(字段ctx被初始化为&ngx_http_shell_module_ctx)。现在我们
就来定义结构体变量ngx_http_shell_module_ctx,它的类型是ngx_http_module_t:
typedef struct {
    ngx_int_t   (*preconfiguration)(ngx_conf_t *cf);
    ngx_int_t   (*postconfiguration)(ngx_conf_t *cf);

    void       *(*create_main_conf)(ngx_conf_t *cf);
    char       *(*init_main_conf)(ngx_conf_t *cf, void *conf);

    void       *(*create_srv_conf)(ngx_conf_t *cf);
    char       *(*merge_srv_conf)(ngx_conf_t *cf, void *prev, void *conf);

    void       *(*create_loc_conf)(ngx_conf_t *cf);
    char       *(*merge_loc_conf)(ngx_conf_t *cf, void *prev, void *conf);
} ngx_http_module_t;
其中包含八个钩子函数,分别在不同时刻被nginx调用。我们只需关注其中最后两个。我还是希望把它们实现为只输出一行log的占位函数以便观察它们在什么时候被调用,但是对于create_main_conf和create_srv_conf却不行(它们需要实际的创建main conf和server conf)。所以,最终我把create_main_conf和create_srv_conf设置为NULL(这样nginx就会调用默认的函数);把preconfiguration、postconfiguration、init_main_conf和merge_srv_conf实现为只打印log的占位函数;着重实现最后两个函数create_loc_conf和merge_loc_conf。结构体变量ngx_http_shell_module_ctx的定义如下:
static ngx_http_module_t ngx_http_shell_module_ctx =
{
  preconfiguration,
  postconfiguration,
  NULL,
  init_main_conf,
  NULL,
  merge_srv_conf,
  create_loc_conf,
  merge_loc_conf
};
这钩子些函数的定义为:
//hooks in context
static ngx_int_t preconfiguration(ngx_conf_t *cf)
{
  ngx_log_error(NGX_LOG_ERR, cf->log, 0, "%s", __func__);
  return NGX_OK;
}
static ngx_int_t postconfiguration(ngx_conf_t *cf)
{
  ngx_log_error(NGX_LOG_ERR, cf->log, 0, "%s", __func__);
  return NGX_OK;
}
/*
static void* create_main_conf(ngx_conf_t *cf)
{
  ngx_log_error(NGX_LOG_ERR, cf->log, 0, "%s", __func__);
  return NULL;
}
*/
static char* init_main_conf(ngx_conf_t *cf, void *conf)
{
  ngx_log_error(NGX_LOG_ERR, cf->log, 0, "%s", __func__);
  return NGX_CONF_OK;
}
/*
static void* create_srv_conf(ngx_conf_t *cf)
{
  ngx_log_error(NGX_LOG_ERR, cf->log, 0, "%s", __func__);
  return NULL;
}
*/
static char* merge_srv_conf(ngx_conf_t *cf, void *prev, void *conf)
{
  ngx_log_error(NGX_LOG_ERR, cf->log, 0, "%s", __func__);
  return NGX_CONF_OK;
}
static void* create_loc_conf(ngx_conf_t* cf)
{
  ngx_log_error(NGX_LOG_ERR, cf->log, 0, "%s", __func__);
  ngx_http_shell_loc_conf_t* conf = ngx_pcalloc(cf->pool, sizeof(ngx_http_shell_loc_conf_t));
  if (conf == NULL)
  {
    return NGX_CONF_ERROR;
  }
  conf->doc_root.len = 0;
  conf->doc_root.data = NULL;

  conf->ls_opts = NGX_CONF_UNSET_PTR;

  conf->head_n.len = 0;
  conf->head_n.data = NULL;

  conf->tail_n.len = 0;
  conf->tail_n.data = NULL;

  return conf;
}
static char* merge_loc_conf(ngx_conf_t* cf, void* prev, void* conf)
{
  ngx_log_error(NGX_LOG_ERR, cf->log, 0, "%s", __func__);
  ngx_http_shell_loc_conf_t* parent = prev;
  ngx_http_shell_loc_conf_t* child = conf;

  ngx_conf_merge_str_value(child->doc_root, parent->doc_root, "/tmp");
  ngx_conf_merge_ptr_value(child->ls_opts, parent->ls_opts, NGX_CONF_UNSET_PTR);
  ngx_conf_merge_str_value(child->head_n, parent->head_n, "-10");
  ngx_conf_merge_str_value(child->tail_n, parent->tail_n, "-10");

  return NGX_CONF_OK;
}
前几个都是只打印log的占位函数,我们看最后两个:
- create_loc_conf: 可以看出,这个函数创建一个loc配置结构体(从cf->pool中分配内存),并初始化其中的各个字段。它在nginx启动阶段被调用(这个启动阶段并不准确,后续研究究竟在什么时候;现在说启动阶段是和请求处理阶段区分的)。在nginx模块开发中,内存分配主要由两个函数完成:ngx_palloc和ngx_pcalloc。它们的区别类似于UNIX API中alloc和calloc的区别,也就是前者分配内存,后者分配内存并把分配的内存全部置为0;实现上,ngx_pcalloc调用ngx_palloc并调用ngx_memzero把分配到的内存置为0。与UNIX API不同的是,这两个函数分配的内存不需要程序员手动释放,因为它们是中nginx的pool中分配的内存,nginx会自行管理它们。
- merge_loc_conf: 这个函数将父block层的配置合并到loc层;在我们的例子中,document_root可以出现在main、server层,也可以出现在location层,假如多层同时出现了这个指令,那么它的参数需要合并到loc配置中。怎么合并呢?
ngx_conf_merge_str_value(child->doc_root, parent->doc_root, "/tmp");
#define ngx_conf_merge_str_value(conf, prev, default)                        \
    if (conf.data == NULL) {                                                 \
        if (prev.data) {                                                     \
            conf.len = prev.len;                                             \
            conf.data = prev.data;                                           \
        } else {                                                             \
            conf.len = sizeof(default) - 1;                                  \
            conf.data = (u_char *) default;                                  \
        }                                                                    \
    }
通过宏ngx_conf_merge_str_value的定义可知:若子block有定义则使用子block的;若子block没有而父block有定义,则使用父block的;若父block也没有,则使用默认值(第三个参数)。其他几个参数的合并规则也是类似的。都是“内部覆盖外部”。
除了ngx_conf_merge_str_value之外,还有其他宏用于其他类型的参数的合并:
ngx_conf_merge_value
ngx_conf_merge_ptr_value
ngx_conf_merge_uint_value
ngx_conf_merge_msec_value
ngx_conf_merge_sec_value
ngx_conf_merge_size_value
ngx_conf_merge_off_value
ngx_conf_merge_bufs_value
ngx_conf_merge_bitmask_value
加上这些context中的钩子函数,nginx启动时log是这样的:
# cat /usr/local/nginx-1.10.0/logs/error.log
2016/05/18 10:14:27 [error] 88858#0: create_loc_conf
2016/05/18 10:14:27 [error] 88858#0: preconfiguration
2016/05/18 10:14:27 [error] 88858#0: create_loc_conf
2016/05/18 10:14:27 [error] 88858#0: create_loc_conf
2016/05/18 10:14:27 [error] 88858#0: create_loc_conf
2016/05/18 10:14:27 [error] 88858#0: create_loc_conf
2016/05/18 10:14:27 [error] 88858#0: create_loc_conf
2016/05/18 10:14:27 [error] 88858#0: create_loc_conf
2016/05/18 10:14:27 [error] 88858#0: create_loc_conf
2016/05/18 10:14:27 [error] 88858#0: create_loc_conf
2016/05/18 10:14:27 [error] 88858#0: create_loc_conf
2016/05/18 10:14:27 [error] 88858#0: init_main_conf
2016/05/18 10:14:27 [error] 88858#0: merge_srv_conf
2016/05/18 10:14:27 [error] 88858#0: merge_loc_conf
2016/05/18 10:14:27 [error] 88858#0: merge_loc_conf
2016/05/18 10:14:27 [error] 88858#0: merge_srv_conf
2016/05/18 10:14:27 [error] 88858#0: merge_loc_conf
2016/05/18 10:14:27 [error] 88858#0: merge_loc_conf
2016/05/18 10:14:27 [error] 88858#0: merge_loc_conf
2016/05/18 10:14:27 [error] 88858#0: merge_loc_conf
2016/05/18 10:14:27 [error] 88858#0: merge_loc_conf
2016/05/18 10:14:27 [error] 88858#0: merge_loc_conf
2016/05/18 10:14:27 [error] 88858#0: merge_loc_conf
2016/05/18 10:14:27 [error] 88858#0: postconfiguration
2016/05/18 10:14:27 [error] 88858#0: init_module
2016/05/18 10:14:27 [error] 88861#0: init_process
2016/05/18 10:14:27 [error] 88862#0: init_process
2016/05/18 10:14:27 [error] 88863#0: init_process
2016/05/18 10:14:27 [error] 88860#0: init_process
通过log可知,create_loc_conf被调用10次,merge_loc_conf被调用9次。而nginx.conf中一共配置了7个location。为什么?merge_srv_conf被调用2次,这个和nginx.conf中配置了两个server有关吗?
3.8 模块的命令
在ngx_module_t ngx_http_shell_module中一个最重要的字段是ngx_http_shell_commands,它定义了nginx模块的功能(有哪些指令,每个
指令的功能是什么)。看看这个自动是怎么定义的:
static ngx_command_t ngx_http_shell_commands[] =
{
  {
    ngx_string("document_root"),

    //this cmd may appear in main, server or location block;
    NGX_HTTP_MAIN_CONF | NGX_HTTP_SRV_CONF | NGX_HTTP_LOC_CONF | NGX_CONF_TAKE1,

    //this cmd does nothing but set variable head_def_n; so we use ngx_conf_set_{type}_slot as
    //the handler;
    ngx_conf_set_str_slot,
    NGX_HTTP_LOC_CONF_OFFSET,
    offsetof(ngx_http_shell_loc_conf_t, doc_root),
    NULL
  },
  {
    ngx_string("ls"),
    NGX_HTTP_LOC_CONF | NGX_CONF_TAKE1,  //3 allowed options: -l -a -h; but it's treated as one param of array type
    ngx_http_shell_ls,
    NGX_HTTP_LOC_CONF_OFFSET,
    offsetof(ngx_http_shell_loc_conf_t, ls_opts),
    NULL
  },
  {
    ngx_string("head"),
    NGX_HTTP_LOC_CONF | NGX_CONF_TAKE1,    //1 allowed option: -num (similar to shell command "head -20")
    ngx_http_shell_head,
    NGX_HTTP_LOC_CONF_OFFSET,
    offsetof(ngx_http_shell_loc_conf_t, head_n),
    NULL
  },
  {
    ngx_string("tail"),
    NGX_HTTP_LOC_CONF | NGX_CONF_TAKE1,    //1 allowed option: num (similar to shell command "tail -20")
    ngx_http_shell_tail,
    NGX_HTTP_LOC_CONF_OFFSET,
    offsetof(ngx_http_shell_loc_conf_t, tail_n),
    NULL
  },
  {
    ngx_string("cat"),
    NGX_HTTP_LOC_CONF | NGX_CONF_NOARGS,
    ngx_http_shell_cat,
    NGX_HTTP_LOC_CONF_OFFSET,
    0,        //no args
    NULL
  },
  ngx_null_command
};
显然,这是一个结构体数组;每个数组元素是一个ngx_command_t类型的结构体,这个结构体定义一个指令。我们一共定义了5个指令:document_root, ls, head, tail和cat。数组以空值ngx_null_command结束。对照nginx.conf,看看这5个指令的作用:
user  nobody;
worker_processes  4;

events {
    worker_connections  1024;
}

http {
    include       mime.types;
    default_type  application/octet-stream;

    sendfile        on;
    keepalive_timeout  65;

    server {
        listen       8080;
        server_name  localhost-proxied;
        root /data/upstream1;

        location / {
        }
    }

    server {
        listen       9090;
        server_name  localhost-proxy;

        document_root /home/yuanguo.hyg/workspace;

        location / {
            proxy_pass http://localhost:8080/;
        }

        location ~\.(gif|jpg|png)$ {
            root /data/images;
        }

        location  /shell/ls/ {
            ls -a;
            ls -l;
            ls -h;
        }
        location  /shell/head/ {
            head -8;
        }
        location  /shell/tail/ {
            tail -12;
        }
        location  /shell/cat/ {
            cat;
        }
    }
}- document_root: 设置下面几个指令操作对象的宿主目录;下面几个指令操作的文件和目录都是位于这个目录之下;
- ls : 当请求URI以/shell/ls/打头时,调用ls命令处理这个请求,列出URI中指定的文件或目录(和linux shell的ls命令类似)。后续的代码中,可以看见ls是如何处理请求的。需要说明的是:为了测试数组做指令参数,ls指令需要写作三行,每行一个参数(不可以写成ls -a -l -h)。这样不是指一个请求被ls以不同的参数处理三遍。
- head : 当请求URI以/shell/head/打头时,调用head处理这个请求,即输出URI中指定的文件的前8行。后续的代码中,可以看见head是如何处理请求的
- tail : 当请求URI以/shell/tail/打头时,调用tail处理这个请求,输出URI中指定文件的最后12行。
- cat : 当请求URI以/shell/cat/打头时,调用cat处理这个命令,输出URI中指定的文件内容。
下面看看每一个指令的构造:
struct ngx_command_s {
    ngx_str_t             name;
    ngx_uint_t            type;
    char               *(*set)(ngx_conf_t *cf, ngx_command_t *cmd, void *conf);
    ngx_uint_t            conf;
    ngx_uint_t            offset;
    void                 *post;
};

typedef struct ngx_command_s     ngx_command_t;
name
指令的名字字符串,无需多讲。
type
指令类型,定义了指令可能出现的地方、参数个数。它们通过bit或组合在type之中。
对应http模块,指令可能出现在三个地方:main块,server块和location块,分别对应如下三个宏:
#define NGX_HTTP_MAIN_CONF        0x02000000
#define NGX_HTTP_SRV_CONF         0x04000000
#define NGX_HTTP_LOC_CONF         0x08000000
例如,document_root指令的type是NGX_HTTP_MAIN_CONF | NGX_HTTP_SRV_CONF | NGX_HTTP_LOC_CONF | ...,表示document_root可以出现在三个块中(若同时出现,则遵循“内部覆盖外部”的原则);而ls指令的type是NGX_HTTP_LOC_CONF |...,表示它只能出现在location块。
参数个数由下列宏来表示:
#define NGX_CONF_NOARGS      0x00000001
#define NGX_CONF_TAKE1       0x00000002
#define NGX_CONF_TAKE2       0x00000004
#define NGX_CONF_TAKE3       0x00000008
#define NGX_CONF_TAKE4       0x00000010
#define NGX_CONF_TAKE5       0x00000020
#define NGX_CONF_TAKE6       0x00000040
#define NGX_CONF_TAKE7       0x00000080

#define NGX_CONF_TAKE12      (NGX_CONF_TAKE1|NGX_CONF_TAKE2)
#define NGX_CONF_TAKE13      (NGX_CONF_TAKE1|NGX_CONF_TAKE3)
#define NGX_CONF_TAKE23      (NGX_CONF_TAKE2|NGX_CONF_TAKE3)
#define NGX_CONF_TAKE123     (NGX_CONF_TAKE1|NGX_CONF_TAKE2|NGX_CONF_TAKE3)
#define NGX_CONF_TAKE1234    (NGX_CONF_TAKE1|NGX_CONF_TAKE2|NGX_CONF_TAKE3   \
                              |NGX_CONF_TAKE4)
NGX_CONF_NOARGS表示指令没有参数,NGX_CONF_TAKE1表示指令有一个参数,NGX_CONF_TAKE2表示指令有两个参数,依次类推,直到NGX_CONF_TAKE7。NGX_CONF_TAKE12表示指令有一个或者两个参数;NGX_CONF_TAKE13表示指令有两个或三个参数,依次类推。显然,cat指令没有参数;document_root,head和tail都有一个参数;ls也有一个参数,不过是数组类型的。
set
函数指针,它有两个作用:
- 解析指令参数:解析指令的参数并保存到模块配置结构体中(在本例中是ngx_http_shell_loc_conf_t结构体);配置结构体内存地址在哪,保存到结构体的哪个字段呢?这是struct ngx_command_s的后两个字段conf和offset决定的。见后文。
- 设置指令处理函数:把指令的处理函数指针设置到core模块的配置中。指令的处理函数就是指令处理用户请求的逻辑。set函数在nginx启动时被调用,解析指令参数并设置指令的处理函数;而指令处理函数在处理请求时被nginx调用,处理用户请求,并产生HTTP响应。
char *ngx_conf_set_flag_slot(ngx_conf_t *cf, ngx_command_t *cmd, void *conf);
char *ngx_conf_set_str_slot(ngx_conf_t *cf, ngx_command_t *cmd, void *conf);
char *ngx_conf_set_str_array_slot(ngx_conf_t *cf, ngx_command_t *cmd,
    void *conf);
char *ngx_conf_set_keyval_slot(ngx_conf_t *cf, ngx_command_t *cmd, void *conf);
char *ngx_conf_set_num_slot(ngx_conf_t *cf, ngx_command_t *cmd, void *conf);
char *ngx_conf_set_size_slot(ngx_conf_t *cf, ngx_command_t *cmd, void *conf);
char *ngx_conf_set_off_slot(ngx_conf_t *cf, ngx_command_t *cmd, void *conf);
char *ngx_conf_set_msec_slot(ngx_conf_t *cf, ngx_command_t *cmd, void *conf);
char *ngx_conf_set_sec_slot(ngx_conf_t *cf, ngx_command_t *cmd, void *conf);
char *ngx_conf_set_bufs_slot(ngx_conf_t *cf, ngx_command_t *cmd, void *conf);
char *ngx_conf_set_enum_slot(ngx_conf_t *cf, ngx_command_t *cmd, void *conf);
char *ngx_conf_set_bitmask_slot(ngx_conf_t *cf, ngx_command_t *cmd, void *conf);
static char* ngx_http_shell_ls(ngx_conf_t* cf, ngx_command_t* cmd, void* conf)
{
  ngx_http_core_loc_conf_t* clcf = ngx_http_conf_get_module_loc_conf(cf, ngx_http_core_module);
  clcf->handler = ngx_http_shell_handler;
  ngx_conf_set_str_array_slot(cf,cmd,conf);
  return NGX_CONF_OK;
}
static char* ngx_http_shell_head(ngx_conf_t* cf, ngx_command_t* cmd, void* conf)
{
  ngx_http_core_loc_conf_t* clcf = ngx_http_conf_get_module_loc_conf(cf, ngx_http_core_module);
  clcf->handler = ngx_http_shell_handler;
  ngx_conf_set_str_slot(cf,cmd,conf);
  return NGX_CONF_OK;
}
static char* ngx_http_shell_tail(ngx_conf_t* cf, ngx_command_t* cmd, void* conf)
{
  ngx_http_core_loc_conf_t* clcf = ngx_http_conf_get_module_loc_conf(cf, ngx_http_core_module);
  clcf->handler = ngx_http_shell_handler;
  ngx_conf_set_str_slot(cf,cmd,conf);
  return NGX_CONF_OK;
}
static char* ngx_http_shell_cat(ngx_conf_t* cf, ngx_command_t* cmd, void* conf)
{
  ngx_http_core_loc_conf_t* clcf = ngx_http_conf_get_module_loc_conf(cf, ngx_http_core_module);
  clcf->handler = ngx_http_shell_handler;
  return NGX_CONF_OK;
}
以ls的set函数ngx_http_shell_ls为例,它首先把ls指令的处理函数设置为ngx_http_shell_handler(暂不考虑其实现),然后调用nginx的内置
函数ngx_conf_set_{type}_slot来解析指令参数。head和tail类似,而cat只需设置指令处理函数因为它没有参数。注意,它们的指令处理函数都
是ngx_http_shell_handler,这是因为我把它们的逻辑写在了同一个函数中(函数中根据URI的不同来进行不同的处理),当然也可以分开写成
不同的函数。指令处理函数将作为单独的一节在3.9中介绍。
如前文所述,ngx_conf_set_{type}_slot会解析指令参数并存储到配置结构体中。然而,配置结构体内存地址在哪,保存到结构体的哪个字段呢?
这是下两个字段决定的(这两个字段相当于ngx_conf_set_{type}_slot的参数):
conf
用于指定nginx模块配置结构体的内存地址。一般通过以下几个内置宏来指定:
#define NGX_HTTP_MAIN_CONF_OFFSET  offsetof(ngx_http_conf_ctx_t, main_conf)
#define NGX_HTTP_SRV_CONF_OFFSET   offsetof(ngx_http_conf_ctx_t, srv_conf)
#define NGX_HTTP_LOC_CONF_OFFSET   offsetof(ngx_http_conf_ctx_t, loc_conf)
offsetof函数是一个UNIX API,它返回结构体类型ngx_http_conf_ctx_t中字段main_conf,srv_conf或者loc_conf的偏移量。这样就从ngx_http_conf_ctx_t中得到了模块配置结构
体的内存地址。
offset
指令参数在模块配置结构体中的偏移量;同理,也是通过UNIX APIoffsetof来计算的。
post
作用未知
3.9 指令处理函数
如3.8节所述,command的set函数解析指令参数并设置指令的处理函数。指令处理函数是指令处理请求的逻辑,负责处理请求并生成HTTP响应。
它完成以下工作:
- 获得模块配置结构体
- 处理业务
- 产生HTTP header
- 产生HTTP body
获得模块配置结构体
ngx_http_shell_loc_conf_t* cf = ngx_http_get_module_loc_conf(r, ngx_http_shell_module);处理业务
产生HTTP header
  r->headers_out.content_type.len = sizeof("text/html") - 1;
  r->headers_out.content_type.data = (u_char*)"text/html";
  r->headers_out.status = NGX_HTTP_OK;
  r->headers_out.content_length_n = content_len;

  rc = ngx_http_send_header(r);
  if (rc == NGX_ERROR || rc > NGX_OK)
  {
    ngx_log_error(NGX_LOG_ERR, r->connection->log, 0, "Failed to send http header.");
    return rc;
}产生HTTP body
# curl http://192.168.75.138/shell/ls/yuanguo/workspace
URI:       /shell/ls/yuanguo/workspace
HEADERS:   Host=192.168.75.138  User-Agent=curl/7.19.7 (x86_64-redhat-linux-gnu) libcurl/7.19.7 NSS/3.19.1 Basic ECC zlib/1.2.3 libidn/1.18 libssh2/1.4.2

file=/home/yuanguo/workspace command=ls -a-l-h

directory
------------------
drwxr-xr-x      0       0              4.0K     .
drwxr-xr-x      0       0              4.0K     storage
drwxr-xr-x      0       0              4.0K     code-reading
drwxr-xr-x      0       0              4.0K     script
drwxr-xr-x      0       0              4.0K     boost-state-machine
drwxr-xr-x      0       0              4.0K     ..
-rw-r--r-- 0 0 6.7M ceph-0.94.5.tar.bz2struct ngx_chain_s {
ngx_buf_t *buf;
ngx_chain_t *next;
};
typedef struct ngx_chain_s ngx_chain_t;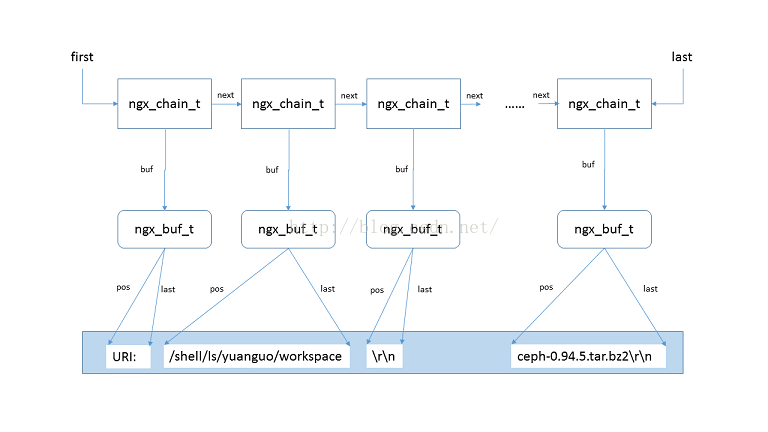
ngx_int_t fill_chain(ngx_http_request_t* r,
                     u_char*             data,
                     size_t              len,
                     int                 memory,
                     ngx_chain_t**       chain,
                     size_t*             content_len)
{
  ngx_buf_t* b = ngx_pcalloc(r->pool, sizeof(ngx_buf_t));
  if(NULL == b)
  {
    ngx_log_error(NGX_LOG_ERR,
                  r->connection->log,
                  0,
                  "Failed to allocate response buffer.");
    return NGX_HTTP_INTERNAL_SERVER_ERROR;
  }

  b->pos = data;
  b->last = b->pos + len;
  if(memory)
  {
    b->memory = 1;
  }

  ngx_chain_t* out = ngx_pcalloc(r->pool, sizeof(ngx_chain_t));
  if(NULL == out)
  {
    ngx_log_error(NGX_LOG_ERR,
                  r->connection->log,
                  0,
                  "Failed to allocate chain.");
    return NGX_HTTP_INTERNAL_SERVER_ERROR;
  }
  out->buf = b;

  *content_len += len;
  if(NULL == *chain)
  {
    *chain = out;
  }
  else
  {
    (*chain)->next = out;
    *chain = (*chain)->next;
  }

  return NGX_OK;
}static ngx_int_t ngx_http_shell_handler(ngx_http_request_t* r)
{
ngx_int_t rc;
ngx_chain_t *first, *curr=NULL;
size_t content_len = 0;
ngx_log_error(NGX_LOG_ERR, r->connection->log, 0, "%s", __func__);
ngx_http_shell_loc_conf_t* cf = ngx_http_get_module_loc_conf(r, ngx_http_shell_module);
//////////////// string "uri: " ////////////////
fill_chain(r, (u_char*)"URI:\t\t", 6, 1, &curr, &content_len);
first = curr;
//////////////// uri ////////////////
fill_chain(r, r->uri.data, r->uri.len, 1, &curr, &content_len);
//////////////// carriage-return and line-feed ////////////////
fill_chain(r, (u_char*)"\r\n", 2, 1, &curr, &content_len);
//////////////// headers in ////////////////
fill_chain(r, (u_char*)"HEADERS:\t", 9, 1, &curr, &content_len);
fill_header(r, r->headers_in.host, &curr, &content_len);
fill_header(r, r->headers_in.user_agent, &curr, &content_len);
//根据业务处理,输出更多内容……省略
//mark curr buf as last buf
curr->buf->last_buf = 1;
curr->next = NULL;
r->headers_out.content_type.len = sizeof("text/html") - 1;
r->headers_out.content_type.data = (u_char*)"text/html";
r->headers_out.status = NGX_HTTP_OK;
r->headers_out.content_length_n = content_len;
rc = ngx_http_send_header(r);
if (rc == NGX_ERROR || rc > NGX_OK)
{
ngx_log_error(NGX_LOG_ERR, r->connection->log, 0, "Failed to send http header.");
return rc;
}
return ngx_http_output_filter(r, first);
}代码中省略了业务处理的逻辑:
ls: 使用readdir_r和stat系统API来获取目录或者文件的元数据,并使用fill_chain输出;
head: 从模块配置结构体中取出参数(行数),然后通过系统API read来读取,直到行数足够或者文件结束,并使用fill_chain输出;
tail: 从模块配置结构体中取出参数(行数),然后通过系统API seek和pread,从末尾开始往前seek并读取,直到行数足够或者到达
文件开头,并使用fill_chain输出;
cat: 使用read读文件直到文件结束,并使用fill_chain输出;
4. 测试
# ./test.sh config
# ./test.sh deploy
#
# curl http://192.168.75.138/shell/ls/yuanguo/test             <---- 测试ls指令
URI:            /shell/ls/yuanguo/test
HEADERS:        Host=192.168.75.138  User-Agent=curl/7.19.7 (x86_64-redhat-linux-gnu) libcurl/7.19.7 NSS/3.19.1 Basic ECC zlib/1.2.3 libidn/1.18 libssh2/1.4.2

file=/home/yuanguo/test command=ls -a-l-h

directory
------------------
drwxr-xr-x      0       0              4.0K     .
prw-r--r--      0       0              0.0B     test_fifo
lrwxrwxrwx      0       0             20.0B     basketball.jpg
-rw-r--r--      0       0            439.0B     test.cpp
drwxr-xr-x      0       0              4.0K     ..
drwxr-xr-x      0       0              4.0K     yuanguo
-rw-r--r--      0       0            146.4M     jdk-7u79-linux-x64.gz
#
# curl http://192.168.75.138/shell/head/yuanguo/test/test.cpp  <---- 测试head指令
URI:            /shell/head/yuanguo/test/test.cpp
HEADERS:        Host=192.168.75.138  User-Agent=curl/7.19.7 (x86_64-redhat-linux-gnu) libcurl/7.19.7 NSS/3.19.1 Basic ECC zlib/1.2.3 libidn/1.18 libssh2/1.4.2

file=/home/yuanguo/test/test.cpp command=head -8

------------------
#include <string>
#include <iostream>

using namespace std;

int main()
{
#
# curl http://192.168.75.138/shell/tail/yuanguo/test/test.cpp  <---- 测试tail指令
URI:            /shell/tail/yuanguo/test/test.cpp
HEADERS:        Host=192.168.75.138  User-Agent=curl/7.19.7 (x86_64-redhat-linux-gnu) libcurl/7.19.7 NSS/3.19.1 Basic ECC zlib/1.2.3 libidn/1.18 libssh2/1.4.2

file=/home/yuanguo/test/test.cpp command=tail -12
------------------

  if(str1.find(p2) == string::npos)
  {
    cout<<"str1 doesn't contain p2"<<endl;
  }
  else
  {
    cout<<"str1 contains p2"<<endl;
  }

  return 0;
}
#
# curl http://192.168.75.138/shell/cat/yuanguo/test/test.cpp   <---- 测试cat指令
URI:            /shell/cat/yuanguo/test/test.cpp
HEADERS:        Host=192.168.75.138  User-Agent=curl/7.19.7 (x86_64-redhat-linux-gnu) libcurl/7.19.7 NSS/3.19.1 Basic ECC zlib/1.2.3 libidn/1.18 libssh2/1.4.2

file=/home/yuanguo/test/test.cpp command=cat
------------------
#include <string>
#include <iostream>

using namespace std;

int main()
{

  ......                                                       <---- 内容略
  return 0;
}
#
# /usr/local/nginx-1.10.0/sbin/nginx -s stop                   <---- 停止nginx
#
# cat /usr/local/nginx-1.10.0/logs/error.log                   <---- 查看log,观察各个钩子函数的调用
2016/05/20 10:25:25 [error] 13727#0: create_loc_conf
2016/05/20 10:25:25 [error] 13727#0: preconfiguration
2016/05/20 10:25:25 [error] 13727#0: create_loc_conf
2016/05/20 10:25:25 [error] 13727#0: create_loc_conf
2016/05/20 10:25:25 [error] 13727#0: create_loc_conf
2016/05/20 10:25:25 [error] 13727#0: create_loc_conf
2016/05/20 10:25:25 [error] 13727#0: create_loc_conf
2016/05/20 10:25:25 [error] 13727#0: create_loc_conf
2016/05/20 10:25:25 [error] 13727#0: create_loc_conf
2016/05/20 10:25:25 [error] 13727#0: create_loc_conf
2016/05/20 10:25:25 [error] 13727#0: create_loc_conf
2016/05/20 10:25:25 [error] 13727#0: init_main_conf
2016/05/20 10:25:25 [error] 13727#0: merge_srv_conf
2016/05/20 10:25:25 [error] 13727#0: merge_loc_conf
2016/05/20 10:25:25 [error] 13727#0: merge_loc_conf
2016/05/20 10:25:25 [error] 13727#0: merge_srv_conf
2016/05/20 10:25:25 [error] 13727#0: merge_loc_conf
2016/05/20 10:25:25 [error] 13727#0: merge_loc_conf
2016/05/20 10:25:25 [error] 13727#0: merge_loc_conf
2016/05/20 10:25:25 [error] 13727#0: merge_loc_conf
2016/05/20 10:25:25 [error] 13727#0: merge_loc_conf
2016/05/20 10:25:25 [error] 13727#0: merge_loc_conf
2016/05/20 10:25:25 [error] 13727#0: merge_loc_conf
2016/05/20 10:25:25 [error] 13727#0: postconfiguration
2016/05/20 10:25:25 [error] 13727#0: init_module
2016/05/20 10:25:25 [error] 13730#0: init_process
2016/05/20 10:25:25 [error] 13731#0: init_process
2016/05/20 10:25:25 [error] 13732#0: init_process
2016/05/20 10:25:25 [error] 13729#0: init_process
2016/05/20 10:25:58 [error] 13730#0: *1 ngx_http_shell_handler, client: 192.168.75.138, server: localhost-proxy, request: "GET /shell/ls/yuanguo/test HTTP/1.1", host: "192.168.75.138"
2016/05/20 10:26:20 [error] 13730#0: *2 ngx_http_shell_handler, client: 192.168.75.138, server: localhost-proxy, request: "GET /shell/head/yuanguo/test/test.cpp HTTP/1.1", host: "192.168.75.138"
2016/05/20 10:26:34 [error] 13730#0: *3 ngx_http_shell_handler, client: 192.168.75.138, server: localhost-proxy, request: "GET /shell/tail/yuanguo/test/test.cpp HTTP/1.1", host: "192.168.75.138"
2016/05/20 10:26:50 [error] 13730#0: *4 ngx_http_shell_handler, client: 192.168.75.138, server: localhost-proxy, request: "GET /shell/cat/yuanguo/test/test.cpp HTTP/1.1", host: "192.168.75.138"
2016/05/20 10:27:25 [error] 13741#0: create_loc_conf
2016/05/20 10:27:25 [error] 13741#0: preconfiguration
2016/05/20 10:27:25 [error] 13741#0: create_loc_conf
2016/05/20 10:27:25 [error] 13741#0: create_loc_conf
2016/05/20 10:27:25 [error] 13741#0: create_loc_conf
2016/05/20 10:27:25 [error] 13741#0: create_loc_conf
2016/05/20 10:27:25 [error] 13741#0: create_loc_conf
2016/05/20 10:27:25 [error] 13741#0: create_loc_conf
2016/05/20 10:27:25 [error] 13741#0: create_loc_conf
2016/05/20 10:27:25 [error] 13741#0: create_loc_conf
2016/05/20 10:27:25 [error] 13741#0: create_loc_conf
2016/05/20 10:27:25 [error] 13741#0: init_main_conf
2016/05/20 10:27:25 [error] 13741#0: merge_srv_conf
2016/05/20 10:27:25 [error] 13741#0: merge_loc_conf
2016/05/20 10:27:25 [error] 13741#0: merge_loc_conf
2016/05/20 10:27:25 [error] 13741#0: merge_srv_conf
2016/05/20 10:27:25 [error] 13741#0: merge_loc_conf
2016/05/20 10:27:25 [error] 13741#0: merge_loc_conf
2016/05/20 10:27:25 [error] 13741#0: merge_loc_conf
2016/05/20 10:27:25 [error] 13741#0: merge_loc_conf
2016/05/20 10:27:25 [error] 13741#0: merge_loc_conf
2016/05/20 10:27:25 [error] 13741#0: merge_loc_conf
2016/05/20 10:27:25 [error] 13741#0: merge_loc_conf
2016/05/20 10:27:25 [error] 13741#0: postconfiguration
2016/05/20 10:27:25 [notice] 13741#0: signal process started
2016/05/20 10:27:25 [error] 13729#0: exit_process
2016/05/20 10:27:25 [error] 13730#0: exit_process
2016/05/20 10:27:25 [error] 13731#0: exit_process
2016/05/20 10:27:25 [error] 13732#0: exit_process
2016/05/20 10:27:25 [error] 13728#0: exit_master
5. 小结
本文主要介绍开发一个http模块需要做什么,即http模块的组成。介绍的比较死板,因为旨在介绍开发步骤,没有涉及nginx内部机制。总结来说,
nginx http模块可由下图表示:
6. 附源代码
# tree modules/
modules/
└── ngx_http_shell_module
    ├── config
    ├── localfile.c
    ├── localfile.h
    ├── ngx_http_shell_module.c
    ├── util.c
    └── util.h

# ls conf/nginx.conf
conf/nginx.conf
modules/ngx_http_shell_module/ngx_http_shell_module.c
#include <ngx_config.h>
#include <ngx_core.h>
#include <ngx_http.h>

#include "util.h"
#include "localfile.h"

typedef struct
{
  ngx_str_t doc_root;
  ngx_array_t* ls_opts;
  ngx_str_t head_n;
  ngx_str_t tail_n;
} ngx_http_shell_loc_conf_t;

//hooks in module
static ngx_int_t init_master(ngx_log_t *log);
static ngx_int_t init_module(ngx_cycle_t *cycle);
static ngx_int_t init_process(ngx_cycle_t *cycle);
static ngx_int_t init_thread(ngx_cycle_t *cycle);
static void exit_thread(ngx_cycle_t *cycle);
static void exit_process(ngx_cycle_t *cycle);
static void exit_master(ngx_cycle_t *cycle);

//hooks in context
static ngx_int_t preconfiguration(ngx_conf_t *cf);
static ngx_int_t postconfiguration(ngx_conf_t *cf);
//static void* create_main_conf(ngx_conf_t *cf);
static char* init_main_conf(ngx_conf_t *cf, void *conf);
//static void* create_srv_conf(ngx_conf_t *cf);
static char* merge_srv_conf(ngx_conf_t *cf, void *prev, void *conf);
static void* create_loc_conf(ngx_conf_t *cf);
static char* merge_loc_conf(ngx_conf_t *cf, void *prev, void *conf);

//hooks in commands
static char* ngx_http_shell_ls(ngx_conf_t* cf, ngx_command_t* cmd, void* conf);
static char* ngx_http_shell_head(ngx_conf_t* cf, ngx_command_t* cmd, void* conf);
static char* ngx_http_shell_tail(ngx_conf_t* cf, ngx_command_t* cmd, void* conf);
static char* ngx_http_shell_cat(ngx_conf_t* cf, ngx_command_t* cmd, void* conf);

static ngx_command_t ngx_http_shell_commands[] =
{
  {
    ngx_string("document_root"),

    //this cmd may appear in main, server or location block;
    NGX_HTTP_MAIN_CONF | NGX_HTTP_SRV_CONF | NGX_HTTP_LOC_CONF | NGX_CONF_TAKE1,

    //this cmd does nothing but set variable head_def_n; so we use ngx_conf_set_{type}_slot as
    //the handler;
    ngx_conf_set_str_slot,
    NGX_HTTP_LOC_CONF_OFFSET,
    offsetof(ngx_http_shell_loc_conf_t, doc_root),
    NULL
  },
  {
    ngx_string("ls"),
    NGX_HTTP_LOC_CONF | NGX_CONF_TAKE1,  //3 allowed options: -l -a -h; but it's treated as one param of array type
    ngx_http_shell_ls,
    NGX_HTTP_LOC_CONF_OFFSET,
    offsetof(ngx_http_shell_loc_conf_t, ls_opts),
    NULL
  },
  {
    ngx_string("head"),
    NGX_HTTP_LOC_CONF | NGX_CONF_TAKE1,    //1 allowed option: -num (similar to shell command "head -20")
    ngx_http_shell_head,
    NGX_HTTP_LOC_CONF_OFFSET,
    offsetof(ngx_http_shell_loc_conf_t, head_n),
    NULL
  },
  {
    ngx_string("tail"),
    NGX_HTTP_LOC_CONF | NGX_CONF_TAKE1,    //1 allowed option: num (similar to shell command "tail -20")
    ngx_http_shell_tail,
    NGX_HTTP_LOC_CONF_OFFSET,
    offsetof(ngx_http_shell_loc_conf_t, tail_n),
    NULL
  },
  {
    ngx_string("cat"),
    NGX_HTTP_LOC_CONF | NGX_CONF_NOARGS,
    ngx_http_shell_cat,
    NGX_HTTP_LOC_CONF_OFFSET,
    0,        //no args
    NULL
  },
  ngx_null_command
};

static ngx_http_module_t ngx_http_shell_module_ctx =
{
  preconfiguration,
  postconfiguration,
  NULL,
  init_main_conf,
  NULL,
  merge_srv_conf,
  create_loc_conf,
  merge_loc_conf
};

ngx_module_t ngx_http_shell_module =
{
  NGX_MODULE_V1,
  &ngx_http_shell_module_ctx,
  ngx_http_shell_commands,
  NGX_HTTP_MODULE,
  init_master,
  init_module,
  init_process,
  init_thread,
  exit_thread,
  exit_process,
  exit_master,
  NGX_MODULE_V1_PADDING
};

//hooks in module
static ngx_int_t init_master(ngx_log_t *log)
{
  ngx_log_error(NGX_LOG_ERR, log, 0, "%s", __func__);
  return NGX_OK;
}
static ngx_int_t init_module(ngx_cycle_t *cycle)
{
  ngx_log_error(NGX_LOG_ERR, cycle->log, 0, "%s", __func__);
  return NGX_OK;
}
static ngx_int_t init_process(ngx_cycle_t *cycle)
{
  ngx_log_error(NGX_LOG_ERR, cycle->log, 0, "%s", __func__);
  return NGX_OK;
}
static ngx_int_t init_thread(ngx_cycle_t *cycle)
{
  ngx_log_error(NGX_LOG_ERR, cycle->log, 0, "%s", __func__);
  return NGX_OK;
}
static void exit_thread(ngx_cycle_t *cycle)
{
  ngx_log_error(NGX_LOG_ERR, cycle->log, 0, "%s", __func__);
}
static void exit_process(ngx_cycle_t *cycle)
{
  ngx_log_error(NGX_LOG_ERR, cycle->log, 0, "%s", __func__);
}
static void exit_master(ngx_cycle_t *cycle)
{
  ngx_log_error(NGX_LOG_ERR, cycle->log, 0, "%s", __func__);
}

//phase handlers
static ngx_int_t phase_handler_post_read(ngx_http_request_t *r)
{
  ngx_log_error(NGX_LOG_ERR, r->connection->log, 0, "%s", __func__);
  return NGX_OK;
}
//static ngx_int_t phase_handler_server_rewrite(ngx_http_request_t *r)
//{
//  ngx_log_error(NGX_LOG_ERR, r->connection->log, 0, "%s", __func__);
//  return NGX_OK;
//}
//static ngx_int_t phase_handler_rewrite(ngx_http_request_t *r)
//{
//  ngx_log_error(NGX_LOG_ERR, r->connection->log, 0, "%s", __func__);
//  return NGX_OK;
//}
static ngx_int_t phase_handler_preaccess(ngx_http_request_t *r)
{
  ngx_log_error(NGX_LOG_ERR, r->connection->log, 0, "%s", __func__);
  return NGX_OK;
}
static ngx_int_t phase_handler_access(ngx_http_request_t *r)
{
  ngx_log_error(NGX_LOG_ERR, r->connection->log, 0, "%s", __func__);
  return NGX_OK;
}
static ngx_int_t phase_handler_precontent(ngx_http_request_t *r)
{
  ngx_log_error(NGX_LOG_ERR, r->connection->log, 0, "%s", __func__);
  return NGX_OK;
}
//NOTICE: content handler will be overwritten by ngx_http_shell_handler,
//which is set by each directive's command;
static ngx_int_t phase_handler_content(ngx_http_request_t *r)
{
  ngx_log_error(NGX_LOG_ERR, r->connection->log, 0, "%s", __func__);
  return NGX_OK;
}
static ngx_int_t phase_handler_log(ngx_http_request_t *r)
{
  ngx_log_error(NGX_LOG_ERR, r->connection->log, 0, "%s", __func__);
  //return NGX_OK;
  return NGX_DONE;
}

struct phase_hander_pair {
  int                 phase;
  ngx_http_handler_pt handler;
};

static struct phase_hander_pair phase_handlers[] = {
  {NGX_HTTP_POST_READ_PHASE,      phase_handler_post_read},
  //{NGX_HTTP_SERVER_REWRITE_PHASE, phase_handler_server_rewrite},
  //{NGX_HTTP_REWRITE_PHASE,        phase_handler_rewrite},
  {NGX_HTTP_PREACCESS_PHASE,      phase_handler_preaccess},
  {NGX_HTTP_ACCESS_PHASE,         phase_handler_access},
  {NGX_HTTP_PRECONTENT_PHASE,     phase_handler_precontent},
  {NGX_HTTP_CONTENT_PHASE,        phase_handler_content},
  {NGX_HTTP_LOG_PHASE,            phase_handler_log}
};

//hooks in context
static ngx_int_t preconfiguration(ngx_conf_t *cf)
{
  ngx_log_error(NGX_LOG_ERR, cf->log, 0, "%s", __func__);
  return NGX_OK;
}

static ngx_int_t postconfiguration(ngx_conf_t *cf)
{
	ngx_log_error(NGX_LOG_ERR, cf->log, 0, "%s", __func__);

  int i;
  int phase;
  ngx_http_handler_pt handler;
	ngx_http_handler_pt        *h;
	ngx_http_core_main_conf_t  *cmcf;
	cmcf = ngx_http_conf_get_module_main_conf(cf, ngx_http_core_module);

  for (i=0; i < (int)(sizeof(phase_handlers)/sizeof(struct phase_hander_pair)); ++i) {
    phase = phase_handlers[i].phase;
    handler = phase_handlers[i].handler;
	  ngx_log_error(NGX_LOG_ERR, cf->log, 0, "%s register handler for phase %d", __func__, phase);
    h = ngx_array_push(&cmcf->phases[phase].handlers);
    if (h == NULL) {
      return NGX_ERROR;
    }
    *h = handler;
  }

	return NGX_OK;
}
/*
static void* create_main_conf(ngx_conf_t *cf)
{
  ngx_log_error(NGX_LOG_ERR, cf->log, 0, "%s", __func__);
  return NULL;
}
*/
static char* init_main_conf(ngx_conf_t *cf, void *conf)
{
  ngx_log_error(NGX_LOG_ERR, cf->log, 0, "%s", __func__);
  return NGX_CONF_OK;
}
/*
static void* create_srv_conf(ngx_conf_t *cf)
{
  ngx_log_error(NGX_LOG_ERR, cf->log, 0, "%s", __func__);
  return NULL;
}
*/
static char* merge_srv_conf(ngx_conf_t *cf, void *prev, void *conf)
{
  ngx_log_error(NGX_LOG_ERR, cf->log, 0, "%s", __func__);
  return NGX_CONF_OK;
}
static void* create_loc_conf(ngx_conf_t* cf)
{
  ngx_log_error(NGX_LOG_ERR, cf->log, 0, "%s", __func__);
  ngx_http_shell_loc_conf_t* conf = ngx_pcalloc(cf->pool, sizeof(ngx_http_shell_loc_conf_t));
  if (conf == NULL)
  {
    return NGX_CONF_ERROR;
  }
  conf->doc_root.len = 0;
  conf->doc_root.data = NULL;

  conf->ls_opts = NGX_CONF_UNSET_PTR;

  conf->head_n.len = 0;
  conf->head_n.data = NULL;

  conf->tail_n.len = 0;
  conf->tail_n.data = NULL;

  return conf;
}
static char* merge_loc_conf(ngx_conf_t* cf, void* prev, void* conf)
{
  ngx_log_error(NGX_LOG_ERR, cf->log, 0, "%s", __func__);
  ngx_http_shell_loc_conf_t* parent = prev;
  ngx_http_shell_loc_conf_t* child = conf;

  ngx_conf_merge_str_value(child->doc_root, parent->doc_root, "/tmp");
  ngx_conf_merge_ptr_value(child->ls_opts, parent->ls_opts, NGX_CONF_UNSET_PTR);
  ngx_conf_merge_str_value(child->head_n, parent->head_n, "-10");
  ngx_conf_merge_str_value(child->tail_n, parent->tail_n, "-10");

  return NGX_CONF_OK;
}

//hooks in commands
static ngx_int_t ngx_http_shell_handler(ngx_http_request_t* r)
{
  ngx_int_t rc;
  ngx_chain_t *first, *curr=NULL;
  size_t content_len = 0;

  ngx_log_error(NGX_LOG_ERR, r->connection->log, 0, "%s", __func__);

  ngx_http_shell_loc_conf_t* cf = ngx_http_get_module_loc_conf(r, ngx_http_shell_module);

  fill_chain(r, (u_char*)"URI:\t\t", 6, 1, &curr, &content_len);
  first = curr;

  fill_chain(r, r->uri.data, r->uri.len, 1, &curr, &content_len);

  fill_chain(r, (u_char*)"\r\n", 2, 1, &curr, &content_len);

  fill_chain(r, (u_char*)"HEADERS:\t", 9, 1, &curr, &content_len);
  fill_header(r, r->headers_in.host,        &curr, &content_len);
  fill_header(r, r->headers_in.user_agent,  &curr, &content_len);

  fill_chain(r, (u_char*)"\r\n\r\n", 4, 1, &curr, &content_len);

  u_char pathname[256];
  ngx_memset(pathname, '\0', 256);

  ngx_memcpy(pathname, cf->doc_root.data, cf->doc_root.len);

  //uri is like "/shell/{cmd}/file", we need to skip /shell/{cmd}
  size_t pos = 0;
  int c=0;

  while(pos < r->uri.len)
  {
    if(*(r->uri.data+pos) == (u_char)'/')
    {
      if(++c == 3) break;
    }
    pos++;
  }
  ngx_memcpy(pathname+cf->doc_root.len, r->uri.data+pos, r->uri.len-pos);

  fill_chain(r, (u_char*)"file=", 5, 1, &curr, &content_len);
  fill_chain(r, pathname, cf->doc_root.len+r->uri.len-pos, 1, &curr, &content_len);

  if(ngx_strncmp((char*)r->uri.data, "/shell/ls", 9) ==0)
  {
    fill_chain(r, (u_char*)" command=ls ", 12, 1, &curr, &content_len);
    ngx_str_t* opt;
    ngx_uint_t i;

    int l=0;
    int a=0;
    int h=0;
    for(i=0; i<cf->ls_opts->nelts; i++)
    {
      opt = ((ngx_str_t*)cf->ls_opts->elts) + i;
      fill_chain(r, opt->data, opt->len, 1, &curr, &content_len);
      if(ngx_strncmp((char*)opt->data, "-l", 2)==0)
      {
        l=1;
      }
      else if(ngx_strncmp((char*)opt->data, "-a", 2)==0)
      {
        a=1;
      }
      else if(ngx_strncmp((char*)opt->data, "-h", 2)==0)
      {
        h=1;
      }
      else
      {
        fill_chain(r, (u_char*)"\r\nError: unknown option ", 24, 1, &curr, &content_len);
        fill_chain(r, opt->data, opt->len, 1, &curr, &content_len);
      }
    }
    fill_chain(r, (u_char*)"\r\n", 2, 1, &curr, &content_len);

    ls_file_dir(r, (char*)pathname, l, a, h, &curr, &content_len);
  }
  else if(ngx_strncmp((char*)r->uri.data, "/shell/head", 11) ==0)
  {
    fill_chain(r, (u_char*)" command=head ", 14, 1, &curr, &content_len);
    fill_chain(r, cf->head_n.data, cf->head_n.len, 1, &curr, &content_len);
    fill_chain(r, (u_char*)"\r\n", 2, 1, &curr, &content_len);

    int headn = ngx_atoi(cf->head_n.data+1, cf->head_n.len-1); //note: head -10; +1 is to skip the '-'
    head_file(r, (char*)pathname, headn, &curr, &content_len);
  }
  else if(ngx_strncmp((char*)r->uri.data, "/shell/tail", 11) ==0)
  {
    fill_chain(r, (u_char*)" command=tail ", 14, 1, &curr, &content_len);
    fill_chain(r, cf->tail_n.data, cf->tail_n.len, 1, &curr, &content_len);
    fill_chain(r, (u_char*)"\r\n", 2, 1, &curr, &content_len);

    int tailn = ngx_atoi(cf->tail_n.data+1, cf->tail_n.len-1); //note: head -10; +1 is to skip the '-'
    tail_file(r, (char*)pathname, tailn, &curr, &content_len);
  }
  else if(ngx_strncmp((char*)r->uri.data, "/shell/cat", 10) ==0)
  {
    fill_chain(r, (u_char*)" command=cat\r\n", 14, 1, &curr, &content_len);
    cat_file(r, (char*)pathname, &curr, &content_len);
  }
  else
  {
    fill_chain(r, (u_char*)" command=unknown\r\n", 18, 1, &curr, &content_len);
  }

  //mark curr buf as last buf
  curr->buf->last_buf = 1;
  curr->next = NULL;

  r->headers_out.content_type.len = sizeof("text/html") - 1;
  r->headers_out.content_type.data = (u_char*)"text/html";
  r->headers_out.status = NGX_HTTP_OK;
  r->headers_out.content_length_n = content_len;

  rc = ngx_http_send_header(r);
  if (rc == NGX_ERROR || rc > NGX_OK)
  {
    ngx_log_error(NGX_LOG_ERR, r->connection->log, 0, "Failed to send http header.");
    return rc;
  }

  return ngx_http_output_filter(r, first);
}

static char* ngx_http_shell_ls(ngx_conf_t* cf, ngx_command_t* cmd, void* conf)
{
  ngx_log_error(NGX_LOG_ERR, cf->log, 0, "%s", __func__);
  ngx_http_core_loc_conf_t* clcf = ngx_http_conf_get_module_loc_conf(cf, ngx_http_core_module);
  clcf->handler = ngx_http_shell_handler;
  ngx_conf_set_str_array_slot(cf,cmd,conf);
  return NGX_CONF_OK;
}
static char* ngx_http_shell_head(ngx_conf_t* cf, ngx_command_t* cmd, void* conf)
{
  ngx_log_error(NGX_LOG_ERR, cf->log, 0, "%s", __func__);
  ngx_http_core_loc_conf_t* clcf = ngx_http_conf_get_module_loc_conf(cf, ngx_http_core_module);
  clcf->handler = ngx_http_shell_handler;
  ngx_conf_set_str_slot(cf,cmd,conf);
  return NGX_CONF_OK;
}

static char* ngx_http_shell_tail(ngx_conf_t* cf, ngx_command_t* cmd, void* conf)
{
  ngx_log_error(NGX_LOG_ERR, cf->log, 0, "%s", __func__);
  ngx_http_core_loc_conf_t* clcf = ngx_http_conf_get_module_loc_conf(cf, ngx_http_core_module);
  clcf->handler = ngx_http_shell_handler;
  ngx_conf_set_str_slot(cf,cmd,conf);
  return NGX_CONF_OK;
}
static char* ngx_http_shell_cat(ngx_conf_t* cf, ngx_command_t* cmd, void* conf)
{
  ngx_log_error(NGX_LOG_ERR, cf->log, 0, "%s", __func__);
  ngx_http_core_loc_conf_t* clcf = ngx_http_conf_get_module_loc_conf(cf, ngx_http_core_module);
  clcf->handler = ngx_http_shell_handler;
  return NGX_CONF_OK;
}
modules/ngx_http_shell_module/util.h
#ifndef __NGX_HTTP_SHELL_UTIL_H__
#define __NGX_HTTP_SHELL_UTIL_H__

#include <ngx_config.h>
#include <ngx_core.h>
#include <ngx_http.h>

//build a chain whose content is data;
//param r:            we allocate memory from r->pool;
//param data:         the content of the chain;
//param len:          the length of the content;
//param memory:       if the buf is in memory;
//param chain:        output param. if it's NULL, make it point to the new chain
//                    we build; else, link the new chain we build to it;
//param content_len:  accumulate the length of all chains;
ngx_int_t fill_chain(ngx_http_request_t* r,
                     u_char*             data,
                     size_t              len,
                     int                 memory,
                     ngx_chain_t**       chain,
                     size_t*             content_len);

//fill a header to the output chains; this function is used for debug (we fill
//request's headers_in into the output chains)
ngx_int_t fill_header(ngx_http_request_t* r,
                      ngx_table_elt_t*    header,
                      ngx_chain_t**       curr,
                      size_t*             content_len);

#endif
modules/ngx_http_shell_module/util.c
#include "util.h"

ngx_int_t fill_chain(ngx_http_request_t* r,
                     u_char*             data,
                     size_t              len,
                     int                 memory,
                     ngx_chain_t**       chain,
                     size_t*             content_len)
{
  ngx_buf_t* b = ngx_pcalloc(r->pool, sizeof(ngx_buf_t));
  if(NULL == b)
  {
    ngx_log_error(NGX_LOG_ERR,
                  r->connection->log,
                  0,
                  "Failed to allocate response buffer.");
    return NGX_HTTP_INTERNAL_SERVER_ERROR;
  }

  b->pos = data;
  b->last = b->pos + len;
  if(memory)
  {
    b->memory = 1;
  }

  ngx_chain_t* out = ngx_pcalloc(r->pool, sizeof(ngx_chain_t));
  if(NULL == out)
  {
    ngx_log_error(NGX_LOG_ERR,
                  r->connection->log,
                  0,
                  "Failed to allocate chain.");
    return NGX_HTTP_INTERNAL_SERVER_ERROR;
  }
  out->buf = b;

  *content_len += len;
  if(NULL == *chain)
  {
    *chain = out;
  }
  else
  {
    (*chain)->next = out;
    *chain = (*chain)->next;
  }

  return NGX_OK;
}

ngx_int_t fill_header(ngx_http_request_t* r,
                      ngx_table_elt_t*    header,
                      ngx_chain_t**       curr,
                      size_t*             content_len)
{
  fill_chain(r, header->key.data,   header->key.len,    1, curr, content_len);
  fill_chain(r, (u_char*)"=",       1,                  1, curr, content_len);
  fill_chain(r, header->value.data, header->value.len,  1, curr, content_len);
  fill_chain(r, (u_char*)"  ",      2,                  1, curr, content_len);

  return NGX_OK;
}
modules/ngx_http_shell_module/localfile.h
#ifndef __NGX_HTTP_SHELL_LOCALFILE_H__
#define __NGX_HTTP_SHELL_LOCALFILE_H__

#include <sys/types.h>
#include <sys/stat.h>
#include <fcntl.h>
#include <errno.h>

#include <ngx_config.h>
#include <ngx_core.h>
#include <ngx_http.h>

#include "util.h"

ngx_int_t cat_file(ngx_http_request_t*  r,
                   const char*          fname,
                   ngx_chain_t**        curr,
                   size_t*              content_len);

ngx_int_t head_file(ngx_http_request_t*  r,
                    const char*          fname,
                    int                  headn,
                    ngx_chain_t**        curr,
                    size_t*              content_len);

ngx_int_t tail_file(ngx_http_request_t*  r,
                    const char*          fname,
                    int                  tailn,
                    ngx_chain_t**        curr,
                    size_t*              content_len);

ngx_int_t ls_file_dir(ngx_http_request_t*   r,
                   const char*              path,
                   int                      opt_l,
                   int                      opt_a,
                   int                      opt_h,
                   ngx_chain_t**            curr,
                   size_t*                  content_len);

#endif
modules/ngx_http_shell_module/localfile.c
#include <dirent.h>
#include <sys/types.h>
#include <dirent.h>
#include <string.h>

#include "localfile.h"

ngx_int_t cat_file(ngx_http_request_t*  r,
                   const char*          fname,
                   ngx_chain_t**        curr,
                   size_t*              content_len)
{
  ngx_int_t rc = NGX_OK;
  int fd = open(fname, O_RDONLY);
  if(fd!=-1)
  {
    fill_chain(r, (u_char*)"------------------\r\n", 20, 1, curr, content_len);

    int num;
    while(1)
    {
      char* buf = ngx_pcalloc(r->pool, sizeof(char)*256);
      if((num=read(fd, buf, 256)) > 0)
      {
        fill_chain(r, (u_char*)buf, num, 1, curr, content_len);
      }
      else if(num<0)
      {
        fill_chain(r, (u_char*)"\r\nread error\r\n", 14, 1, curr, content_len);
        rc = NGX_ERROR;
        break;
      }
      else  //num==0, EOF
      {
        break;
      }
    }
    close(fd);
  }
  else
  {
    fill_chain(r, (u_char*)"\r\nopen error\r\n", 14, 1, curr, content_len);
    rc = NGX_ERROR;
  }
  return rc;
}

ngx_int_t head_file(ngx_http_request_t*  r,
                    const char*          fname,
                    int                  headn,
                    ngx_chain_t**        curr,
                    size_t*              content_len)
{
  ngx_int_t rc = NGX_OK;

  int fd = open(fname, O_RDONLY);
  if(fd!=-1)
  {
    fill_chain(r, (u_char*)"------------------\r\n", 20, 1, curr, content_len);

    int i, num, lines=0;
    int enough=0;
    while(!enough)
    {
      char* buf = ngx_pcalloc(r->pool, sizeof(char)*256);
      if((num=read(fd, buf, 256)) > 0)
      {
        for(i=0;i<num;i++)
        {
          if(buf[i] == '\n')
          {
            if(++lines == headn)
            {
              num = i+1;   //num points to '\n'; discard contents after this '\n'
              enough = 1;
              break;
            }
          }
        }
        fill_chain(r, (u_char*)buf, num, 1, curr, content_len);
      }
      else if(num<0)
      {
        fill_chain(r, (u_char*)"\r\nread error\r\n", 14, 1, curr, content_len);
        rc = NGX_ERROR;
        break;
      }
      else //num==0, EOF
      {
        break;
      }
    }
    close(fd);
  }
  else
  {
    fill_chain(r, (u_char*)"\r\nopen error\r\n", 14, 1, curr, content_len);
    rc = NGX_ERROR;
  }
  return rc;
}

ngx_int_t tail_file(ngx_http_request_t*  r,
                    const char*          fname,
                    int                  tailn,
                    ngx_chain_t**        curr,
                    size_t*              content_len)
{
  ngx_int_t rc = NGX_OK;

  tailn++;  //the last line contains '\n'

  int fd = open(fname, O_RDONLY);
  if(fd!=-1)
  {
    fill_chain(r, (u_char*)"------------------\r\n", 20, 1, curr, content_len);

    off_t pos = lseek(fd, 0, SEEK_END);   //pos points to the end of the file;
    int i, num, lines=0;
    ngx_chain_t *last = NULL;
    ngx_chain_t *first = NULL;
    int enough = 0;

    //eg. a file whose size is 800; we read it like this:
    //     [544, 800)
    //     [288, 544)
    //     [32,  288)
    //     [0,   32)
    //and we quit read once we got enough lines;
    while(!enough && pos>0)
    {
      ngx_log_error(NGX_LOG_ERR, r->connection->log, 0, "pos=%d",pos);
      size_t count;
      if(pos < 256) //from 0 to pos < 256, read all (from 0 to pos);
      {
        count = pos;                      //read 'pos' bytes next time;
        pos = lseek(fd, -pos, SEEK_CUR);  //move backward by 'pos' bytes (to 0)
      }
      else //from begin to pos >= 256, read 256 bytes (from pos-256 to pos)
      {
        count = 256;                      //read 256 bytes next time;
        pos = lseek(fd, -256, SEEK_CUR);  //move backward by 256 bytes;
      }
      ngx_log_error(NGX_LOG_ERR, r->connection->log, 0, "after seek pos=%d, count=%d",pos, count);

      char* buf = ngx_pcalloc(r->pool, sizeof(char)*count);
      if((num=pread(fd,buf,count,pos))>0)
      {
        for(i=count-1;i>=0;i--)
        {
          if(buf[i]=='\n')
          {
            if(++lines == tailn)
            {
              enough = 1;
              break;
            }
          }
        }

        //read in reverse order, so we have to link the chain manaully;
        ngx_chain_t * ret = NULL;
        fill_chain(r, (u_char*)(buf+i+1), count-i-1, 1, &ret, content_len);
        if(NULL == last)
        {
          first = last = ret;
        }
        else
        {
          ret->next = first;
          first = ret;
        }
      }
      else if(num != 0)
      {
        ngx_log_error(NGX_LOG_ERR, r->connection->log, 0, "pread errno=%d, errmsg=%s",errno, strerror(errno));
        fill_chain(r, (u_char*)"\r\npread error\r\n", 14, 1, curr, content_len);
        rc = NGX_ERROR;
        break;
      }
    }

    //we have got a piece of chain:  first->...->...->last; link it to curr;
    if(NULL != first)
    {
      (*curr)->next = first;
      (*curr) = last;
    }
    close(fd);
  }
  else
  {
    rc = NGX_ERROR;
  }
  return rc;
}

static ngx_int_t ll_file(ngx_http_request_t*   r,
                         const char*           pathname,
                         const char*           shortname,
                         int                   opt_h,
                         ngx_chain_t**         curr,
                         size_t*               content_len)
{
  struct stat buf;
  if(lstat(pathname, &buf)!=0)
  {
    ngx_log_error(NGX_LOG_ERR, r->connection->log, 0, "lstat pathname=%s, errno=%d, errmsg=%s", pathname, errno, strerror(errno));
    fill_chain(r, (u_char*)"\r\nlstat error\r\n", 15, 1, curr, content_len);
    return NGX_ERROR;
  }

  //file type
  if(S_ISLNK(buf.st_mode))
  {
    fill_chain(r, (u_char*)"l", 1, 1, curr, content_len);
  }
  else if(S_ISREG(buf.st_mode))
  {
    fill_chain(r, (u_char*)"-", 1, 1, curr, content_len);
  }
  else if(S_ISDIR(buf.st_mode))
  {
    fill_chain(r, (u_char*)"d", 1, 1, curr, content_len);
  }
  else if(S_ISFIFO(buf.st_mode))
  {
    fill_chain(r, (u_char*)"p", 1, 1, curr, content_len);
  }
  else if(S_ISSOCK(buf.st_mode))
  {
    fill_chain(r, (u_char*)"s", 1, 1, curr, content_len);
  }
  else if(S_ISBLK(buf.st_mode))
  {
    fill_chain(r, (u_char*)"b", 1, 1, curr, content_len);
  }
  else if(S_ISCHR(buf.st_mode))
  {
    fill_chain(r, (u_char*)"c", 1, 1, curr, content_len);
  }
  else
  {
    fill_chain(r, (u_char*)" ", 1, 1, curr, content_len);
  }

  //permissions;
  fill_chain(r, (S_IRUSR&buf.st_mode)?((u_char*)"r"):((u_char*)"-"), 1, 1, curr, content_len);
  fill_chain(r, (S_IWUSR&buf.st_mode)?((u_char*)"w"):((u_char*)"-"), 1, 1, curr, content_len);
  fill_chain(r, (S_IXUSR&buf.st_mode)?((u_char*)"x"):((u_char*)"-"), 1, 1, curr, content_len);

  fill_chain(r, (S_IRGRP&buf.st_mode)?((u_char*)"r"):((u_char*)"-"), 1, 1, curr, content_len);
  fill_chain(r, (S_IWGRP&buf.st_mode)?((u_char*)"w"):((u_char*)"-"), 1, 1, curr, content_len);
  fill_chain(r, (S_IXGRP&buf.st_mode)?((u_char*)"x"):((u_char*)"-"), 1, 1, curr, content_len);

  fill_chain(r, (S_IROTH&buf.st_mode)?((u_char*)"r"):((u_char*)"-"), 1, 1, curr, content_len);
  fill_chain(r, (S_IWOTH&buf.st_mode)?((u_char*)"w"):((u_char*)"-"), 1, 1, curr, content_len);
  fill_chain(r, (S_IXOTH&buf.st_mode)?((u_char*)"x"):((u_char*)"-"), 1, 1, curr, content_len);

  //space
  fill_chain(r, (u_char*)"\t", 1, 1, curr, content_len);

  ngx_log_error(NGX_LOG_ERR, r->connection->log, 0, "stat st_uid=%d, st_gid=%d", buf.st_uid, buf.st_gid);

  //user id
  char* uidbuf = ngx_pcalloc(r->pool, 32);
  sprintf(uidbuf,"%u",buf.st_uid);
  fill_chain(r, (u_char*)uidbuf, strlen(uidbuf), 1, curr, content_len);

  //space
  fill_chain(r, (u_char*)"\t", 1, 1, curr, content_len);

  //group id
  char* gidbuf = ngx_pcalloc(r->pool, 32);
  sprintf(gidbuf,"%u",buf.st_uid);
  fill_chain(r, (u_char*)gidbuf, strlen(gidbuf), 1, curr, content_len);

  //space
  fill_chain(r, (u_char*)"\t", 1, 1, curr, content_len);

  //size
  long size = buf.st_size;
  if(!opt_h)
  {
    char* sizebuf = ngx_pcalloc(r->pool, 32);
    sprintf(sizebuf, "%10.li", size);
    fill_chain(r, (u_char*)sizebuf, strlen(sizebuf), 1, curr, content_len);
  }
  else
  {
    float fsize=0;
    char* unit = ngx_pcalloc(r->pool, 1);
    if(size>=1024*1024*1024)
    {
      unit[0] = 'G';
      fsize = ((float)size)/(1024*1024*1024);
    }
    else if(size>=1024*1024)
    {
      unit[0] = 'M';
      fsize = ((float)size)/(1024*1024);
    }
    else if(size>=1024)
    {
      unit[0] = 'K';
      fsize = ((float)size)/(1024);
    }
    else
    {
      fsize = size;
      unit[0] = 'B';
    }
    char* fsizebuf = ngx_pcalloc(r->pool, 32);
    sprintf(fsizebuf,"%10.1f", fsize);
    fill_chain(r, (u_char*)fsizebuf, strlen(fsizebuf), 1, curr, content_len);
    fill_chain(r, (u_char*)unit, 1, 1, curr, content_len);
  }

  //space
  fill_chain(r, (u_char*)"\t", 1, 1, curr, content_len);

  //file name
  fill_chain(r, (u_char*)shortname, strlen(shortname), 1, curr, content_len);

  fill_chain(r, (u_char*)"\r\n", 2, 1, curr, content_len);
  return NGX_OK;
}

ngx_int_t ls_file_dir(ngx_http_request_t*   r,
                   const char*              path,
                   int                      opt_l,
                   int                      opt_a,
                   int                      opt_h,
                   ngx_chain_t**            curr,
                   size_t*                  content_len)
{
  ngx_int_t rc = NGX_OK;

  struct stat statbuf;
  if(stat(path, &statbuf) != 0)
  {
    ngx_log_error(NGX_LOG_ERR, r->connection->log, 0, "stat path=%s, errno=%d, errmsg=%s", path, errno, strerror(errno));
    fill_chain(r, (u_char*)"\r\nstat error\r\n", 14, 1, curr, content_len);
    return NGX_ERROR;
  }


  if(S_ISDIR(statbuf.st_mode))  //directory
  {
    fill_chain(r, (u_char*)"\r\ndirectory\r\n", 13, 1, curr, content_len);
    fill_chain(r, (u_char*)"------------------\r\n", 20, 1, curr, content_len);

    DIR * dir = opendir(path);
    if(NULL == dir)
    {
      ngx_log_error(NGX_LOG_ERR, r->connection->log, 0, "opendir errno=%d, errmsg=%s",errno, strerror(errno));
      fill_chain(r, (u_char*)"\r\nopendir error\r\n", 17, 1, curr, content_len);
      return NGX_ERROR;
    }

    struct dirent denbuf, *result;
    int ret = readdir_r(dir, &denbuf, &result);
    while(0 == ret && NULL != result)
    {
      size_t len = strlen(denbuf.d_name);

      char* dname = ngx_pcalloc(r->pool, len+1);
      strcpy(dname,denbuf.d_name);

      ngx_log_error(NGX_LOG_ERR, r->connection->log, 0, "d_name=%s, len=%d",dname, len);

      if(!opt_a && dname[0]=='.')   //skip invisible files if -a is not set
      {
        ngx_log_error(NGX_LOG_ERR, r->connection->log, 0, "skip %s because it's invisible and -a not set", dname);
      }
      else
      {
        if(!opt_l)
        {
          fill_chain(r, (u_char*)dname, len, 1, curr, content_len);
          fill_chain(r, (u_char*)"\t", 1, 1, curr, content_len);
        }
        else
        {
          size_t pathlen = strlen(path);

          char* fullname = ngx_pcalloc(r->pool, pathlen+len+2);
          strcpy(fullname, path);
          if(path[pathlen-1] != '/')
          {
            strcpy(fullname+pathlen, "/");
            pathlen++;
          }
          strcpy(fullname+pathlen,dname);
          ngx_log_error(NGX_LOG_ERR, r->connection->log, 0, "fullname=%s, len=%d",fullname, strlen(fullname));

          ll_file(r, fullname, dname, opt_h, curr, content_len);
        }
      }

      ret = readdir_r(dir, &denbuf, &result);
    }
    fill_chain(r, (u_char*)"\r\n", 2, 1, curr, content_len);
    closedir(dir);
    if(ret != 0 )
    {
      ngx_log_error(NGX_LOG_ERR, r->connection->log, 0, "readdir_r errno=%d, errmsg=%s",ret, strerror(ret));
      fill_chain(r, (u_char*)"\r\nreaddir_r error\r\n", 17, 1, curr, content_len);
      return NGX_ERROR;
    }
  }
  else //file
  {
    fill_chain(r, (u_char*)"\r\nfile\r\n", 8, 1, curr, content_len);
    fill_chain(r, (u_char*)"------------------\r\n", 20, 1, curr, content_len);

    size_t pathlen = strlen(path);

    int p;
    for(p=pathlen-1; p>=0&&path[p]!='/'; p--);
    char* shortname = ngx_pcalloc(r->pool, pathlen-p);
    strcpy(shortname, path+p+1);
    if(!opt_l)
    {
      fill_chain(r, (u_char*)shortname, strlen(shortname), 1, curr, content_len);
    }
    else
    {
      ll_file(r, path, shortname, opt_h, curr, content_len);
    }
  }

  return rc;
}
modules/ngx_http_shell_module/config
ngx_addon_name=ngx_http_shell_module
HTTP_MODULES="$HTTP_MODULES ngx_http_shell_module"
NGX_ADDON_SRCS="$NGX_ADDON_SRCS $ngx_addon_dir/ngx_http_shell_module.c $ngx_addon_dir/util.c $ngx_addon_dir/localfile.c"
configconf/nginx.conf
user  nobody;
worker_processes  4;

events {
    worker_connections  1024;
}

http {
    include       mime.types;
    default_type  application/octet-stream;

    sendfile        on;
    keepalive_timeout  65;

    server {
        listen       8080;
        server_name  localhost-proxied;
        root /data/upstream1;

        location / {
        }
    }

    server {
        listen       9090;
        server_name  localhost-proxy;

        document_root /home/yuanguo.hyg/workspace;

        location / {
            proxy_pass http://localhost:8080/;
        }

        location ~\.(gif|jpg|png)$ {
            root /data/images;
        }

        location  /shell/ls/ {
            ls -a;
            ls -l;
            ls -h;
        }
        location  /shell/head/ {
            head -8;
        }
        location  /shell/tail/ {
            tail -12;
        }
        location  /shell/cat/ {
            cat;
        }
    }
}


 1534
1534

 被折叠的 条评论
为什么被折叠?
被折叠的 条评论
为什么被折叠?
 到【灌水乐园】发言


