


shrio自带的Realm
- IniRealm:我们前面的示例中使用的,从ini文件中提供用户信息和认证信息
- JdbcRealm:shrio提供的使用Jdbc访问数据库的方式,提供用户信息和认证信息
- 其他PropertiesRealm等
shiro自带的Realm都有其相应的局限性,在大多数情况下我们还是需要根据业务要求自定义Realm
继承AuthorizingRealm来实现自定义Realm
为什么自定义Realm要继承AuthorizingRealm来实现?Realm接口的定义如下:
public interface Realm {
    String getName();

    boolean supports(AuthenticationToken var1);
    // shiro认证一章我们已经提到,每个Realm认证前都会调用该方法
    // 以查看是否supports(支持)已提交AuthenticationToken
    // 如果由于某种原因,您不希望Realm对数据源执行身份验证(也许是因为您只希望Realm执行授权),使该方法返回false即可

    AuthenticationInfo getAuthenticationInfo(AuthenticationToken var1) throws AuthenticationException;
    // 如果supports方法返回true,则会调用该方法进行用户认证并返回认证信息AuthenticationInfo
}
来看看Realm的继承关系图
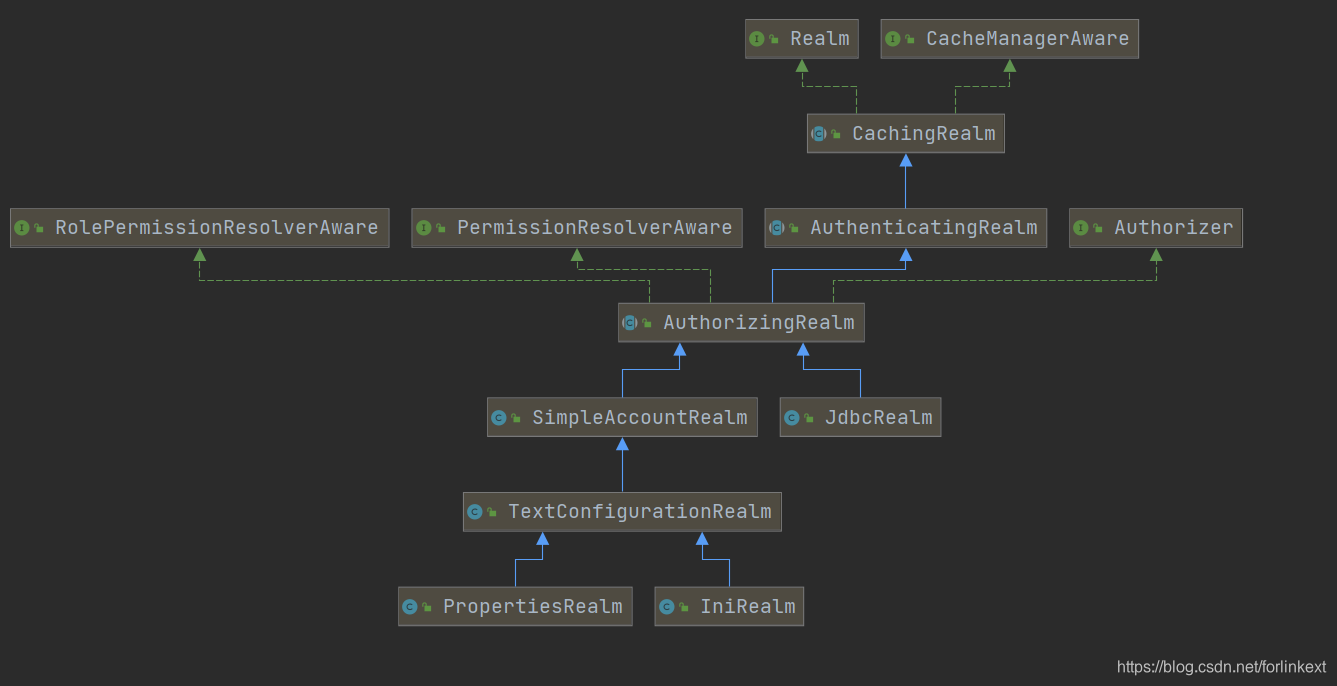
- 图中我们可以看到shiro自定义的几个Realm都直接或间接继承自AuthorizingRealm
- CachingRealm提供了可缓存的Realm(最终是通过CacheManager接口来实现的缓存,Realm通过setCacheManager方法来设置)(感兴趣可自己去查看CachingRealm的代码)
- AuthenticatingRealm实现了Realm的全部3个接口方法,其中getAuthenticationInfo方法的实现如下:
public final AuthenticationInfo getAuthenticationInfo(AuthenticationToken token) throws AuthenticationException {
	// 先获取缓存信息,通过CachingRealm中设置的CacheManager来实现的
   AuthenticationInfo info = this.getCachedAuthenticationInfo(token);
   if (info == null) {
   		// 如果缓存信息为空,则执行本类中的doGetAuthenticationInfo方法,该方法是抽象方法,由实现类实现
       info = this.doGetAuthenticationInfo(token);
       log.debug("Looked up AuthenticationInfo [{}] from doGetAuthenticationInfo", info);
       if (token != null && info != null) {
           this.cacheAuthenticationInfoIfPossible(token, info);
       }
   } else {
       log.debug("Using cached authentication info [{}] to perform credentials matching.", info);
   }

   if (info != null) {
       this.assertCredentialsMatch(token, info);
   } else {
       log.debug("No AuthenticationInfo found for submitted AuthenticationToken [{}].  Returning null.", token);
   }

   return info;
}
通过该源码可知,AuthenticatingRealm实现了shiro的认证流程,也就是调用login方法后如果有缓存则返回缓存认证信息,如果没有缓存则调用doGetAuthenticationInfo方法,我们自定义Realm就需要实现该方法。
- AuthorizingRealm(注意单词,这几个单词真的太相近了)其实现了Authorizer接口,Authorizer接口中定义了has*、check*等权限认证的方法,AuthorizingRealm中实现了这些权限认证的方法,每个has*,check*方法执行时都会执行如下getAuthorizationInfo方法。
protected AuthorizationInfo getAuthorizationInfo(PrincipalCollection principals) {
   if (principals == null) {
        return null;
    } else {
        AuthorizationInfo info = null;
        if (log.isTraceEnabled()) {
            log.trace("Retrieving AuthorizationInfo for principals [" + principals + "]");
        }

        Cache<Object, AuthorizationInfo> cache = this.getAvailableAuthorizationCache();
        Object key;
        if (cache != null) {
            if (log.isTraceEnabled()) {
                log.trace("Attempting to retrieve the AuthorizationInfo from cache.");
            }

            key = this.getAuthorizationCacheKey(principals);
            info = (AuthorizationInfo)cache.get(key);
            if (log.isTraceEnabled()) {
                if (info == null) {
                    log.trace("No AuthorizationInfo found in cache for principals [" + principals + "]");
                } else {
                    log.trace("AuthorizationInfo found in cache for principals [" + principals + "]");
                }
            }
        }

        if (info == null) {
            info = this.doGetAuthorizationInfo(principals);
            if (info != null && cache != null) {
                if (log.isTraceEnabled()) {
                    log.trace("Caching authorization info for principals: [" + principals + "].");
                }

                key = this.getAuthorizationCacheKey(principals);
                cache.put(key, info);
            }
        }

        return info;
    }
}
该方法中doGetAuthorizationInfo方法是抽象方法,需要其实现类实现。且在执行的时候,如果有缓存则直接返回缓存AuthorizationInfo 对象,如果缓存为空,才执行doGetAuthorizationInfo返回AuthorizationInfo 对象
自定义Realm
注意:该示例我们需要创建如下3个类
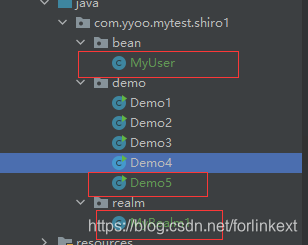
MyUser类
package com.yyoo.mytest.shiro1.bean;

import java.util.ArrayList;
import java.util.List;

/**
 * 自己的user对象,一般和你的数据库设计一致
 * 当然你还可以添加部门什么的其他信息
 */
public class MyUser {

    private String userName;

    private String password;

    /**
     * 用户角色列表(我们将角色和用户绑定)
     */
    private List<String> roles = new ArrayList<String>();

    /**
     * 用户权限列表
     */
    private List<String> permissions = new ArrayList<String>();

    public String getUserName() {
        return userName;
    }

    public void setUserName(String userName) {
        this.userName = userName;
    }

    public String getPassword() {
        return password;
    }

    public void setPassword(String password) {
        this.password = password;
    }

    public List<String> getRoles() {
        return roles;
    }

    public void setRoles(List<String> roles) {
        this.roles = roles;
    }

    public List<String> getPermissions() {
        return permissions;
    }

    public void setPermissions(List<String> permissions) {
        this.permissions = permissions;
    }

    @Override
    public String toString() {
        final StringBuilder sb = new StringBuilder("MyUser{");
        sb.append("userName='").append(userName).append('\'');
        sb.append(", password='").append(password).append('\'');
        sb.append(", roles=").append(roles);
        sb.append(", permissions=").append(permissions);
        sb.append('}');
        return sb.toString();
    }
}
MyRealm1
由于AuthorizingRealm继承自AuthenticatingRealm,其具备了基本的认证逻辑,而AuthorizingRealm本身又实现了基本的授权逻辑,这意味着我们只要继承AuthorizingRealm然后实现doGetAuthenticationInfo、doGetAuthorizationInfo两个方法即可。所以我们自定义的Realm如下:
package com.yyoo.mytest.shiro1.realm;

import com.yyoo.mytest.shiro1.bean.MyUser;
import org.apache.shiro.authc.*;
import org.apache.shiro.authz.AuthorizationInfo;
import org.apache.shiro.authz.SimpleAuthorizationInfo;
import org.apache.shiro.realm.AuthorizingRealm;
import org.apache.shiro.subject.PrincipalCollection;

public class MyRealm1 extends AuthorizingRealm {

    /**
     * 用户认证
     * @param authenticationToken
     * @return
     * @throws AuthenticationException
     */
    @Override
    protected AuthenticationInfo doGetAuthenticationInfo(AuthenticationToken authenticationToken) throws AuthenticationException {

        // 我们login的时候使用的UsernamePasswordToken,所以此处我直接强转了,大家可以根据自己的需要来做
        UsernamePasswordToken token = (UsernamePasswordToken)authenticationToken;

        // 实际开发中,请使用log打印日志
        System.out.println("realm获取的username:"+token.getUsername());// 需要认证的用户名和密码
        System.out.println("realm获取的password:"+new String(token.getPassword()));

        // 此处可自定义一个Service来实现数据库的查询以验证用户名、密码
        // 当然密码可能需要进行加密比对等,这里我们先写死,一步步来(这里我们再定义一个我们自己的User类MyUser)
        MyUser user = new MyUser(); // 此处应该通过Service获取
        user.setUserName(token.getUsername());
        user.setPassword(new String(token.getPassword()));
        // 建设实际使用中不用返回密码(只需通过用户名、密码查询数据库即可,有值说明认证通过,没有表示用户名、密码错误)
        user.getRoles().add("role1");
        user.getPermissions().add("p1:*");

        // 这里存入user,通过 subject.getPrincipal(); 返回就是对应的MyUser类型
        SimpleAuthenticationInfo simpleAuthenticationInfo =
                new SimpleAuthenticationInfo(user,
                        user.getPassword(), getName());
        return simpleAuthenticationInfo;
    }

    /**
     * 用户授权(角色权限和对应权限添加到shiro)
     * @param principalCollection
     * @return
     * 注:只有在调用如下几种情况的链接时才会执行该方法
     *
     * 直接使用checkPermissions或checkoutRoles方法鉴权
     * 或者是添加了权限注解的url
     */
    @Override
    protected AuthorizationInfo doGetAuthorizationInfo(PrincipalCollection principalCollection) {
        // 获取登录用户Bean(因为下面方法中设置的就是MyUser对象)
        // principalCollection就是在上面认证成功后会存在shiro的session的用户信息
        // 调用shiro鉴权方法后,用户信息会通过参数传递到此,所以此处直接可以获取当前登录人的信息
        MyUser user = (MyUser) principalCollection.getPrimaryPrincipal();
        // 这里需要使用获取自定义的用户信息(角色和权限)
        // 添加当前用户所拥有的角色和权限
        SimpleAuthorizationInfo simpleAuthorizationInfo = new SimpleAuthorizationInfo();
        // 添加角色
        simpleAuthorizationInfo.addRoles(user.getRoles());
        // 添加权限
        simpleAuthorizationInfo.addStringPermissions(user.getPermissions());

        return simpleAuthorizationInfo;
    }
}
Demo5
package com.yyoo.mytest.shiro1.demo;

import com.yyoo.mytest.shiro1.realm.MyRealm1;
import org.apache.shiro.SecurityUtils;
import org.apache.shiro.authc.UsernamePasswordToken;
import org.apache.shiro.mgt.DefaultSecurityManager;
import org.apache.shiro.realm.Realm;
import org.apache.shiro.subject.Subject;

public class Demo5 {

    public static void main(String[] args) {

        // 定义多个领域
        Realm realm1 = new MyRealm1();

        DefaultSecurityManager securityManager = new DefaultSecurityManager(realm1);
        SecurityUtils.setSecurityManager(securityManager);

        Subject subject = SecurityUtils.getSubject();
        UsernamePasswordToken token = new UsernamePasswordToken("user2","password");
        subject.login(token);

        System.out.println(subject.isAuthenticated());
        System.out.println(subject.getPrincipal());// 打印出来就是我们自定义的MyUser


        System.out.println(subject.isPermitted("p1"));// 会执行我们自定义的doGetAuthorizationInfo方法
        System.out.println(subject.isPermitted("p2"));

        System.out.println(subject.getSession());
        subject.getSession();
        System.out.println(subject.getSession());
        subject.logout();
        System.out.println(subject.getSession());

    }

}
缓存
上面我们提到doGetAuthenticationInfo、doGetAuthorizationInfo这两个方法的缓存都是通过CacheManager来管理,关于缓存的设置与使用我们将在后续章节讨论。
上一篇:004-shiro授权
下一篇:006-springboot整合shrio


 1万+
1万+

 被折叠的 条评论
为什么被折叠?
被折叠的 条评论
为什么被折叠?
 到【灌水乐园】发言


