


项目我已上传到github中,感兴趣的可以下载下来看看,希望大神可以在以后多多指点。
github代码地址:https://github.com/sjctt/spartacus
本章相关技术:UDP网络通信、java线程池多线程处理、redis。
项目需求文档地址:https://blog.csdn.net/FormatWindowsXP/article/details/108279929
在前一篇中我完成了关于redis模块的内容,下面我们来把采集模块完成,关于udp网络通信部分。
首先,在之前整理的需求中,对于UDP的要求为可通过配置文件对udp绑定的ip及端口进行配置,下面先来设计一下配置文件。
1.设计系统配置文件
在spartacus_datacollection/src/main/resources/config目录下建立sysconf.ini文件,作为系统配置文件。
######################Syslog_Config#########################
#------------------------------------------------------------------------------------
#open system debug log
#<debug_log>	true:open debug log
		false:close debug log
#------------------------------------------------------------------------------------
[debug]
debug_log=true

######################Syslog_Config#########################
#------------------------------------------------------------------------------------
#syslog_config is nts server sync log receive configuration option
#<IP>	Bind IPaddress to UDP Server
#<Port>	Bind Port to UDP Server
#------------------------------------------------------------------------------------
[syslog_config]
IP=0.0.0.0
Port=514
其中debug配置是我在系统中对于一些运行信息追踪的日志记录的开启和关闭配置,可以不用理会syslog为我们采集模块udp的配置,后续关系这个模块的系统配置内容都会在这个配置文件下进行配置。
2.建立服务类
在spartacus_datacollection/src/main/java/spartacus_services/syslog_service目录下建立一个syslog_service.java类文件,作为syslog模块的入口
为了不影响接口部分的正常工作,我们在一个新的线程下启动syslog服务。
package spartacus_services.syslog_service;

public class syslog_service extends Thread
{
	public void run()
	{

	}
}
然后在app.java类中,启动syslog采集模块
package spartacus_controlls;

import org.springframework.boot.SpringApplication;
import org.springframework.boot.autoconfigure.SpringBootApplication;
import org.springframework.boot.context.embedded.ConfigurableEmbeddedServletContainer;
import org.springframework.boot.context.embedded.EmbeddedServletContainerCustomizer;
import org.springframework.context.annotation.Bean;

import spartacus_public.entity.spartacus_debug;
import spartacus_services.syslog_service.syslog_service;

@SpringBootApplication
public class App
{
	public static void main(String[] args)
	{
		spartacus_debug debug = new spartacus_debug();
		debug.init();//初始化debug状态

		syslog_service syslog = new syslog_service();
		syslog.start();//启动syslog采集模块

		SpringApplication.run(App.class, args);
	}

	@Bean
	public EmbeddedServletContainerCustomizer containerCustomizer()
	{
			return new EmbeddedServletContainerCustomizer()
			{
				@Override
				public void customize(ConfigurableEmbeddedServletContainer container)
				{
					container.setPort(8003);//修改tomcat端口
				}
			};
	}
}
回到syslog_service.java中,来实现UDP监听。
package spartacus_services.syslog_service;

import java.net.DatagramSocket;
import java.net.InetSocketAddress;
import java.net.URL;
import java.nio.ByteBuffer;
import java.nio.channels.DatagramChannel;
import java.nio.channels.SelectionKey;
import java.nio.channels.Selector;
import java.nio.charset.Charset;
import java.util.Iterator;
import java.util.Set;

import org.helper.tools.iniHelper.iniOperate;

import spartacus_public.entity.spartacus_debug;

/**
 * @author Song
 * @category spartacus 接收syslog协议的服务 数据采集模块
 * @serial
 *【2020年09月01日】	建立对象
 */
public class syslog_service extends Thread
{
	public void run()
	{
		String bind_ip ="0.0.0.0"; //udp绑定的ip地址
		int bind_port =514; //udp绑定的端口
		DatagramChannel channel =null;
		DatagramSocket socket =null;
		Selector selector =null;
		ByteBuffer byteBuffer = ByteBuffer.allocate (102400000) ;//设定udp缓存区大小
		//#region 读取配置文件
		try
		{
			URL sysconf = getClass().getClassLoader().getResource("config/sysconf.ini");//获取配置文件
			iniOperate ini = new iniOperate(sysconf.getPath());
			bind_ip = ini.getValue("syslog_config", "IP");
			bind_port = Integer.parseInt(ini.getValue("syslog_config", "Port"));
		}
		catch (Exception e)
		{
			spartacus_debug.writelog_txt("spartacus_datacollection[syslog_service]:读取系统配置文件时触发catch异常,"+e.getMessage());
		}
		//#endregion

		//#region 准备udp对象
		try
		{
			channel = DatagramChannel.open();
			channel.configureBlocking(false);//将通道设置为非阻塞模式,考虑高并发
			socket = channel.socket();//创建socket监听器

			InetSocketAddress bindAddress = new InetSocketAddress(bind_ip,bind_port);
			socket.bind(bindAddress);

			selector = Selector.open(); //采用nio选择器 可支持多通道监听,方便以后扩展
			channel.register(selector, SelectionKey.OP_READ);
		}
		catch (Exception e)
		{
			spartacus_debug.writelog_txt("spartacus_datacollection[syslog_service]:绑定端口时触发catch异常,请检查端口是否已被占用,绑定ip:"+bind_ip+",端口号:"+bind_port+","+e.getMessage());
		}
		//#endregion

		//#region 开始监听
		while(true)
		{
			try
			{
				if(selector.select()>0)//如果存在0个以上的通道
				{
					Set selectedKeys = selector.selectedKeys();
					Iterator iterator = selectedKeys.iterator();
					while(iterator.hasNext())
					{
						SelectionKey sk = (SelectionKey) iterator.next() ;
						if (sk.isReadable())
						{
							DatagramChannel datagramChannel = (DatagramChannel)sk.channel();
							byteBuffer.clear();//清空缓冲区
							String server_ip= datagramChannel.receive(byteBuffer).toString().split(":")[0].replace("/", "");//获取发送者ip地址
							byteBuffer.flip();
							String data = Charset.forName("UTF-8").decode(byteBuffer).toString();//获取日志内容
							System.out.println(server_ip+"     "+data);
							iterator.remove();
						}
					}
				}
			}
			catch (Exception e)
			{
				spartacus_debug.writelog_txt("spartacus_datacollection[syslog_service]:数据接收时catch异常,"+e.getMessage());
			}
		}
		//#endregion

	}
}
测试一下监听功能是否可以正常运行,运行app.java,使用syslog发送测试工具向本机发送消息。
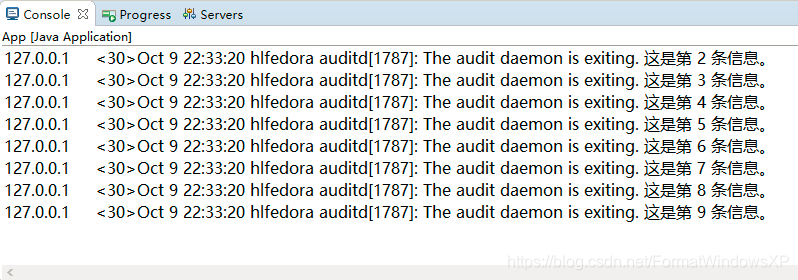
接收情况正常,udp监听部分就完成了,明天来做redis入库,syslog测试工具是我用c#做的一个模拟发送syslog日志的工具,有需要的可以到https://download.csdn.net/download/FormatWindowsXP/12794140下载
项目我已上传到github中,感兴趣的可以下载下来看看,希望大神可以在以后多多指点。
github代码地址:https://github.com/sjctt/spartacus


 3662
3662


 被折叠的 条评论
为什么被折叠?
被折叠的 条评论
为什么被折叠?
 到【灌水乐园】发言


