


1 安装python环境
mac 自带不需要安装
2 安装pip
easy_install pip
3 安装frida 安装frida-tools
pip install frida
pip install frida-tools
//检测是否安装成功
frida-ps
//能看到系统进程,表示安装成功
4 下载frida-server
官网下载:https://github.com/frida/frida/releases 对应的版本,
注意:Frida-server的版本必须跟你宿主机的Frida版本一致,比如我宿主机Frida的版本是12.2.28,
getprop ro.product.cpu.abi
armeabi-v7a
Android手机是arm的,那么应该下载:rida-server-12.2.28-android-arm.xz 文件。
5 推送frida-server到root过的手机
#下载后解压文件,并将文件重命名为: frida-server,然后推送到手机
adb push frida-server /data/local/tmp/
#修改权限并运行frida-server
adb shell
su
cd /data/local/tmp/
chmod 777 frida-server
./frida-server
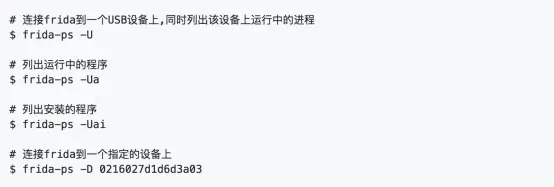
#如果要启动frida-server作为后台进程、可以使用这个命令./frida-server &6 开一个终端,使用frida-ps -U命令检查Frida是否正常运行,如果正常运行则会列出Android设备上当前正在运行的进程

7 开始Hook
利用命令行工具hook libc.so的open()函数
frida这个命令行工具,可以通过frida -help 查看"-U" 参数代表我们连接的是远程USB server,同理你也可以使用其他参数来连接,"-f "参数则表示在手机端启动一个你指定的android程序,那个FILE则表示应用的包名,
通常"-f"这个参数配合"--no-pause"参数来使用,因为可能不让进程恢复的话可能会有奇怪的问题,"-p" 与"-n"命令分别表示attach到进程的名字或者pid,"-l"参数则是代表需要注入的javascript脚本,而这个javascript的脚本就是我们所写的hook代码,完成函数的hook,内存的dump等一系列功能,
当我们使用frida这个命令行工具成功attach到目标进程的时候,frida会给我们返回一个Frida CLI,说明白点就是一个交互窗口,下面我们就能看到
test.js
setImmediate(function() {
Interceptor.attach(Module.findExportByName("libc.so" , "open"), {
    onEnter: function(args) {
        log("open() called!")
    },
    onLeave:function(retval){

    }
});
});
bogon:~ ljp$ frida -U -f com.android.chrome --no-pause
____
/ _ | Frida 12.2.28 - A world-class dynamic instrumentation toolkit
| (_| |
> _ | Commands:
/_/ |_| help -> Displays the help system
. . . . object? -> Display information about 'object'
. . . . exit/quit -> Exit
. . . .
. . . . More info at http://www.frida.re/docs/home/
[LGE Nexus 5::com.android.chrome]-> %load /Users/ljp/Documents/frida/test.js首先我们知道frida是python的一个模块,那么这样我们当然可以通过写python脚本import frida来实现对frida的利用,此外frida同时会提供几个命令行工具(工具存放在python/Scripts目录下面,所以你可以添加到系统环境变量方便使用),
# hook chrome进程的libc.so中的函数open
import frida
import sys

device = frida.get_usb_device()
pid = device.spawn(["com.android.chrome"])
session = device.attach(pid)
device.resume(pid)

src = """
Interceptor.attach(Module.findExportByName("libc.so" , "open"), {
    onEnter: function(args) {
        send("open called!");
    },
    onLeave:function(retval){

    }
});
"""
def on_message(message ,data):
    print(message['payload'])


script = session.create_script(src)
script.on("message" , on_message)
script.load()
sys.stdin.read()这个args其实就包括我们想要的东西,onEnter 表示在函数调用之前执行的代码,onLeave 表示在函数执行后需要执行的代码,所以这个retval也就包括了返回值,关于我们用的Interceptor API,frida官方的JavaScript API 文档是这么写的:
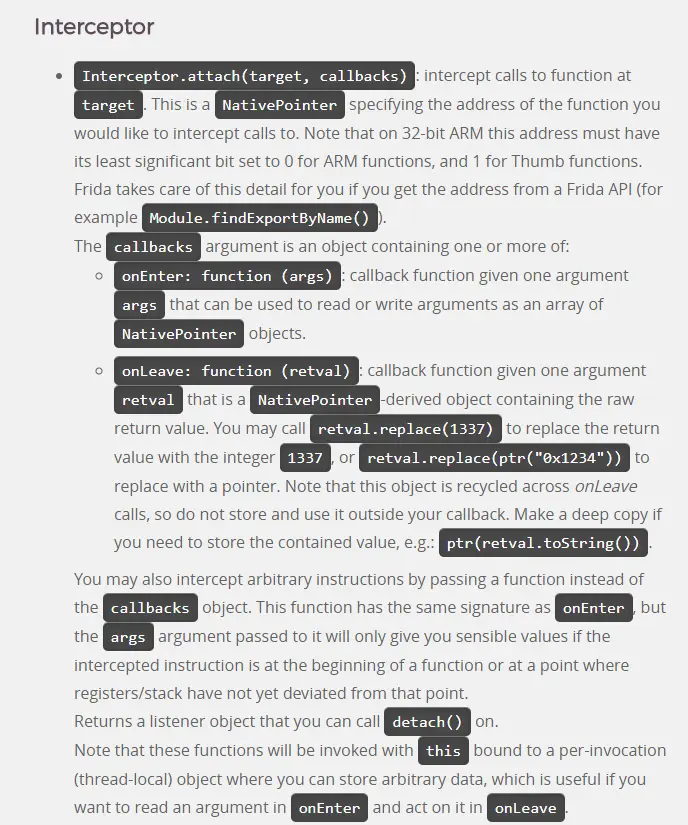
Interceptor.attach()第一个参数是一个NativePointer指针,
在之前我们用的Module.findExportByName("libc.so" , "open")的返回值,关于Moudle同样在文档中可以找到,
第二个参数则就是我们的js代码块,我们所要的打印参数与返回值也就是在这里完成。

我们完善一下代码,关于libc.so的open函数参数是这样定义的,int open( const char * pathname, int flags);
//hook chrome进程的libc.so中的函数open
import frida
import sys
import io
device = frida.get_usb_device()
pid = device.spawn(["com.android.chrome"])
session = device.attach(pid)

scr = """
setImmediate(function() {
Interceptor.attach(Module.findExportByName("libc.so" , "open"), {
    onEnter: function(args) {
        send("open called! args[0]:",Memory.readByteArray(args[0],256));
    },
    onLeave:function(retval){

    }
});
});
"""

def on_message(message ,data):
    file_object=open("/Users/ljp/Documents/frida/log.txt",'ab+')
    file_object.write(message['payload'].encode())
    file_object.write(data.split(b'\x00')[0])
    file_object.write('\n'.encode())
    file_object.close()

script = session.create_script(scr)
script.on("message" , on_message)
script.load()
sys.stdin.read()
细心的同学可能会发现,我这次没有用spawn()函数来启动chrome应用,因为如果你想hook的动作如果不是在程序开始就进行的话,而是可控的动作,那么你直接attach到其相应的进程上就好了,这样可以避免我从程序一开始就大量hook open,
此次我们启动的方式为python open.py
send("open called! args[0]:",Memory.readByteArray(args[0],256));可以看到args[0]表示open的第一个参数,由于我并不知道第一个参数的长度有多长,所以我用Memory.readByteArray(args[0],256)来读取256个字节(文件名一般不会长过256个字节吧)
然后传递给send(message[, data])的第二个参数data,
关于send(message[, data])的介绍也在官网的JS的API中,如下截图:
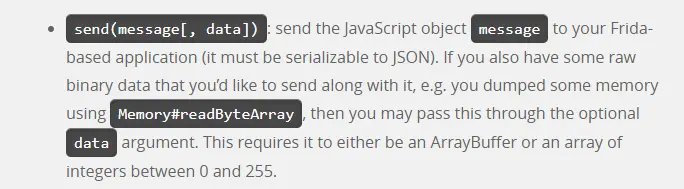
可见第二个参数是需要ArrayBuffer类型的,而Memory.readByteArray(args[0],256)的返回值刚好是ArrayBuffer类型的,所以直接传值就可以。
那么有的同学会问,如果不是ArrayBuffer类型的怎么办,比如说文档中的hexdump(target[, options])函数,它的返回值不是ArrayBuffer类型的,那么我们就需要利用下面的函数来转换:
function str2ab(str) {
            var buf = new ArrayBuffer(str.length); // 1 bytes for each char
            var bufView = new Uint8Array(buf);
            for (var i=0, strLen=str.length; i < strLen; i++) {
                bufView[i] = str.charCodeAt(i);
                }
            return buf;
        }
将上面这段代码放入hook代码中,然后调用它便可以解决问题。
数据通过send(message[, data])传递给python的on_message(message,data)函数。
第一个参数message是一个python字典类型,message['payload']存放的是send(message[, data])参数1的内容
第二个参数data是send(message[, data])的第二个参数,不过是以bytes的类型传递给python data参数。
所以我们写入文件的话,如果文件打开方式为"ab+"那么直接可以写进去,否则如果是"a+"来打开文件的话,那么需要data.decode()转换为str类型来写入。
那细心的同学可能问了,你为啥写的data.split(b'\x00')[0],首先我打开方式是"ab+",所以不需要转换类型,其次由于我之前不知道args[0]有多长,所以我读取了256个字节,那这256个字节肯定不是我全想要的,我们知道文件名中肯定不能存在0x00字节,而且C语言中字符串是要以0x00'\0'作为截断的,所以我用split(b'\x00')[0]分割字符串并且取列表中的第一项输出到文件。
到此我们的open函数就算是hook完了;
作者:SimonKoh
链接:https://www.jianshu.com/p/b833fba1bffe
来源:简书
著作权归作者所有。商业转载请联系作者获得授权,非商业转载请注明出处。


 1164
1164

 被折叠的 条评论
为什么被折叠?
被折叠的 条评论
为什么被折叠?
 到【灌水乐园】发言


