


目录
1. 1. 使用 ClassPathXmlApplicationContext 注册 bean
1.2 使用AnnotationConfigApplicationContext注册bean
2.2 InitializingBean和DisposableBean
2.3 @PostConstruct & @PreDestroy
2.5 BeanPostProcessor在Spring中的应用
4.2 Spring还支持使用@Resource(JSR250)和@Inject(JSR330)[java规范注解]
7.2、BeanDefinitionRegistryPostProcessor
前言
spring核心包:
    <dependency>
	    <groupId>org.springframework</groupId>
	    <artifactId>spring-context</artifactId>
	    <version>4.3.12.RELEASE</version>
	</dependency>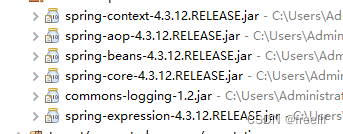
一、 组件注册
创建 bean
public class Person {
    private String name;
     Integer age;
    public String getName() {
        return name;
    }
    public void setName(String name) {
        this.name = name;
    }
    public Integer getAge() {
        return age;
    }
    public void setAge(Integer age) {
        this.age = age;
    }
    @Override
    public String toString() {
        return "Person [name=" + name + ", age=" + age + "]";
    }
    public Person(String name, Integer age) {
        super();
        this.name = name;
        this.age = age;
    }
    public Person() {
        super();
        // TODO Auto-generated constructor stub
    }
}
1. 1. 使用 ClassPathXmlApplicationContext 注册 bean
1.1.1编写 spring bean配置文件
    <?xml version="1.0" encoding="UTF-8"?>
    <beans xmlns="http://www.springframework.org/schema/beans"
           xmlns:xsi="http://www.w3.org/2001/XMLSchema-instance"
           xsi:schemaLocation="http://www.springframework.org/schema/beans
            http://www.springframework.org/schema/beans/spring-beans.xsd">
          <!-- 使用 xml配置开发    -->
         <bean id="person" class="com.study.annotation.bean.Person">
            <property name="age" value="22"></property>
            <property name="name" value="张三"></property>
         </bean>
    </beans>
附: Spring bean配置文件几种文件头
<!-- 普通 -->
<?xml version="1.0" encoding="UTF-8"?>
<beans xmlns="http://www.springframework.org/schema/beans"
xmlns:xsi="http://www.w3.org/2001/XMLSchema-instance"
xsi:schemaLocation="http://www.springframework.org/schema/beans
http://www.springframework.org/schema/beans/spring-beans.xsd">
<!-- context约束 -->
<?xml version="1.0" encoding="UTF-8"?>
<beans xmlns="http://www.springframework.org/schema/beans"
xmlns:xsi="http://www.w3.org/2001/XMLSchema-instance"
xmlns:context="http://www.springframework.org/schema/context"
xsi:schemaLocation="http://www.springframework.org/schema/beans
http://www.springframework.org/schema/beans/spring-beans.xsd
http://www.springframework.org/schema/context
http://www.springframework.org/schema/context/spring-context.xsd">
<!-- aop -->
<?xml version="1.0" encoding="UTF-8"?>
<beans xmlns="Index of /schema/beans"
xmlns:xsi="http://www.w3.org/2001/XMLSchema-instance"
xmlns:aop="Index of /schema/aop"
xsi:schemaLocation="Index of /schema/beans
https://www.springframework.org/schema/beans/spring-beans.xsd Index of /schema/aop https://www.springframework.org/schema/aop/spring-aop.xsd">
<!-- aop基于注解 -->
<?xml version="1.0" encoding="UTF-8"?>
<beans xmlns="Index of /schema/beans"
xmlns:xsi="http://www.w3.org/2001/XMLSchema-instance"
xmlns:aop="" xmlns:context="Index of /schema/context"
xsi:schemaLocation="Index of /schema/beans
https://www.springframework.org/schema/beans/spring-beans.xsd Index of /schema/aop
https://www.springframework.org/schema/aop/spring-aop.xsd Index of /schema/context
https://www.springframework.org/schema/context/spring-context.xsd">
<!-- 配置事务 -->
<?xml version="1.0" encoding="UTF-8"?>
<beans xmlns="Index of /schema/beans"
xmlns:xsi="http://www.w3.org/2001/XMLSchema-instance"
xmlns:aop="Index of /schema/aop"
xmlns:tx="Index of /schema/tx"
xsi:schemaLocation=" Index of /schema/beans
https://www.springframework.org/schema/beans/spring-beans.xsd Index of /schema/tx https://www.springframework.org/schema/tx/spring-tx.xsd Index of /schema/aop
https://www.springframework.org/schema/aop/spring-aop.xsd">
1.1.2 使用
 public static void main(String[] args) {
            ApplicationContext applicationContext = new
                        ClassPathXmlApplicationContext("beans.xml");
            Person bean = (Person)applicationContext.getBean("person");
            System.out.println(bean);
        }
1.2 使用AnnotationConfigApplicationContext注册bean
1. 创建配置文件
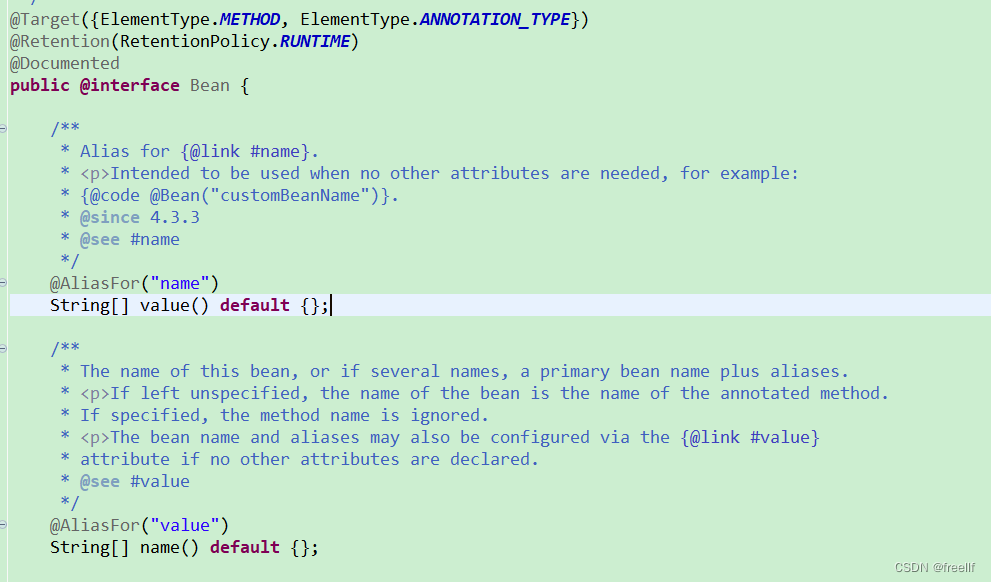
添加添加@Configuration, 告诉Spring这是一个配置类
添加注解@Bean 给容器中注册一个Bean; 类型为返回值的类型,id默认是用方法名作为id
package com.study.annotation.config;
import org.springframework.context.annotation.Bean;
import org.springframework.context.annotation.Configuration;
import com.study.annotation.bean.Person;
//配置类==配置文件
@Configuration //告诉Spring这是一个配置类
public class MainConfig {
//给容器中注册一个Bean; 类型为返回值的类型,id默认是用方法名作为id
@Bean
public Person person() {
return new Person("李四", 23);
}
}
2. 使用
2.1 按类取Bean
public static void main(String[] args) {
        ApplicationContext applicationContext = new
             AnnotationConfigApplicationContext(MainConfig.class);
        Person bean = applicationContext.getBean(Person.class);
        System.out.println(bean);
  }
2.2 按类型获取对象的名称
ApplicationContext applicationContext = new AnnotationConfigApplicationContext(MainConfig.class);

           String[] namesForType = applicationContext.getBeanNamesForType(Person.class);
            for(String str : namesForType)
            {
                System.out.println(str);
            }
        }
修改id的方法:
1. 修改 config 文件中的方法名
        @Bean
        public Person person01() {
            return new Person("lisi", 20);
        }
2. 给@Bean添加属性
		@Bean("person01")
        public Person person() {
            return new Person("lisi", 20);
        }
源码:
1.3 @ComponentScan包扫描
1. 经典的xml文件配置包扫描
引入 context 命名空间, 添加包扫描
<?xml version="1.0" encoding="UTF-8"?>
<beans xmlns="http://www.springframework.org/schema/beans"
       xmlns:xsi="http://www.w3.org/2001/XMLSchema-instance"
       xmlns:context="http://www.springframework.org/schema/context"
       xsi:schemaLocation="http://www.springframework.org/schema/beans
        http://www.springframework.org/schema/beans/spring-beans.xsd
        http://www.springframework.org/schema/context
        http://www.springframework.org/schema/context/spring-context.xsd">

      <!-- 包扫描, 只要标注了@Controller、@Service、@Repository、@Component -->
      <context:component-scan base-package="com.study.annotation"></context:component-scan>
</beans>
2. 注解配置包扫描
在配置文件中添加@ComponentScan 注解,配置value属性
//配置类==配置文件
@Configuration           //告诉Spring这是一个配置类
@ComponentScan(value = "com.study.annotation")
public class MainConfig {

	//给容器中注册一个Bean; 类型为返回值的类型,id默认是用方法名作为id
	@Bean
	public Person person() {
		return new Person("李四", 23);
	}
}
3. 源码
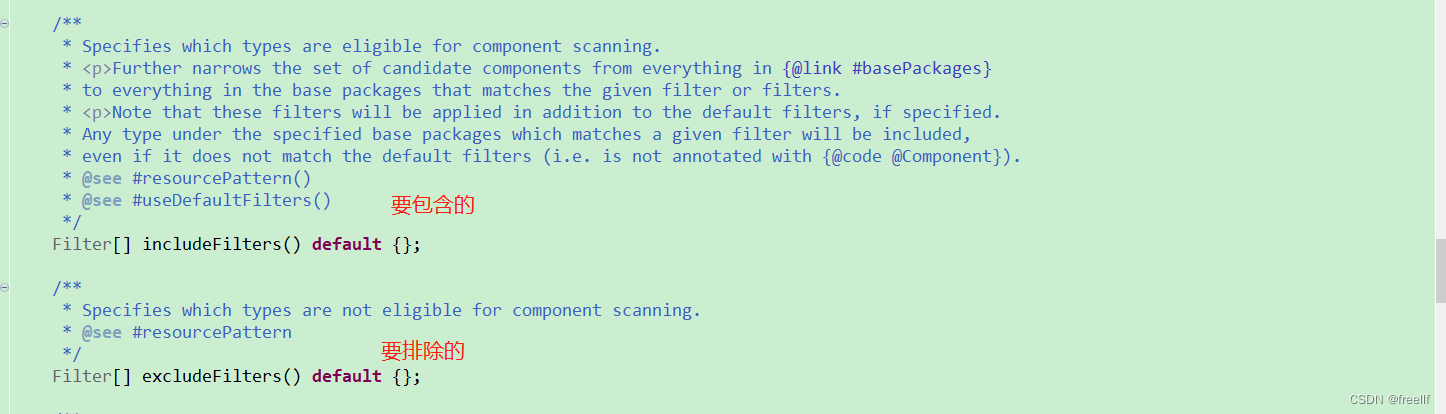

3.1. 注解中使用 excludeFilters = Filter[], 指定扫描的时候按照什么规则排除那些组件
//配置类==配置文件
@Configuration           //告诉Spring这是一个配置类
@ComponentScan(value = "com.study.annotation",
				excludeFilters = {@Filter(type = FilterType.ANNOTATION, classes = {Controller.class, Service.class})})
public class MainConfig {

	//给容器中注册一个Bean; 类型为返回值的类型,id默认是用方法名作为id
	@Bean
	public Person person() {
		return new Person("李四", 23);
	}

	@Bean("person")
	public Person person01() {
		return new Person("lisi", 20);
	}
}
3.2. 注解中使用 includeFilters = Filter[], 指定扫描的时候只需要包含哪些组件, 同时需要指定( useDefaultFilters = false )
//配置类==配置文件
@Configuration           //告诉Spring这是一个配置类
@ComponentScan(value = "com.study.annotation",
				includeFilters = {@Filter(type = FilterType.ANNOTATION, classes = {Controller.class})},
                useDefaultFilters = false)
//@ComponentScan   value: 指定要扫描的包
//excludeFilters = Filter[], 指定扫描的时候按照什么规则排除那些组件
//includeFilters = Filter[], 指定扫描的时候只需要包含哪些组件
public class MainConfig {

	//给容器中注册一个Bean; 类型为返回值的类型,id默认是用方法名作为id
	@Bean
	public Person person() {
		return new Person("李四", 23);
	}

	@Bean("person")
	public Person person01() {
		return new Person("lisi", 20);
	}
}
等同 xml 配置里的
 <!-- 包扫描, 只要标注了@Controller、@Service、@Repository、@Component -->
  <context:component-scan base-package="com.study.annotation" use-default-filters="false"></context:component-scan>
禁用默认的规则。
3.3 如果jdk 是1.8 可以编写多组 @ComponentScan
如果jdk低于1.8, 可使用 @ComponentScans 来指定多组 @ComponentScan
@Configuration           //告诉Spring这是一个配置类
@ComponentScans(value = {
		@ComponentScan(value = "com.study.annotation",
				includeFilters = {@Filter(type = FilterType.ANNOTATION, classes = {Controller.class})},
                useDefaultFilters = false)
})
public class MainConfig {  ... }
1.4 自定义Type, Filter指定过滤规则
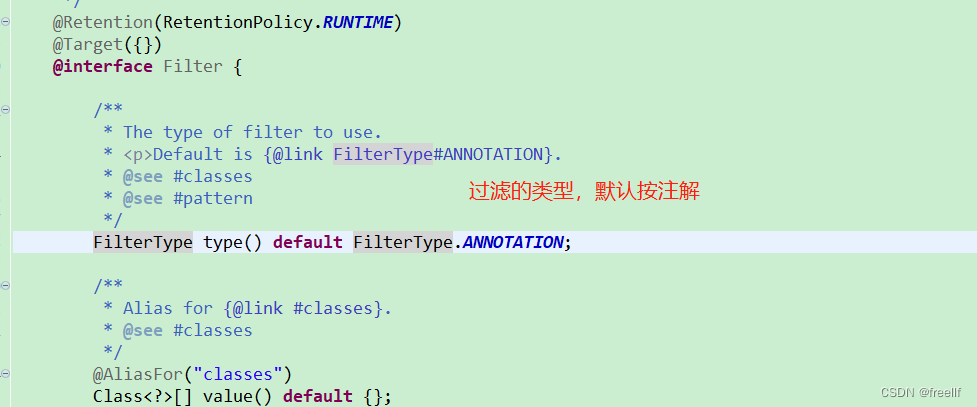
FilterType.ANNOTATION: 按照注解
FilterType.ASSIGNABLE_TYPE:按照给定的类型
//配置类==配置文件
@Configuration           //告诉Spring这是一个配置类
@ComponentScans(value = {
		@ComponentScan(value = "com.study.annotation",
				includeFilters = { @Filter(type = FilterType.ANNOTATION, classes = {Controller.class}),
								 @Filter(type = FilterType.ASSIGNABLE_TYPE, classes = {BookService.class})},
                useDefaultFilters = false)
})
public class MainConfig {
...
}
FilterType.ASPECTJ:使用ASPECT表达式
FilterType.REGEX: 使用正则表达式
FilterType.CUSTOM: 自定义规则

public class MyTypeFilter implements TypeFilter {

	/**
	 * metadataReader: 读取到当前正在扫描的类的信息
	 * metadataReaderFactory a factory for obtaining metadata readers
	 * for other classes (such as superclasses and interfaces)   //可以获取到其他任何类信息的
	 *
	 */
	@Override
	public boolean match(MetadataReader metadataReader, MetadataReaderFactory metadataReaderFactory)
			throws IOException {
		// TODO Auto-generated method stub
		//获取当前类注解的信息
		AnnotationMetadata annotationMetadata = metadataReader.getAnnotationMetadata();
		//获取当前正在扫描的类的类信息
		ClassMetadata classMetadata = metadataReader.getClassMetadata();

		//获取当前类资源(类的路径)
		Resource resource = metadataReader.getResource();
		String className = classMetadata.getClassName();
		System.out.println("----->" + className);
		if(className.contains("er")) {
			return true;
		}
		return false;
	}
}
@Configuration
@ComponentScans(value = {
@ComponentScan(value = "com.study.annotation",
includeFilters = {@Filter(type = FilterType.CUSTOM, classes = {MyTypeFilter.class})},
useDefaultFilters = false)
})
public class MainConfig { ... }1.5 注解@Scope 设置组件作用域
1.@Scope 默认为 singleton, 等同 @Scope("singleton") 单实例:ioc容器启动时会调用方法创建对象放到ioc容器中。 以后每次获取就是直接从容器中拿
2. @Scope("prototype") 多实例:ioc容器启动并不倒去调用方法创建对象放在容器中。每次获取时,调用方法创建对象
3. @Scope("request") 同一次请求创建一个实例,见于web
4.@Scope("session") 同一个session创建一个实例,见于web
5.@Scope(“global session”) 见于Web
详见: Spring中的@scope注解 - lonecloud - 博客园
等同xml配置:

1.6@Lazy 懒加载
懒加载作用于单实例bean,单实例bean默认在容器启动的时候创建对象; 单懒加载注解的单实例bean, 在容器启动时不创建对象,只在 第一次获取Bean创建对象时,才初始化。
@Lazy
@Bean("personLazy")
public Person personLazy() {
	System.out.println("给容器人添加personLazy...");
	return new Person("王麻子", 25);
}
1.7 @Conditional 按照条件注解

编定条件类,实现condition接口,
//判断是否是windows系统
        public class WindowsCondition implements Condition{
        	    /**
                 * ConditionContext: 判断条件能使用的上下文环境
                 * tedTypeMetadata: 注解信息
               */
             	    @Override
             	    public boolean matches(ConditionContext context, AnnotatedTypeMetadata metadata) {
             	        // TODO 是否 Windows 系统
             	        // 1、能获取到ioc使用的beanfactory
             	        ConfigurableListableBeanFactory beanFactory = context.getBeanFactory();
             	        // 2、获取类加载器
             	        ClassLoader classLoader = context.getClassLoader();
             	        // 3、获取当前环境信息
             	        Environment environment = context.getEnvironment();
             	        // 4、获取到bean定义的注册类
             	        BeanDefinitionRegistry registry = context.getRegistry();
             	         String property = environment.getProperty("os.name");
    	        if(property.contains("Windows")) {
    	            return true;
    	        }
    	        return false;
    	    }
    	}
//判断是否是linux系统
public class LinuxCondition implements Condition {
@Override
public boolean matches(ConditionContext context, AnnotatedTypeMetadata metadata) {
// TODO 是否 linux 系统
Environment environment = context.getEnvironment();
String property = environment.getProperty("os.name");
if (property.contains("Linux")) {
return true;
}
return false;
}
}2. 添加条件注解
        @Conditional(LinuxCondition.class)
     	@Bean("bill")
     	public Person person01() {
     		return new Person("bill", 56);
     	}

     	@Conditional(WindowsCondition.class)
     	@Bean("linux")
     	Person person02() {
     		return new Person("linus", 48);
     	}
3. 更改条件进行测试

4、类中组件统一设定,满足当前条件, 这个类中配置的所有bean注册才能生效
@Conditional({LinuxCondition.class})
@Configuration
public class MainConfig2 {
...
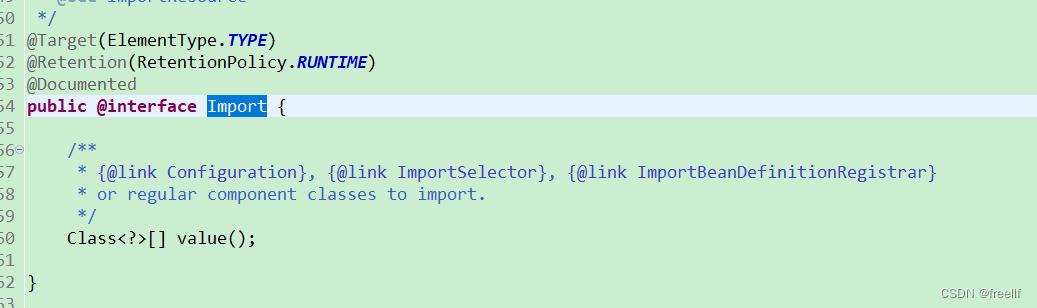
}1.8 @Import 给容器中快速导入一个组件
给容器中注册组件:
包扫描+组件标注注解(@Controller/@Service/Repository/@Component)
@Bean[导入的第三方包里面的组件]
1.@Import(要导入到容器中的组件): 容器中就会自动注册这个组件, id默认是组件的全类名
  @Configuration
  @Import(Color.class)

  public class MainConfig2 {
    ...
  }
也可以导入多个
@Configuration
@Import({Color.class, Red.class})
public class MainConfig2 {
	...
}
2、ImportSelector:返回需要导入的组件的全类名数组:
        @Configuration
        @Import({Color.class, Red.class, MyImportSelector.class})
        public class MainConfig2 {
        	...
        }
需要实现 ImportSelector接口
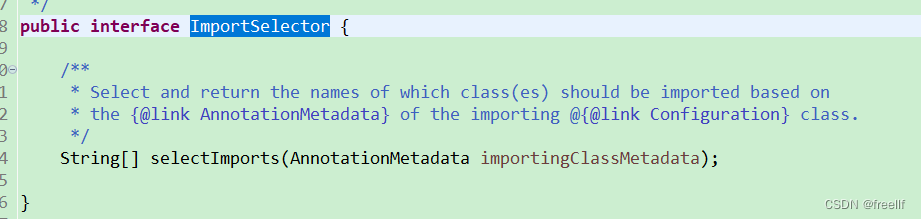
AnnotationMetadata:当前标注@Import注解的类的所有注解信息
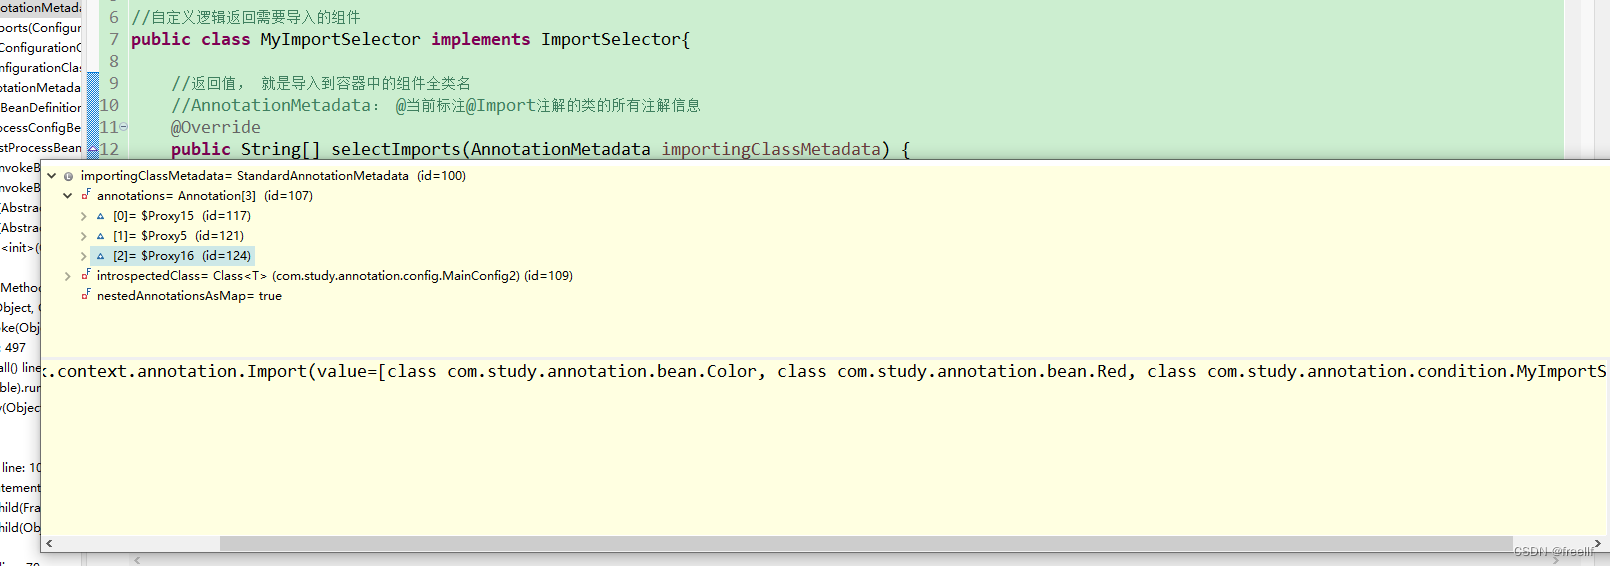
实现ImportSelector接口, 重写selectImports方法,返回值不能是null, 会报 NullPointException, 可以返回一个 new String[]{};。

3、ImportBeanDefinitionRegistrar:手动注岫bean到容器中
    @Configuration
    @Import({Color.class, Red.class, MyImportBeanDefinitionRegistrar.class})
    //@Import导入组件, id默认是组件的全类名
    public class MainConfig2 {
    	...
    }
实现 ImportBeanDefinitionRegistrar 接口, 重写 registerBeanDefinitions方法
AnnotationMetadata: 当前类的注解信息
BeanDefinitionRegistry: BeanDefinition注册类; 把所有需要添加到容器中的bean,调用BeanDefinitionRegistry.registerBeanDefinition 手工注册入
public class MyImportBeanDefinitionRegistrar implements ImportBeanDefinitionRegistrar{
            @Override
            public void registerBeanDefinitions(AnnotationMetadata importingClassMetadata, BeanDefinitionRegistry registry) {
                boolean definition = registry.containsBeanDefinition("com.study.annotation.bean.Red");
                boolean definition2 = registry.containsBeanDefinition("com.study.annotation.bean.Blue");

                if(definition && definition2) {
                    //指定Bean定义信息: (Bean的类型, Bean...)
                    RootBeanDefinition beanDefinition = new RootBeanDefinition(RainBow.class);
                    //注册一个Bean, 指定bean名
                    registry.registerBeanDefinition("rainBow", beanDefinition);
                }
            }
    	}
4、使用Spring提供的FactoryBean(工厂Bean)
1. 实现FactoryBean<T>接口
	    //创建一个Spring定义的FactoryBean
        public class ColorFactoryBean implements FactoryBean<Color> {

            //返回一个Color对象,这个对象会添加到容器中
            @Override
            public Color getObject() throws Exception {
                // TODO Auto-generated method stub
                System.out.println("ColorFactoryBean ... getObject ...");
                return new Color();
            }
            @Override
            public Class<?> getObjectType() {
                // TODO Auto-generated method stub
                return Color.class;
            }

            //是单例?
            //true: 这个bean是单实例,在容器中保存一份
            //false: 多实例, 每次获取都会创建一个新的bean
            @Override
            public boolean isSingleton() {
                // TODO Auto-generated method stub
                return true;
            }
        }
2. 在配置类中配置
        @Configuration
        public class MainConfig2 {
            @Bean
            public ColorFactoryBean colorFactoryBean() {
                return new ColorFactoryBean();
            }
        }
3.默认获取到的是工厂bean调用getObject创建的对象, 要获取工厂Bean本身,需要给id前面加一个&, 如:&colorFactoryBean
         //工厂Bean获取的是调用getObject创建的对象
		 Object object = applicationContext.getBean("colorFactoryBean");
         Object object2 = applicationContext.getBean("&colorFactoryBean");
二、生命周期
bean的生命周期
bean创建---初始化----销毁的过程
容器管理bean的生命周期:
我们可以自定义初始化和销毁方法;容器在bean进行到当前生命周期的时候来调用我们自定义的初始化和销毁方法
构造(对象创建)
单实例:在容器启动的时候创建对象
多实例:在每次获取的时候创建对象
BeanPostProcessor.postProcessBeforeInitialization
初始化:
对象创建完成,并赋值好,调用初始化方法...
BeanPostProcessor.postProcessAfterInitialization
销毁:
单实例:容器关闭的时候
多实例:容器不会管理这个bean,容器不会调用销毁方法;
2.1 @Bean指定初始化和销毁
    public class Car {
        public Car() {
            System.out.println("car constructor...");
        }

        public void init() {
            System.out.println("car ... init ...");
        }

        public void detory() {
            System.out.println("car ... detory ...");
        }
    }
1. 配置文件中配置:
  <bean id="car" class="com.study.annotation.bean.Car" init-method="" destroy-method="">
     	...
     </bean>
2. java配置类中配置:
@Configuration
public class IOCLifeCycle {
@Bean(initMethod = "init", destroyMethod = "detory")
public Car car() {
return new Car();
}
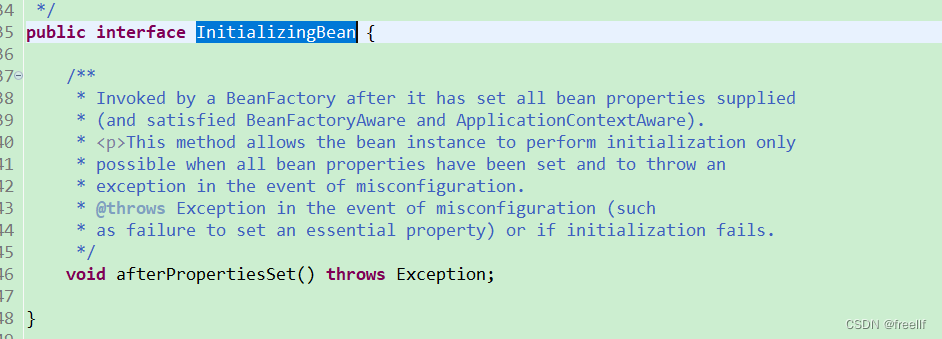
}2.2 InitializingBean和DisposableBean
通过让Bean实现InitializingBean(定义初始化逻辑)、DisposableBean(定义销毁)

    @Component
    public class Cat implements InitializingBean, DisposableBean{

        public Cat() {
            System.out.println("cat ... constructor ...");
        }

        @Override
        public void destroy() throws Exception {
            System.out.println("cat...destroy...");

        }

        @Override
        public void afterPropertiesSet() throws Exception {
            System.out.println("cat...init...");
        }

    }
2.3 @PostConstruct & @PreDestroy
可以使用JSR250:
@PostConstruct:在bean创建完成并且属性赋值完成,来执行初始化方法
/**
* The PostConstruct annotation is used on a method that needs to be executed
* after dependency injection is done to perform any initialization. This
* method MUST be invoked before the class is put into service. This
* annotation MUST be supported on all classes that support dependency
* injection. The method annotated with PostConstruct MUST be invoked even
* if the class does not request any resources to be injected. Only one
* method can be annotated with this annotation. The method on which the
* PostConstruct annotation is applied MUST fulfill all of the following
* criteria:
* <p>
* <ul>
* <li>The method MUST NOT have any parameters except in the case of
* interceptors in which case it takes an InvocationContext object as
* defined by the Interceptors specification.</li>
* <li>The method defined on an interceptor class MUST HAVE one of the
* following signatures:
* <p>
* void <METHOD>(InvocationContext)
* <p>
* Object <METHOD>(InvocationContext) throws Exception
* <p>
* <i>Note: A PostConstruct interceptor method must not throw application
* exceptions, but it may be declared to throw checked exceptions including
* the java.lang.Exception if the same interceptor method interposes on
* business or timeout methods in addition to lifecycle events. If a
* PostConstruct interceptor method returns a value, it is ignored by
* the container.</i>
* </li>
* <li>The method defined on a non-interceptor class MUST HAVE the
* following signature:
* <p>
* void <METHOD>()
* </li>
* <li>The method on which PostConstruct is applied MAY be public, protected,
* package private or private.</li>
* <li>The method MUST NOT be static except for the application client.</li>
* <li>The method MAY be final.</li>
* <li>If the method throws an unchecked exception the class MUST NOT be put into
* service except in the case of EJBs where the EJB can handle exceptions and
* even recover from them.</li></ul>
* @since Common Annotations 1.0
* @see javax.annotation.PreDestroy
* @see javax.annotation.Resource
*/
@Documented
@Retention (RUNTIME)
@Target(METHOD)
public @interface PostConstruct {
}@PreDestroy: 在容器销毁bean之前通知进行清理工作
/**
* The PreDestroy annotation is used on methods as a callback notification to
* signal that the instance is in the process of being removed by the
* container. The method annotated with PreDestroy is typically used to
* release resources that it has been holding. This annotation MUST be
* supported by all container managed objects that support PostConstruct
* except the application client container in Java EE 5. The method on which
* the PreDestroy annotation is applied MUST fulfill all of the following
* criteria:
* <p>
* <ul>
* <li>The method MUST NOT have any parameters except in the case of
* interceptors in which case it takes an InvocationContext object as
* defined by the Interceptors specification.</li>
* <li>The method defined on an interceptor class MUST HAVE one of the
* following signatures:
* <p>
* void <METHOD>(InvocationContext)
* <p>
* Object <METHOD>(InvocationContext) throws Exception
* <p>
* <i>Note: A PreDestroy interceptor method must not throw application
* exceptions, but it may be declared to throw checked exceptions including
* the java.lang.Exception if the same interceptor method interposes on
* business or timeout methods in addition to lifecycle events. If a
* PreDestroy interceptor method returns a value, it is ignored by
* the container.</i>
* </li>
* <li>The method defined on a non-interceptor class MUST HAVE the
* following signature:
* <p>
* void <METHOD>()
* </li>
* <li>The method on which PreDestroy is applied MAY be public, protected,
* package private or private.</li>
* <li>The method MUST NOT be static.</li>
* <li>The method MAY be final.</li>
* <li>If the method throws an unchecked exception it is ignored except in the
* case of EJBs where the EJB can handle exceptions.</li>
* </ul>
*
* @see javax.annotation.PostConstruct
* @see javax.annotation.Resource
* @since Common Annotations 1.0
*/
@Documented
@Retention (RUNTIME)
@Target(METHOD)
public @interface PreDestroy {
}@Component
public class Dog {
public Dog() {
System.out.println("dog constructor...");
}
//对象创建并赋值之后调用
@PostConstruct
public void init() {
System.out.println("dog ... init");
}
@PreDestroy
public void destroy() {
System.out.println("dog...destroy");
}
}2.4 BeanPostProcessor-后置处理器
【interface】: bean的后置处理器, 在bean初始化前后进行一些处理工作
/**
         * Factory hook that allows for custom modification of new bean instances,
         * e.g. checking for marker interfaces or wrapping them with proxies.
         *
         * <p>ApplicationContexts can autodetect BeanPostProcessor beans in their
         * bean definitions and apply them to any beans subsequently created.
         * Plain bean factories allow for programmatic registration of post-processors,
         * applying to all beans created through this factory.
         *
         * <p>Typically, post-processors that populate beans via marker interfaces
         * or the like will implement {@link #postProcessBeforeInitialization},
         * while post-processors that wrap beans with proxies will normally
         * implement {@link #postProcessAfterInitialization}.
         *
         * @author Juergen Hoeller
         * @since 10.10.2003
         * @see InstantiationAwareBeanPostProcessor
         * @see DestructionAwareBeanPostProcessor
         * @see ConfigurableBeanFactory#addBeanPostProcessor
         * @see BeanFactoryPostProcessor
         */
        public interface BeanPostProcessor {

            /**
             * Apply this BeanPostProcessor to the given new bean instance <i>before</i> any bean
             * initialization callbacks (like InitializingBean's {@code afterPropertiesSet}
             * or a custom init-method). The bean will already be populated with property values.
             * The returned bean instance may be a wrapper around the original.
             * @param bean the new bean instance
             * @param beanName the name of the bean
             * @return the bean instance to use, either the original or a wrapped one;
             * if {@code null}, no subsequent BeanPostProcessors will be invoked
             * @throws org.springframework.beans.BeansException in case of errors
             * @see org.springframework.beans.factory.InitializingBean#afterPropertiesSet
             */
            Object postProcessBeforeInitialization(Object bean, String beanName) throws BeansException;

            /**
             * Apply this BeanPostProcessor to the given new bean instance <i>after</i> any bean
             * initialization callbacks (like InitializingBean's {@code afterPropertiesSet}
             * or a custom init-method). The bean will already be populated with property values.
             * The returned bean instance may be a wrapper around the original.
             * <p>In case of a FactoryBean, this callback will be invoked for both the FactoryBean
             * instance and the objects created by the FactoryBean (as of Spring 2.0). The
             * post-processor can decide whether to apply to either the FactoryBean or created
             * objects or both through corresponding {@code bean instanceof FactoryBean} checks.
             * <p>This callback will also be invoked after a short-circuiting triggered by a
             * {@link InstantiationAwareBeanPostProcessor#postProcessBeforeInstantiation} method,
             * in contrast to all other BeanPostProcessor callbacks.
             * @param bean the new bean instance
             * @param beanName the name of the bean
             * @return the bean instance to use, either the original or a wrapped one;
             * if {@code null}, no subsequent BeanPostProcessors will be invoked
             * @throws org.springframework.beans.BeansException in case of errors
             * @see org.springframework.beans.factory.InitializingBean#afterPropertiesSet
             * @see org.springframework.beans.factory.FactoryBean
             */
            Object postProcessAfterInitialization(Object bean, String beanName) throws BeansException;

        }
postProcessBeforeInitialization:在初始化之前工作 param bean the new bean instance @param beanName the name of the bean
postProcessAfterInitialization: 在初始化之后工作
    /**
     * 后置处理器, 初始化前后进行处理工作
     * 将后置处理器加入到容器中
     *
     */
    @Component
    public class Bee implements BeanPostProcessor{

        public Bee() {
            System.out.println("bee...constructor...");
        }
        @Override
        public Object postProcessBeforeInitialization(Object bean, String beanName) throws BeansException {
            System.out.println("bee...before..." + beanName +"..." + bean);
            return bean;
        }

        @PostConstruct
        public void init() {
            System.out.println("bee ... init");
        }

        @PreDestroy
        public void destroy() {
            System.out.println("bee...destroy");
        }

        @Override
        public Object postProcessAfterInitialization(Object bean, String beanName) throws BeansException {
            System.out.println("bee...after..." + beanName +"..." + bean);
            return bean;
        }

    }
2.5 BeanPostProcessor 后置处理器原理
调用过程


简单流程
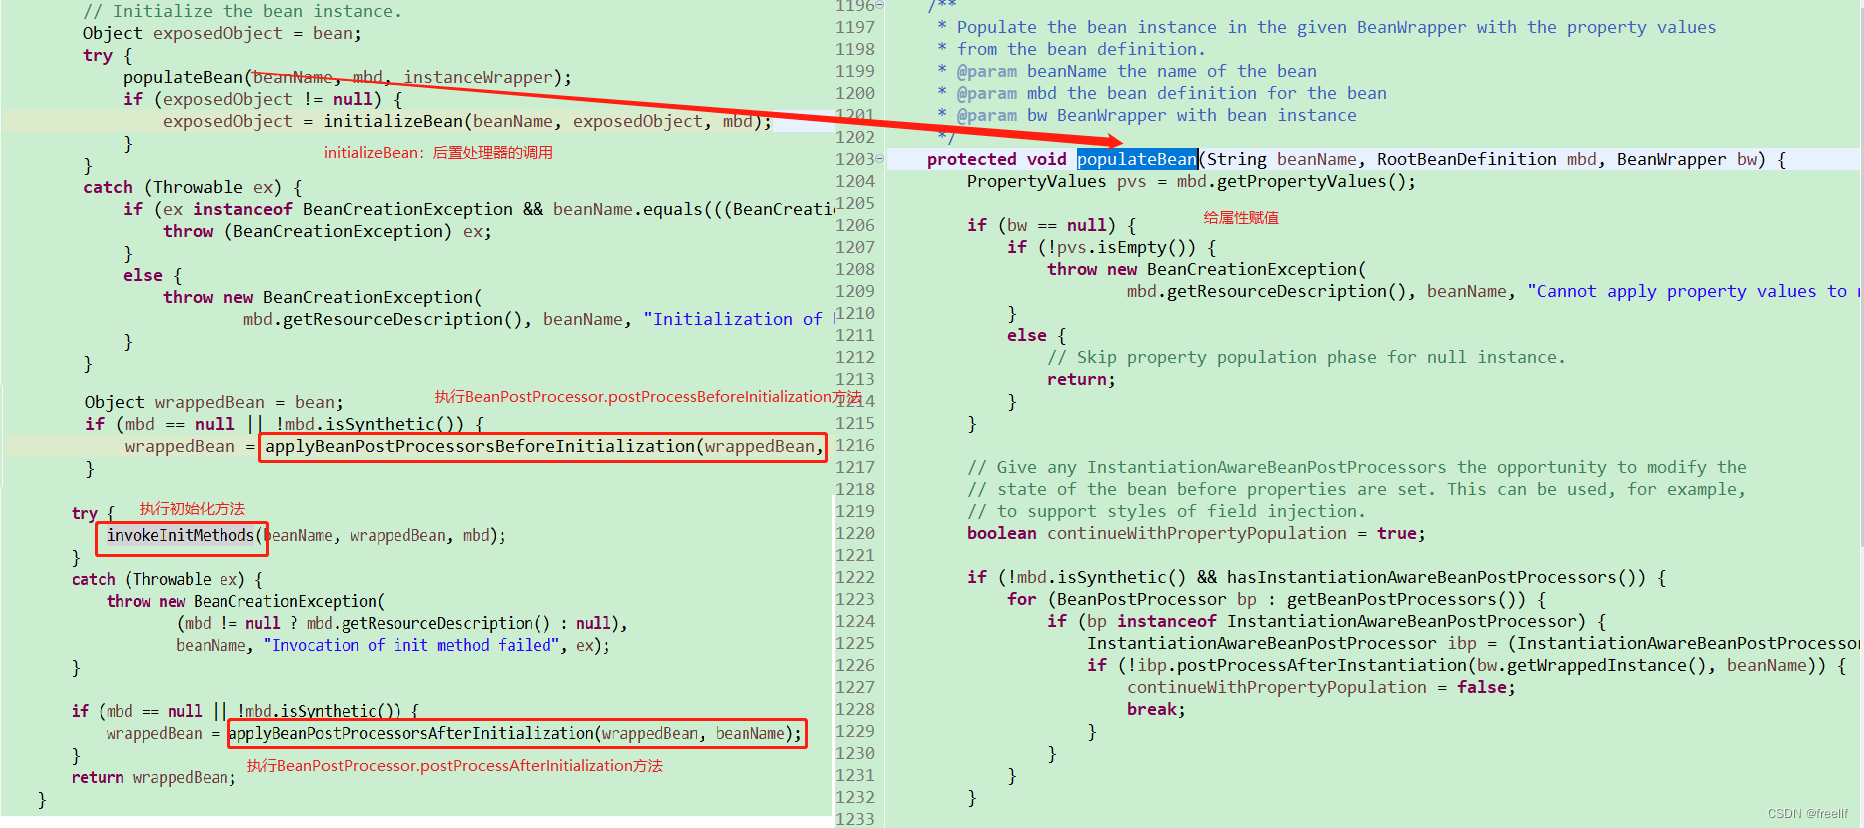
populateBean(beanName, mbd, instanceWrapper); 给bean进行属性赋值
initializeBean {
applyBeanPostProcessorsBeforeInitialization(wrappedBean, beanName);
invokeInitMethods(beanName, wrappedBean, mbd); 执行自定义初始化
applyBeanPostProcessorsAfterInitialization(wrappedBean, beanName);
}
2.5 BeanPostProcessor在Spring中的应用

使用范围广泛,如:bean赋值,注入其他组件, @Autowired, 生命周期注解功能,@Async, 等等都继承于BeanPostProcessor;
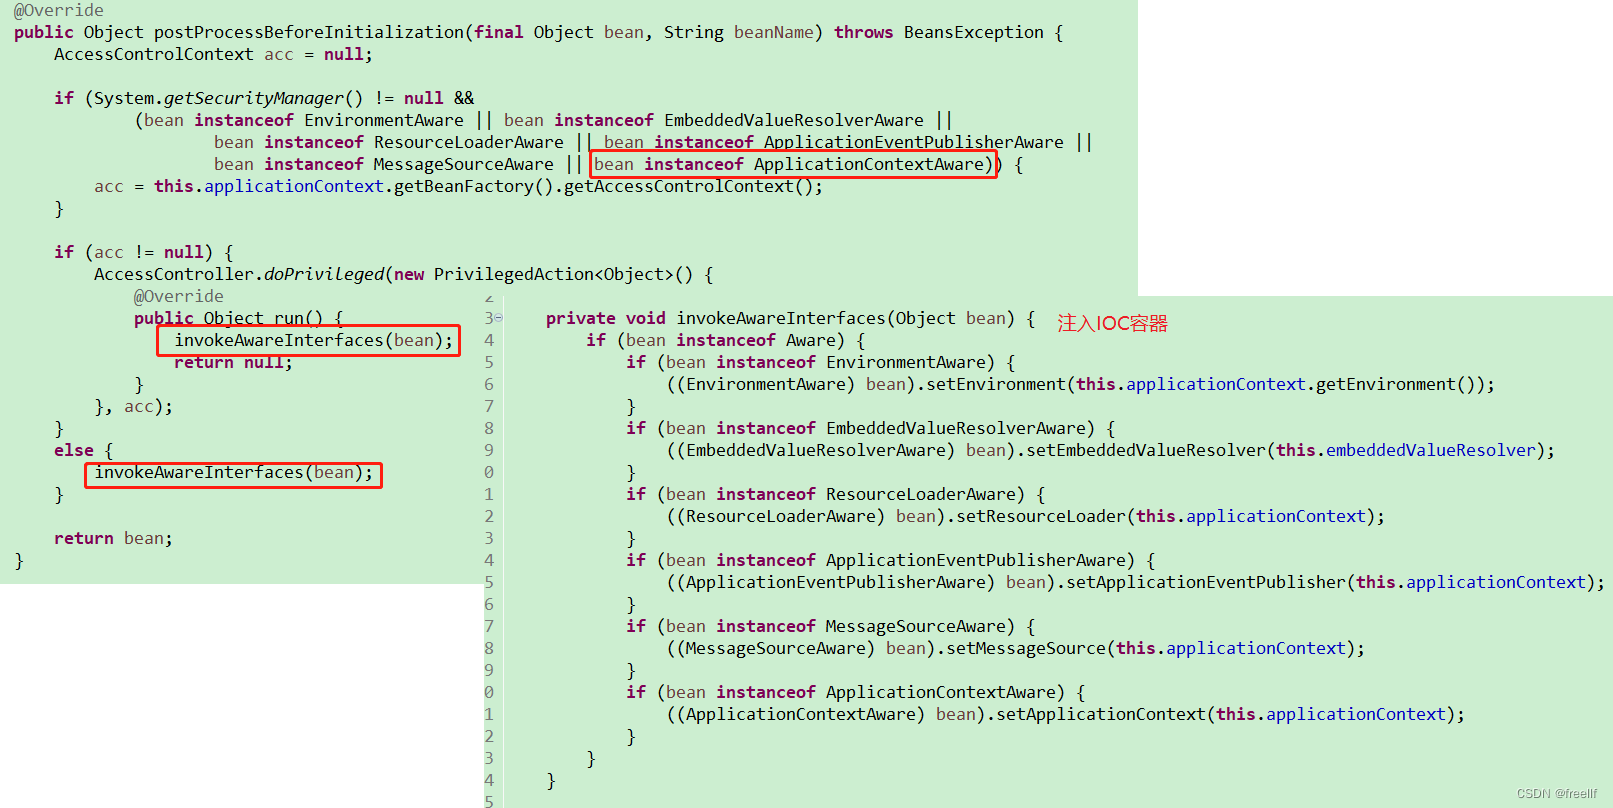
1. ApplicationContextAwareProcessor:
向组件中注入IOC容器
 public class Red implements ApplicationContextAware{

        private ApplicationContext applicationContext;
        @Override
        public void setApplicationContext(ApplicationContext applicationContext) throws BeansException {
            this.applicationContext = applicationContext;
        }
 }
2. BeanValidationPostProcessor web工程中 数据校验
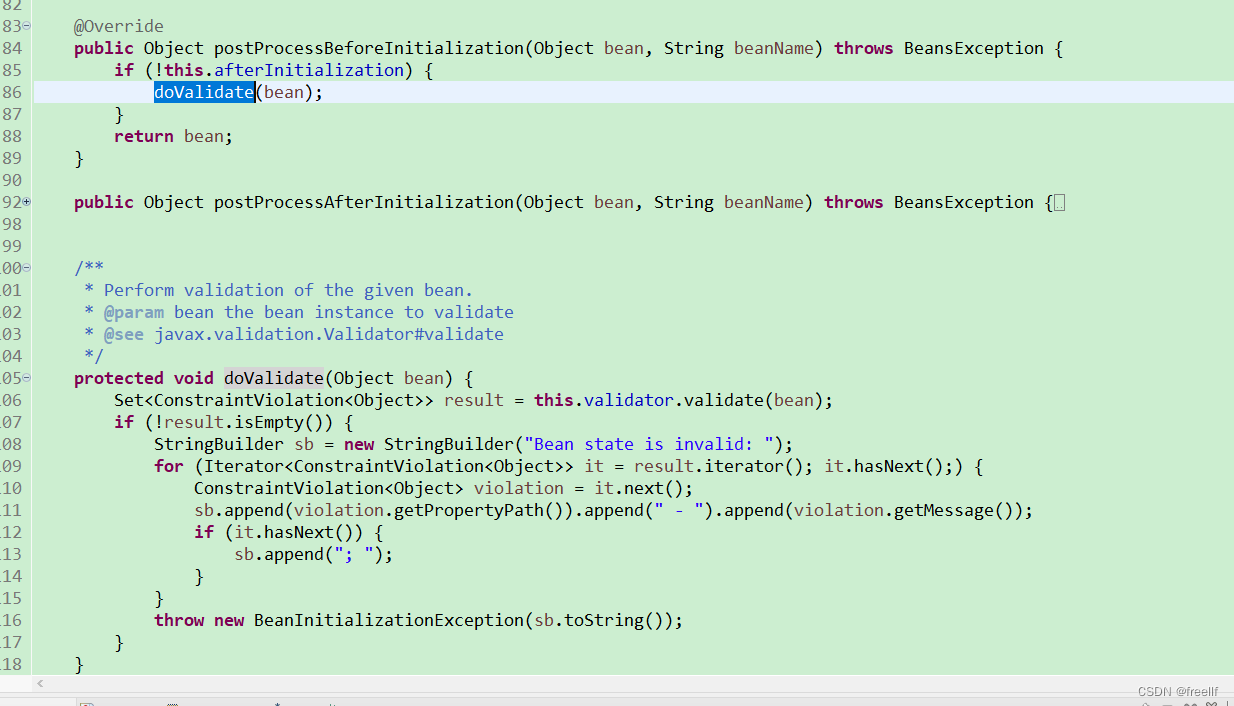
在 doValidate(bean)中来完成数据校验
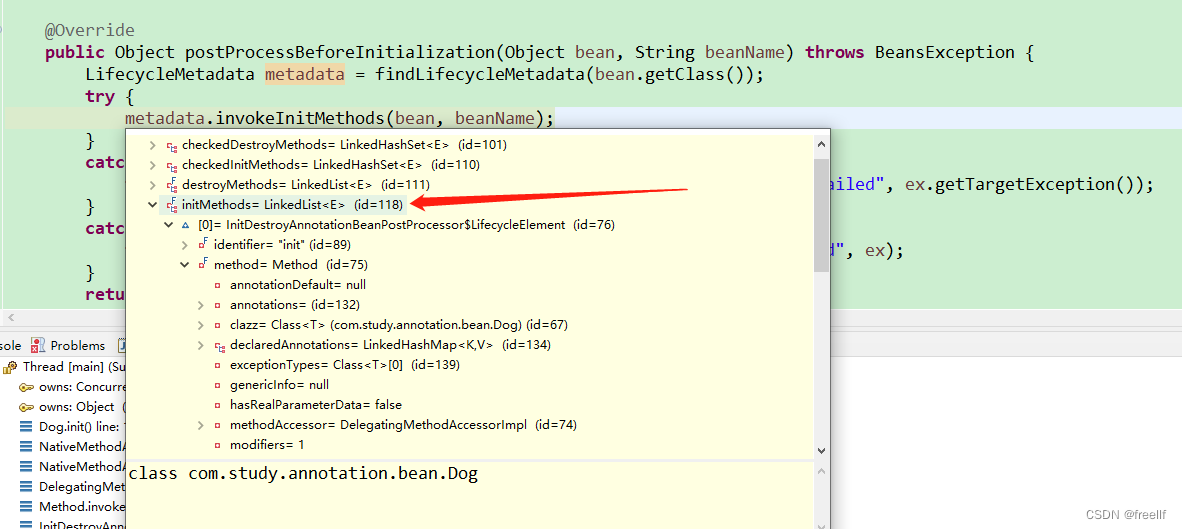
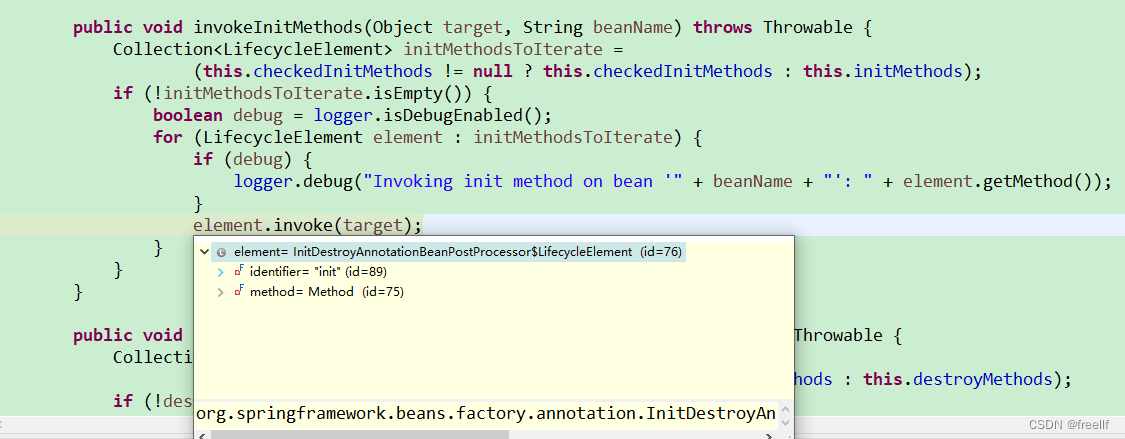
3. InitDestroyAnnotationBeanPostProcessor
that invokes annotated init and destroy methods.
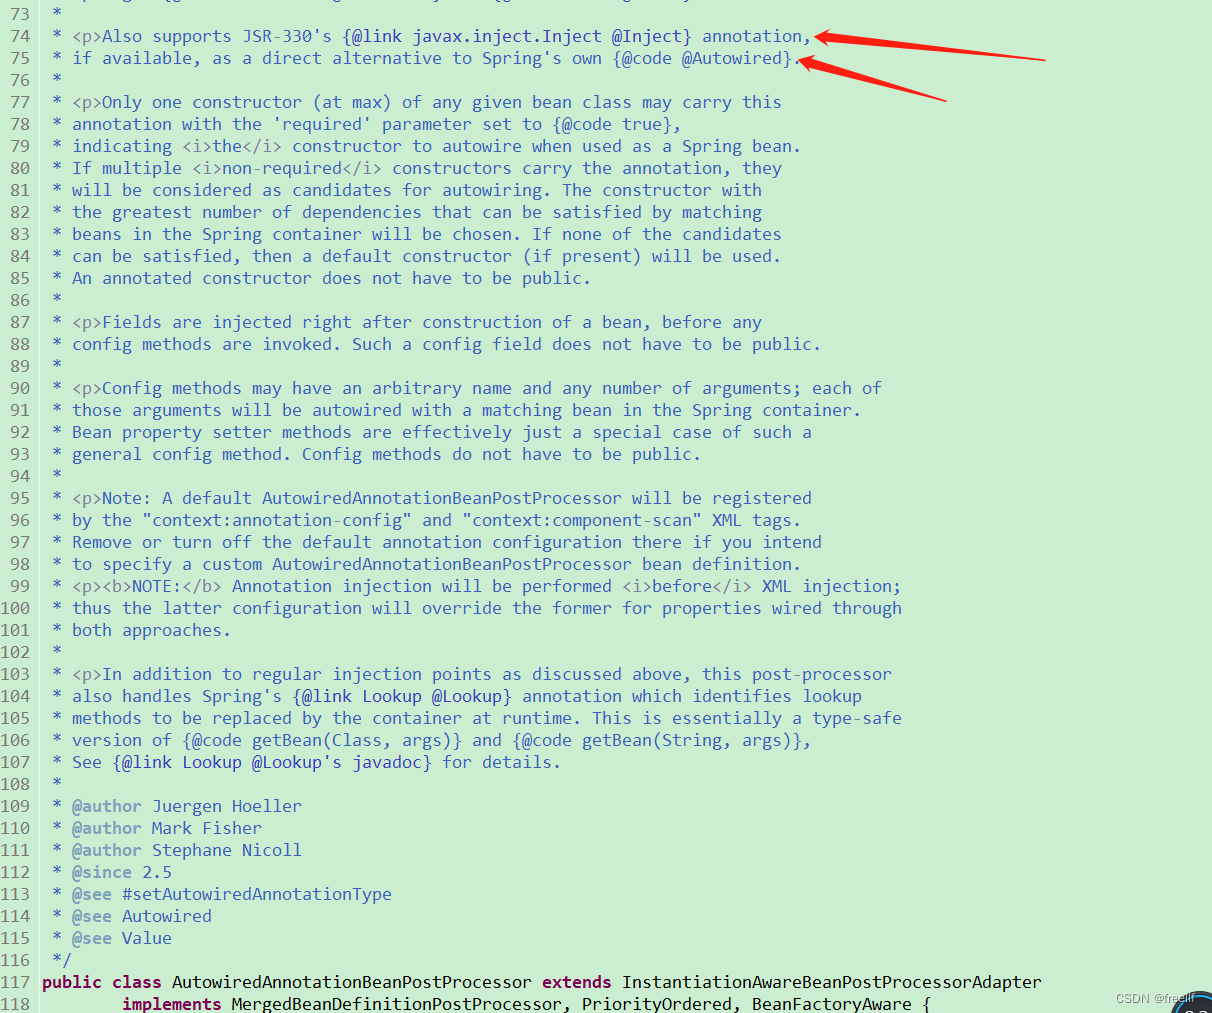
4. AutowiredAnnotationBeanPostProcessor
@Autowired 注解自动注入
三、属性赋值
3.1 @Value 赋值
1、基本数值
2、可以写SpEL, #{}
public class Person {
	@Value("赵五")
	private String name;
	@Value("#{30+2}")
	private Integer age;
	...
}
等同于
<!-- 使用 xml配置开发 -->
<bean id="person" class="com.study.annotation.bean.Person">
<property name="age" value="22"></property>
<property name="name" value="张三"></property>
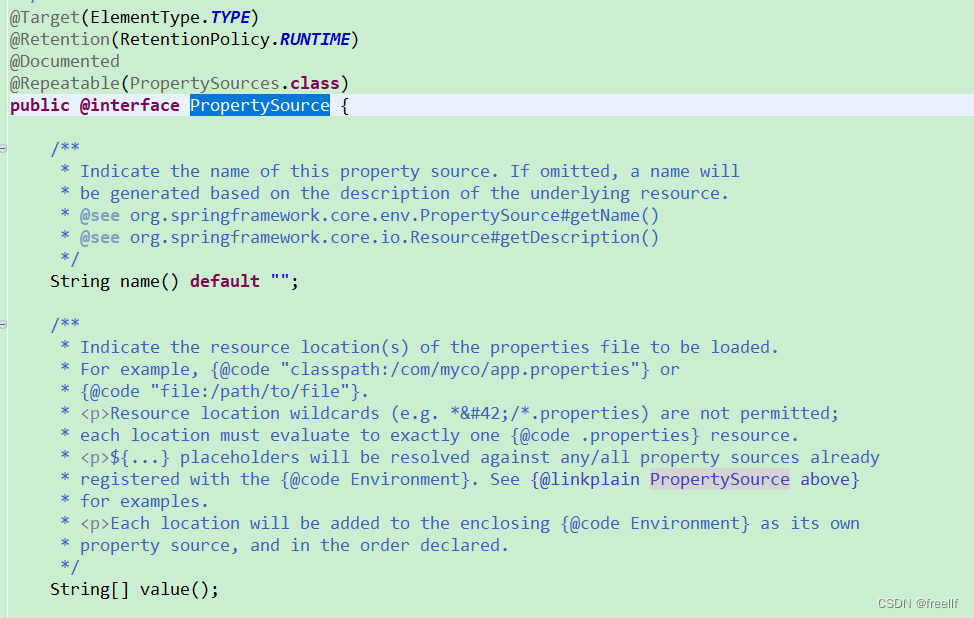
</bean>3.2 @PropertySource
@PropertySource读取外部配置文中的k/v保存到运行的环境变量中; 加载完外部的配置文件,
使用${}, 取出配置文件【properties】的中(在运行环境变量里面)的值
创建 person.properties 文件
person.nickName=\u5F02\u6B65\u8BF7\u6C42 @PropertySource(value= {"classpath:/person.properties"})
@Configuration
public class MainConfigOfPropertyValues {
@Bean
public Person person() {
return new Person();
}
} public class Person {
@Value("${person.nickName}")
private String nickName;
...
}等同于
      <context:property-placeholder location="classpath:person.properties"/>
      <context:component-scan base-package="..." ></context:component-scan>
      <!-- 使用 xml配置开发    -->
     <bean id="person" class="...">
     	<property name="age" value="22"></property>
     	<property name="name" value="张三"></property>
     </bean>
也可以使用以下方式获取
  ConfigurableEnvironment environment = applicationContext.getEnvironment();
  String property = environment.getProperty("person.nickName");
是个可重复使用的注解, 也可使用@PropertySources注解, value值是个数组
四、自动装配
Sping利用依赖注入(DI), 完成对IOC容器中各个组件的依赖关系赋值
4.1. @Autowired: 自动注入:
1、 默认优先按照类型去容器中找对应的组件: applicationContext.getBean(BookDao.class); 找到既赋值。
            @Service
            public class BookService {

                @Autowired
                private BookDao bookDao;

                public void println() {
                    System.out.println(bookDao);
                }
             }
2、如果找到多个相同类型的组件,再将属性的名称作为组件的id去容器中查找
            //名字默认是首字母小写
            @Repository
            public class BookDao {

                private String lable="自动注入";

                public String getLable() {
                    return lable;
                }

                public void setLable(String lable) {
                    this.lable = lable;
                }

                @Override
                public String toString() {
                    return "BookDao [lable=" + lable + "]";
                }
            }
@Configuration
public class MainConfigOfAutowired {
@Bean("bookDao2")
public BookDao bookDao() {
BookDao bookDao = new BookDao();
bookDao.setLable("手动注入");
return bookDao;
}
}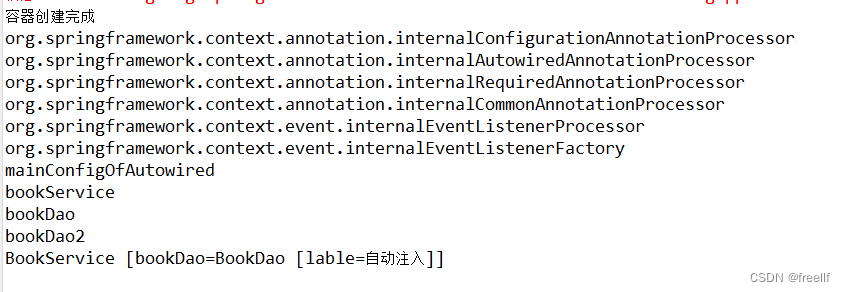
3、使用@Qualifier指定需要装配的组件的id, 而不是使用属性名
	        @Service
            public class BookService {

                @Qualifier("bookDao")
                @Autowired
                private BookDao bookDao2;

                ...
            }
4、自动装配默认一定要将属性赋值好,没有就会报错
可以使用@Autowired(required=false)
                @Service
                public class BookService {

                    @Qualifier("bookDao")
                    @Autowired(required = false)
                    private BookDao bookDao2;
                    ...
                }
5、@Primary: 让Spring进行自动装配时候, 默认使用首选的bean;
也可以继续使用@Qualifier指定需要装配的bean的名字
            @Primary
            @Bean("bookDao2")
            public BookDao bookDao() {
                BookDao bookDao = new BookDao();
                bookDao.setLable("手动注入");
                return bookDao;
            }
4.2 Spring还支持使用@Resource(JSR250)和@Inject(JSR330)[java规范注解]
1. Resource:
可以和@Autowired一样实现自动装配功能,默认是按照组件名称进行装配的; 没有支持@Primary功能,也没有@Autowired(required=false)
    @Service
    public class BookService {
        @Resource(name = "bookDao")
        private BookDao bookDao2;

        ...
    }
2. @Inject:
需要导入javax.inject包, 和Autowired的功能一样,没有required=false的功能
        <dependency>
            <groupId>javax.inject</groupId>
            <artifactId>javax.inject</artifactId>
            <version>1</version>
        </dependency>

@Autowired:Spring定义的; @Resource、 @Inject都是java规范定义的。
AutowiredAnnotationBeanPostProcessor:解析完成自动装配功能;

4.3 @Autowired使用
@Autowired 可以使用在构造器, 参数, 方法, 属性 都是从容器中获取参数组件的值

1、标注在方法
Spring容器创建当前对象,就会调用方法,完成赋值, 方法使用的参数, 自定义类型的值从ioc容器中获取
@Bean + 方法参数:参数从容器中获取; 默认不写@Autowired效果是一样的,都能自动从ioc容器中获取。
        @Component
        public class Boss {
            private Car car;
            public Car getCar() {
                return car;
            }

            @Autowired
            public void setCar(Car car) {
                this.car = car;
            }
        }
2、标在构造器上
默认加在ioc容器中的组件, 容器启动调用无参构造器创建对象,再进行初始化赋值等操作
构造器要用的组件, 都是从容器中获取
        @Component
        public class Boss {
            @Autowired
            public Boss(Car car) {
                super();
                this.car = car;
                System.out.println("Boss ... 有参构造器");
            }
		   ...
        }
3、放在参数位置
  public Boss(@Autowired Car car) {
            this.car = car;
   }
@Bean标注方法创建对象的时候,方法参数的值从容器中获取
    @Bean
	public Color color(@Autowired Car car) {
		return new Color(car);
	}
4.4 自定义组件
想要使用Spring容器底层的一些组件(ApplicationContext, BeanFactory, xxx);自动义组件实现xxxAware; 在创建对象的时候,会调用接口规写的方法注入相关组件, AWare; 把Spring底层一些组件注入到自定义的Bean中:
xxxAware: 功能使用xxxProcessor;
ApplicationContextAware ==> ApplicationContextWare

ApplicationContextAware: 获取 spring 容器
4.5 @Profile
Spring为我们提供的可以根据当前环境,动态的激活和切换一系列组件的功能。
开发环境、测试环境,生产环境
数据源:(/A)(/B)(/C)
@Profile: 指定组件在哪个环境情况下才能被注册到容器中,不指定,任何环境下都能注册这个组件
        @PropertySource(value= {"classpath:/dbconfig.properties"})
        @Configuration
        public class MainConfigOfProfile implements EmbeddedValueResolverAware{

            @Value("${db.user}")
            private String user;

            private StringValueResolver valueResolver;

            private String driverClass;

            @Bean
            public Yellow yellow() {
                return new Yellow();
            }

            @Profile("test")
            @Bean("testDataSource")
            public DataSource dataSourceTest(@Value("${db.password}") String pwd) throws PropertyVetoException {
                ComboPooledDataSource dataSource = new ComboPooledDataSource();
                dataSource.setUser(user);
                dataSource.setPassword(pwd);
                dataSource.setJdbcUrl("jdbd:mysql://localhost:3306/test");
                dataSource.setDriverClass(driverClass);
                return dataSource;
            }

            @Profile("dev")
            @Bean("devDataSource")
            public DataSource dataSourceDev() throws PropertyVetoException {
                ComboPooledDataSource dataSource = new ComboPooledDataSource();
                dataSource.setUser("root");
                dataSource.setPassword("123456");
                dataSource.setJdbcUrl("jdbd:mysql://localhost:3306/dev");
                dataSource.setDriverClass(driverClass);
                return dataSource;
            }

            @Profile("prod")
            @Bean("prodDataSource")
            public DataSource dataSourceProd() throws PropertyVetoException {
                ComboPooledDataSource dataSource = new ComboPooledDataSource();
                dataSource.setUser("root");
                dataSource.setPassword("123456");
                dataSource.setJdbcUrl("jdbd:mysql://localhost:3306/prod");
                dataSource.setDriverClass("com.mysql.jdbc.Driver");
                return dataSource;
            }

            @Override
            public void setEmbeddedValueResolver(StringValueResolver resolver) {
                // TODO Auto-generated method stub
                this.valueResolver = resolver;
                driverClass = valueResolver.resolveStringValue("${db.driverClass}");
            }
        }
1、加了环境标识的bean, 只有这个环境被激活的时候才能注册到容器中, 默认是default
1. 使用命令行动态参数: 在虚拟机参数位置加载 -Dspring.profiles.active=test
2. 代码方式激活某种环境
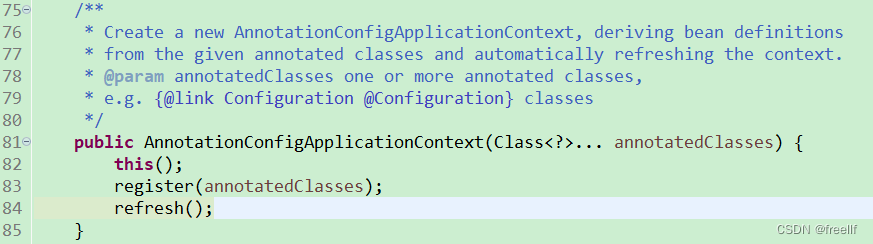
        //1. 创建一个无参applicationContext
		AnnotationConfigApplicationContext applicationContext = new AnnotationConfigApplicationContext();
		//2. 设置需要激活的环境
		applicationContext.getEnvironment().setActiveProfiles("test", "dev");
		//3.注册主配置类
		applicationContext.register(MainConfigOfProfile.class);
		//4.启动刷新容器
		applicationContext.refresh();
2、写在配置类上,只有指定的环境的时候,整个配置类里面的所有配置才能开始生效
3、没有标注环境标识的bean, 在任何环境下都是加载的.
五、AOP 原理
【动态代理】 指在程序运行期间动态的将某段代码切入到指定方法指定位置进行运行的编程方式:
5.1 例子
1、导入aop模块, Spring AOP: spring-aspects
            <dependency>
                <groupId>org.springframework</groupId>
                <artifactId>spring-aspects</artifactId>
                <version>4.3.12.RELEASE</version>
            </dependency>
2、定义一个业务逻辑类(MathCalculator): 在业务逻辑运行的时候将日志进行打印(方法之前、方法支行结束、方法出现异常、xxx)
    public class MathCalculator {

          public int div(int i, int j) {
           System.out.println("MathCalculator...div...");
           return i/j;
          }
     }
3、定义一个日志切面类(LogAspects)切面类里面的方法需要动态感知MathCalculator.div运行到哪里然后执行;
通知方法:
前置通知(@Before):logStart: 在目标方法(div)运行之前运行
后置通知(@After):logEnd: 在目标方法(div)运行结束之后运行(无论方法正常结束,还是异常结束)
返回通知(@AfterReturning):logReturn: 在目标方法(div)正常返回之后运行
异常通知(@AfterThrowing):logException: 在目标方法(div)出现异常之后运行
环绕通知(@Around):动态代理, 手动推进目标方法运行(joinPoint.procced())
public class LogAspects {

	public void logStart() {
		System.out.println("运行... @Before 参数列表是: {}");
	}

	public void logEnd() {
		System.out.println("结束...@After");
	}

	public void logReturn() {
		System.out.println("正常返回...@AfterReturning: 运行结果: { }");
	}

	public void logException() {
		System.out.println("异常...异常信息:{ }");
	}
}
4、给切面类的目标方法标注何时何地运行(通知注解)
1、包内一般切入点表达式
public int com.study.annotation.aop.MathCalculator.div(int i, int j)2、匹配的切入点表达式
public int com.study.annotation.aop.MathCalculator.*(..)3、公共的切入点表达式
 @Pointcut("execution(public int com.study.annotation.aop.MathCalculator.*(..))")
 public void pointCut() {};
4、其他的切面引用
             @After("com.study.annotation.aop.LogAspects.pointCut()")
             public class LogAspects {

                //抽取公共的切入点表达式
                // 1、本类引用
                @Pointcut("execution(public int com.study.annotation.aop.MathCalculator.*(..))")
                public void pointCut() {};

                //@Before在目标方法之前切入; 切入点表达式(指定在哪个方法切入)
                //public int com.study.annotation.aop.MathCalculator.div(int i, int j)
                @Before("pointCut()")
                public void logStart(JoinPoint joinPoint) {
                    System.out.println("运行... @Before 参数列表是: { }");
                }

                // 2、其他的切面引用
                @After("com.study.annotation.aop.LogAspects.pointCut()")
                public void logEnd() {
                    System.out.println("结束...@After");
                }

                @AfterReturning("pointCut()")
                public void logReturn() {
                    System.out.println("正常返回...@AfterReturning: 运行结果: { }");
                }

                @AfterThrowing("pointCut()")
                public void logException() {
                    System.out.println("异常...异常信息:{ }");
                }
            }
5、将切面类和业务逻辑类(目标方法所在类)都要加入到容器中;
       @Configuration
        public class MainConfigOfAOP {

            //业务逻辑类加入容器中
            @Bean
            public MathCalculator mathCalculator() {
                return new MathCalculator();
            }

            //切面类加到容器中
            @Bean
            public LogAspects logAspects() {
                return new LogAspects();
            }
        }
6、必须告诉Spring哪个类是切面类(给切面类上加一个注解:@Aspect)
        @Aspect
        public class LogAspects { ... }
7、给配置类中加 @EnableAspectJAutoProxy 【开启基于注解的AOP模式】
xml配置中开启注解 AOP
        <!-- 开启基于注解版的切面功能 -->
        <aop:aspectj-autoproxy></aop:aspectj-autoproxy>


        @EnableAspectJAutoProxy
        @Configuration
        public class MainConfigOfAOP { ... }
8、在切面类中获取切点的方法名和参数
JoinPoint
        @Before("pointCut()")
        public void logStart(JoinPoint joinPoint) {
            Object[] argsObjects = joinPoint.getArgs();
            System.out.println("" + joinPoint.getSignature().getName() + "运行... @Before 参数列表是: {" + Arrays.asList(argsObjects) +                 "}");
        }

        @After("com.study.annotation.aop.LogAspects.pointCut()")
        public void logEnd(JoinPoint joinPoint) {
            System.out.println("" + joinPoint.getSignature().getName() + "结束...@After");
        }

        //获取执行结果
        @AfterReturning(value = "pointCut()", returning = "result")
        public void logReturn(JoinPoint joinPoint, Object result) {
            System.out.println("" + joinPoint.getSignature().getName() + "正常返回...@AfterReturning: 运行结果: {" + result + "}");
        }

        //获取异常信息
        @AfterThrowing(value = "pointCut()", throwing="exception")
        public void logException(JoinPoint joinPoint, Exception exception) {
            System.out.println("" + joinPoint.getSignature().getName() + "异常...异常信息:{" + exception + "}");
        }
9、应用
  MathCalculator mathCalculator = applicationContext.getBean(MathCalculator.class);
		mathCalculator.div(100, 2);
5.2 AOP执行流程
1、@EnableAspectJAutoProxy是什么?
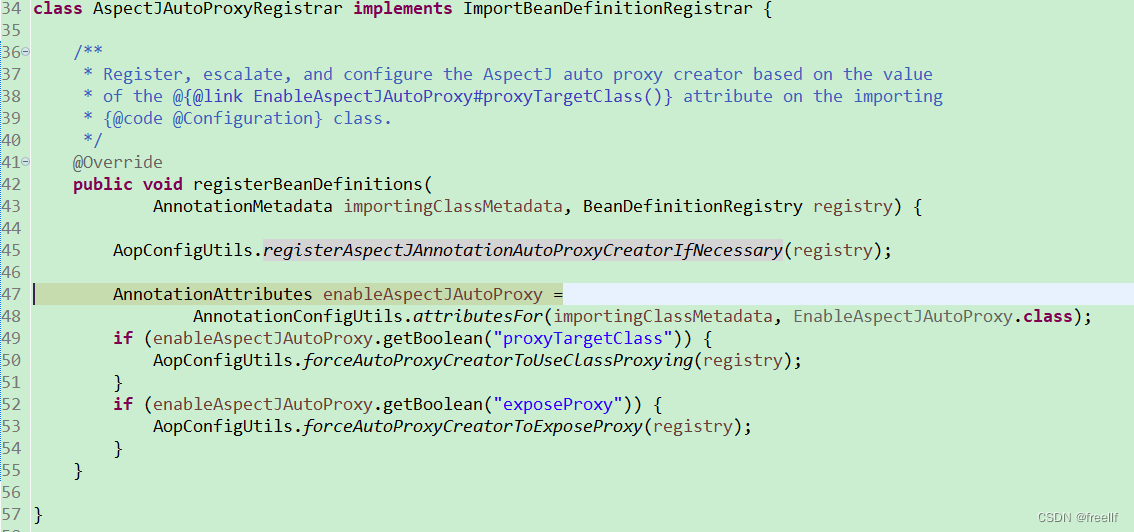
1、@Import(AspectJAutoProxyRegistrar.class): 给容器中导入AspectJAutoProxyRegistrar
利用AspectJAutoProxyRegistrar自定义给容器中注册bean;
org.springframework.aop.config.internalAutoProxyCreator=AnnotationAwareAspectJAutoProxyCreator
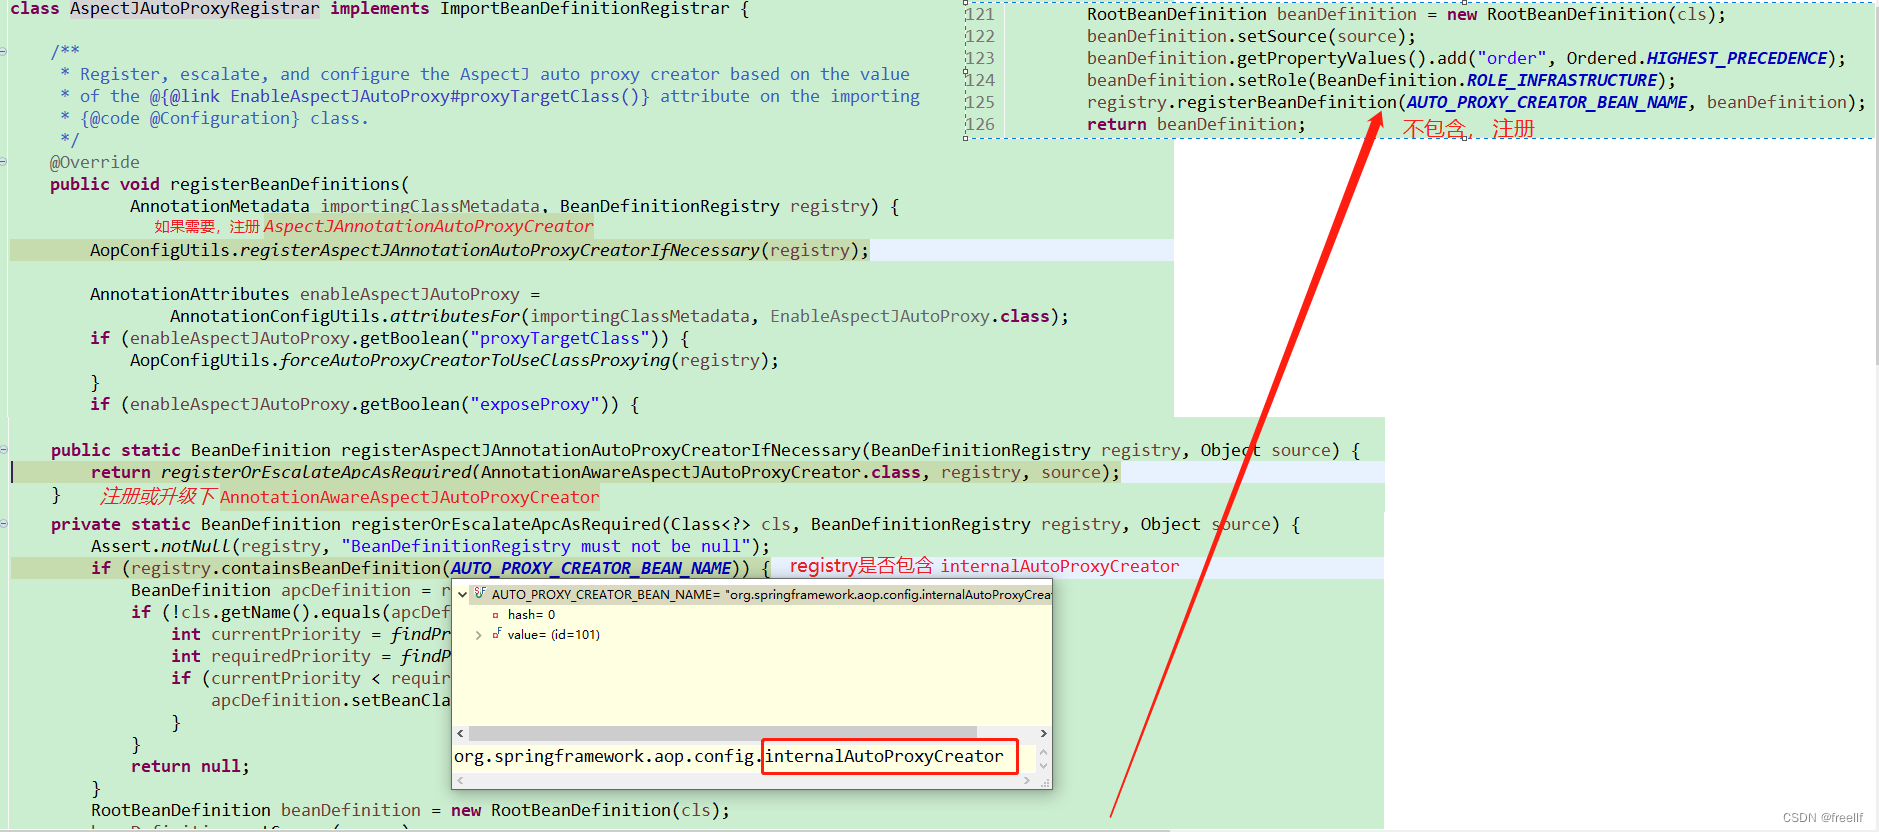
接下来,获得@EnableAspectJAutoProxy的一些属性。如果是true,做一些其他工作。
给容器中注册了一个AnnotationAwareAspectJAutoProxyCreator
2、 AnnotationAwareAspectJAutoProxyCreator 分析
AnnotationAwareAspectJAutoProxyCreator
->AspectJAwareAdvisorAutoProxyCreator
->AbstractAdvisorAutoProxyCreator
->AbstractAutoProxyCreator
implements SmartInstantiationAwareBeanPostProcessor, BeanFactoryAware
关注后置处理器(在bean初始化完成前后做事情)、自动装配BeanFactory
3、注册 AnnotationAwareAspectJAutoProxyCreator
AbstractAutoProxyCreator.setBeanFactory()
AbstractAutoProxyCreator.有后置处理器的逻辑
AbstractAdvisorAutoProxyCreator.setBeanFactory() -> initBeanFactory()
AnnotationAwareAspectJAutoProxyCreator.initBeanFactory()
创建和注册AnnotationAwareAspectJAutoProxyCreator的过程:
1.传入配置类,创建ioc容器
2.注册配置类,调用refresh()刷新容器
3.registerBeanPostProcessors(beanFactory);注册bean的后置处理器来方便拦截bean的创建;
1)、先获取ioc容器已经定义了的需要创建对象的所有BeanPostProcessor
2)、给容器中加别的BeanPostProcessor
3)、优先注册实现了PriorityOrderedr接口的BeanPostProcessor;
4)、再给容器中注册实现了Ordered接口的BeanPostProcessor;
5)、注册实现优先级接口的BeanPostProcessor;
6)、注册BeanPostProcessor,实际上就是创建BeanPostProcessor
创建internalAutoProxyCreator的BeanPostProcessor【AnnotationAwareAspectJautoProxyCreator】
1). 创建Bean的实例
2). populateBean: 给bean的各种属性赋值
3). initializeBean: 初始化bean;
1)、invokeAwareMethods(): 处理Aware接口的方法回调
2)、applyBeanPostProcessorBeforeInitialization: 应用后置处理器的postProcessBeforeInitialization()
3)、invokeInitMethods(): 执行自定义的初始化方法
4)、applyBeanPostProcessorsAfterInitialization(); 执行后置处理器的postProcessAfterInitialization();
4)、BeanPostProcessor(AnnotationAwareAspectJautoProxyCreator)创建成功: --》aspectJAdvisorsBuilder
7)、把BeanPostProcessor注册到BeanFactory中:
beanFactory.addBeanPostProcessor(postProcessor);
4、AnnotationAwareAspectJAutoProxyCreator执行时机
AnnotationAwareAspectJAutoProxyCreator => InstantiationAwareBeanPostProcessor
接上面执行步骤
4、finishBeanFactoryInitializatopm(beanFactory); 完成BeanFactory初始化工作,创建剩下的单实例
1)、遍历获取容器中所有的Bean, 依次创建对象getBean(beanName);
getBean -> doGetBean() -> getSingleton() ->
2)、创建bean
【AnnotationAwareAspectJAutoProxyCreator在所有bean创建之前会有一个拦戴,InstantiationWaareBeanPostProcessor,会调用postProcessBeforeInstantiation()】
1)、先从缓存中获取当前bean, 如果能获取到,说明bean是之前被创建过的:直接使用,否则再创建;
只要创建好的Bean都会被缓存起来
2)、createBean(); 创建bean;
AnnotationAwareAspectJAutoProxyCreator会在任何bean创建之前返回bean的实例
【BeanPostProcessor是在Bean对象创建完成初始化前后调用的】
【InstantiationAwareBeanPostProcessor是在创建Bean实例之前先尝试用后置处理器返回对象的】
1)、resolveBeforeInstantiation(beanName, mbdToUse); 解析BeforeInstantiat
希望后置处理器在此能返回一个代理对象,如果能返回代理对象就使用,如果不能就继续
1)、后置处理器先尝试返回对象:
bean = applyBeanPostProcessorsBeforeInstantiation();
拿到所有后置处理器,如果是InstantiationAwareBeanPostProcessor;
就执行postPrecessBeforeInstatiation
if (bean != null) {
bean = applyBeanPostProcessorsAfterInitialization(bean,
}
2)、doCreateBean(beanName, mbdToUse, args);真正的去创建一个bean实例,和3.6流程一样
5、 AnnotationAwareAspectJAutoProxyCreator【InstantiationAwareBeanPostProcessor】的作用
1)、每一个bean创建之前,调用 postProcessBeforeInstantiation()
关心切面t的创建
1)、判断当前bean是否在advisedBeans中(保存了所有需要增强的bean)
2)、判断当前bean是否是基础类型的Advice、Pointcut、Advisor、AppInfrastructureBean, 或者是否是切面(@Aspect)
3)、是否需要跳过
1)、获取候选的增强器(切面里面的通知方法) 【List<Advisor> candidateAdvisors】
每一个封装的通知方法的增强器是:InstantiationModelAwarePointcutAdvisor
判断每一个增强器是否是Aspect3PointcutAdvisor类型的, 返回true
2)、永远返回 false
2)、创建对象
postProcessAfterINitialization:
return wrapIfNecessary(bean, beanName, cacheKey); //包装如果里需要的情况下
1)、 获取当前bean的所有增强器(通知方法) Object[] specificInterceptors
1、找到候选的所有的增强器(找到哪些通知方法是需要切入当前bean方法的)
2、获取到能在bean使用的增强器
3、给增强器排序
2)、保存当前bean在advisedBeans中:
3)、如果当前bean需要增强,创建当前bean的代理对象;
1)、获取所有增强器(通知方法)
2)、保存到proxyFactory
3)、创建代理对象, Spring自动决定
JdkDynamicAopProxy(config); jdk动态代理
ObjenesisCglibAopProxy(config); cglib的动态代理
4)、给容器中返回当前组件使用cglib增强了的代理对象
5)、以后容器中获取到的就是这个组件的代理对象, 执行目标方法的时候,代理对象就会执行通知方法的流程
3)、目标方法执行
容器中保存了组件的代理对象(cglib增强后的对象), 这个对象里面保存了详细信息(比如增强器,目标对象,xxx);
1)、CglibAopProxy.intercept(): 拦截目标方法的执行
2)、根据ProxyFactory对象获取将要执行的目标方法拦截器链:
List<Object> chain = this.advised.getInterceptorsAndDynamicInterceptionAdvice(method, targetClass);
1)、List<Object> interceptorList保存所有拦截器 5
一个默认的ExposeInvocationInterceptor和4个增加器
2)、遍历所有的增强器,将其转为Interceptor:
registry.getInterceptors(advisor);
3)、将增强器转为List<MethodInterceptor>:
如果是MethodInterceptor, 直接加入到集合中
如果不是, 使用AdvisorAdapter将增强器转为MethodInterceptor;
转换完成返回MethodInterceptor数组;
3)、如果没有拦截器链, 直接执行目标方法
拦截器链(每一个通知方法又被包装为方法拦截器, 利用MethodInterceptor机制)
4)、如果有拦截器链,把需要执行的目标对象,目标方法,
拦截器链等信息传入创建一个CglibMethodInvocation对象.
并调用 Object retVal = mi.proceed()
5)、拦截器链的触发过程;
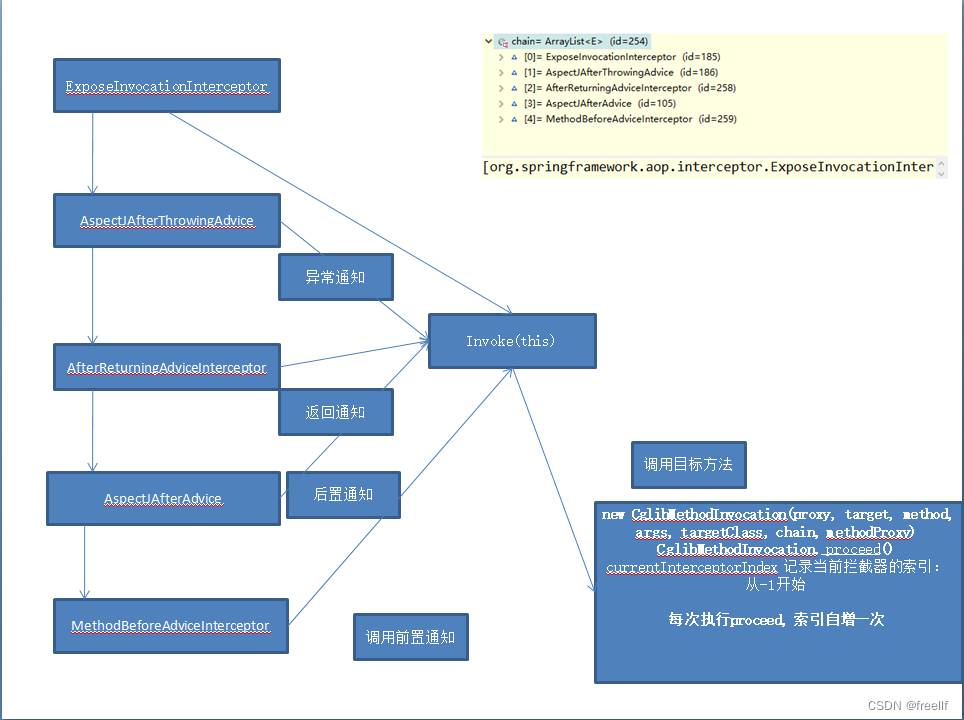
1)、如果没有拦截器执行目标方法, 或者拦截器的索引和拦截器数组-1大小一样(指定到了最后一个拦截器)执行目标方法;
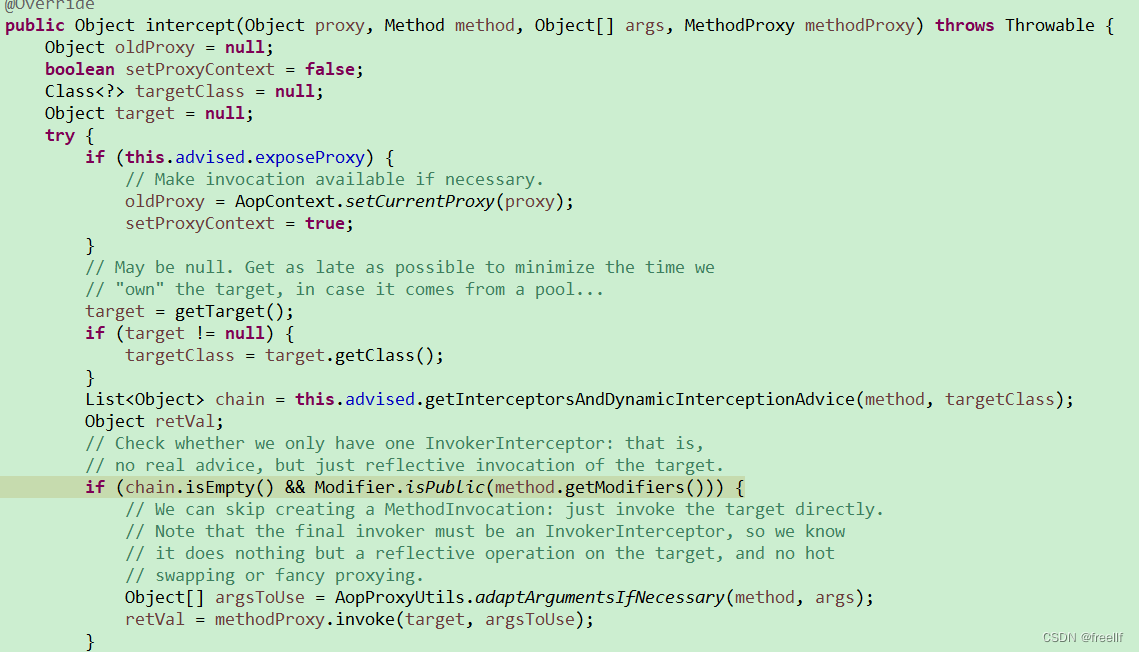

2)、链式获取每一个拦截器, 拦截器执行invoke方法,每一个拦截器等待下一个拦截器执行完成返以后再来执行;
拦截器的机制,保证通知方法与目标方法的执行顺序
5.3、流程总结
1)、 @EnableAsprectJAutoProxy 开启AOP功能
2)、 @EnableAsprectJAutoProxy 给容器中注册一个组件 AnnotationAwareAspectJAutoProxyCreator
3)、AnnotationAwareAspectJAutoProxyCreator是一个后置处理器;
4)、容器的创建流程:
1)、 registerBeanPostProcessors() 注册后置处理器; 创建 AnnotationAwareAspectJAutoProxyCreator对象
2)、finishBeanFactoryInitialization() 初始化剩下的单实例bean
1)、创建业务逻辑组件和切面组件
2)、AnnotationAwareAspectJAutoProxyCreator拦截组件的创建过程
3)、组件创建完成之后,判断组件是否需要增强
是: 切面的通知方法, 包装成增强器(Advisor); 给业务逻辑组件创建一个代理对象 (cglib)
5)、执行目标方法
1)、代理对象执行目标方法
2)、CglibAopProxy.intercept();
1)、得到目标方法的拦截器链(增强器包装成拦截器MethodInterceptor)
2)、利用拦截器的链式机制,依次进入每一个拦截器进行执行;
3)、效果
正常执行: 前置通知 -> 目标方法 -> 后置通知 -> 返回通知
出现异常: 前置通知 -> 目标方法 -> 后置通知 -> 异常通知
六、声明式事务
6. 1、环境搭建:
1、导入相关依赖
数据源、数据库驱动、 Spring-jdbc模块
        <dependency>
            <groupId>org.springframework</groupId>
            <artifactId>spring-jdbc</artifactId>
            <version>4.3.12.RELEASE</version>
        </dependency>
2、配置数据源, JdbcTemplate(Spring提供的简化数据库操作的工具)操作数据
    @Configuration
    public class TxConfig {

        @Bean
        public DataSource dataSource() throws PropertyVetoException {
            ComboPooledDataSource dataSource = new ComboPooledDataSource();
            dataSource.setUser("root");
            dataSource.setPassword("123456");
            dataSource.setJdbcUrl("jdbd:mysql://localhost:3306/test");
            dataSource.setDriverClass("com.mysql.jdbc.Driver");
            return dataSource;
        }

        @Bean
        public JdbcTemplate jdbcTemplate() throws PropertyVetoException {
            JdbcTemplate jdbcTemplate = new JdbcTemplate(dataSource());
            return jdbcTemplate;
        }
    }
@Repository
public class UserDao {
@Autowired
private JdbcTemplate jdbcTemplate;
public void insert() {
String sql = "Insert into `tab_user`(username, age) values(?, ?)";
String username = UUID.randomUUID().toString().substring(0,5);
jdbcTemplate.update(sql, username, 20);
}
}3、给方法上标注 @Transactional 表示当前方法是一个事务方法
        @Service
        public class UserService {

            @Autowired
            private UserDao userDao;

            @Transactional
            public void insertUser() {
                userDao.insert();
            }
        }
4、@EnableTransactionManagement开启基于注解的事务管理功能
    @EnableTransactionManagement
    @ComponentScan("com.study.annotation.tx")
    @Configuration
    public class TxConfig {
       ...
    }
5、配置事务管理器
    @EnableTransactionManagement
    @ComponentScan("com.study.annotation.tx")
    @Configuration
    public class TxConfig {
        ...
        //注册事务管理器在容器中
        @Bean
        public PlatformTransactionManager transactionManager() throws PropertyVetoException {
            return new DataSourceTransactionManager(dataSource());
        }
    }
6.2、源码:
1)、@EnableTransactionManagement
利用TransactionManagementConfigurationSelector给容器中会导入组件
导入两个组件
AutoProxyRegistrar
ProxyTransactionManagementConfiguration
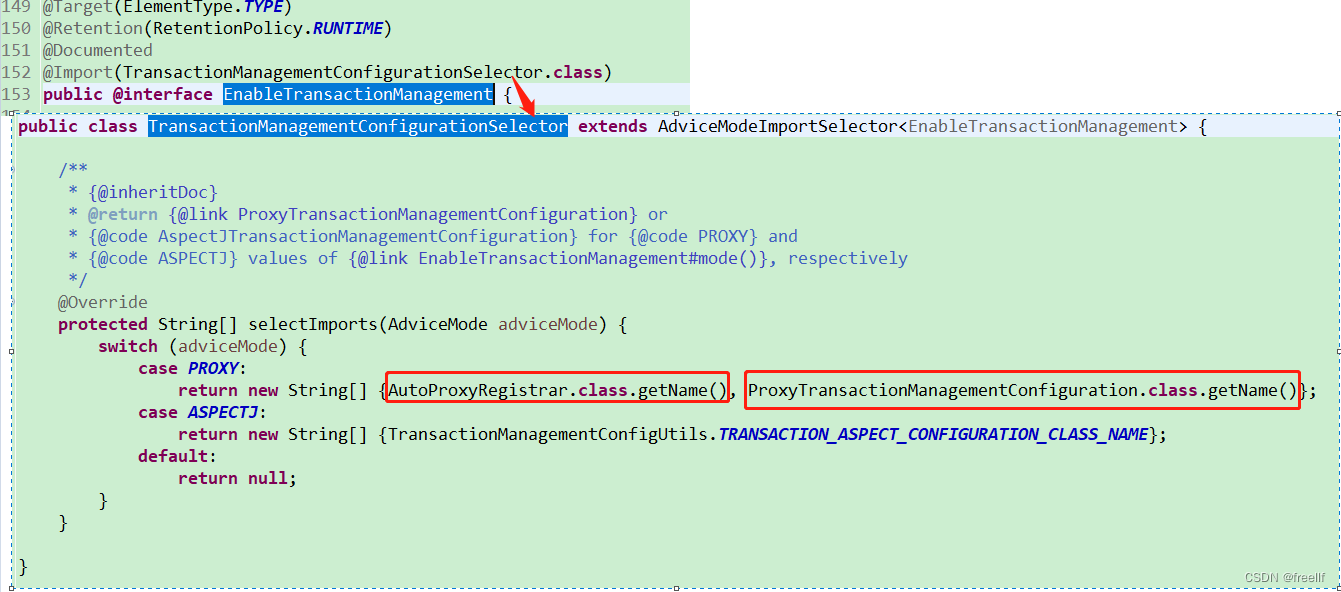
2)、AutoProxyRegistrar:
给容器中注册InfrastructureAdvisorAutoProxyCreator组件
InfrastructureAdvisorAutoProxyCreator:
利用后置处理器机制在对象创建以后,包装对象,返回一个代理对象(增加器), 代理对象执行方法利用拦截器链进行调用

3)、ProxyTransactionManagementConfiguration
给容器中注册事务增强器
1)、事务增强器要用事务注解的信息: AnnotationTransactionAttributeSource解析事务注解
2)、事务拦截器:
TransactionInterceptor: 保存了事务属性信息,事务管理器
它是一个MethodInterceptor:
在目票方法执行的时候:
执行拦截器链:
事务拦截器:
1)、先获取事务相关的属性
2)、再获取PlatformTransactionManager,如果事先没有添加指定任何transactionManager,
最终会从容器中按照类型获取一个PlatformTransactionManager;
3)、执行目标方法
如果异常,获取到事务管理器,利用事务管理回滚操作
如果正常,利用事务管理器,提交事务
七、扩展
7.1 BeanFactoryPostProcessor
BeanPostProcessor: bean后置处理器, bean创建对象初始化前后进行拦截工作的
BeanFactoryPostProcessor: beanFactory的后置处理器:
在BeanFactory标准初始化之后调用; 所有的bean定义已经保存加载到beanFactory, 但是bean的实例还没有创建;
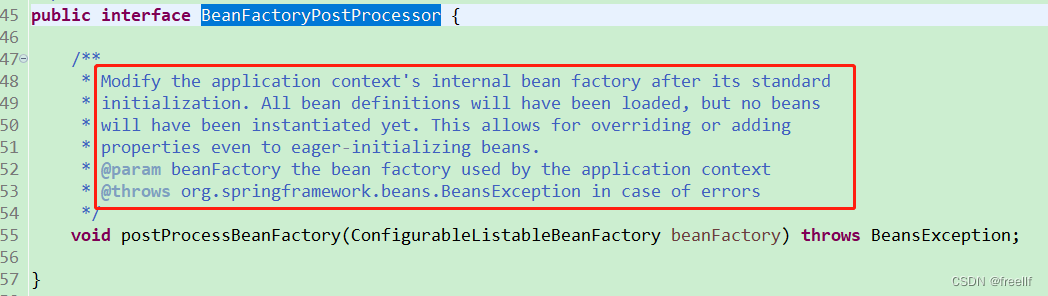
执行流程:

1)、ioc容器创建对象
2)、invokeBeanFactoryPostProcessors(beanFactory); 执行BeanFactoryPostProcessors
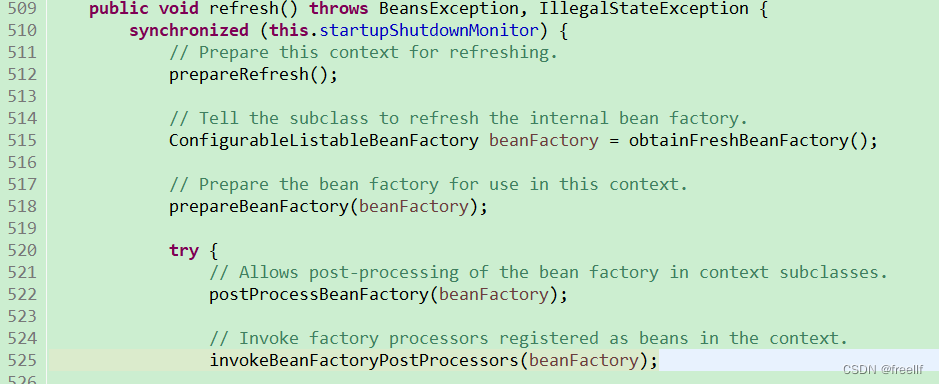
如何找到所有的BeanFactoryPostProcessor并执行它们的方法
1)、直接在BeanFactory中找到所有类型是BeanFactoryPostProcessor的组件, 并执行它们的方法


2)、在初始化创建其他组件前面执行
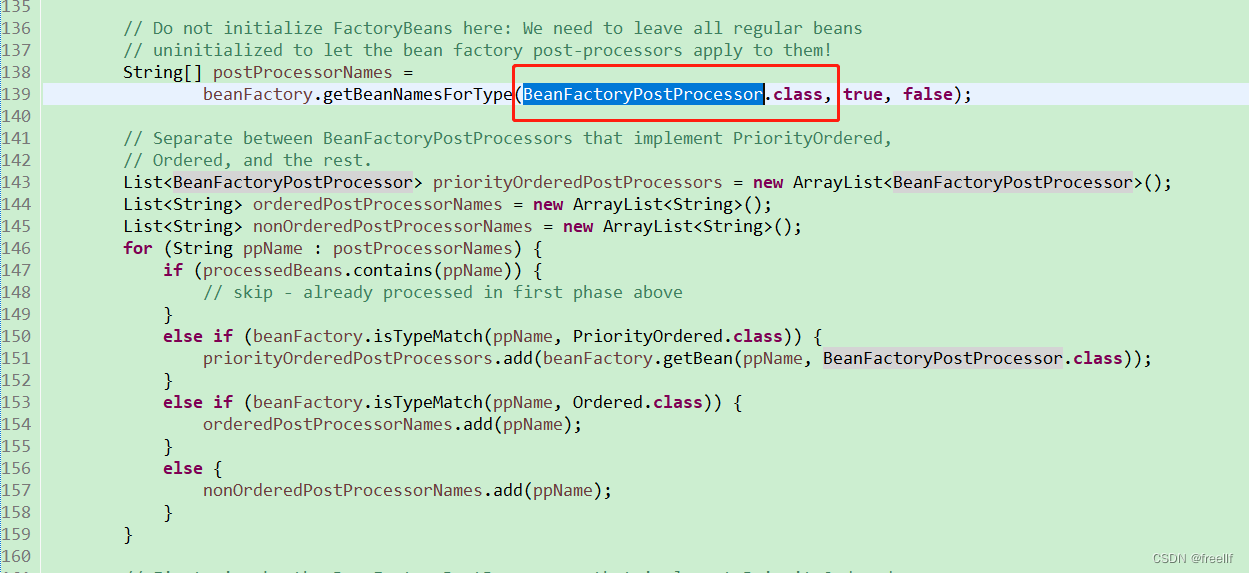
7.2、BeanDefinitionRegistryPostProcessor
BeanDefinitionRegistryPostProcessor extends BeanFactoryPostProcessor
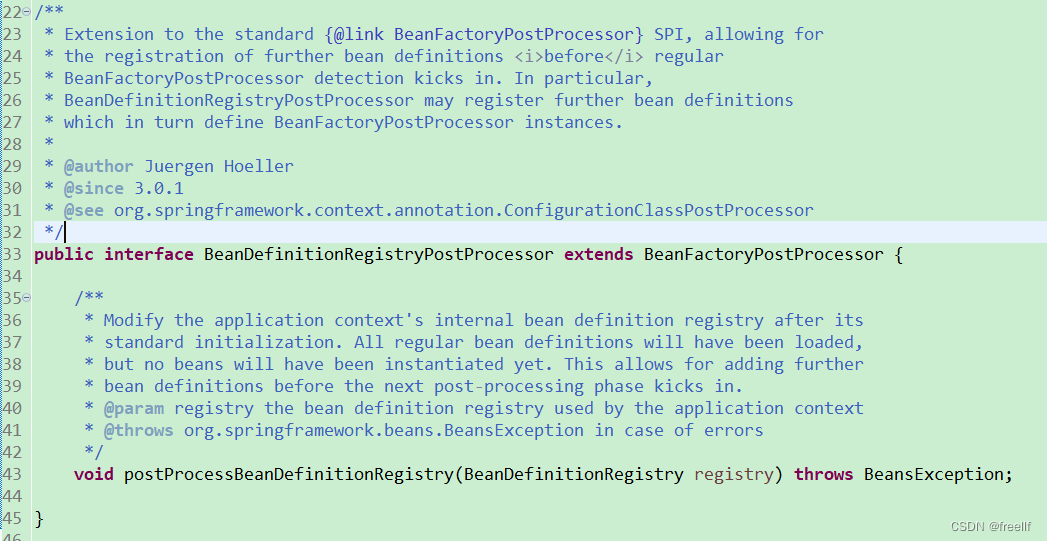
postProcessBeanDefinitionRegistry();
在所有bean定义信息将要被加载, bean实例还未创建的;
BeanDefinitionRegistry bean定义信息的保存中心, 以后BeanFactory就是按照BeanDefinitionRegistry里面保存的每一个bean定义信息创建bean实例;
优先于BeanFactoryPostProcessor执行;
利用BeanDefinitionRegistryPostProcessor给容器中再额外添加一些组件;
1、使用RootBeanDefinition注册Bean
     @Override
	public void postProcessBeanDefinitionRegistry(BeanDefinitionRegistry registry) throws BeansException {
		RootBeanDefinition beanDefinition = new RootBeanDefinition(Blue.class);
		registry.registerBeanDefinition("hello", beanDefinition);
	}
2、使用AbstractBeanDefinition注册Bean
    @Override
	public void postProcessBeanDefinitionRegistry(BeanDefinitionRegistry registry) throws BeansException {
		AbstractBeanDefinition beanDefinition = BeanDefinitionBuilder.rootBeanDefinition(Blue.class).getBeanDefinition();
		registry.registerBeanDefinition("hello", beanDefinition);
	}
执行流程:
1、 创建IOC容器
2、refresh() -> invokeBeanFactoryPostProcessors(beanFactory);
3、从容器中获取到所有的BeanDefinitionRegistryPostProcessor组件。
1、依次触发postProcessBeanDefinitionRegistry()方法
2、再来触发postProcessBeanFactory()方法BeanFactoryPostProcessor;
4、再来从容器中找到BeanFactoryPostProcess组件, 然后依次触发postProcessBeanFactory()方法
7.3、ApplicationListener
监听容器中发布的事件。事件驱动模型开发
ApplicationListener<E extends ApplicationEvent> extends EventListene
监听ApplicationListener及其下面的子事件
3.1 实现步骤
1)、写一个监听器(ApplicationListener实现类)来监听某个事件(ApplicationEvent及其子类)
    public class MyApplicationListener implements ApplicationListener<ApplicationEvent>{

        //当容器中发布的事件以后,方法触发
        @Override
        public void onApplicationEvent(ApplicationEvent event) {
            // TODO Auto-generated method stub
            System.out.println("收到事件" + event);
        }
    }
@EventListener;
原理: 使用 EventListenerMethodProcessor 处理器来解析方法上的 @EventListener
    @EventListener(classes= {ApplicationEvent.class})
	public void listen(ApplicationEvent event) {
		System.out.println("UserService... 监听事件" + event);
	}
2)、把监听器加入到容器
使用@Component
3)、发布一个事件
只要容器中有相关事件的发布,我们就能监听到这个事件
如: ContextRefreshedEvent:容器刷新完成(所有bean都完全创建)会发布这个事件
ContextClosedEvent: 关闭容器会发布这个事件
自定义发布一个事件: applicationContext.publishEvent()
AnnotationConfigApplicationContext applicationContext = new AnnotationConfigApplicationContext(ExtConfig.class);
		applicationContext.publishEvent(new ApplicationEvent(new String("我的事件")) {});
		applicationContext.close();
3.2、执行流程
1)、ContextRefreshedEvent事件:
1)、容器创建对象: refresh();
2)、finishRefresh();容器刷新完成
2)、自定义发布事件
3)、容器关闭会发布ContextClosedEvent
【事件发布流程】:
3)、publishEvent(new ContextRefreshedEvent(this));
1)、获取事件多播器(派发器):getApplicationEventMulticaster()
2)、multicastEvent派发事件:
3)、获取到所有的ApplicationListener:
for (final ApplicationListener<?> listener : getApplicationListeners(event, type))
1)、如果有Executor, 可以支持使用Executor进行异步派发;
Executor executor = getTaskExecutor();
2)、否则,同步的方式直接执行listener方法: invokeListener(listener, event);
3.3、【事件多播器(派发器)】
1)、容器创建对象: refresh();
2)、initApplicationEventMulticaster(); 初始化ApplicationEventMulticaster;
1)、先运容器中找有没有id="applicationEventMulticaster"的组件
2)、如果没有this.applicationEventMulticaster = new SimpleApplicationEventMulticaster(beanFactory);
beanFactory.registerSingleton(APPLICATION_EVENT_MULTICASTER_BEAN_NAME, this.applicationEventMulticaster);
并且加入到容器中,我们就可以在其他组件中派发事件,自动注入这个applicationEventMulticaster;
3.4、【容器中有哪些监听器】
1)、容器创建对象: refresh();
2)、registerListeners();
从容器中拿到所有的监听器,把它们注册到applicationEventMulticaster中:
String[] listenerBeanNames = getBeanNamesForType(ApplicationListener.class, true, false);
//将listener注册到ApplicationEventMulticaster
getApplicationEventMulticaster().addApplicationListenerBean(listenerBeanName);
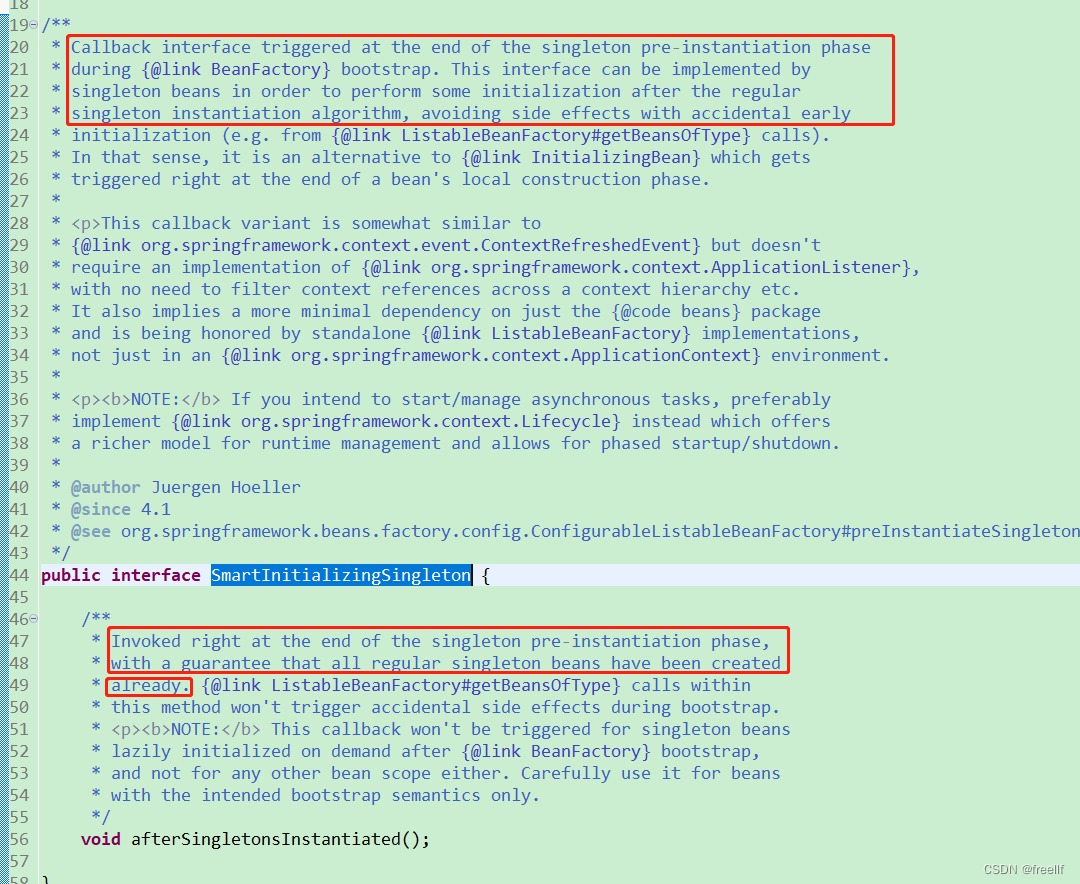
3.5、 SmartInitializingSingleton

1)、ioc容器创建对象并refresh();
2)、finishBeanFactoryInitialization(beanFactory); 初始化剩下的单实例bean;
1)、先创建所有的单实例bean; getBean();
2)、finishBeanFactoryInitialization(beanFactory); 初始化剩下的单实例bean;
1)、先创建所有的单实例bean:getBean();
2)、获取所有创建好的单实例bean, 判断是否是SmartInitializingSingleton类型的:
如果是就调用afterSingletonsInstantiated();
7.4(补)


 254
254


 被折叠的 条评论
为什么被折叠?
被折叠的 条评论
为什么被折叠?
 到【灌水乐园】发言


