


服务是什么
服务(Service)是Android中实现后台运行程序的解决方案,他非常适合用于那些不需要和用户进行交互的并且需要长期运行的任务,即使用户打开了另一个应用程序,程序被切到了后台,服务依然能够运行。需要注意的是服务的运行并不是再一个新的线程中,而是在主线程中运行的。
服务的基本用法
首先定义一个MyService类继承Service类,这样就可以重写他的几个方法了
public class MyService extends Service{

    @Override
    public IBinder onBind(Intent intent) {
        return null;
    }
    @Override
    public void onCreate() {
        super.onCreate();
    }
    @Override
    public int onStartCommand(Intent intent, int flags, int startId) {
        return super.onStartCommand(intent, flags, startId);
    }
    @Override
    public void onDestroy() {
        super.onDestroy();
    }

}
官方API文档中对这几个方法的解释
onBind方法:当其他组件调用onBind方法请求绑定Service时该方法被调用,该方法返回一个IBinder接口,这个IBinder接口是Service与请求绑定者之间的桥梁,如果没有组件与Service进行绑定,则该方法返回null。
onCreate方法:在服务第一次被创建的时候回调该方法,只会被回调一次,并且在onStartCommand方法和OnBind方法被回调之前调用,如果服务正在运行,则该方法不会被调用。
onStartCommand方法:当其他组件调用startService方法请求启动Service时该方法回调,一旦服务启动,服务处于后台运行状态,如果需要结束服务的运行,需要调用stopSelf或stopService方法结束服务的运行(如果仅仅是bindService,则无需调用这些方法)
onDestory方法:在服务销毁时调用,再改房中应该释放一些资源,如停止线程或者解除绑定的监听器或者一些BroadcastReceiver,该方法是Service中的最后一个回调
作为四大组件之一,服务还需要在androidmanifest.xml文件中进行注册
<service android:name=".MyService"></service>服务的启动与停止
定义两个按钮,一个用来启动服务,一个停止服务,布局代码不再给出
    mStartButton.setOnClickListener(new OnClickListener() {

            @Override
            public void onClick(View v) {
                Intent intent=new Intent(MainActivity.this,MyService.class);
                startService(intent);
            }
        });

        mStopButton.setOnClickListener(new OnClickListener() {

            @Override
            public void onClick(View v) {
                Intent intent=new Intent(MainActivity.this,MyService.class);
                stopService(intent);
            }
        });
使用Context类的startService和stopService方法启动或停止服务,使用显示Intent指定需要开启或关闭的服务
在MyService中我在每个发那个方法中调用了Log日志打印,这样就可以知道哪个方法被调用了
public class MyService extends Service{
    private static final String TAG="MyService";

    @Override
    public IBinder onBind(Intent intent) {
        Log.i(TAG, "---------------onBind");
        return null;
    }
    @Override
    public void onCreate() {
        Log.i(TAG, "---------------onCreate");
        super.onCreate();
    }
    @Override
    public int onStartCommand(Intent intent, int flags, int startId) {
        Log.i(TAG, "---------------onStartCommand");
        return super.onStartCommand(intent, flags, startId);
    }
    @Override
    public void onDestroy() {
        Log.i(TAG, "---------------onDestroy");
        super.onDestroy();
    }

}
点击startService
- onCreate
- onStratCommand
再次点击startService
- onStartCommand
点击stopService
- onDestroy
可以看到onCreate方法只会调用一次,之后再次开启服务,只会调用onStartCommand方法
活动与服务进行通信
虽然已经启动了服务,但是在启动之后好像Activity与Service就没有关系了,要想知道服务到底干了什么,并且完成的进度等,就需要服务与活动进行通信,这时候就需要用到刚才介绍的onBind方法了
    private DownloadBinder mBinder=new DownloadBinder();

    class DownloadBinder extends Binder{
        public void startDownload(){
            Log.i(TAG, "-------------startDownload");
        }

        public int getProcess(){
            Log.i(TAG, "--------------getProcess");
            return 0;
        }
    }

    @Override
    public IBinder onBind(Intent intent) {
        Log.i(TAG, "---------------onBind");
        return mBinder;
    }
首先我定义了一个内部类DownloadBinder继承Binder类,里面实现了两个方法,一个是开始下载,一个是查看下载的进度,方然这都是虚拟的方法。然后在MyService中创建了DownloadBinder的实例,并且在onBind方法中返回这个mBinder实例。这样工作几乎就完成了。
再定义两个按钮bindService和unBindService
修改MainActivity中的代码,使得MainActivity与MyService建立连接
private MyService.DownloadBinder mBinder;

    private ServiceConnection connection=new ServiceConnection() {

        @Override
        public void onServiceDisconnected(ComponentName name) {

        }

        @Override
        public void onServiceConnected(ComponentName name, IBinder service) {
            mBinder=(DownloadBinder) service;
            mBinder.startDownload();
            mBinder.getProcess();
        }
    };
首先定义了一个匿名类ServiceConnection,在里面重写了onServiceConnected方法和onServiceDisconnected方法,这两个方法分别在服务与活动进行绑定和解除绑定时调用。然后我在onServiceConnected方法中通过向下转型得到了mBinder实例,也就是在MyService的onBind方法中返回的mBinder,这样就可以调用MyBinder中的任何public方法,例如开始下载的方法和查看进度的方法。
mBindButton.setOnClickListener(new OnClickListener() {

            @Override
            public void onClick(View v) {
                Intent bindIntent=new Intent(MainActivity.this,MyService.class);
                bindService(bindIntent, connection, BIND_AUTO_CREATE);

            }
        });

        mUnBindButton.setOnClickListener(new OnClickListener() {

            @Override
            public void onClick(View v) {

                unbindService(connection);
            }
        });
绑定的关键是bindService方法,第一个是Intent对象,第二个是刚刚创建的connection对象,第三个是参数,这里传入的BIND_AUTO_CREATE指的是在绑定后立即创建服务,即调用onCreate方法,但onstartCommand方法不会调用.
取消绑定很简单,调用unBindService方法,传入刚才创建的connection对象就可以取消绑定了。
运行
点击bindService按钮
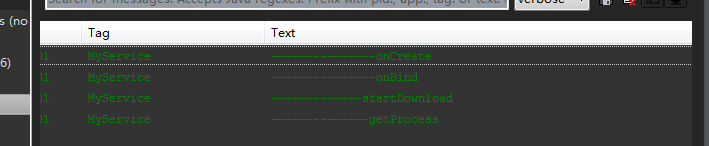
可以看到分别调用了
- onCreate
- onBind
- startDownload
- getProcess
点击unBindService
- onDestroy
注意,经过试验后得到如果只调用了startService方法,只需要调用stopService方法就会调用onDestroy方法,如果只调用了bindService方法,则只需要调用unBindService方法就会回掉onDestroy方法,如果startService和bindService方法都调用了,则需要stopService和unBindService方法都被调用后,服务才会停止。
使用前台服务
前段时间刚学了通知的使用即Notification,这里前台服务其实与Notification很相似的
在MyService的onCreate方法中
public void onCreate() {
        Log.i(TAG, "---------------onCreate");
        super.onCreate();

        Notification notification=new Notification(R.drawable.ic_launcher, "通知来了!",System.currentTimeMillis());
        Intent intent=new Intent(this,MainActivity.class);
        PendingIntent pendingIntent=PendingIntent.getActivity(this,0, intent,0);
        notification.setLatestEventInfo(this, "前台服务标题", "前台服务内容", pendingIntent);
        notification.defaults=Notification.DEFAULT_ALL;
        startForeground(1, notification);

    }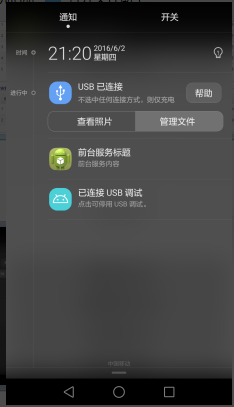
可以看到前台服务其实和通知是一样的,只不过没用NotificationManager,而使用startForeground来开启通知。


 2073
2073

 被折叠的 条评论
为什么被折叠?
被折叠的 条评论
为什么被折叠?
 到【灌水乐园】发言


