


目录
背景
- Spring Cloud Gateway①入门以及自定义过滤器开发
- Spring Cloud Gateway②聚合Swagger
- Spring Cloud Gateway③编码实现动态增加、修改、删除路由
以上文章演示了Gateway的部分功能的自定义开发,API网关还承担了流量入口的角色,为了保护后端微服务不被高峰流量冲垮,API网关可以进行限流、熔断、降级处理。熔断、降级有Hystrix等组件支持,限流策略也有RequestRateLimiter,我们这篇文章主要演示如何自定义限流策略,学会了自定义限流后,就可以开发更多满足自己业务需求的功能了。
本文开发环境介绍
| 开发依赖 | 版本 |
|---|---|
| Spring Boot | 2.7.0 |
| Spring Cloud | 2021.0.1 |
| Spring Cloud Alibaba | 2021.0.1.0 |
本文继续接着上一篇文章往下讲,代码和配置都是接着上一篇,如有看不懂的地方可以把前面关于Gateway的内容过目一下。
新增每秒限流过滤器
自定义DemoRateLimitPerSecondGatewayFilterFactory类
import lombok.Data;
import lombok.extern.slf4j.Slf4j;
import org.springframework.cloud.gateway.filter.GatewayFilter;
import org.springframework.cloud.gateway.filter.factory.AbstractGatewayFilterFactory;
import org.springframework.http.HttpStatus;
import org.springframework.stereotype.Component;
import reactor.core.publisher.Mono;

import java.util.Arrays;
import java.util.HashMap;
import java.util.List;
import java.util.Map;
import java.util.concurrent.ConcurrentHashMap;
import java.util.concurrent.atomic.AtomicInteger;

@Component
@Slf4j
public class DemoRateLimitPerSecondGatewayFilterFactory extends AbstractGatewayFilterFactory<DemoRateLimitPerSecondGatewayFilterFactory.Config> {

    private final Map<Long, Map<String, AtomicInteger>> rateLimitMap = new ConcurrentHashMap<>();

    public DemoRateLimitPerSecondGatewayFilterFactory() {
        super(Config.class);
    }

    @Override
    public List<String> shortcutFieldOrder() {
        // yml配置文件中参数的赋值顺序
        return Arrays.asList("limit");
    }

    @Override
    public GatewayFilter apply(Config config) {
        return (exchange, chain) -> {
            String path = exchange.getRequest().getPath().toString();
            long nowSecond = System.currentTimeMillis() / 1000;
            Map<String, AtomicInteger> apiCount = rateLimitMap.computeIfAbsent(nowSecond, k->new HashMap<String, AtomicInteger>(){{
                put(path, new AtomicInteger(1));
            }});
            AtomicInteger count = apiCount.computeIfAbsent(path, k->new AtomicInteger(1));
            int countValue = count.get();
            log.debug("count: {}", countValue);
            if(countValue > config.getLimit()) {
                exchange.getResponse().setStatusCode(HttpStatus.TOO_MANY_REQUESTS);
                return exchange.getResponse().setComplete();
            }
            count.addAndGet(1);
            return chain.filter(exchange).then(Mono.fromRunnable(()->{
                rateLimitMap.keySet().stream().filter(time->time<nowSecond).forEach(rateLimitMap::remove);
            }));
        };
    }

    @Data
    public static class Config {
        private Integer limit;
    }
}
这个过滤器可以根据每秒请求次数进行限制,超过指定的次数,则返回429状态码
修改路由配置
server:
  port: 8081
spring:
  application:
    name: demo-gateway
  cloud:
    gateway:
      #路由配置
      routes:
        - id: baidu
          uri: https://www.baidu.com
          predicates:
            - Path=/baidu
          filters:
            - DemoRateLimitPerSecond=1
            - StripPrefix=1
            - Demo=true,hello,world
            - name: Demo
              args:
                enabled: true
                arg1: hello2
                arg2: world2
上面配置了DemoRateLimitPerSecond限流策略,每秒1个请求
验证每秒限流策略
在浏览器输入http://localhost:8081/baidu, 按F5刷新几次
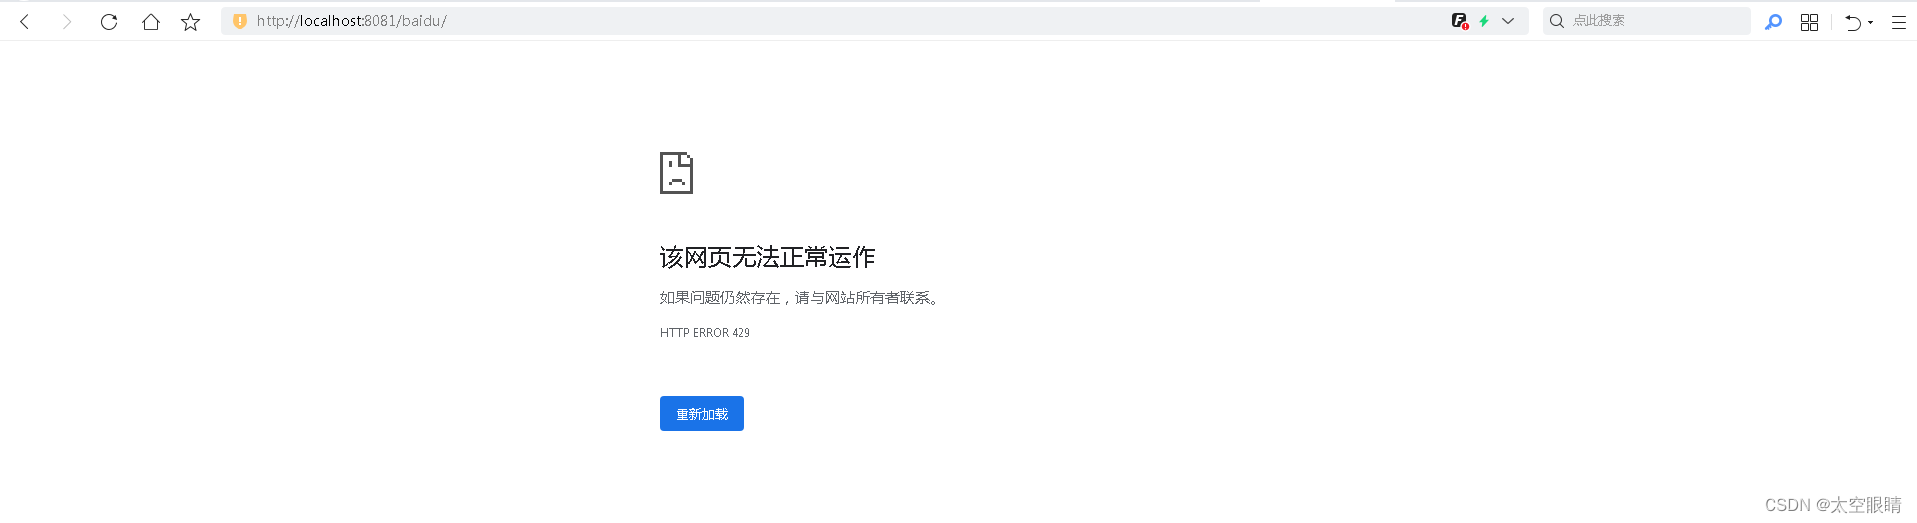
出现以上图片内容,表示限流策略已经生效了。
新增每天限流过滤器
自定义DemoRateLimitPerDayGatewayFilterFactory类
import lombok.Data;
import lombok.extern.slf4j.Slf4j;
import org.springframework.cloud.gateway.filter.GatewayFilter;
import org.springframework.cloud.gateway.filter.factory.AbstractGatewayFilterFactory;
import org.springframework.http.HttpStatus;
import org.springframework.stereotype.Component;
import reactor.core.publisher.Mono;

import java.time.LocalDate;
import java.time.ZoneId;
import java.util.Arrays;
import java.util.HashMap;
import java.util.List;
import java.util.Map;
import java.util.concurrent.ConcurrentHashMap;
import java.util.concurrent.atomic.AtomicInteger;

@Component
@Slf4j
public class DemoRateLimitPerDayGatewayFilterFactory extends AbstractGatewayFilterFactory<DemoRateLimitPerDayGatewayFilterFactory.Config> {

    private final Map<Long, Map<String, AtomicInteger>> rateLimitMap = new ConcurrentHashMap<>();

    public DemoRateLimitPerDayGatewayFilterFactory() {
        super(Config.class);
    }

    @Override
    public List<String> shortcutFieldOrder() {
        // yml配置文件中参数的赋值顺序
        return Arrays.asList("limit");
    }

    @Override
    public GatewayFilter apply(Config config) {
        return (exchange, chain) -> {
            String path = exchange.getRequest().getPath().toString();
            long nowSecond = LocalDate.now().atStartOfDay().atZone(ZoneId.systemDefault()).toInstant().getEpochSecond();
            Map<String, AtomicInteger> apiCount = rateLimitMap.computeIfAbsent(nowSecond, k->new HashMap<String, AtomicInteger>(){{
                put(path, new AtomicInteger(1));
            }});
            AtomicInteger count = apiCount.computeIfAbsent(path, k->new AtomicInteger(1));
            int countValue = count.get();
            log.debug("count: {}", countValue);
            if(countValue > config.getLimit()) {
                exchange.getResponse().setStatusCode(HttpStatus.TOO_MANY_REQUESTS);
                return exchange.getResponse().setComplete();
            }
            count.addAndGet(1);
            return chain.filter(exchange).then(Mono.fromRunnable(()->{
                rateLimitMap.keySet().stream().filter(time->time<nowSecond).forEach(rateLimitMap::remove);
            }));
        };
    }

    @Data
    public static class Config {
        private Integer limit;
    }
}
这个过滤器可以根据每天请求次数进行限制,超过指定的次数,则返回429状态码
修改路由配置
server:
  port: 8081
spring:
  application:
    name: demo-gateway
  cloud:
    gateway:
      #路由配置
      routes:
        - id: baidu
          uri: https://www.baidu.com
          predicates:
            - Path=/baidu
          filters:
            - DemoRateLimitPerSecond=10
            - DemoRateLimitPerDay=2
            - StripPrefix=1
            - Demo=true,hello,world
            - name: Demo
              args:
                enabled: true
                arg1: hello2
                arg2: world2
上面配置了
- DemoRateLimitPerSecond限流策略,每秒10个请求
- DemoRateLimitPerDay限流策略,每天2个请求
期望的结果是:能通过每秒10个请求的限制,但过不了每天2个请求的限制。(当然这样的限制仅是为了演示,实际业务中每天的请求次数一般会高于每秒请求次数)
验证每秒限流策略
在浏览器输入http://localhost:8081/baidu, 按F5刷新后
出现以上图片内容,表示限流策略已经生效了。
想验证细节的小伙伴可以在对应的过滤器进行断点,查看具体的次数值,控制台也会输出请求的次数

总结
以上演示了如何在Gateway中实现自定义限流策略,并且简单实现了每秒、每天的限流算法,掌握之后,大家就可以结合自己实际的业务场景进行愉快的开发了。Gateway本身也提供了一些强大的限流策略,比如令牌桶算法的限流策略,是一个基于Redis实现的漏桶算法,下一篇会专门开一篇讲Gateway的令牌桶算法策略。


 2109
2109


 被折叠的 条评论
为什么被折叠?
被折叠的 条评论
为什么被折叠?
 到【灌水乐园】发言


