


当单表数据量随着时间变的越来越大时,会给数据的管理和查询带来不便。我们可以考虑对表进行分区,利用分区表特性将数据分成小块存储,可以大幅提升查询性能,管理便捷性及数据的可用性。
目录
四、分区表运维(Partition Maintenance)
5.1 dba_/all_/user_part_tables
5.2 dba_/all_/user_tab_partitions
5.3 dba_/all_/user_part_key_columns
5.4 dba_/all_/user_part_col_statistics
一、分区表概述
1.1 分区表概念
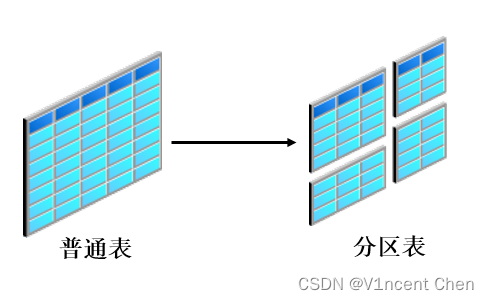
分区表就是将表在物理存储层面分成多个小的片段,这些片段即称为分区,每个分区保存表的一部分数据,表的分区对上层应用是完全透明的,从应用的角度来看,表在逻辑上依然是一个整体。
每个分区都有自己的名字并可以拥有不同的存储特性,例如可以将分区保存在不同的磁盘以上分散I/O,或者分散在不同的表空间(表空间需要有相同的block size)。
向分区表插入数据时,为了判断每条数据应该被分配至哪个分区,我们通常需要选择定义一个分区键(Partition Key)。根据每条数据分区键的值或者对其运算的结果来决定数据的分区归属,分区键可以由1或多个列组成(最多16个列).
1.2 何时使用分区表
知道了分区表的概念,那么什么情况下应该使用分区表呢?如果遇到如下几个场景你可以考虑使用分区表:
- 表的大小超过2G
- 表中有大量的历史数据,数据存在明显的时间顺序
- 表的存储必须分散在不同的存储设备上
1.3 分区表的优点
分区表在结构和管理上比普通表更复杂,但它也有一定的优点,主要优点有以下3类:
1.3.1 提升SQL查询性能
对于SQL查询,当where条件涉及分区键时,可以快速定位需要扫描的分区,这样可以将数据的扫描范围限制在很小的范围,极大的提升查询性能。这个特性叫做分区裁剪(Partition Pruning)。
另外,在多表连接(join)时,如果在每个表在连接的键上都进行了分区,那么Oracle可以将两个大表之间的连接转换成更小的分区级连接,极大提升连接速度,这个特性叫做分区连接(Partition-wise Join)。
1.3.2 提升表可管理性
使用分区表之后,原来表级别的管理操作也被分散为至“分区级”,各个分区上独立的进行运维任务,原先一个大表上的运维任务,现在可以拆开成一系列小任务分散在不同的时间窗口执行。例如,平时备份表的操作,现在可以备份单个分区。
1.3.3 提升数据可用性
当表分区后,每个分区都具有独立性。在你操作某个分区时,不会影响其他分区数据的使用,即使某个分区因为故障不可用,也完全不会影响其他分区上运行的事务。同时分区可以存储在不同的表空间/物理介质上,分散I/O压力。
二、基础分区策略
根据不同的应用场景,你可以为表选择不同的分区策略,Oracle提供的基础分区策略有:
- 范围分区(Range Partition)
- 哈希分区(Hash Partition)
- 列表分区(List partition)
在基础分区策略的基础上,还有一些其他的扩展分区策略,后面再进行讨论。
2.1 范围分区(Range Partition)
范围分区根据预先定义的范围来划分分区,范围分区最适合管理类似且有明显顺序的数据,根据数据的顺序可以很容易划定分区范围。范围分区最典型的应用场景就是按时间对数据进行分区,所以其经常使用时间类型的分区键。
范围分区表是通过 create table 语句的 partition by range 子句来创建的,分区的范围通过 values less than 子句指定,其指定的是分区的上限(不包含),所有大于等于指定值的数据被分配至下一个分区,除了第一个分区,每个分区的下限即前一个分区的上限:
create table members (
id number,
name varchar2(32),
create_time date)
partition by range(create_time)
(
 partition p1 values less than (to_date('2023-02-01', 'yyyy-mm-dd')),
 partition p2 values less than (to_date('2023-03-01', 'yyyy-mm-dd')),
 partition pmax values less than (maxvalue)
);
上面的例子中定义了3个分区:
- 所有create_time小于'2023-02-01'的数据(不包含)被分配在分区p1中。
- 所有create_time小于'2023-03-01'的数据(不包含)被分配在p2中。
- 所有create_time大于等于'2023-03-01'的数据被分配在pmax中,如果没有这个分区,那么插入大于等于'2023-03-01'的数据时,会因为没有合适的存储分区而报错。
你也可以在定义分区时指定存储特性,例如将分区分散到不同的表空间(表空间可以放到不同的物理磁盘上):
create tablespace tbs1;
create tablespace tbs2;
create tablespace tbs3;

create table members (
id number,
name varchar2(32),
create_time date)
partition by range(create_time)
(
 partition p1 values less than (to_date('2023-02-01', 'yyyy-mm-dd')) tablespace tbs1,  -- 指定分区p1放在tbs1中
 partition p2 values less than (to_date('2023-03-01', 'yyyy-mm-dd')) tablespace tbs2,
 partition pmax values less than (maxvalue) tablespace tbs3
);
2.1.1 间隔分区(Interval partition)
间隔分区是范围分区的一个扩展,它也是通过范围来划分分区,唯一的区别是:间隔分区可以在相应分区数据插入时自动创建分区,省去了普通范围分区手动创建分区的操作。
如果不是需要创建不规则的范围分区,那么更推荐使用间隔分区来替代范围分区,你只需要指定一个分区间隔及初始分区,后续的分区创建将由Oracle自动完成。
间隔分区表的创建由在普通范围分区定义上新增一个interval子句创建:
create table inv_part (
id number,
name varchar2(32),
create_time date)
partition by range(create_time)
interval (numtoyminterval(1, 'MONTH'))     -- 指定分区间隔
(
 partition p1 values less than (to_date('2023-02-01', 'yyyy-mm-dd'))
);
上面的例子指定在初始分区p1的基础上,每隔1个月创建一个分区。
通过视图user_tab_partitions可以看到目前只有1个分区p1:
select table_name, partition_name from user_tab_partitions where table_name='INV_PART';
我们在初始分区的上限之上插入一条数据:
insert into inv_part values(1, 'Vincent', date '2023-02-02');
commit;
select table_name, partition_name from user_tab_partitions where table_name='INV_PART';
在现有分区之上插入数据时,Oracle自动为我们创建了1个对应的分区SYS_P327。
对于间隔分区,你也可以通过 store in 子句指定多个表空间,Oracle将以循环的方式在各个表空间中创建分区。
create table multi_tbs (
id number,
name varchar2(32),
create_time date)
partition by range(create_time)
interval (numtoyminterval(1, 'MONTH'))  store in (tbs1, tbs2, tbs3)
(
 partition p1 values less than (to_date('2023-02-01', 'yyyy-mm-dd')) tablespace tbs1
);
查询初始分区的所属表空间:
select table_name, partition_name, tablespace_name from user_tab_partitions where table_name='MULTI_TBS';
插入两条数据,触发自动创建新的分区:
insert into multi_tbs values(1, 'Vincent', date '2023-02-02');
insert into multi_tbs values(2, 'Victor', date '2023-03-02');
commit;

select table_name, partition_name, tablespace_name from user_tab_partitions where table_name='MULTI_TBS';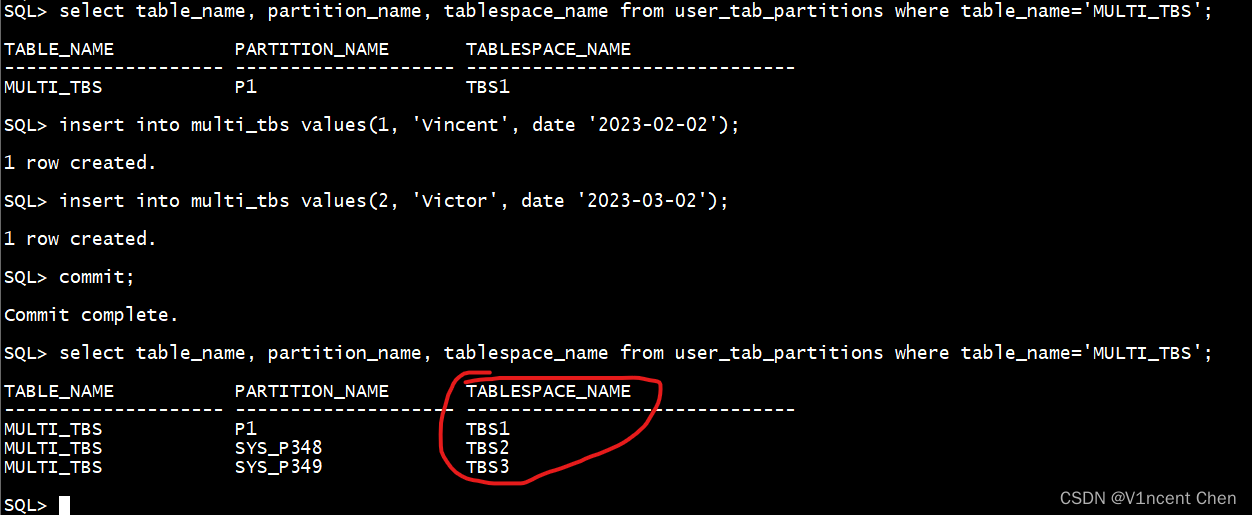
可以看到Oracle自动以循环的方式在3个表空间中创建了分区。
2.2 哈希分区(Hash Partition)
哈希分区是对指定的分区键(Partition Key)运行哈希算法来决定数据存储在哪个分区。哈希分区会随机的将数据分配到各个分区中,并尽量平均,保证各个分区的大小差不多一致。
由于数据是随机分布,所以哈希分区并不适合管理有明显时间顺序的历史数据。它更适合需要将数据平均的分布到各个不同存储设备上的场景。同时在选用哈希分区时建议满足下列条件:
- 选取分区键时尽量选取唯一列(Unique)或列中有大量唯一值(Almost Unique)的列。
- 创建哈希分区时,分区的数量尽量是2的幂,例如2,4,8,16等。
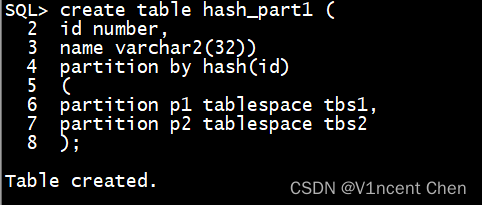
哈希分区表是通过 create table 语句的 partition by hash 子句来创建的,创建时你可以显式的指定每个分区名称,所属表空间。
create table hash_part1 (
id number,
name varchar2(32))
partition by hash(id)
(
partition p1 tablespace tbs1,
partition p2 tablespace tbs2
);
也可以仅指定哈希分区的数量,此时Oracle会自动为每个分区生成名字:
create table hash_part2 (
id number,
name varchar2(32))
partition by hash(id)
partitions 2;    -- 指定哈希分区数量,不用指定分区名
你也可以用 store in 子句让分区以循环的方式建立在各个表空间中:
create table hash_part3 (
id number,
name varchar2(32))
partition by hash(id)
partitions 4
store in (tbs1, tbs2, tbs3);
2.3 列表分区(List partition)
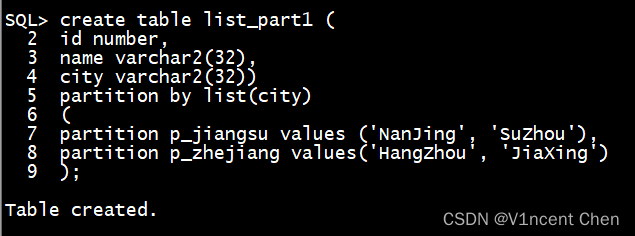
列表分区是由你为每个分区指定一系列的离散值(列表),当分区键等于特定的离散值时,数据会被放到相应的分区。列表分区可以让你自定义数据的组织方式,例如按照地域来分类数据。
列表分区表是通过 create table 语句的 partition by list 子句来创建的,创建时你需要为每个分区指定一个列表(离散值)。
create table list_part1 (
id number,
name varchar2(32),
city varchar2(32))
partition by list(city)
(
partition p_jiangsu values ('NanJing', 'SuZhou'),
partition p_zhejiang values('HangZhou', 'JiaXing')
);
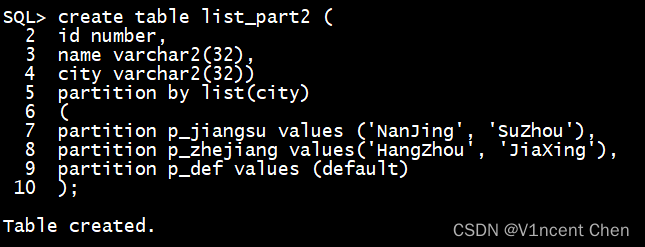
你可以选择性的增加一个包含 default 值的分区,这样所有没有预先定义的分区键值都会放入该分区,否则会报错:
create table list_part2 (
id number,
name varchar2(32),
city varchar2(32))
partition by list(city)
(
partition p_jiangsu values ('NanJing', 'SuZhou'),
partition p_zhejiang values('HangZhou', 'JiaXing'),
partition p_def values (default)
);
列表分区建立完成后,你可以很方便的利用 alter table … modify partition … add/drop values ( … ) 来修改列表分区的枚举值:
alter table list_part2 modify partition p_jiangsu add values('YangZhou');
alter table list_part2 modify partition p_jiangsu drop values('YangZhou');
如果列表分区是子分区,只需要将 modify partition 替换为 modify subpartition 即可。
三、扩展分区策略
除了前面介绍的3种基础分区策略,Oracle还提供一些其他的分区策略,它们都是在基础分区策略上进行某种功能的扩充。
3.1 复合分区(Composite Partition)
复合分局,顾名思义,就是将多种分区策略结合起来使用,在基础分区的策略上,对每个分区再一次应用分区策略。例如,在基础的范围分区基础上,还可以对每个分区再次应用范围分区,即每个分区又被划分为若干个子分区。类似于中国可以划分为很多省(分区),每个省又可以划分为很多市(子分区)。
在使用复合分区时,3种基础分区策略可以随意组合,例如,使用范围分区作为基础分区,其子分区可以使用范围、哈希、列表分区策略,即:
- 范围-范围分区
- 范围-哈希分区
- 范围-列表分区
其他两种分区类型同理,因此复合分区共有3*3=9种方案。
子分区是通过原来分区策略上通过新增 subpartition子句来定义的,下面我们以范围分区(间隔分区)为基础分区,演示三种子分区的创建方式
comp_part1的采用范围-哈希分区策略:
create table comp_part1 (
id number,
name varchar2(32),
create_time date)
partition by range(create_time) interval (numtoyminterval(1, 'MONTH'))  -- 范围分区(间隔分区)
subpartition by hash(id) subpartitions 4    -- 子分区采用哈希分区,每个范围分区再分为4个哈希分区
(
 partition p1 values less than  (to_date('2023-02-01', 'yyyy-mm-dd'))
);
comp_part2的采用范围-范围分区策略:
create table comp_part2 (
id number,
name varchar2(32),
age number,
create_time date)
partition by range(create_time) interval (numtoyminterval(1, 'MONTH'))  -- 范围分区(间隔分区)
subpartition by range(age)     -- 子分区通过年龄进行划分
subpartition template    -- 定义子分区模板
(
 subpartition p_children    values less than (12),
 subpartition p_adolescent values less than (30),
 subpartition p_adult         values less than (60),
 subpartition p_elder         values less than (100)
)
(
 partition p1 values less than  (to_date('2023-02-01', 'yyyy-mm-dd'))
);
comp_part3的采用范围-列表分区策略:
create table comp_part3 (
id number,
name varchar2(32),
sex varchar2 (32),
create_time date)
partition by range(create_time) interval (numtoyminterval(1, 'MONTH'))  -- 范围分区(间隔分区)
subpartition by list(sex)     -- 子分区通过性别进行划分
subpartition template
(
 subpartition p_man    values  ('male'),
 subpartition p_women values ('female')
)
(
 partition p1 values less than  (to_date('2023-02-01', 'yyyy-mm-dd'))
);
3.2 引用分区(Reference Partition)
引用分区是一种基于主-外键引用关系的分区策略,如果两张表上定义了外键引用,即两张表存在父-子关系(Parent-Child Realtionship),那么基于这种主键-外键引用关系,可以使子表继承主表的分区策略。
引用分区特别适合在需要自动维护子表,或者两表频繁连接查询的场景,因为他们的分区策略是相同的,两表连接通常会被转换为分区连接(partition-wise join),大大缩小连接的结果集。
引用分区是通过partition by reference创建的。例如,下面两张表parent_table和child_table 定义了引用分区:
create table parent_table (
id number primary key,
name varchar2(32),
create_time date)
partition by range(create_time)
interval (numtoyminterval(1, 'MONTH'))
(
 partition p1 values less than  (to_date('2023-02-01', 'yyyy-mm-dd'))
);
创建子表时,如果要采用引用分区,则定义外键的列要非空,子表会通过外键继承主表的分区方案。
create table child_table (
id number primary key,
parent_id number not null,  -- 定义外键的列要非空
sex varchar2(32),
constraint parent_id_fk foreign key (parent_id) references parent_table(id))  -- 定义外键约束
partition by reference (parent_id_fk);
下面我们验证一下引用分区的继承,通过视图 user_tab_partitions 可以看到,初始child_table也继承了主表初始分区
select table_name, partition_name, tablespace_name from user_tab_partitions where table_name='PARENT_TABLE';

select table_name, partition_name, tablespace_name from user_tab_partitions where table_name='CHILD_TABLE';
我们往 parent_table 中插入一条数据,触发间隔分区的自动新建分区特性:
insert into parent_table values(1, 'Vincent', date '2023-02-02');
commit;

select table_name, partition_name, tablespace_name from user_tab_partitions where table_name='PARENT_TABLE';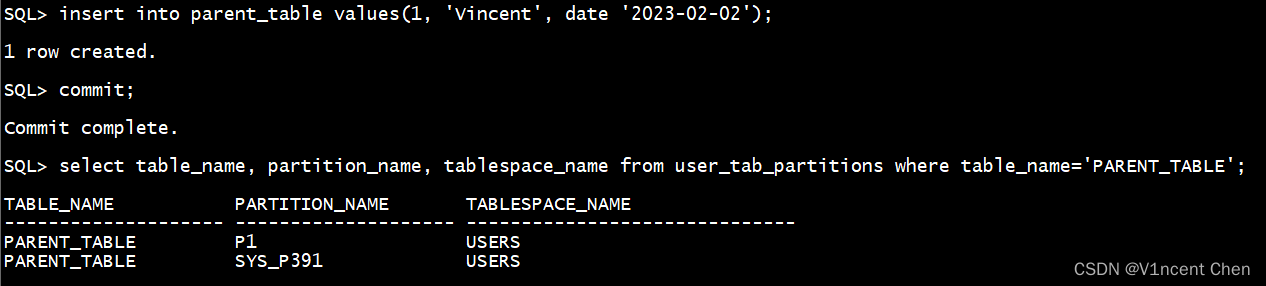
下面我们往child_table中插入一条数据:
insert into child_table values(1, 1,'male');
commit;

select table_name, partition_name, tablespace_name from user_tab_partitions where table_name='CHILD_TABLE';
可以看到,在子表插入数据的时候,对应的分区也自动创建了出来(且分区编号都相同)。
当我们在主表上删除分区时,对应的子表上的分区也被自动删除了:
alter table parent_table drop partition SYS_P391;

select table_name, partition_name, tablespace_name from user_tab_partitions where table_name='CHILD_TABLE';

3.3 虚拟列分区(Virtual Column-based Partition)
虚拟列分区即分区键可以定义在虚拟列上,虚拟列分区使分区键可以定义在一个表达式上,这个表达式会被保存为元数据,而列并不实际存在于数据库中。虚拟列分区可以与任何分区策略结合使用。
下面示例中,表 virtual_part 上通过salary和bonus定义了一个虚拟列income,然后将income作为分区键:
create table virtual_part(
id number primary key,
name varchar2(32),
salary number,
bonus number,
income as (salary + bonus))
partition by range(income)
(
 partition p1 values less than (1000),
 partition p2 values less than (5000)
);
3.4 系统分区(System Partition)
前介绍的分区策略都是由数据库来决定数据放在哪个分区,分区对应用都是透明的。而系统分区可以仅建立一个分区表,但不指定分区策略,因此它没有分区键和分区规则。系统分区对上层应用不是透明的,应用往系统分区插入数据时,SQL必须显式的指定分区名,否则会报错。
系统分区通过 create table 的 partition by system 子句创建,后续只需要定义分区,不需要分区键:
create table system_part (
id number primary key,
name varchar2(32))
partition by system(
partition p1,
partition p2
);
系统分区的数据存储完全由应用决定,因此在插入数据时,必须显示指定数据保存的分区:
insert into system_part values (1, 'Vincent'); 
仅通过表名插入数据时报错:系统分区还需要提供分区扩展名
insert into system_part partition(p1) values (1, 'Vincent'); 
插入时显式指定分区,插入成功。
四、分区表运维(Partition Maintenance)
在日常运行中,我们有时候还需要对分区表进行一些维护操作,下面是一些常见的运维案例。
4.1 新增分区
手动新增分区,不同的分区类型操作稍微有些不同。注意间隔分区和引用分区的分区都是自动创建的,因此它们无法手动新增分区。
范围分区可以使用alter table … add partition 手动新增分区,注意仅可以在范围分区最大范围的上面新增分区,如果已经定义了最大值分区(maxvalue)或者想要在中间插入一个分区,则只可以使用分裂分区来完成(后面会介绍):
alter table members drop partition pmax; --由于建表时定义了p_max,要先删除才能演示,实际应用中要注意p_max分区是否有数据
alter table members add partition p3 values less than (to_date('2023-04-01', 'yyyy-mm-dd'));
哈希分区直接alter table … add partition 即可,你可以指定分区名,也可以不指定分区名,数据会重新在各分区中进行分布,可能需要一些时间:
alter table hash_part1 add partition p3 tablespace tbs3;

alter table hash_part2 add partition tablespace tbs3;
列表分区直接 alter table … add partition 新增一个分区定义:
alter table list_part1 add partition p_anhui values('HeFei', 'ChuZhou');
4.2 删除分区
使用 alter table … drop partition 可以删除指定的分区,对于范围分区、间隔分区,列表分区,直接指定要删除的分区名即可,间隔分区虽然无法显式新增分区,但是可以显式删除:
alter table members drop partition p3; 
引用分区无法显式删除,因为它的分区策略继承自父表,只有当父表删除分区时,子表上的引用分区才会级联删除(前面演示过)。
对于哈希分区,我们无法直接删除分区。如果要减少分区的数量,必须采用一个叫 coalesce partition (融合分区)的操作,下面的示例会将哈希分区的数量减少1个。这个操作虽然减少了一个分区,但是并不会丢失数据,数据会在剩下的分区中重新分布。
alter table hash_part1 coalesce partition;
4.3 置换分区
置换分区指可以用一个非分区表与分区表的某个分区/子分区进行置换(数据段交换)。利用置换分区可以快速将数据载入或者移出分区表,且置换分区操作没有类型限制,所有的分区策略都可以使用此特性。
要置换分区,首先你要创建一个与分区表结构一样的非分区表,我们以前面的范围分区表members作为示例:
select table_name, partition_name, tablespace_name from user_tab_partitions where table_name='MEMBERS';
创建一个与members结构一样的表,并插入几条测试数据,我们计划置换members分区p2,但是第二条数据我们插入一条违反该分区规则(create_time <'2023-03-01')的数据。
create table mem_ext (
id number,
name varchar2(32),
create_time date);

insert into mem_ext values (3, 'exchanged_data', date '2023-02-01');
insert into mem_ext values (4, 'exchanged_data', date '2023-03-01');
commit;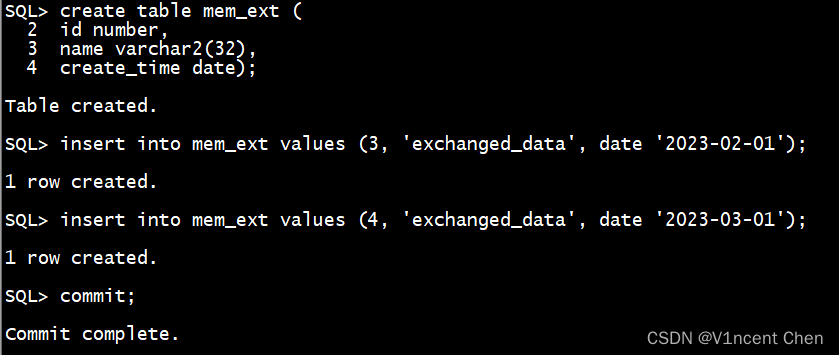
如果是12cR2以上的版本,你还可以用 create table … for exchange with table … 语句来快速创建一个与分区表完全匹配的非分区表:
create table mem_ext for exchange with table members;将mem_ext表与members表的p2分区进行置换:
alter table members exchange partition p2 with table mem_ext;    -- 由于预先插入违反分区规则的数据导致报错

alter table members exchange partition p2 with table mem_ext without validation;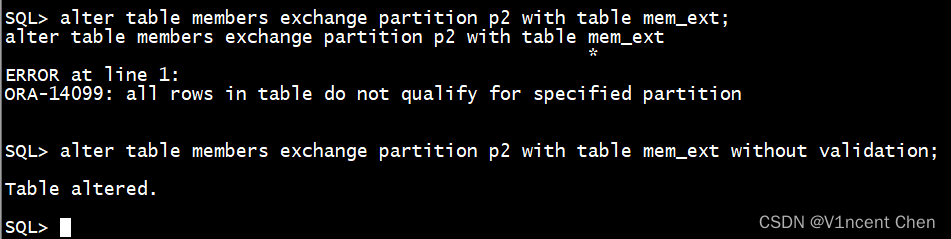
如果置换的分区中有不符合分区规则的数据(第二条),可以用 without validation 子句跳过数据验证(仅更新数据字典)。
当交换分区或者更新分区键时,可能会导致数据的分区归属变化(下面第一个报错),这时候Oracle就需要在不同分区移动数据,我们可以在建表的时候开启行移动(row movement),或者手动打开,这样当分区键被更新且需要移动分区时,Oracle会自动将数据移动到正确的分区:
update members set create_time='2023-03-03 00:00:00' where id=3;  -- 更新分区键会导致切换分区,报错

alter table members enable row movement;

update members set create_time='2023-03-03 00:00:00' where id=3;  -- 分区键更新后,数据会被移动到正确的分区
4.4 合并分区
利用 alter table 的 merge partition/subpartion 子句,你可以将两个分区合并成一个。合并分区仅适用于范围、间隔、列表分区类型,哈希和引用分区不适用。
对于范围分区,你只能将相邻两个的分区进行合并,且只能合并到边界高的分区,例如下面,由于p2分区上限更高,只能将分区p1合并至p2,不能将p2合并至p1:
alter table members merge partitions p1, p2 into partition p2 update indexes;
合并分区时,建议带上update indexes来更新索引,或合并后重建。
间隔分区限制同范围分区,你也只能合并相邻的分区,而且合并还回会导致所有低于合并分区的间隔分区都转换为范围分区,合并分区的上沿就是范围分区和间隔分区的分界点,以下面的interval_part表示例,每月1个分区,我们插入数据让3、7、8,11月的间隔分区创建出来
create table interval_part (
id number,
name varchar2(32),
create_time date)
partition by range(create_time)
interval (numtoyminterval(1, 'MONTH'))
(
 partition p1 values less than (to_date('2023-01-01', 'yyyy-mm-dd'))
);


insert into interval_part values(1,'abc', date '2023-03-10');
insert into interval_part values(1,'abc', date '2023-07-10');
insert into interval_part values(1,'abc', date '2023-08-10');
insert into interval_part values(1,'abc', date '2023-11-10');
commit;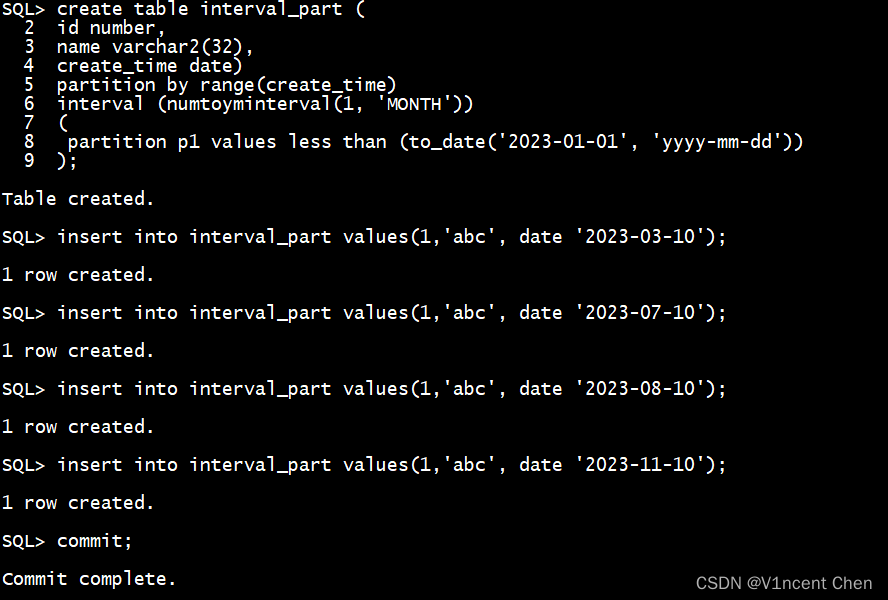
可以看到我们插入数据触发的新建分区属于间隔分区(interval=YES):
select table_name, partition_name, interval from user_tab_partitions where table_name='INTERVAL_PART';
下面将相邻的7,8月分区进行合并(SYS_448, SYS_P449):
alter table interval_part merge partitions for (to_date('2023-07-10', 'yyyy-mm-dd')), for(to_date('2023-08-10', 'yyyy-mm-dd')) ;

select table_name, partition_name, interval from user_tab_partitions where table_name='INTERVAL_PART';
可以看到7,8月分区SYS_448, SYS_P449消失了,生成了一个新的分区SYS_P451,原先边界范围在合并分区之下的3月分区(SYS_P447)也被转换成了范围分区(interval=NO),而合并分区之上11月的分区(SYS_P450)依然是间隔分区(interval=YES)。
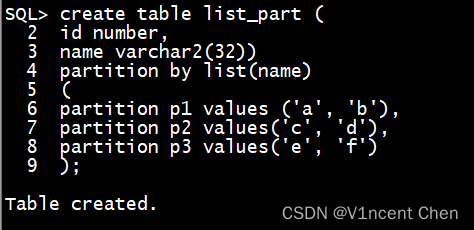
列表分区由于分区之间没有顺序,因此你可以合并任意两个分区,合并后的分区包含两个分区的所有数据,以下面list_part表举例:
create table list_part (
id number,
name varchar2(32))
partition by list(name)
(
partition p1 values ('a', 'b'),
partition p2 values('c', 'd'),
partition p3 values('e', 'f')
);
我们将不相邻的分区p1,p3合并成了p_merged:
select table_name, partition_name from user_tab_partitions where table_name='LIST_PART';

alter table list_part merge partitions p1,p3 into partition p_merged;

select table_name, partition_name from user_tab_partitions where table_name='LIST_PART';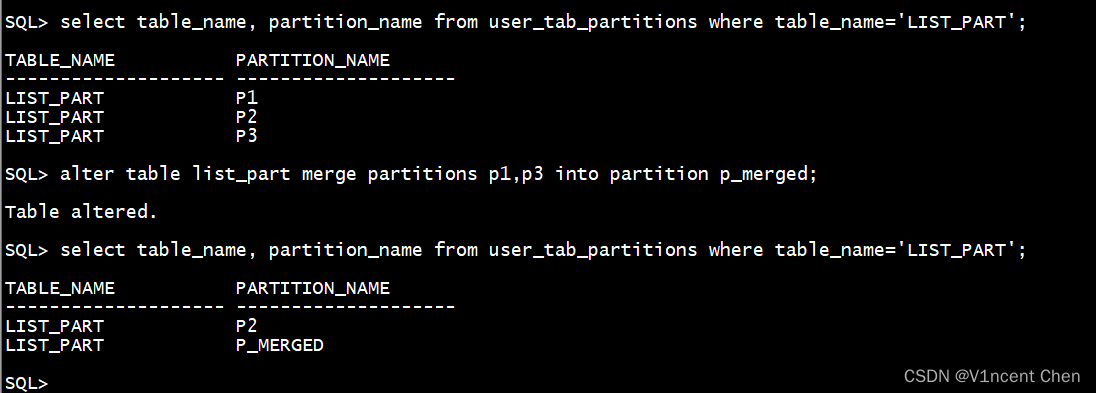
4.5 分裂分区
当某个分区过大时,你可能想要将它分裂成2个分区。分裂分区是合并分区的逆向操作,和合并分区的限制一样,分裂分区也仅适用于范围、间隔、列表分区类型,哈希和引用分区不适用。
分裂操作会重新将数据在2个分区中进行分布,现在以上面一节合并的分区为示例,再将它们分开。
分裂范围分区,我们需要指定一个分裂点(包含在分区内),整个分区将以这个分裂点为边界拆分为2个分区,分裂点会作为第一个分区的上限(不包含),下面示例将范围分区p2拆分为p1和p2:
alter table members split partition p2 at (to_date('2023-02-01', 'yyyy-mm-dd')) into (partition p1, partition p2) update indexes;
分裂间隔分区和分裂范围分区类似,我们也需要指定一个分裂点。且分裂间隔分区和和合并间隔分区一样,也会导致所有低于被分裂分区上限的间隔分区都转换为范围分区,被分裂分区的上限即范围分区和间隔分区的分界点。我们将上面示例的最后一个间隔分区 - 11月的分区(SYS_P450)从11月15号分裂为2个分区:
select table_name, partition_name, interval from user_tab_partitions where table_name='INTERVAL_PART';

alter table interval_part split partition for(date '2023-11-10') at (date '2023-11-15') update indexes;

select table_name, partition_name, interval from user_tab_partitions where table_name='INTERVAL_PART';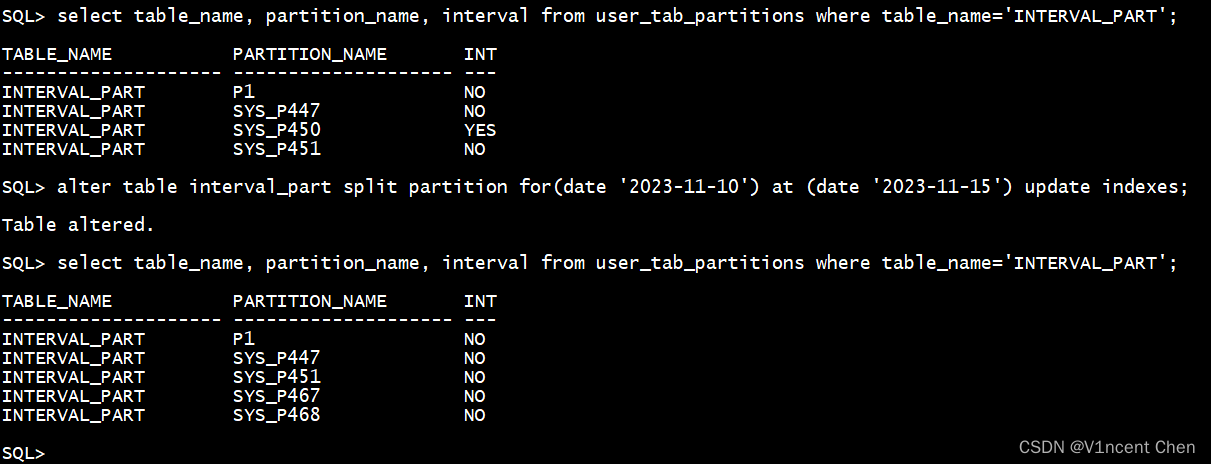
分区SYS_P450分裂成了SYS_P467和SYS_P468,同时低于原分区上限的所有分区都会被转换为范围分区(interval=NO)。
分裂列表分区,你需要指定需要分裂出去的值,这些指定的值会分配到第一个分区,原分区剩余的值会分配到第二个分区。
在上面一节列表分区合并操作中,我们将p1和p3合并成了p_merged,现在再将它们分开:
select table_name, partition_name, high_value from user_tab_partitions where table_name='LIST_PART';

alter table list_part split partition p_merged values('a', 'b') into
(
 partition p1,
 partition p3
);

select table_name, partition_name, high_value from user_tab_partitions where table_name='LIST_PART';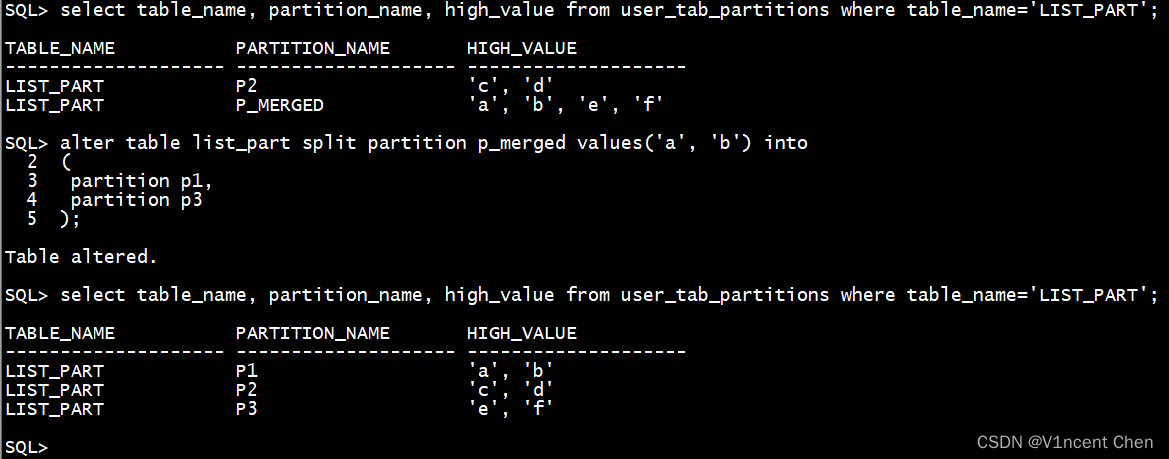
观察分裂前后的分区枚举值,我们指定'a', 'b'被分裂出去,那么它们将被放入p1,剩余的值会被放入p3。
4.6 移动分区
移动分区可以让你随意将某个分区移动其他表空间,这种情况通常用在需要将分区迁移到另一个存储设备上。同时也可以顺便对分区进行一些其他操作,例如压缩。所有类型的分区策略都支持移动分区。
要移动分区至其他表空间,使用alter table的 move partition 子句,:
alter table interval_part move partition p1 tablespace tbs1 update indexes compress;
移动分区实际是在新目的地新建一个分区,并将原分区删除(drop),即使目的地是相同的表空间也是如此。
4.7 重命名分区
你可以用 alter table … rename partition … to … 来给指定的分区重命名,重命名没有限制,所有分区策略都可以使用:
alter table interval_part rename partition sys_p447 to p2;
4.8 截断分区
需要彻底清除某个分区数据时,你可以用 alter table … truncate partition … 来彻底清除该分区的数据(所有分区策略都适用)。
alter table interval_part truncate partition p2 update indexes;
五、常用分区表视图
分区表有一组相关视图,可以供我们查询分区信息,例如前面用到的user_table_partitions,这些视图都有三个级别,分别以dba_,all_,user_开头:
- dba_ 开头的视图可以查询所有信息
- all_ 开头的时候可以查询有权限访问的信息(归属自己 + 被赋权的)
- user_ 开头的视图可以查询归属自己对象的信息
5.1 dba_/all_/user_part_tables
该组视图显示表级别的分区信息(每个分区表一条数据):
select * from all_part_tables;
主要字段含义解释:
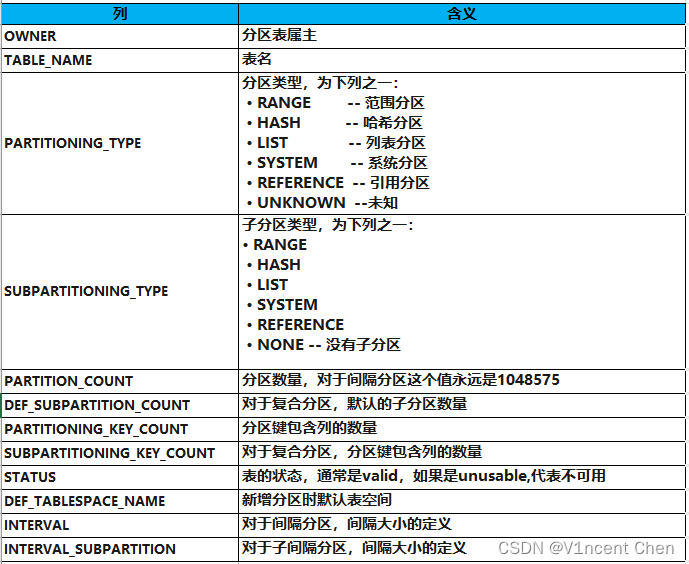
5.2 dba_/all_/user_tab_partitions
该组视图显示分区级别的分区信息(每个分区一条数据):
select * from all_tab_partitions;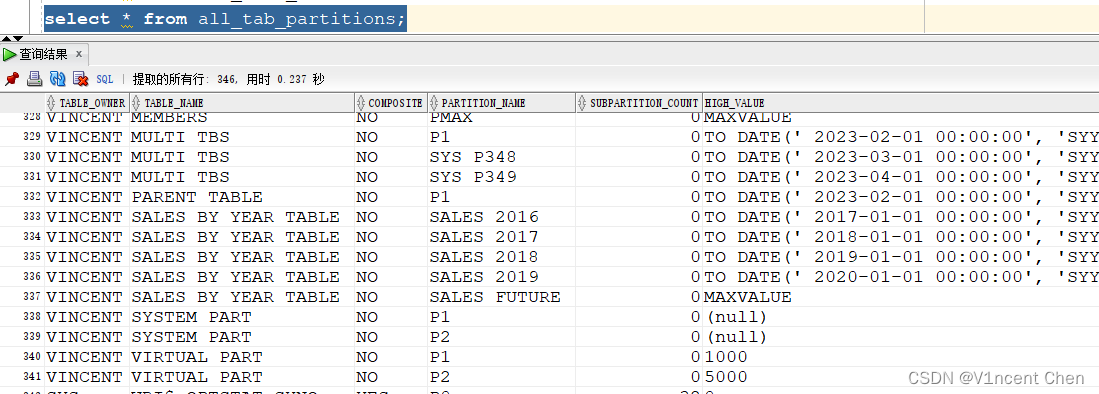
主要字段含义解释:

另外 dba_/all_/user_tab_subpartitions 视图显示信息类似,显示子分区级别的信息。
5.3 dba_/all_/user_part_key_columns
该组视图显示分区键信息:
select * from all_part_key_columns;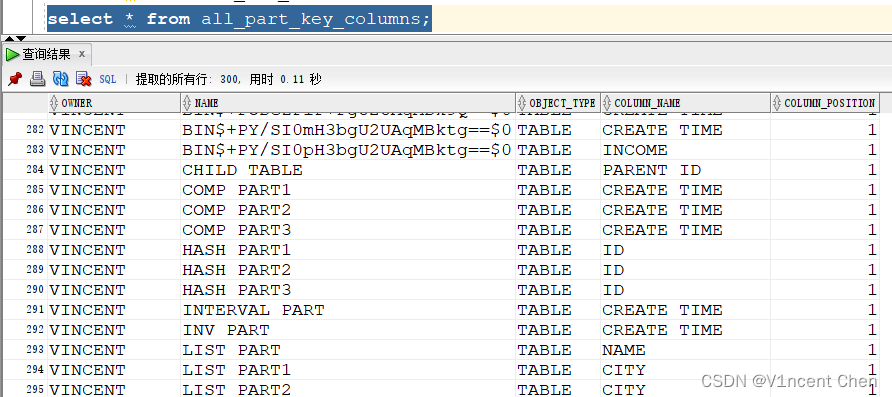
主要字段含义解释:

另外 dba_/all_/user_subpart_key_columns 视图显示信息类似,显示子分区级别的信息。
5.4 dba_/all_/user_part_col_statistics
改组视图显示列相关的统计信息
select * from all_part_col_statistics;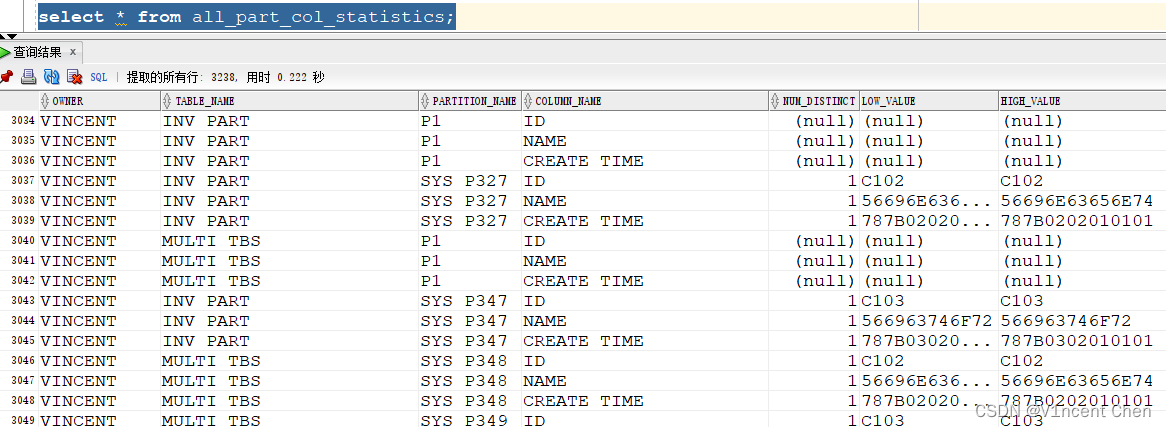
主要字段含义解释:

另外 dba_/all_/user_subpart_col_statistics 视图显示信息类似,显示子分区级别的信息。
六、总结导图


 2万+
2万+


 被折叠的 条评论
为什么被折叠?
被折叠的 条评论
为什么被折叠?
 到【灌水乐园】发言


