


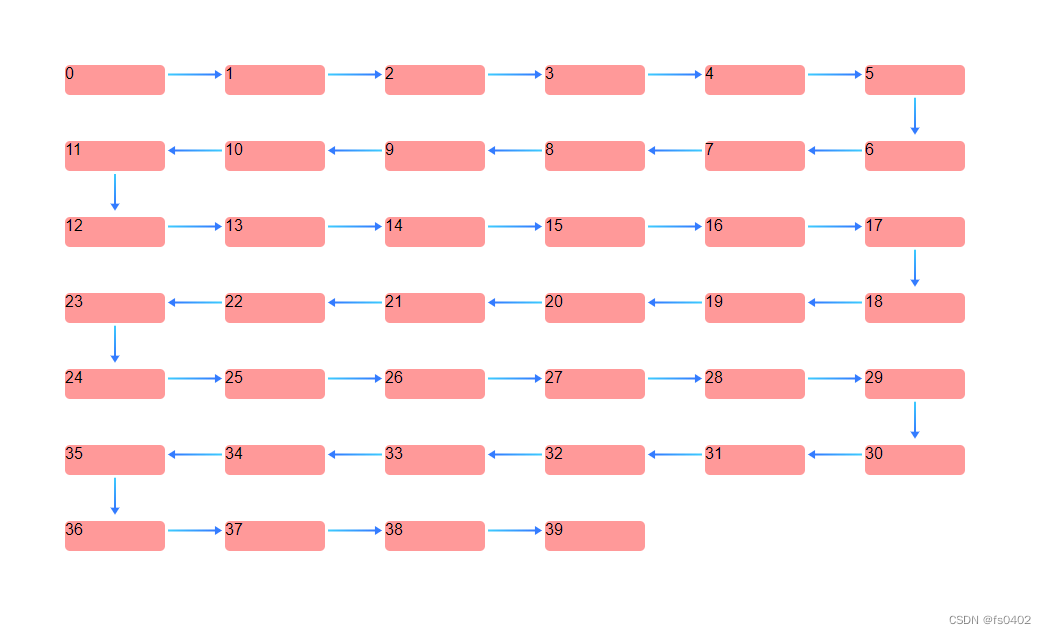
vue3 多行步骤条
<template>
  <div
    class="list"
    ref="list"
  >
    <div
      v-for="item in arr"
      :key="item.index"
      class="itemBox"
      :style="{float:item.float}"
    >
      <img
        src="/img/svg/icon-left.svg"
        v-if="item.imgDirection == 'left'"
        style="width:54px"
      >
      <div
        class="content"
        ref="content"
      >
        {{item.index}}
      </div>
      <img
        src="/img/svg/icon-right.svg"
        v-if="item.imgDirection == 'right'"
        style="width:54px"
      >
      <img
        class="imgBottom"
        src="/img/svg/icon-bottom.svg"
        v-if="item.imgDirection == 'bottom'"
      >
    </div>
  </div>
</template>
<script setup>
import { ref, reactive, onMounted, getCurrentInstance } from "vue";
const list = ref(null);
const content = ref([]);

let arr = ref([]);
for (let i = 0; i < 40; i++) {
  arr.value.push({
    index: i,
    imgDirection: null,
    float: null,
  });
}

// 计算
function test() {
  list.value.style.width = "100%";
  let listWidth = list.value.offsetWidth + 6;
  let contentWidth = content.value[0].offsetWidth + 6;
  let imgWidth = 54;

  let eachRowNum = Math.floor(
    (listWidth - contentWidth) / (contentWidth + imgWidth) + 1
  );

  let listDesireWidth =
    contentWidth + (contentWidth + imgWidth) * (eachRowNum - 1);
  list.value.style.width = listDesireWidth + "px";

  for (let i = 0; i < arr.value.length; i++) {
    let item = arr.value[i];
    let row = Math.floor(i / eachRowNum);
    let column = (i % eachRowNum) + 1;

    if (row % 2 == 0) {
      // 奇数行
      item.float = "left";
      if (column != eachRowNum) {
        item.imgDirection = "right";
      } else {
        item.imgDirection = "bottom";
      }
    } else {
      // 偶数行
      item.float = "right";
      if (column != eachRowNum) {
        item.imgDirection = "left";
      } else {
        item.imgDirection = "bottom";
      }
    }
    if (i == arr.value.length - 1) {
      item.imgDirection = "";
    }
  }
}

onMounted(() => {
  test();
  window.onresize = () => {
    test();
  };
});
</script>
<style scope lang="scss">
.list {
  overflow: hidden;
  .itemBox {
    position: relative;
    margin-bottom: 40px;
    .content {
      width: 100px;
      height: 30px;
      box-sizing: border-box;
      background-color: #f99;
      border-radius: 5px;
      margin: 3px;
      display: inline-block;
    }
    .imgBottom {
      position: absolute;
      left: 50%;
      bottom: 0;
      transform: translate(-50%, 100%);
    }
  }
}
</style>


 422
422


 被折叠的 条评论
为什么被折叠?
被折叠的 条评论
为什么被折叠?
 到【灌水乐园】发言


