


Spring Security Resource Server的使用
一、背景
在前一节我们学习了 Spring Authorization Server的使用,此处我们简单的记录下 Spring 资源服务器的使用。
二、需求
资源服务器提供2个资源 ,userInfo 和 hello。
userInfo:资源是受保护的资源,需要user.userInfo权限才可以访问。
hello:资源是公开资源,不要权限即可访问。
三、分析
1、如何验证资源服务器中访问的令牌是有效的?
此处只考虑JWT的令牌。
令牌是授权服务器颁发的,且进行了签名操作,因此资源服务器对令牌的验证,就需要授权服务器的JWK信息,此处可以配置JwtDecoder来实现,并且填写好jwk set uri。
2、令牌是从请求中那个地方来的?
令牌可以从请求的 request header或者request query param中获取,因此就需要配置 BearerTokenResolver来实现。
3、令牌中的权限字段,默认会加上SCOPE_前缀,想去掉如何操作。
配置JwtAuthenticationConverter对象。
4、如果像向JWT的claim中增加值如何操作?
通过 JwtDecoder#setClaimSetConverter来操作。此处也可以实现删除claim的中内容。
5、如何验证JWT是否合法?
通过 JwtDecoder#setJwtValidator方法来操作。
6、如何设置从授权服务器获取JWK的超时时间?
通过 JwkSetUriJwtDecoderBuilder#restOperations来操作。
四、资源服务器认证流程
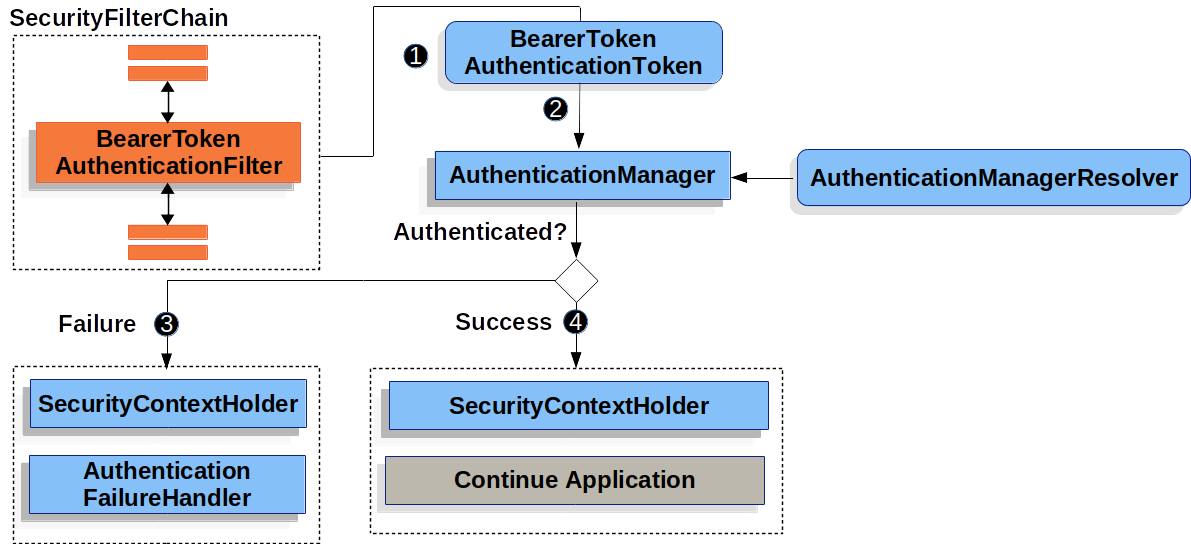
1、请求会被 BearerTokenAuthenticationFilter 拦截器拦截,并从中解析出token出来,如果没有解析出来,则由下一个过滤器处理。解析出来则构建一个BearerTokenAuthenticationToken对象。
2、下一步将HttpServletRequest传递给AuthenticationManagerResolver对象,由它选择出AuthenticationManager对象,然后将 BearerTokenAuthenticationToken传递给AuthenticationManager对象进行认证。AuthenticationManager对象的实现,取决于我们的token对象是JWT还是opaque token
3、验证失败
- 清空
SecurityContextHolder对象。 - 交由
AuthenticationFailureHandler对象处理。
4、验证成功
- 将
Authentication对象设置到SecurityContextHolder中。 - 交由余下的过滤器继续处理。
五、实现资源服务器
1、引入jar包
<dependency>
     <groupId>org.springframework.boot</groupId>
     <artifactId>spring-boot-starter-oauth2-resource-server</artifactId>
 </dependency>
 <dependency>
     <groupId>org.springframework.boot</groupId>
     <artifactId>spring-boot-starter-security</artifactId>
 </dependency>
2、资源服务器配置
package com.huan.study.resource.config;

import org.slf4j.Logger;
import org.slf4j.LoggerFactory;
import org.springframework.beans.factory.annotation.Autowired;
import org.springframework.boot.web.client.RestTemplateBuilder;
import org.springframework.http.HttpHeaders;
import org.springframework.http.MediaType;
import org.springframework.security.config.annotation.web.builders.HttpSecurity;
import org.springframework.security.config.annotation.web.configuration.EnableWebSecurity;
import org.springframework.security.config.annotation.web.configuration.WebSecurityConfigurerAdapter;
import org.springframework.security.oauth2.core.OAuth2AuthenticationException;
import org.springframework.security.oauth2.core.OAuth2Error;
import org.springframework.security.oauth2.jwt.JwtDecoder;
import org.springframework.security.oauth2.jwt.JwtValidators;
import org.springframework.security.oauth2.jwt.MappedJwtClaimSetConverter;
import org.springframework.security.oauth2.jwt.NimbusJwtDecoder;
import org.springframework.security.oauth2.server.resource.authentication.JwtAuthenticationConverter;
import org.springframework.security.oauth2.server.resource.authentication.JwtGrantedAuthoritiesConverter;
import org.springframework.security.oauth2.server.resource.web.BearerTokenResolver;
import org.springframework.security.oauth2.server.resource.web.DefaultBearerTokenResolver;

import java.nio.charset.StandardCharsets;
import java.time.Duration;
import java.util.Collections;

/**
 * 资源服务器配置
 *
 * @author huan.fu 2021/7/16 - 下午5:00
 */
@EnableWebSecurity
public class ResourceServerConfig extends WebSecurityConfigurerAdapter {

    private static final Logger log = LoggerFactory.getLogger(ResourceServerConfig.class);

    @Autowired
    private RestTemplateBuilder restTemplateBuilder;

    @Override
    protected void configure(HttpSecurity http) throws Exception {
        http.authorizeRequests()
                // 对于 userInfo 这个api 需要 s
                .antMatchers("/userInfo").access("hasAuthority('user.userInfo')")
                .and()
                // 设置session是无状态的
                .sessionManagement()
                   .sessionCreationPolicy(SessionCreationPolicy.STATELESS)
                .and()
                .oauth2ResourceServer()
                .jwt()
                // 解码jwt信息
                .decoder(jwtDecoder(restTemplateBuilder))
                // 将jwt信息转换成JwtAuthenticationToken对象
                .jwtAuthenticationConverter(jwtAuthenticationConverter())
                .and()
                // 从request请求那个地方中获取 token
                .bearerTokenResolver(bearerTokenResolver())
                // 此时是认证失败
                .authenticationEntryPoint((request, response, exception) -> {
                    // oauth2 认证失败导致的,还有一种可能是非oauth2认证失败导致的,比如没有传递token,但是访问受权限保护的方法
                    if (exception instanceof OAuth2AuthenticationException) {
                        OAuth2AuthenticationException oAuth2AuthenticationException = (OAuth2AuthenticationException) exception;
                        OAuth2Error error = oAuth2AuthenticationException.getError();
                        log.info("认证失败,异常类型:[{}],异常:[{}]", exception.getClass().getName(), error);
                    }
                    response.setCharacterEncoding(StandardCharsets.UTF_8.name());
                    response.setContentType(MediaType.APPLICATION_JSON.toString());
                    response.getWriter().write("{\"code\":-3,\"message\":\"您无权限访问\"}");
                })
                // 认证成功后,无权限访问
                .accessDeniedHandler((request, response, exception) -> {
                    log.info("您无权限访问,异常类型:[{}]", exception.getClass().getName());
                    response.setCharacterEncoding(StandardCharsets.UTF_8.name());
                    response.setContentType(MediaType.APPLICATION_JSON.toString());
                    response.getWriter().write("{\"code\":-4,\"message\":\"您无权限访问\"}");
                })
        ;
    }

    /**
     * 从request请求中那个地方获取到token
     */
    private BearerTokenResolver bearerTokenResolver() {
        DefaultBearerTokenResolver bearerTokenResolver = new DefaultBearerTokenResolver();
        // 设置请求头的参数,即从这个请求头中获取到token
        bearerTokenResolver.setBearerTokenHeaderName(HttpHeaders.AUTHORIZATION);
        bearerTokenResolver.setAllowFormEncodedBodyParameter(false);
        // 是否可以从uri请求参数中获取token
        bearerTokenResolver.setAllowUriQueryParameter(false);
        return bearerTokenResolver;
    }

    /**
     * 从 JWT 的 scope 中获取的权限 取消 SCOPE_ 的前缀
     * 设置从 jwt claim 中那个字段获取权限
     * 如果需要同多个字段中获取权限或者是通过url请求获取的权限,则需要自己提供jwtAuthenticationConverter()这个方法的实现
     *
     * @return JwtAuthenticationConverter
     */
    private JwtAuthenticationConverter jwtAuthenticationConverter() {
        JwtAuthenticationConverter converter = new JwtAuthenticationConverter();
        JwtGrantedAuthoritiesConverter authoritiesConverter = new JwtGrantedAuthoritiesConverter();
        // 去掉 SCOPE_ 的前缀
        authoritiesConverter.setAuthorityPrefix("");
        // 从jwt claim 中那个字段获取权限,模式是从 scope 或 scp 字段中获取
        authoritiesConverter.setAuthoritiesClaimName("scope");
        converter.setJwtGrantedAuthoritiesConverter(authoritiesConverter);
        return converter;
    }

    /**
     * jwt 的解码器
     *
     * @return JwtDecoder
     */
    public JwtDecoder jwtDecoder(RestTemplateBuilder builder) {
        // 授权服务器 jwk 的信息
        NimbusJwtDecoder decoder = NimbusJwtDecoder.withJwkSetUri("http://qq.com:8080/oauth2/jwks")
                // 设置获取 jwk 信息的超时时间
                .restOperations(
                        builder.setReadTimeout(Duration.ofSeconds(3))
                                .setConnectTimeout(Duration.ofSeconds(3))
                                .build()
                )
                .build();
        // 对jwt进行校验
        decoder.setJwtValidator(JwtValidators.createDefault());
        // 对 jwt 的 claim 中增加值
        decoder.setClaimSetConverter(
                MappedJwtClaimSetConverter.withDefaults(Collections.singletonMap("为claim中增加key", custom -> "值"))
        );
        return decoder;
    }
}
此处对资源服务器进行了很多的自定义操作,因此配置比较长。
资源服务器的session需要是无状态的
3、资源
1个受保护的资源和一个非受保护的资源。
@RestController
public class UserController {

    /**
     * 这个是受保护的资源,需要 user.userInfo 权限才可以访问。
     */
    @GetMapping("userInfo")
    public Map<String, Object> userInfo(@AuthenticationPrincipal Jwt principal) {
        return new HashMap<String, Object>(4) {{
            put("principal", principal);
            put("userInfo", "获取用户信息");
        }};
    }

    /**
     * 非受权限保护的资源
     */
    @GetMapping("hello")
    public String hello() {
        return "hello 不要需要受保护的资源";
    }
}
六、测试
1、访问非受保护的资源
可以看到不需要token即可以访问。
2、访问受保护的资源
1、先不用token访问,可以看到是拒绝的。
2、然后通过授权服务器生成一个token,授权服务器为上一篇文章使用的授权服务器。
3、通过token访问后,可以返现可以访问资源了。
4、演示可以向token的claim中增加值。
5、演示 userInfo 是需要user.userInfo权限的。
七、完整代码
1、授权服务器,为上篇文章中的授权服务器
https://gitee.com/huan1993/spring-cloud-parent/tree/master/security/authorization-server
2、资源服务器
https://gitee.com/huan1993/spring-cloud-parent/tree/master/security/resource-server
八、参考文档
1、https://docs.spring.io/spring-security/site/docs/current/reference/html5/#oauth2resourceserver


 5204
5204


 被折叠的 条评论
为什么被折叠?
被折叠的 条评论
为什么被折叠?
 到【灌水乐园】发言


