


目录--Content
原理探究
1. SpringBoot的pom.xml
1.1 依赖的父工程
pom.xml中可以看到所建立的SpringBoot项目依赖于一个父工程spring-boot-starter-parent。所以在项目中,我们不需要给引入的jar进行版本管理,因为父工程已经帮我们做好了版本的管理,只需要调用就可以使用了。
<parent>
    <groupId>org.springframework.boot</groupId>
    <artifactId>spring-boot-starter-parent</artifactId>
    <version>2.3.2.RELEASE</version>
    <relativePath/> <!-- lookup parent from repository -->
</parent>
进入到spring-boot-starter-parent中,可以看到更多的配置信息。比如说,它所依赖的一个父级工程。
<parent>
  <groupId>org.springframework.boot</groupId>
  <artifactId>spring-boot-dependencies</artifactId>
  <version>2.3.2.RELEASE</version>
</parent>
再比如说,自动帮我们配置好了资源过滤,不需要我们自己进行配置。
<resources>
  <resource>
    <directory>${basedir}/src/main/resources</directory>
    <filtering>true</filtering>
    <includes>
      <include>**/application*.yml</include>
      <include>**/application*.yaml</include>
      <include>**/application*.properties</include>
    </includes>
  </resource>
  <resource>
    <directory>${basedir}/src/main/resources</directory>
    <excludes>
      <exclude>**/application*.yml</exclude>
      <exclude>**/application*.yaml</exclude>
      <exclude>**/application*.properties</exclude>
    </excludes>
  </resource>
</resources>
还有,帮我们配置好了插件。
<!--只选择了少部分代码进行展示-->
<plugin>
  <groupId>org.apache.maven.plugins</groupId>
  <artifactId>maven-compiler-plugin</artifactId>
  <configuration>
    <parameters>true</parameters>
  </configuration>
</plugin>
<plugin>
  ......
在pom.xml中还包含了许多的启动器。
<!--启动器-->
<!--spring-boot-starter-web不仅包含spring-boot-starter,还自动开启了web功能。-->
<dependency>
    <groupId>org.springframework.boot</groupId>
    <artifactId>spring-boot-starter-web</artifactId>
</dependency>
<dependency>
    <groupId>org.springframework.boot</groupId>
    <artifactId>spring-boot-starter-test</artifactId>
    <scope>test</scope>
    <exclusions>
    ........
所以在写入或者引入SpringBoot依赖的时候,不需要指定版本号,因为有了这些版本仓库。
1.2 启动器
启动器也就是SpringBoot的启动场景,在不同的场景下使用,就应该启动对应场景的启动器。之后SpringBoot就可以自动装配许多的依赖而避免了人为的配置。
如果将pom.xml的启动器去掉,那么这个项目就启动不了,SpringBoot默认的项目启动器包括
- spring-boot-starter
- spring-boot-starter-web
- spring-boot-starter-test
比如spring-boot-starter-web,就能够帮我们自动导入web环境所有的依赖。在SpringBoot中,会将所有的场景功能变为一个一个的启动器。
点开spring-boot-dependencies,可以看到这些配置信息
<properties>
  <activemq.version>5.15.13</activemq.version>
  <aspectj.version>1.9.6</aspectj.version>
  <assertj.version>3.16.1</assertj.version>
  <build-helper-maven-plugin.version>3.1.0</build-helper-maven-plugin.version>
  <commons-codec.version>1.14</commons-codec.version>
  <commons-dbcp2.version>2.7.0</commons-dbcp2.version>
  <commons-lang3.version>3.10</commons-lang3.version>
  <commons-pool.version>1.6</commons-pool.version>
  <commons-pool2.version>2.8.0</commons-pool2.version>
  <db2-jdbc.version>11.5.4.0</db2-jdbc.version>
  (省略部分信息.....)
如果我们在开发中需要使用某些功能,只要找到对应的启动器就可以了。可以打开Spring.io查找相应的启动器Starters进行查看。

2. 主程序
主程序中就包含两个内容,一个是@SpringBootApplication,另一个是SpringApplication.run。
@SpringBootApplication
public class SpringbootdemoApplication {
    public static void main ( String[] args ) {
        SpringApplication.run(SpringbootdemoApplication.class , args);
    }
}
- @SpringBootApplication:标注这个类是一个Springboot的应用。
- SpringApplication.run():run()是一个静态方法,通过反射,加载了类对象。
2.1 @SpringBootApplication
@SpringBootApplication标注这个类是一个SpringBoot的应用,如果去掉了这个注解,这个程序是不能运行的。这是一个组合注解,点进去可以发现还包含了许多其他的内容:
@Target({ElementType.TYPE})
@Retention(RetentionPolicy.RUNTIME)
@Documented
@Inherited
@SpringBootConfiguration
@EnableAutoConfiguration
@ComponentScan(
    excludeFilters = {@Filter(
    type = FilterType.CUSTOM,
    classes = {TypeExcludeFilter.class}
), @Filter(
    type = FilterType.CUSTOM,
    classes = {AutoConfigurationExcludeFilter.class}
)}
)
2.1.1 @SpringBootConfiguration
这是一个SpringBoot的配置,点进去还可以发现:
@Target({ElementType.TYPE})
@Retention(RetentionPolicy.RUNTIME)
@Documented
@Configuration
public @interface SpringBootConfiguration {
    @AliasFor(
        annotation = Configuration.class
    )
    boolean proxyBeanMethods() default true;
}
说明这个类也是一个由@configuration的配置类配置而来的,表示当前类是一个Spring的配置类,所以往回追溯,启动类也是一个配置类。
点进@configuration中,还可以发现有以下的内容:
@Target({ElementType.TYPE})
@Retention(RetentionPolicy.RUNTIME)
@Documented
@Component
public @interface Configuration {
    @AliasFor(
        annotation = Component.class
    )
    String value() default "";
    boolean proxyBeanMethods() default true;
}
其中有一个注解为@Component,说明也是一个Spring的组件。
2.1.2 @EnableAutoConfiguration
从该注解的名字上来看,大致能够猜到其作用是自动导入配置,所以这也是一个很重要的注解,点进这个注解:
@Target({ElementType.TYPE})
@Retention(RetentionPolicy.RUNTIME)
@Documented
@Inherited
@AutoConfigurationPackage
@Import({AutoConfigurationImportSelector.class})
public @interface EnableAutoConfiguration {
    String ENABLED_OVERRIDE_PROPERTY = "spring.boot.enableautoconfiguration";
    Class<?>[] exclude() default {};
    String[] excludeName() default {};
}
2.1.2.1 @AutoConfigurationPackage
发现除了四个注解之外,还有一个注解叫做@AutoConfigurationPackage,从字面意思上来看是自动配置包,再点进这个注解,看看内部包含些什么。
@Target({ElementType.TYPE})
@Retention(RetentionPolicy.RUNTIME)
@Documented
@Inherited
@Import({Registrar.class})
public @interface AutoConfigurationPackage {
    String[] basePackages() default {};
    Class<?>[] basePackageClasses() default {};
}
从该注解中发现@Import({Registrar.class})导入了选择器,再向下点进入到AutoConfigurationPackages下:
static class Registrar implements ImportBeanDefinitionRegistrar, DeterminableImports {
    Registrar() {
    }
    public void registerBeanDefinitions(AnnotationMetadata metadata, BeanDefinitionRegistry registry) {
        AutoConfigurationPackages.register(registry, (String[])(new AutoConfigurationPackages.PackageImports(metadata)).getPackageNames().toArray(new String[0]));
    }
    public Set<Object> determineImports(AnnotationMetadata metadata) {
        return Collections.singleton(new AutoConfigurationPackages.PackageImports(metadata));
    }
}
2.1.2.2 @Import({AutoConfigurationImportSelector.class})
public String[] selectImports(AnnotationMetadata annotationMetadata) {
    if (!this.isEnabled(annotationMetadata)) {
        return NO_IMPORTS;
    } else {
        AutoConfigurationImportSelector.AutoConfigurationEntry autoConfigurationEntry = this.getAutoConfigurationEntry(annotationMetadata);
        return StringUtils.toStringArray(autoConfigurationEntry.getConfigurations());
    }
}
this.getAutoConfigurationEntry(annotationMetadata)调用了一个方法
protected AutoConfigurationImportSelector.AutoConfigurationEntry getAutoConfigurationEntry(AnnotationMetadata annotationMetadata) {
    if (!this.isEnabled(annotationMetadata)) {
        return EMPTY_ENTRY;
    } else {
        AnnotationAttributes attributes = this.getAttributes(annotationMetadata);
        List<String> configurations = this.getCandidateConfigurations(annotationMetadata, attributes);
        configurations = this.removeDuplicates(configurations);
        Set<String> exclusions = this.getExclusions(annotationMetadata, attributes);
        this.checkExcludedClasses(configurations, exclusions);
        configurations.removeAll(exclusions);
        configurations = this.getConfigurationClassFilter().filter(configurations);
        this.fireAutoConfigurationImportEvents(configurations, exclusions);
        return new AutoConfigurationImportSelector.AutoConfigurationEntry(configurations, exclusions);
    }
}
其中List<String> configurations = this.getCandidateConfigurations(annotationMetadata, attributes);一行代码起到了关键的作用,它获取到了所有的配置信息。根据名称来看getCandidateConfigurations是获取候选的配置信息,我们不妨再点进去看一下其中有什么奥秘。
获取候选的配置信息:
protected List<String> getCandidateConfigurations(AnnotationMetadata metadata, AnnotationAttributes attributes) {
    List<String> configurations = SpringFactoriesLoader.loadFactoryNames(this.getSpringFactoriesLoaderFactoryClass(), this.getBeanClassLoader());
    Assert.notEmpty(configurations, "No auto configuration classes found in META-INF/spring.factories. If you are using a custom packaging, make sure that file is correct.");
    return configurations;
}
首先通过SpringFactoriesLoader.loadFactoryNames加载所有的配置信息,配置信息的来源就是getSpringFactoriesLoaderFactoryClass()来的,这个方法里面只返回了一个数据就是EnableAutoConfiguration.class
protected Class<?> getSpringFactoriesLoaderFactoryClass() {
    return EnableAutoConfiguration.class;
}
所以就标注了这个类里面所有的配置,从上到下,我们发现使用了@EnableAutoConfiguration注解的类就是SpringBootApplication.class,也就是@SpringBootApplication,追溯到最开始使用这个注解的地方,就是我们提到的启动类SpringbootdemoApplication。
所以我们得出了一个结论,@SpringBootApplication的作用除了标注使用该注解的类是一个启动类之外,还导入了该启动类下的所有资源,即导入该启动类需要导入的所有资源。
调用过程如下:

上面提到的方法中还有这个样一句代码:
Assert.notEmpty(configurations, "No auto configuration classes found in META-INF/spring.factories. If you are using a custom packaging, make sure that file is correct.");
即,如果得到的配置信息列表为空(没有找到配置信息),就会抛出一个异常,异常提示的信息表明在META-INF/spring.factories中没有找到自动配置类。下面贴出该文件所在的位置。

打开这个文件可以看到里面包含了许多的配置,所以这个文件至关重要。
# Initializers
org.springframework.context.ApplicationContextInitializer=\
org.springframework.boot.autoconfigure.SharedMetadataReaderFactoryContextInitializer,\
org.springframework.boot.autoconfigure.logging.ConditionEvaluationReportLoggingListener

# Application Listeners
org.springframework.context.ApplicationListener=\
org.springframework.boot.autoconfigure.BackgroundPreinitializer

# Auto Configuration Import Listeners
org.springframework.boot.autoconfigure.AutoConfigurationImportListener=\
org.springframework.boot.autoconfigure.condition.ConditionEvaluationReportAutoConfigurationImportListener

# Auto Configuration Import Filters
org.springframework.boot.autoconfigure.AutoConfigurationImportFilter=\
org.springframework.boot.autoconfigure.condition.OnBeanCondition,\
(省略部分信息)

# Auto Configure
org.springframework.boot.autoconfigure.aop.AopAutoConfiguration,\
org.springframework.boot.autoconfigure.amqp.RabbitAutoConfiguration,\
(省略部分信息)

# Failure analyzers
org.springframework.boot.diagnostics.FailureAnalyzer=\
org.springframework.boot.autoconfigure.data.redis.RedisUrlSyntaxFailureAnalyzer,\
(省略部分信息)

# Template availability providers
org.springframework.boot.autoconfigure.template.TemplateAvailabilityProvider=\
org.springframework.boot.autoconfigure.freemarker.FreeMarkerTemplateAvailabilityProvider,\
(省略部分信息)
从上面的代码看,包括了初始化、监听、自动选择导入、过滤、自动配置等信息。
上面是从assert的message里面看到的spring.factories文件,从而确定了该文件的位置,除此之外,我们也能从方法中找到这个文件。获取配置信息的关键代码为:
List<String> configurations = SpringFactoriesLoader.loadFactoryNames(this.getSpringFactoriesLoaderFactoryClass(), this.getBeanClassLoader());
点开loadFactoryNames之后可以看到完整的代码。
public static List<String> loadFactoryNames(Class<?> factoryType, @Nullable ClassLoader classLoader) {
    String factoryTypeName = factoryType.getName();
    return (List)loadSpringFactories(classLoader).getOrDefault(factoryTypeName, Collections.emptyList());
}
上面做了两件事情:
- 获取类的名称
- 得到默认的值
Question:默认的值是什么呢?再看一下上面调用的方法。
private static Map<String, List<String>> loadSpringFactories(@Nullable ClassLoader classLoader) {
    MultiValueMap<String, String> result = (MultiValueMap)cache.get(classLoader);
    if (result != null) {
        return result;
    } else {
        try {
            Enumeration<URL> urls = classLoader != null ? classLoader.getResources("META-INF/spring.factories") : ClassLoader.getSystemResources("META-INF/spring.factories");
            LinkedMultiValueMap result = new LinkedMultiValueMap();
            while(urls.hasMoreElements()) {
                URL url = (URL)urls.nextElement();
                UrlResource resource = new UrlResource(url);
                Properties properties = PropertiesLoaderUtils.loadProperties(resource);
                Iterator var6 = properties.entrySet().iterator();
                while(var6.hasNext()) {
                    Entry<?, ?> entry = (Entry)var6.next();
                    String factoryTypeName = ((String)entry.getKey()).trim();
                    String[] var9 = StringUtils.commaDelimitedListToStringArray((String)entry.getValue());
                    int var10 = var9.length;
                    for(int var11 = 0; var11 < var10; ++var11) {
                        String factoryImplementationName = var9[var11];
                        result.add(factoryTypeName, factoryImplementationName.trim());
                    }
                }
            }
            cache.put(classLoader, result);
            return result;
        } catch (IOException var13) {
            throw new IllegalArgumentException("Unable to load factories from location [META-INF/spring.factories]", var13);
        }
    }
}
Enumeration<URL> urls从类加载器中获取所有的资源。如果urls中有数据,就将数据封装到Properties(配置)当中。另外,从下面这句代码可以看出,加载的内容是META-INF/spring.factories。
Enumeration<URL> urls = classLoader != null ? classLoader.getResources("META-INF/spring.factories") : ClassLoader.getSystemResources("META-INF/spring.factories");
思考:
META-INF/spring.factories中包含了那么多的配置,为什么有的配置没有生效,需要导入对应的start才能生效呢?
在该文件配置中,每一个类中都有**@ConditionalOnClass**这个注解,这其实是一个判断条件,只在条件成立的情况下才会加载这个类,比如点进org.springframework.boot.autoconfigure.jdbc.JdbcTemplateAutoConfiguration,有这样的语句
@ConditionalOnClass({DataSource.class, JdbcTemplate.class})
如果DataSource.class和JdbcTemplate.class在该类路径下存在,EnableAutoConfiguration就会自动加载该类。
2.2 SpringApplication.run()
public static void main ( String[] args ) {
    SpringApplication.run(SpringbootdemoApplication.class , args);
}
这一部分包括两部分
- SpringApplication类
- run方法
2.2.1 SpringApplication
SpringApplication类用于引导和启动一个Spring应用程序(即SpringBoot开发的应用)。
这个类主要做了以下四件事情:
- 初始化Spring容器的配置类primarySources
- 推断应用的类型是普通的项目还是一个web项目
- 查找并加载所有可用初始化器,设置到initializer属性中
- 找出所有的应用程序监听器,设置到listeners属性中
- 推断并设置main方法的定义类,找到可运行的主类
构造方法:
public SpringApplication(ResourceLoader resourceLoader, Class<?>... primarySources) {
    this.sources = new LinkedHashSet();
    this.bannerMode = Mode.CONSOLE;
    this.logStartupInfo = true;
    this.addCommandLineProperties = true;
    this.addConversionService = true;
    this.headless = true;
    this.registerShutdownHook = true;
    this.additionalProfiles = new HashSet();
    this.isCustomEnvironment = false;
    this.lazyInitialization = false;
    this.resourceLoader = resourceLoader;
    Assert.notNull(primarySources, "PrimarySources must not be null");
    this.primarySources = new LinkedHashSet(Arrays.asList(primarySources));
    this.webApplicationType = WebApplicationType.deduceFromClasspath();
    this.setInitializers(this.getSpringFactoriesInstances(ApplicationContextInitializer.class));
    this.setListeners(this.getSpringFactoriesInstances(ApplicationListener.class));
    this.mainApplicationClass = this.deduceMainApplicationClass();
}
Spring 容器配置:
SpringApplication能够从各种不同的配置源读取bean的定义,同时SpringBoot可以同时使用多种不同的配置源
如果是Java注解的配置方式,会使用AnnotatedBeanDefinitionReader加载配置(通过全类名)。如果是XML的配置方式,则会使用XmlBeanDefinitionReader加载配置(通过XML文件地址)。
推断应用程序的类别:
构造函数中有这样一句代码this.webApplicationType = WebApplicationType.deduceFromClasspath();用于确定应用程序的类别,点开发现其实是一个枚举类。
public enum WebApplicationType {
    NONE,				//非web类应用,无需内嵌web server
    SERVLET,			//servlet类型的web应用,需要启动内嵌的web server
    REACTIVE;			//reactive类型的web应用,需要启动内嵌的reactive web server
	/**省略代码**/
}
判断应用程序类别的标准就是在类路径下检索是否存在对应的类。
static WebApplicationType deduceFromClasspath() {
    if (ClassUtils.isPresent("org.springframework.web.reactive.DispatcherHandler", (ClassLoader)null) && !ClassUtils.isPresent("org.springframework.web.servlet.DispatcherServlet", (ClassLoader)null) && !ClassUtils.isPresent("org.glassfish.jersey.servlet.ServletContainer", (ClassLoader)null)) {
        return REACTIVE;
    } else {
    // private static final String[] SERVLET_INDICATOR_CLASSES = new String[]{"javax.servlet.Servlet", "org.springframework.web.context.ConfigurableWebApplicationContext"};
        String[] var0 = SERVLET_INDICATOR_CLASSES;
        int var1 = var0.length;
        for(int var2 = 0; var2 < var1; ++var2) {
            String className = var0[var2];
            if (!ClassUtils.isPresent(className, (ClassLoader)null)) {
                return NONE;
            }
        }
        return SERVLET;
    }
}
- 如果在类路径下存在
org.springframework.web.reactive.DispatcherHandler存在org.springframework.web.servlet.DispatcherServlet和org.glassfish.jersey.servlet.ServletContainer不存在,那么这个应用程序类别就是REACTIVE - 如果在类路径存在
org.springframework.web.servlet.DispatcherServlet和org.glassfish.jersey.servlet.ServletContainer而org.springframework.web.reactive.DispatcherHandler不存在,那么这个应用程序类别就是SERVLET - 在第二项的条件下,如果找不到
javax.servlet.Servlet或org.springframework.web.context.ConfigurableWebApplicationContext,那么这个应用程序类别就会定义为NONE
应用类型直接决定了要创建的ApplicationContext类型,下表整理了三种应用类型和所创建的ApplicationContext间的对应关系:
| 应用类型 | ApplicationContext类型 |
|---|---|
| NONE | AnnotationConfigApplicationContext |
| SERVLET | AnnotationConfigServletWebServerApplicationContext |
| REACTIVE | AnnotationConfigReactiveWebServerApplicationContext |
加载初始化器
首先通过getSpringFactoriesInstances(ApplicationContextInitializer.class)方法在META-INF/spring.factories文件下查找ApplicationContextInitializer类型对应的资源名称。
private <T> Collection<T> getSpringFactoriesInstances(Class<T> type, Class<?>[] parameterTypes, Object... args) {
    ClassLoader classLoader = this.getClassLoader();
    Set<String> names = new LinkedHashSet(SpringFactoriesLoader.loadFactoryNames(type, classLoader));
    List<T> instances = this.createSpringFactoriesInstances(type, parameterTypes, classLoader, args, names);
    AnnotationAwareOrderComparator.sort(instances);
    return instances;
}
在这上面的代码中又通过SpringFactoriesLoader.loadFactoryNames(type, classLoader)读取到了配置信息,最终进入到了Map<String, List<String>> loadSpringFactories(@Nullable ClassLoader classLoader)方法中。而这部分我们在上面介绍注解的时候也提到过。
加载监听器和上述过程完全一样,下面可以做个流程图来看看调用的过程。

推断主类:
最后一步就是推断运行主类,通过遍历异常堆栈找到方法名称是main的类,将其作为主类。
private Class<?> deduceMainApplicationClass() {
    try {
        StackTraceElement[] stackTrace = (new RuntimeException()).getStackTrace();
        StackTraceElement[] var2 = stackTrace;
        int var3 = stackTrace.length;
        for(int var4 = 0; var4 < var3; ++var4) {
            StackTraceElement stackTraceElement = var2[var4];
            if ("main".equals(stackTraceElement.getMethodName())) {
                return Class.forName(stackTraceElement.getClassName());
            }
        }
    } catch (ClassNotFoundException var6) {
    }
    return null;
}
Spring应用启动流程图
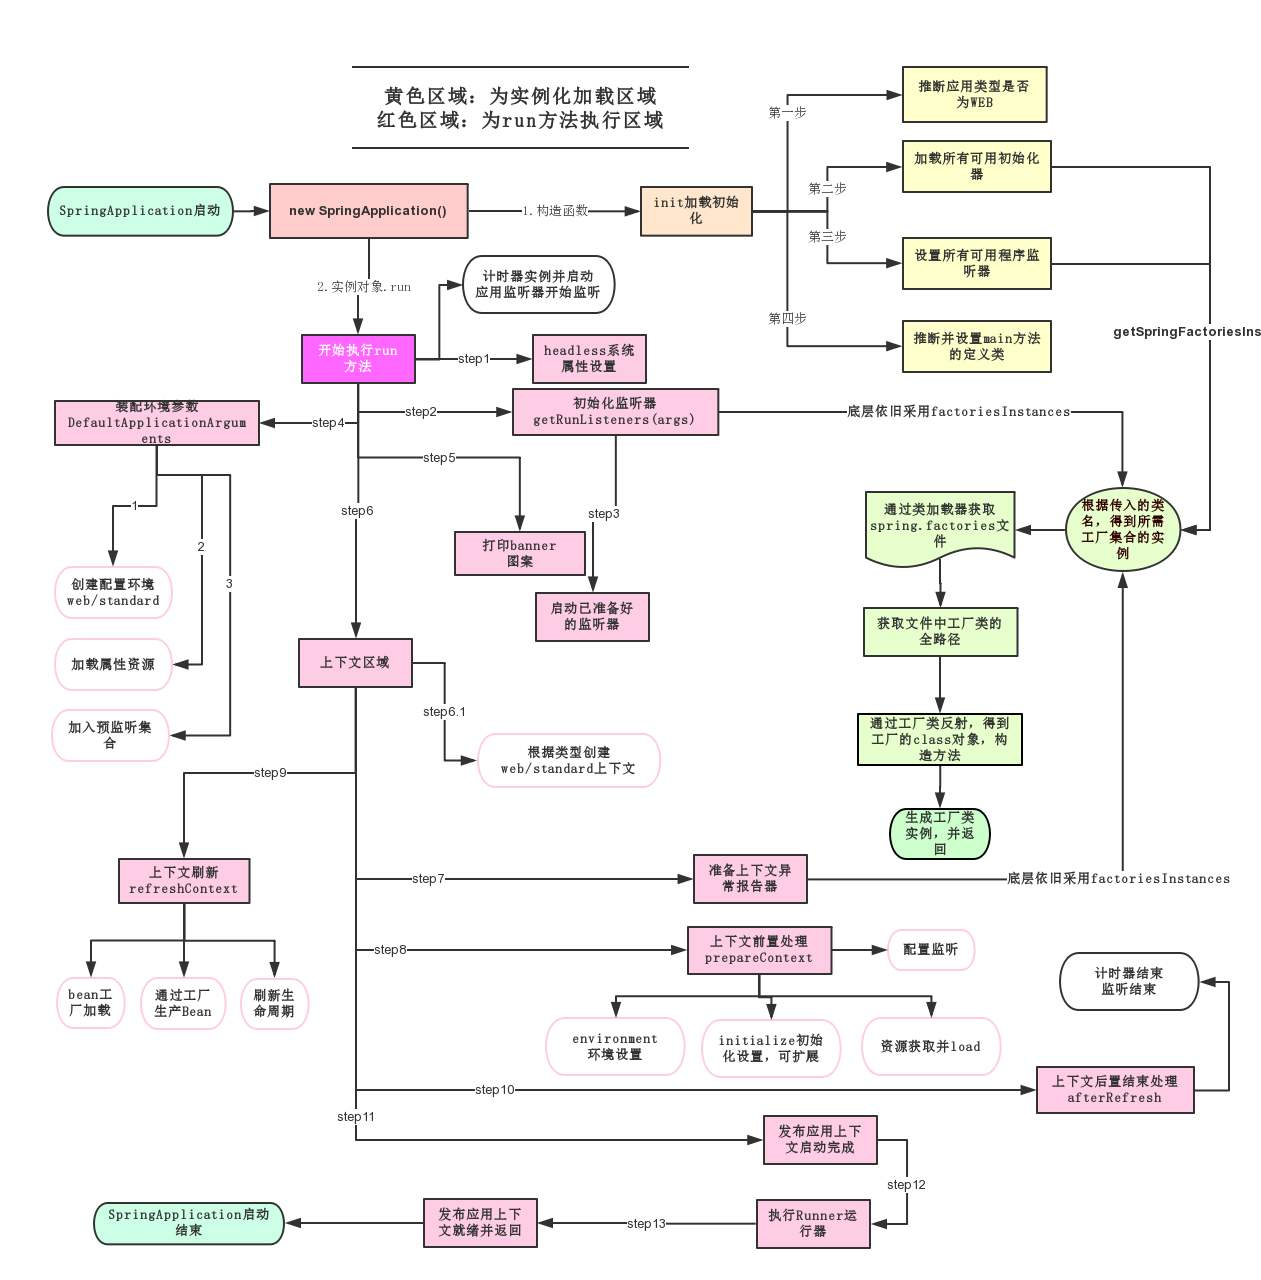
2.2.2 run方法
SprigApplication的run方法是一个静态方法,第一个参数Class<?> primarySource接受一个Spring容器配置类(用Java代码对Spring容器进行配置)。第二个参数是命令行参数。将命令行参数转发给SpringApplication类,就可以在用java命令启动应用时,通过命令行参数对Spring应用做一些配置。
public static ConfigurableApplicationContext run(Class<?> primarySource, String... args) {
    return run(new Class[]{primarySource}, args);
}
调用这一层的run方法,实际上会构造一个SpringApplication实例,然后再调用实例的run方法完成spring应用的启动。
public static ConfigurableApplicationContext run(Class<?>[] primarySources, String[] args) {
    return (new SpringApplication(primarySources)).run(args);
}
上面run方法的具体实现的逻辑代码如下所示:
public ConfigurableApplicationContext run(String... args) {
    //记录程序运行时间
    StopWatch stopWatch = new StopWatch();
    stopWatch.start();
    //Spring 应用的上下文
    ConfigurableApplicationContext context = null;
    Collection<SpringBootExceptionReporter> exceptionReporters = new ArrayList<>();
    configureHeadlessProperty();
    // 获取 SpringApplicationRunListeners
    SpringApplicationRunListeners listeners = getRunListeners(args);
    listeners.starting();
    try {
        // 创建 ApplicationArguments 对象
        ApplicationArguments applicationArguments = new DefaultApplicationArguments(args);
        // 加载属性配置
        ConfigurableEnvironment environment = prepareEnvironment(listeners,
                applicationArguments);
        // 处理需要忽略的Bean
        configureIgnoreBeanInfo(environment);
        // 打印 banner
        Banner printedBanner = printBanner(environment);
        // 创建 Spring 应用上下文
        context = createApplicationContext();
        // 实例化 SpringBootExceptionReporter,用来报告关于启动过程中的错误
        exceptionReporters = getSpringFactoriesInstances(
                SpringBootExceptionReporter.class,
                new Class[] { ConfigurableApplicationContext.class }, context);
        // 应用上下文的准备阶段
        prepareContext(context, environment, listeners, applicationArguments,
                printedBanner);
        // 刷新应用上下文(自动装配,初始化 IOC 容器)
        refreshContext(context);
        ...
    }
  }
这一部分的内容实在是太多了,所以这里不介绍了,我弄明白了再说…
3. 总结
SpringBoot所有的配置都是在启动的时候扫描并加载:
扫描的文件是"META-INF/spring.factories",所有的配置类都在这个当中,但是不一定所有的配置类都会生效,需要判断条件是否满足,即导入了对应的start就会有对应的启动器,有了启动器,自动装配就会生效,就配置成功 了。
- SpringBoot启动时从类路径下的
META-INF/spring.factories,获取指定的值 - 将自动配置的类导入容器,自动配置类就会生效,最终帮助我们进行自动配置
- 以前需要自己做配置的东西,现在SpringBoot就帮忙做好了
- 整合javaEE,解决方案和自动配置的东西都在
spring-boot-autoconfigure-2.2.0.RELEASE.jar中 - 他会把所有需要导入的组件,以类名的方式进行返回,这些组件就会被添加到容器当中
- 容器中会存在许多的
XXXAutoConfigurition的文件,这些文件会给容器中导入这个场景所需要的所有组件并自动配置 - 有了自动配置类,就免去了我们手动编写配置文件的工作
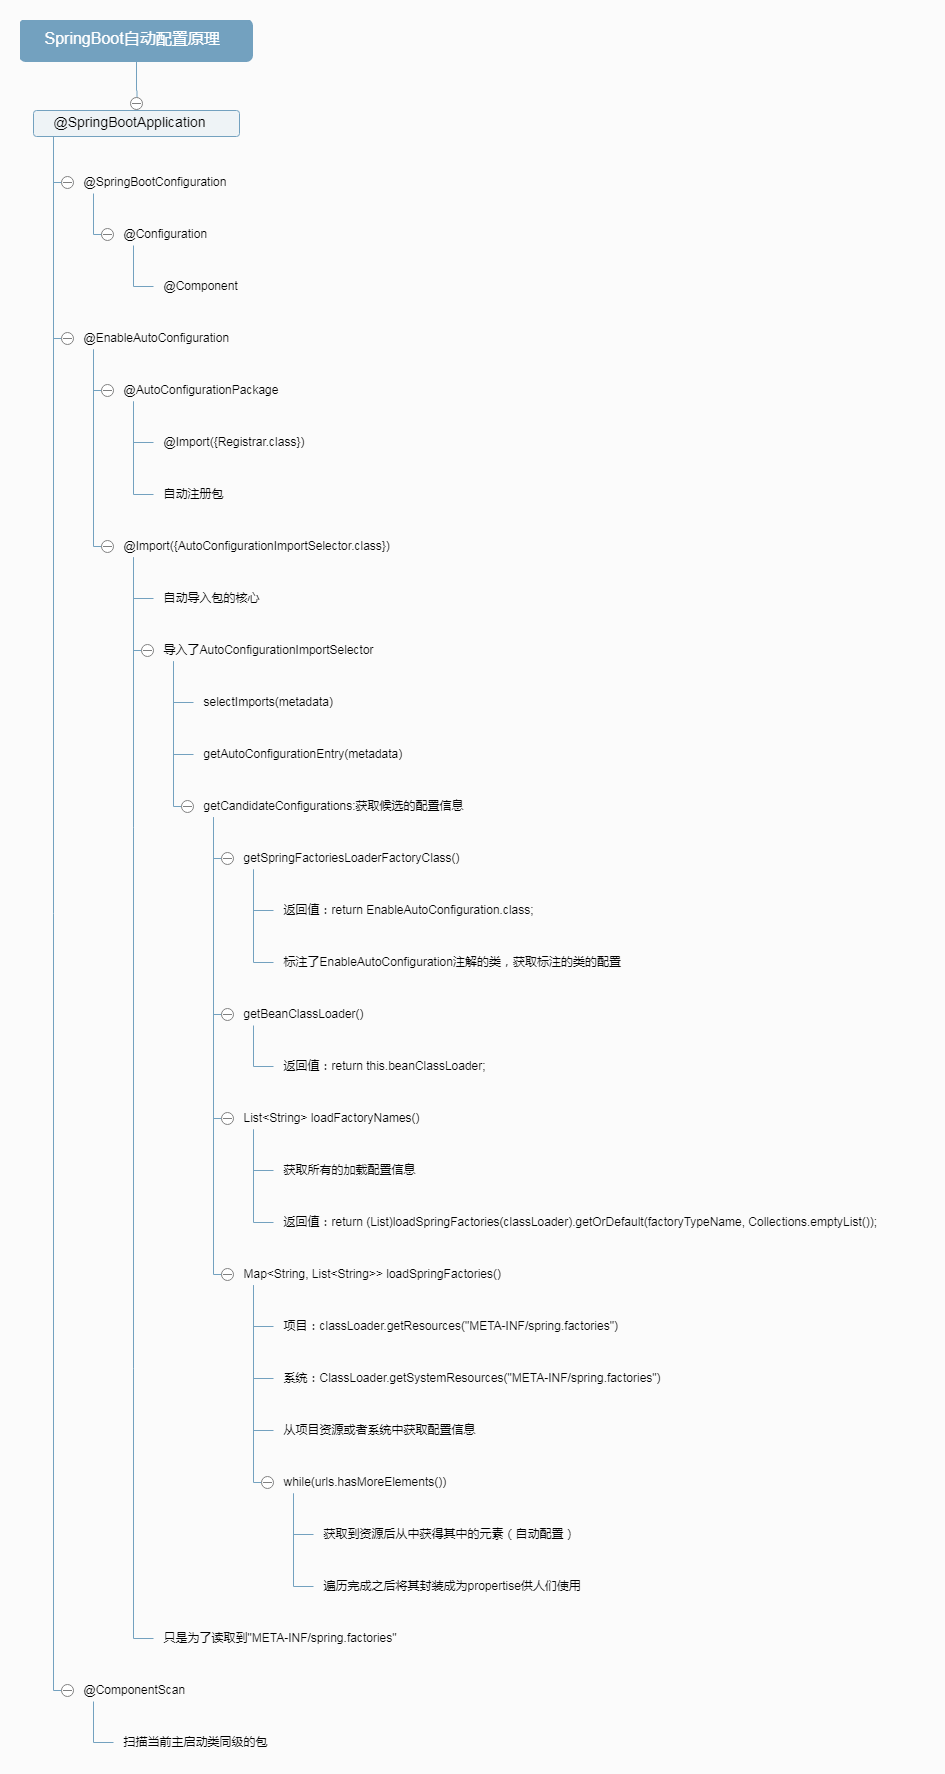
最后贴一份脑图


 1万+
1万+


 被折叠的 条评论
为什么被折叠?
被折叠的 条评论
为什么被折叠?
 到【灌水乐园】发言


