


Mybatis与Spring整合之配置文件
案例制作步骤——基础准备工作
⚫ 环境准备
- 导入Spring坐标,MyBatis坐标,MySQL坐标,Druid坐标
⚫ 业务类与接口准备 - 创建数据库表,并制作相应的实体类
- 定义业务层接口与数据层接口
- 在业务层调用数据层接口,并实现业务方法的调用
⚫ 基础配置文件 - jdbc.properties
- MyBatis映射配置文件
⚫ 整合前基础准备工作 - spring配置文件,加上context命名空间,用于加载properties文件
- 开启加载properties文件
- 配置数据源druid(备用)
- 定义service层bean,注入dao层bean
- dao的bean无需定义,使用代理自动生成
整合Spring与Mybatis
1. 导入Spring坐标,MyBatis坐标,MySQL坐标,Druid坐标
<?xml version="1.0" encoding="UTF-8"?>
<project xmlns="http://maven.apache.org/POM/4.0.0"
         xmlns:xsi="http://www.w3.org/2001/XMLSchema-instance"
         xsi:schemaLocation="http://maven.apache.org/POM/4.0.0 http://maven.apache.org/xsd/maven-4.0.0.xsd">
    <modelVersion>4.0.0</modelVersion>

    <groupId>com.fs</groupId>
    <artifactId>day01_spring_ioc_mybatis</artifactId>
    <version>1.0-SNAPSHOT</version>

    <dependencies>
        <dependency>
            <groupId>org.springframework</groupId>
            <artifactId>spring-context</artifactId>
            <version>5.1.9.RELEASE</version>
        </dependency>

<!--        jdbc-->

        <dependency>
            <groupId>org.springframework</groupId>
            <artifactId>spring-jdbc</artifactId>
            <version>5.1.9.RELEASE</version>
        </dependency>

<!--        spring整合mybatis-->
        <dependency>
            <groupId>org.mybatis</groupId>
            <artifactId>mybatis-spring</artifactId>
            <version>2.0.1</version>
        </dependency>
        <dependency>
            <groupId>org.mybatis</groupId>
            <artifactId>mybatis</artifactId>
            <version>3.5.5</version>
        </dependency>
<!--        mysql-->
        <dependency>
            <groupId>mysql</groupId>
            <artifactId>mysql-connector-java</artifactId>
            <version>5.1.47</version>
        </dependency>
<!--druid连接池-->
        <dependency>
            <groupId>com.alibaba</groupId>
            <artifactId>druid</artifactId>
            <version>1.1.20</version>
        </dependency>

        <dependency>
            <groupId>org.projectlombok</groupId>
            <artifactId>lombok</artifactId>
            <version>1.18.12</version>
        </dependency>

        <dependency>
            <groupId>junit</groupId>
            <artifactId>junit</artifactId>
            <version>4.12</version>
            <scope>test</scope>
        </dependency>
    </dependencies>
</project>
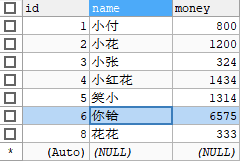
2. 创建数据库表,并制作相应的实体类
mysql数据库表
实体类
package com.fs.pojo;

import lombok.Data;

@Data
public class Account {
    private Integer id;
    private String name;
    private Double money;
}
3. 定义业务层接口与数据层接口
数据层接口
package com.fs.dao;

import com.fs.pojo.Account;
import org.apache.ibatis.annotations.*;

import java.util.List;

public interface AccountDao {
    @Select("select * from account")
    List<Account> findAll();//查询所有
}
业务层接口
package com.fs.service;

import com.fs.pojo.Account;

import java.util.List;

public interface AccountService {
    List<Account> findAll();
}
4. 在业务层调用数据层接口,并实现业务方法的调用
package com.fs.service.impl;

import com.fs.dao.AccountDao;
import com.fs.pojo.Account;
import com.fs.service.AccountService;

import java.util.List;

public class AccountServiceImpl implements AccountService {
	//在业务层调用数据层接口
    private AccountDao accountDao;

    //提供DI依耐注入的set方法
    public void setAccountDao(AccountDao accountDao) {
        this.accountDao = accountDao;
    }

	//并实现业务方法的调用
    @Override
    public List<Account> findAll() {
        return accountDao.findAll();
    }
}
5. jdbc.properties
jdbc.driver=com.mysql.jdbc.Driver
jdbc.url=jdbc:mysql://192.168.93.132:3306/test
jdbc.username=root
jdbc.password=root
6. MyBatis映射配置文件
我这里使用的MyBatis的注解开发,所以没有使用这个映射配置文件
7. spring配置文件,整合MyBatis(xml中有详细解释)
spring核心配置文件
<?xml version="1.0" encoding="UTF-8"?>
<beans xmlns="http://www.springframework.org/schema/beans"
       xmlns:xsi="http://www.w3.org/2001/XMLSchema-instance"
       xmlns:context="http://www.springframework.org/schema/context"
       xsi:schemaLocation="http://www.springframework.org/schema/beans
       http://www.springframework.org/schema/beans/spring-beans.xsd
       http://www.springframework.org/schema/context
       https://www.springframework.org/schema/context/spring-context.xsd">

<!--    引入properties-->
    <context:property-placeholder location="classpath:jdbc.properties"/>

<!--    整合druid,把DruidDataSource交给spring管理-->
    <bean id="dataSource" class="com.alibaba.druid.pool.DruidDataSource">
        <property name="driverClassName" value="${jdbc.driver}"/>
        <property name="url" value="${jdbc.url}"/>
        <property name="username" value="${jdbc.username}"/>
        <property name="password" value="${jdbc.password}"/>
    </bean>

    <!--    整合MyBatis-->
    <!--    配置MyBatis的会话工厂类  mybatis.spring 下的SqlSessionFactoryBean
    配置的sqlSessionFactory得到SqlSession,然后MyBatis从spring中拿到SqlSession.getMapper()去动态代理dao-->
    <bean id="sqlSessionFactory" class="org.mybatis.spring.SqlSessionFactoryBean">
<!--        给MyBatis配置链接池,依耐注入-->
        <property name="dataSource" ref="dataSource"/>
<!--        配置别名扫描的包,被扫描的包下的类起的别名就是类名首字母小写,用于mapper.xml文件中使用-->
        <property name="typeAliasesPackage" value="com.fs.pojo"/>
    </bean>

<!--配置MyBatis扫描dao的包,让MyBatis动态代理生成这个dao的实现类,并交给ioc管理
        mybatis-spring这个包下MapperScannerConfigurer提供了spring于MyBatis的整合-->
    <bean id="mapperScanner" class="org.mybatis.spring.mapper.MapperScannerConfigurer">
<!--        告诉MyBatis我dao在哪里.然后MyBatis将这个dao实现,然后给spring管理-->
        <property name="basePackage" value="com.fs.dao"/>
    </bean>


    <!--  把业务类 AccountServiceImpl 交给ioc管理 -->
    <bean id="accountServiceImpl" class="com.fs.service.impl.AccountServiceImpl">
<!--       依耐注入dao,这个dao被MyBatis动态代理实现后被spring存放在ioc容器中-->
        <property name="accountDao" ref="accountDao"/>
    </bean>
</beans>
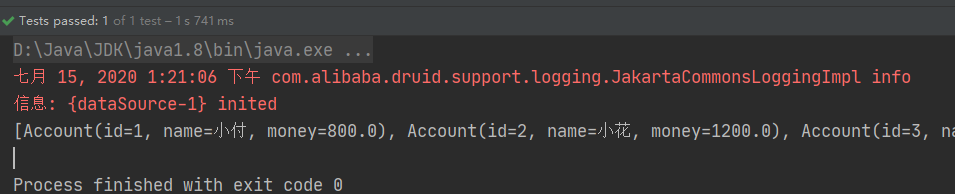
测试方法
    @Test
    public void findAll() {
        //创建ioc容器
        ApplicationContext applicationContext = new ClassPathXmlApplicationContext("applicationContext.xml");
        //从容器中获取accountServiceImpl
        AccountServiceImpl accountServiceImpl = (AccountServiceImpl) applicationContext.getBean("accountServiceImpl");
        //调用方法,查询结果
        List<Account> all = accountServiceImpl.findAll();
        System.out.println(all);
    }
执行结果


 1247
1247


 被折叠的 条评论
为什么被折叠?
被折叠的 条评论
为什么被折叠?
 到【灌水乐园】发言


