


from :
http://blog.sina.com.cn/s/blog_6a8b794001015jx7.html
http://blog.csdn.net/hongtao_liu/article/details/6060734
一、概述
本文希望通过分析台湾的Jollen的mokoid 工程代码,和在s5pc100平台上实现过程种遇到的问题,解析Andorid HAL的开发方法。
二、HAL介绍
现有HAL架构由Patrick Brady (Google) 在2008 Google I/O演讲中提出的,如下图。
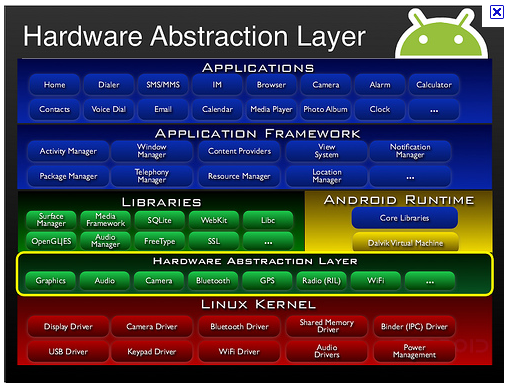
Android的HAL是为了保护一些硬件提供商的知识产权而提出的,是为了避开linux的GPL束缚。思路是把控制硬件的动作都放到了Android HAL中,而linux driver仅仅完成一些简单的数据交互作用,甚至把硬件寄存器空间直接映射到user space。而Android是基于Aparch的license,因此硬件厂商可以只提供二进制代码,所以说Android只是一个开放的平台,并不是一个开源的平台。也许也正是因为Android不遵从GPL,所以Greg Kroah-Hartman才在2.6.33内核将Andorid驱动从linux中删除。GPL和硬件厂商目前还是有着无法弥合的裂痕。Android想要把这个问题处理好也是不容易的。
总结下来,Android HAL存在的原因主要有:
1. 并不是所有的硬件设备都有标准的linux kernel的接口
2. KERNEL DRIVER涉及到GPL的版权。某些设备制造商并不原因公开硬件驱动,所以才去用HAL方 式绕过GPL。
3. 针对某些硬件,An有一些特殊的需求
三、HAL内容
1、HAL 主要的储存于以下目录:
(注意:HAL在其它目录下也可以正常编译)
/hardware/libhardware_legacy/ - 旧的架构、采取链接库模块的方式
/hardware/libhardware 新架构、调整为 HAL stub 目录的结构如下:
/hardware/libhardware/hardware.c 编译成libhardware.s置于/system/lib
/hardware/libhardware/include/hardware目录下包含如下头文件:
hardware.h 通用硬件模块头文件
lights.h 背光模块头文件
sensors.h 传感器模块头文件
/hardware/libhardware/modules 目录下定义了很多硬件模块
/hardware/qcom
/device/qcom // 各个厂商平台相关的hal(qcom) , 比如:device/qcom/common/power , 相同id module,优先加载平台相关module
这些硬件模块都编译成xxx.xxx.so,目标位置为/system/lib/hw目录
2、两种 HAL 架构比较
目前存在两种HAL架构,位于libhardware_legacy目录下的“旧HAL架构”和位于libhardware目录下的“新HAL架构”。两种框架如下图所示。
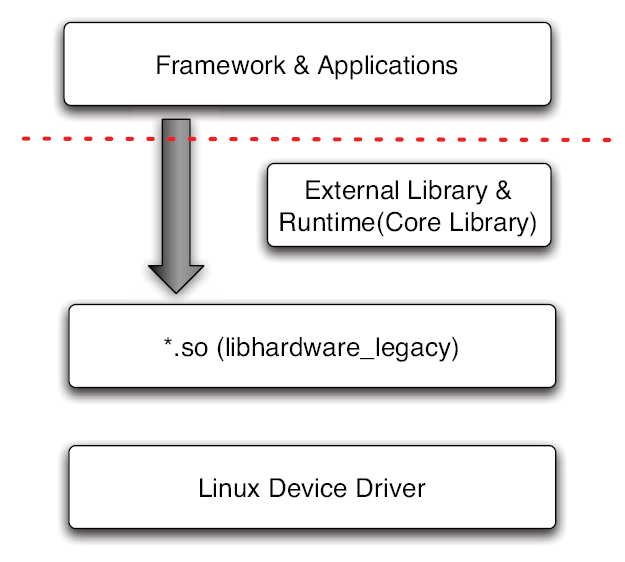
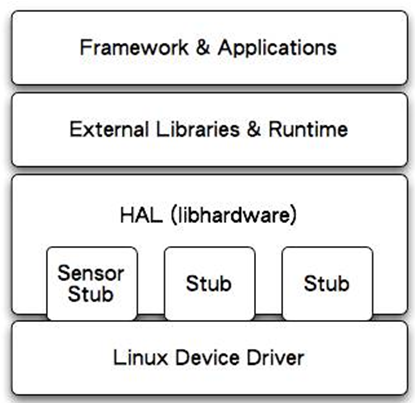
图3.1 旧HAL架构 图3.2 新HAL架构
libhardware_legacy 是将 *.so 文件当作shared library来使用,在runtime(JNI 部份)以 direct function call 使用 HAL module。通过直接函数调用的方式,来操作驱动程序。当然,应用程序也可以不需要通过 JNI 的方式进行,直接加载 *.so (dlopen)的做法调用*.so 里的符号(symbol)也是一种方式。总而言之是没有经过封装,上层可以直接操作硬件。
现在的libhardware 架构,就有stub的味道了。HAL stub 是一种代理人(proxy)的概念,stub 虽然仍是以 *.so檔的形式存在,但HAL已经将 *.so 档隐藏起来了。Stub 向 HAL提供操作函数(operations),而 runtime 则是向 HAL 取得特定模块(stub)的 operations,再 callback 这些操作函数。这种以 indirect function call 的架构,让HAL stub 变成是一种包含关系,即 HAL 里包含了许许多多的 stub(代理人)。Runtime 只要说明类型,即 module ID,就可以取得操作函数。对于目前的HAL,可以认为Android定义了HAL层结构框架,通过几个接口访问硬件从而统一了调用方式。
3、Android系统通过HAL访问linux驱动的过程
/hardware/libhardware/include/hardware/hardward.h
a、Native Service通过调用hw_get_module函数获取hw_module_t结构的实例module(获取HAL stub);
b、通过module中hw_module_methods_t结构的实例指针methods获得打开具体设备的HAL的open方法;
c、在HAL的open方法的实现中调用C库的open函数打开linux设备文件(获取文件描述符),进而通过其他的文件操作函数实现对设备的控制(此部分可以看作是linux应用编程,注意Android libc库与glibc的不同);
4、非常重要的三个Android HAL结构
typedef struct hw_module_t {
} hw_module_t;
typedef struct hw_module_methods_t {
const char *id,
struct hw_device_t **device);
} hw_module_methods_t;
typedef struct hw_device_t {
} hw_device_t;
本人添加如下注释:
4、device module load : hw_get_module实现细节
/hardware/libhardware/hardware.c
/** Base path of the hal modules */
#if defined(__LP64__)
#define HAL_LIBRARY_PATH1 "/system/lib64/hw"
#define HAL_LIBRARY_PATH2 "/vendor/lib64/hw"
#else
#define HAL_LIBRARY_PATH1 "/system/lib/hw"
#define HAL_LIBRARY_PATH2 "/vendor/lib/hw"
#endif
static const char *variant_keys[] = {
"ro.hardware", /* This goes first so that it can pick up a different
file on the emulator. */
"ro.product.board",
"ro.board.platform",
"ro.arch"
};
static const int HAL_VARIANT_KEYS_COUNT =
(sizeof(variant_keys)/sizeof(variant_keys[0]));
/**
* Load the file defined by the variant and if successful
* return the dlopen handle and the hmi.
* @return 0 = success, !0 = failure.
*/
static int load(const char *id,
const char *path,
const struct hw_module_t **pHmi)
{
int status;
void *handle;
struct hw_module_t *hmi;
/*
* load the symbols resolving undefined symbols before
* dlopen returns. Since RTLD_GLOBAL is not or'd in with
* RTLD_NOW the external symbols will not be global
*/
handle = dlopen(path, RTLD_NOW);
if (handle == NULL) {
char const *err_str = dlerror();
ALOGE("load: module=%s\n%s", path, err_str?err_str:"unknown");
status = -EINVAL;
goto done;
}
/* Get the address of the struct hal_module_info. */
const char *sym = HAL_MODULE_INFO_SYM_AS_STR;
hmi = (struct hw_module_t *)dlsym(handle, sym);
if (hmi == NULL) {
ALOGE("load: couldn't find symbol %s", sym);
status = -EINVAL;
goto done;
}
/* Check that the id matches */
if (strcmp(id, hmi->id) != 0) {
ALOGE("load: id=%s != hmi->id=%s", id, hmi->id);
status = -EINVAL;
goto done;
}
hmi->dso = handle;
/* success */
status = 0;
done:
if (status != 0) {
hmi = NULL;
if (handle != NULL) {
dlclose(handle);
handle = NULL;
}
} else {
ALOGV("loaded HAL id=%s path=%s hmi=%p handle=%p",
id, path, *pHmi, handle);
}
*pHmi = hmi;
return status;
}
/*
* Check if a HAL with given name and subname exists, if so return 0, otherwise
* otherwise return negative. On success path will contain the path to the HAL.
*/
static int hw_module_exists(char *path, size_t path_len, const char *name,
const char *subname)
{
snprintf(path, path_len, "%s/%s.%s.so",
HAL_LIBRARY_PATH2, name, subname);
if (access(path, R_OK) == 0)
return 0;
snprintf(path, path_len, "%s/%s.%s.so",
HAL_LIBRARY_PATH1, name, subname);
if (access(path, R_OK) == 0)
return 0;
return -ENOENT;
}
int hw_get_module_by_class(const char *class_id, const char *inst,
const struct hw_module_t **module)
{
int i;
char prop[PATH_MAX];
char path[PATH_MAX];
char name[PATH_MAX];
char prop_name[PATH_MAX];
if (inst)
snprintf(name, PATH_MAX, "%s.%s", class_id, inst);
else
strlcpy(name, class_id, PATH_MAX);
/*
* Here we rely on the fact that calling dlopen multiple times on
* the same .so will simply increment a refcount (and not load
* a new copy of the library).
* We also assume that dlopen() is thread-safe.
*/
// 相同id module,优先加载平台命名相关module,比如:power.qcom.so
/* Loop through the configuration variants looking for a module */
for (i=0 ; i<HAL_VARIANT_KEYS_COUNT; i++) {
if (property_get(variant_keys[i], prop, NULL) == 0) {
continue;
}
if (hw_module_exists(path, sizeof(path), name, prop) == 0) {
goto found;
}
}
// 未找到平台命名module,继续找default命名module,比如:power.default.so
/* Nothing found, try the default */
if (hw_module_exists(path, sizeof(path), name, "default") == 0) {
goto found;
}
return -ENOENT;
found:
/* load the module, if this fails, we're doomed, and we should not try
* to load a different variant. */
return load(class_id, path, module);
}
int hw_get_module(const char *id, const struct hw_module_t **module)
{
return hw_get_module_by_class(id, NULL, module);
}
下面结合实例来分析HAL编程方法。
四、mokoid 工程代码下载与结构分析
1、mokid项目概述
modkoid工程提供了一个LedTest示例程序,是台湾的Jollen用于培训的。对于理解android层次结构、Hal编程方法都非常有意义。
2、下载方法
#svn checkout http://mokoid.googlecode.com/svn/trunk/mokoid-read-only
3、结构分析
|-- Android.mk
|-- apps //两种应用测试方法
| |-- Android.mk
| |-- LedClient //直接调用service来调用jni
| | |-- AndroidManifest.xml
| | |-- Android.mk
| | `-- src
| | `-- com
| | `-- mokoid
| | `-- LedClient
| | `-- LedClient.java //第1种方式应用程序实现代码
| `-- LedTest //通过manager来调用jni
| |-- AndroidManifest.xml
| |-- Android.mk
| `-- src
| `-- com
| `-- mokoid
| `-- LedTest
| |-- LedSystemServer.java //开启了一个后台service,下文会有解释
| `-- LedTest.java //第2种方式应用程序实现代码
|-- dma6410xp //这个目录可以不要
| |-- AndroidBoard.mk
| |-- AndroidProducts.mk
| |-- BoardConfig.mk
| |-- dma6410xp.mk
| |-- init.dma6410xp.rc
| |-- init.goldfish.sh
| `-- init.rc
|-- frameworks //框架代码
| |-- Android.mk
| `-- base
| |-- Android.mk
| |-- core
| | `-- java
| | `-- mokoid
| | `-- hardware
| | |-- ILedService.aidl
| | `-- LedManager.java //实现了Manager,给第2种方法用
| `-- service
| |-- Android.mk
| |-- com.mokoid.server.xml
| |-- java
| | `-- com
| | `-- mokoid
| | `-- server
| | `-- LedService.java //Framework service代码
| `-- jni
| |-- Android.mk
| `-- com_mokoid_server_LedService.cpp //jni代码
|-- hardware
| |-- Android.mk
| |-- libled
| | |-- Android.mk
| | `-- libled.c
| `-- modules
| |-- Android.mk
| |-- include
| | `-- mokoid
| | `-- led.h
| `-- led
| |-- Android.mk
| `-- led.c //led stub 硬件控制代码
`-- README.txt
Android的HAL的实现需要通过JNI(Java Native Interface),JNI简单来说就是java程序可以调用C/C++写的动态链接库,这样的话,HAL可以使用C/C++语言编写,效率更高。在Android下访问HAL大致有以下两种方式:
(1)Android的app可以直接通过service调用.so格式的jni
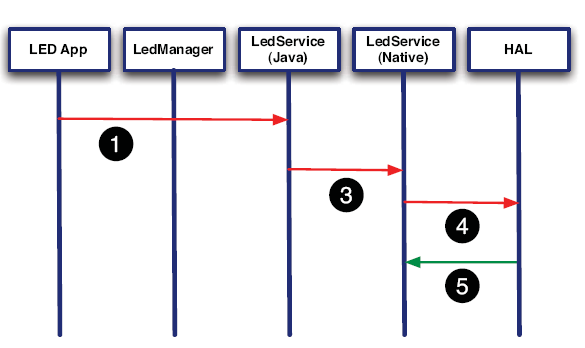
(2)经过Manager调用service
上面两种方法应该说是各有优缺点,第一种方法简单高效,但不正规。第二种方法实现起来比较复杂,但更符合目前的Android框架。第二种方法中,LegManager和LedService(java)在两个进程中,需要通过进程通讯的方式来通讯。
mokoid工程中实现了上述两种方法。下面将详细介绍这两种方法的实现原理。
4、第一种方法:直接调用service方法的实现过程
下面分析第一种方法中,各层的关键代码。
(1)HAL层
一般来说HAL moudle需要涉及的是三个关键结构体:
struct hw_module_t;
struct hw_module_methods_t;
struct hw_device_t;
下面结合代码说明这3个结构的用法。部分代码经过修改,后面的章节会给出修改的原因。
文件:mokoid-read-only/hardware/modules/include/mokoid/led.h
- struct led_module_t {
- struct hw_module_t common;
- };
- //HAL 规定不能直接使用hw_module_t结构,因此需要做这么一个继承。
- struct led_control_device_t {
- //自定义的一个针对Led控制的结构,包含hw_device_t和支持的API操作
- struct hw_device_t common;
- /* attributes */
- int fd; //可用于具体的设备描述符
- /* supporting control APIs go here */
- int (*set_on)(struct led_control_device_t *dev, int32_t led);
- int (*set_off)(struct led_control_device_t *dev, int32_t led);
- };
- #define LED_HARDWARE_MODULE_ID "led"
- //定义一个MODULE_ID,HAL层可以根据这个ID找到我们这个HAL stub
文件:mokoid-read-only/hardware/modules/led/led.c
- #define LOG_TAG "MokoidLedStub"
- #include <hardware/hardware.h>
- #include <fcntl.h>
- #include <errno.h>
- #include <cutils/log.h>
- #include <cutils/atomic.h>
- //#include <mokoid/led.h>
- #include "../include/mokoid/led.h"
- /*****************************************************************************/
- int fd; //硬件led的设备描述符 。你也可以用led_control_device_t结构中定义的fd
- #define GPG3DAT2_ON 0x4800 //ioctl控制命令
- #define GPG3DAT2_OFF 0x4801
- int led_device_close(struct hw_device_t* device)
- {
- struct led_control_device_t* ctx = (struct led_control_device_t*)device;
- if (ctx) {
- free(ctx);
- }
- close(fd);
- return 0;
- }
- int led_on(struct led_control_device_t *dev, int32_t led)
- {
- LOGI("LED Stub: set %d on.", led);
- ioctl(fd,GPG3DAT2_ON,NULL); //控制Led亮灭,和硬件相关
- return 0;
- }
- int led_off(struct led_control_device_t *dev, int32_t led)
- {
- LOGI("LED Stub: set %d off.", led);
- return 0;
- }
- static int led_device_open(const struct hw_module_t* module, const char* name,
- struct hw_device_t** device)
- {
- struct led_control_device_t *dev;
- dev = (struct led_control_device_t *)malloc(sizeof(*dev));
- memset(dev, 0, sizeof(*dev));
- dev->common.tag = HARDWARE_DEVICE_TAG;
- dev->common.version = 0;
- dev->common.module = module;
- dev->common.close = led_device_close;
- dev->set_on = led_on; //实例化支持的操作
- dev->set_off = led_off;
- *device = &dev->common; //将实例化后的led_control_device_t地址返回给jni层
- //这样jni层就可以直接调用led_on、led_off、led_device_close方法了。
- if((fd=open("/dev/led",O_RDWR))==-1) //打开硬件设备
- {
- LOGE("LED open error");
- }
- else
- LOGI("open ok");
- success:
- return 0;
- }
- static struct hw_module_methods_t led_module_methods = {
- open: led_device_open
- };
- const struct led_module_t HAL_MODULE_INFO_SYM = {
- //定义这个对象等于向系统注册了一个ID为LED_HARDWARE_MODULE_ID的stub。注意这里HAL_MODULE_INFO_SYM的名称不能改。
- common: {
- tag: HARDWARE_MODULE_TAG,
- version_major: 1,
- version_minor: 0,
- id: LED_HARDWARE_MODULE_ID,
- name: "Sample LED Stub",
- author: "The Mokoid Open Source Project",
- methods: &led_module_methods, //实现了一个open的方法供jni层调用,
- //从而实例化led_control_device_t
- }
- /* supporting APIs go here */
- };
(2)JNI层
文件:mokoid-read-only/frameworks/base/service/jni/com_mokoid_server_LedService.cpp
- struct led_control_device_t *sLedDevice = NULL;
- static jboolean mokoid_setOn(JNIEnv* env, jobject thiz, jint led)
- {
- LOGI("LedService JNI: mokoid_setOn() is invoked.");
- if (sLedDevice == NULL) {
- LOGI("LedService JNI: sLedDevice was not fetched correctly.");
- return -1;
- } else {
- return sLedDevice->set_on(sLedDevice, led);//调用hal层的注册的方法
- }
- }
- static jboolean mokoid_setOff(JNIEnv* env, jobject thiz, jint led)
- {
- LOGI("LedService JNI: mokoid_setOff() is invoked.");
- if (sLedDevice == NULL) {
- LOGI("LedService JNI: sLedDevice was not fetched correctly.");
- return -1;
- } else {
- return sLedDevice->set_off(sLedDevice, led); //调用hal层的注册的方法
- }
- }
- /** helper APIs */
- static inline int led_control_open(const struct hw_module_t* module,
- struct led_control_device_t** device) {
- return module->methods->open(module,
- LED_HARDWARE_MODULE_ID, (struct hw_device_t**)device);
- //这个过程非常重要,jni通过LED_HARDWARE_MODULE_ID找到对应的stub
- }
- static jboolean mokoid_init(JNIEnv *env, jclass clazz)
- {
- led_module_t* module;
- LOGI("jni init-----------------------.");
- if (hw_get_module(LED_HARDWARE_MODULE_ID, (const hw_module_t**)&module) == 0) {
- //根据LED_HARDWARE_MODULE_ID找到hw_module_t,参考hal层的实现
- LOGI("LedService JNI: LED Stub found.");
- if (led_control_open(&module->common, &sLedDevice) == 0) {
- //通过hw_module_t找到led_control_device_t
- LOGI("LedService JNI: Got Stub operations.");
- return 0;
- }
- }
- LOGE("LedService JNI: Get Stub operations failed.");
- return -1;
- }
- /*
- * Array of methods.
- * Each entry has three fields: the name of the method, the method
- * signature, and a pointer to the native implementation.
- */
- static const JNINativeMethod gMethods[] = {
- { "_init", "()Z", (void *)mokoid_init },//Framework层调用_init时促发
- { "_set_on", "(I)Z", (void *)mokoid_setOn },
- { "_set_off", "(I)Z", (void *)mokoid_setOff },
- };
- /*
- *JNINativeMethod是jni层注册的方法,Framework层可以使用这些方法
- *_init 、_set_on、_set_off是在Framework中调用的方法名称,函数的类型及返回值如下:
- *()Z 无参数 返回值为bool型
- * (I)Z 整型参数 返回值为bool型
- */
- static int registerMethods(JNIEnv* env) {
- static const char* const kClassName =
- "com/mokoid/server/LedService";//注意:必须和你Framework层的service类名相同
- jclass clazz;
- /* look up the class */
- clazz = env->FindClass(kClassName);
- if (clazz == NULL) {
- LOGE("Can't find class %s/n", kClassName);
- return -1;
- }
- /* register all the methods */
- if (env->RegisterNatives(clazz, gMethods,
- sizeof(gMethods) / sizeof(gMethods[0])) != JNI_OK)
- {
- LOGE("Failed registering methods for %s/n", kClassName);
- return -1;
- }
- /* fill out the rest of the ID cache */
- return 0;
- }
- jint JNI_OnLoad(JavaVM* vm, void* reserved) {//Framework层加载jni库时调用
- JNIEnv* env = NULL;
- jint result = -1;
- LOGI("JNI_OnLoad LED");
- if (vm->GetEnv((void**) &env, JNI_VERSION_1_4) != JNI_OK) {
- LOGE("ERROR: GetEnv failed/n");
- goto fail;
- }
- assert(env != NULL);
- if (registerMethods(env) != 0) { //注册你的JNINativeMethod
- LOGE("ERROR: PlatformLibrary native registration failed/n");
- goto fail;
- }
- /* success -- return valid version number */
- result = JNI_VERSION_1_4;
- fail:
- return result;
- }
(3)service (属于Framework层)
文件:frameworks/base/service/java/com/mokoid/server/LedService.java
- package com.mokoid.server;
- import android.util.Config;
- import android.util.Log;
- import android.content.Context;
- import android.os.Binder;
- import android.os.Bundle;
- import android.os.RemoteException;
- import android.os.IBinder;
- import mokoid.hardware.ILedService;
- public final class LedService extends ILedService.Stub {
- //对于这种直接模式不需要进程通讯,所以可以不加extends ILedService.Stub,此处加上主要是为了后面的第二种模式.
- static {
- System.load("/system/lib/libmokoid_runtime.so");//加载jni的动态库
- }
- public LedService() {
- Log.i("LedService", "Go to get LED Stub...");
- _init();
- }
- /*
- * Mokoid LED native methods.
- */
- public boolean setOn(int led) {
- Log.i("MokoidPlatform", "LED On");
- return _set_on(led);
- }
- public boolean setOff(int led) {
- Log.i("MokoidPlatform", "LED Off");
- return _set_off(led);
- }
- private static native boolean _init(); //声明jni库可以提供的方法
- private static native boolean _set_on(int led);
- private static native boolean _set_off(int led);
- }
(4)APP 测试程序 (属于APP层)
文件:apps/LedClient/src/com/mokoid/LedClient/LedClient.java
- package com.mokoid.LedClient;
- import com.mokoid.server.LedService;// 导入Framework层的LedService
- import android.app.Activity;
- import android.os.Bundle;
- import android.widget.TextView;
- public class LedClient extends Activity {
- @Override
- public void onCreate(Bundle savedInstanceState) {
- super.onCreate(savedInstanceState);
- // Call an API on the library.
- LedService ls = new LedService(); //实例化LedService
- ls.setOn(1); //通过LedService提供的方法,控制底层硬件
- ls.setOff(2);
- TextView tv = new TextView(this);
- tv.setText("LED 1 is on. LED 2 is off.");
- setContentView(tv);
- }
- }
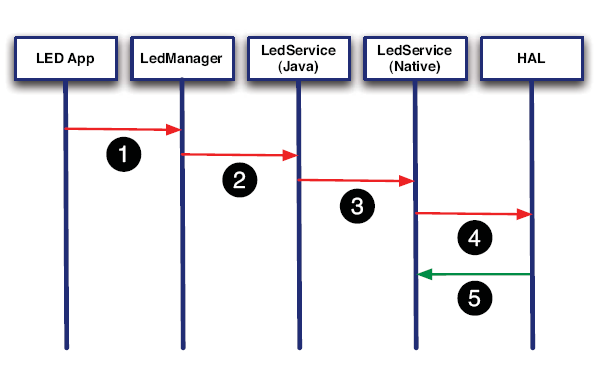
5、第二种方法:经过Manager调用service
HAL、JNI两层和第一种方法一样,所以后面只分析其他的层次。
(1)Manager (属于Framework层)
APP通过这个Manager和service通讯。
文件:mokoid-read-only /frameworks/base/core/java/mokoid/hardware/LedManager.java
- package mokoid.hardware;
- import android.content.Context;
- import android.os.Binder;
- import android.os.Bundle;
- import android.os.Parcelable;
- import android.os.ParcelFileDescriptor;
- import android.os.Process;
- import android.os.RemoteException;
- import android.os.Handler;
- import android.os.Message;
- import android.os.ServiceManager;
- import android.util.Log;
- import mokoid.hardware.ILedService;
- /*
- * Class that lets you access the Mokoid LedService.
- */
- public class LedManager
- {
- private static final String TAG = "LedManager";
- private ILedService mLedService;
- public LedManager() {
- mLedService = ILedService.Stub.asInterface(ServiceManager.getService("led"));
- /*
- *这一步是关键,利用ServiceManager获取到LedService,从而调用它提供的方法。这要求LedService必
- *须已经添加到了ServiceManager中,这个过程将在App中的一个service进程中完成。
- */
- if (mLedService != null) {
- Log.i(TAG, "The LedManager object is ready.");
- }
- }
- public boolean LedOn(int n) {
- boolean result = false;
- try {
- result = mLedService.setOn(n);
- } catch (RemoteException e) {
- Log.e(TAG, "RemoteException in LedManager.LedOn:", e);
- }
- return result;
- }
- public boolean LedOff(int n) {
- boolean result = false;
- try {
- result = mLedService.setOff(n);
- } catch (RemoteException e) {
- Log.e(TAG, "RemoteException in LedManager.LedOff:", e);
- }
- return result;
- }
- }
因为LedService和LedManager在不同的进程,所以要考虑到进程通讯的问题。Manager通过增加一个aidl文件来描述通讯接口。
文件:mokoid-read-only/frameworks/base/core/java/mokoid/hardware/ILedService.aidl
- package mokoid.hardware;
- interface ILedService
- {
- boolean setOn(int led);
- boolean setOff(int led);
- }
- //系统的aidl工具会将ILedService.aidl文件ILedService.java文件,实现了ILedService
(2)SystemServer (属于APP层)
文件:mokoid-read-only/apps/LedTest/src/com/mokoid/LedTest/LedSystemServer.java
- package com.mokoid.LedTest;
- import com.mokoid.server.LedService;
- import android.os.IBinder;
- import android.os.ServiceManager;
- import android.util.Log;
- import android.app.Service;
- import android.content.Context;
- import android.content.Intent;
- public class LedSystemServer extends Service {
- //注意这里的Service是APP中的概念,代表一个后台进程。注意区别和Framework中的service的概念。
- @Override
- public IBinder onBind(Intent intent) {
- return null;
- public void onStart(Intent intent, int startId) {
- Log.i("LedSystemServer", "Start LedService...");
- /* Please also see SystemServer.java for your interests. */
- LedService ls = new LedService();
- try {
- ServiceManager.addService("led", ls); //将LedService添加到ServiceManager中
- } catch (RuntimeException e) {
- Log.e("LedSystemServer", "Start LedService failed.");
- }
- }
- }
(3)APP 测试程序(属于APP层)
文件:mokoid-read-only/apps/LedTest/src/com/mokoid/LedTest/LedTest.java
- package com.mokoid.LedTest;
- import mokoid.hardware.LedManager;
- import com.mokoid.server.LedService;
- import android.app.Activity;
- import android.os.Bundle;
- import android.util.Log;
- import android.widget.TextView;
- import android.widget.Button;
- import android.content.Intent;
- import android.view.View;
- public class LedTest extends Activity implements View.OnClickListener {
- private LedManager mLedManager = null;
- @Override
- public void onCreate(Bundle savedInstanceState) {
- super.onCreate(savedInstanceState);
- // Start LedService in a seperated process.
- startService(new Intent("com.mokoid.systemserver"));//开启后台进程
- Button btn = new Button(this);
- btn.setText("Click to turn LED 1 On");
- btn.setOnClickListener(this);
- setContentView(btn);
- }
- public void onClick(View v) {
- // Get LedManager.
- if (mLedManager == null) {
- Log.i("LedTest", "Creat a new LedManager object.");
- mLedManager = new LedManager(); //实例化Framework层中的Manager
- }
- if (mLedManager != null) {
- Log.i("LedTest", "Got LedManager object.");
- }
- /** Call methods in LedService via proxy object
- * which is provided by LedManager.
- */
- mLedManager.LedOn(1);
- TextView tv = new TextView(this);
- tv.setText("LED 1 is On.");
- setContentView(tv);
- }
- }
五、实验中需要注意的问题
将下载后的源码放到你的android源码目录下,然后编译系统。本实验用的android版本为2.1。实验的过程中大致出现过以下几个问题:
1、目标系统中没有生成LedClient.apk或LedTest.apk应用程序
编译完成后,没有在目标系统的system/app/目录下找到LedClient.apk或LedTest应用程序。只有通过单独编译LedClient或LedTest才能在目标目录中生成。方法如下:
#mmm mokoid-read-only/apps/LedTest/
检查原因后发现mokoid-read-only/apps/LedTest/Android.mk
LOCAL_MODULES_TAGS :=user
而我们的s5pc100系统在配置时tapas时选择的是eng,所以没有装载到目标系统
所以修改LedTest和LedClient的Android.mk
LOCAL_MODULES_TAGS :=user eng
再次编译即可自动装载到目标系统/system/app/目录下。
2、启动后没有图标,找不到应用程序
目标系统启动后找不到两个应用程序的图标。仔细阅读logcat输出的信息发现:
E/PackageManager( 2717): Package com.mokoid.LedClient requires unavailable shared library com.mokoid.server; failing!
原因是找不到 com.mokoid.server。检查mokoid-read-only/frameworks/base/Android.mk发现系统将LedManager和LedService编译成 mokoid.jar库文件。为了让应用程序可以访问到这个库,需要通过com.mokoid.server.xml 来设定其对应关系。解决方法:拷贝com.mokoid.server.xml到目标系统的system/etc/permissions/目录下
此时两个应用的程序的图标都正常出现了。
3、提示找不到 JNI_OnLoad
按照以前的实验加入下列代码:
- static int registerMethods(JNIEnv* env) {
- static const char* const kClassName ="com/mokoid/server/LedService";
- jclass clazz;
- /* look up the class */
- clazz = env->FindClass(kClassName);
- if (clazz == NULL) {
- LOGE("Can't find class %s/n", kClassName);
- return -1;
- }
- /* register all the methods */
- if (env->RegisterNatives(clazz, gMethods,
- sizeof(gMethods) / sizeof(gMethods[0])) != JNI_OK)
- {
- LOGE("Failed registering methods for %s/n", kClassName);
- return -1;
- }
- /* fill out the rest of the ID cache */
- return 0;
- }
- /*
- * This is called by the VM when the shared library is first loaded.
- */
- jint JNI_OnLoad(JavaVM* vm, void* reserved) {
- JNIEnv* env = NULL;
- jint result = -1;
- LOGI("JNI_OnLoad LED");
- if (vm->GetEnv((void**) &env, JNI_VERSION_1_4) != JNI_OK) {
- LOGE("ERROR: GetEnv failed/n");
- goto fail;
- }
- assert(env != NULL);
- if (registerMethods(env) != 0) {
- LOGE("ERROR: PlatformLibrary native registration failed/n");
- goto fail;
- }
- /* success -- return valid version number */
- result = JNI_VERSION_1_4;
- fail:
- return result;
- }
4、需要针对你的目标平台修改HAL的Makefile
修改mokoid-read-only/hardware/modules/led/Android.mk
LOCAL_MODULE := led.default
5、在eclipse中编译不了LedSystemServer.java
原因是程序中要用到ServiceManager.addService,这需要系统权限。
解决方法可以把应用程序放入Android源码中编译,并确保以下两点:
(1)在应用程序的AndroidManifest.xml中的manifest节点中加入android:sharedUserId="android.uid.system"这个属性。
(2)修改Android 加入LOCAL_CERTIFICATE := platform.
当然:mokoid工程源码中已经做了这些。
(2)经过Manager调用service


 948
948

 被折叠的 条评论
为什么被折叠?
被折叠的 条评论
为什么被折叠?
 到【灌水乐园】发言


