http://www.eoeandroid.com/thread-325172-1-1.html
http://www.eoeandroid.com/thread-325172-1-1.html
http://www.eoeandroid.com/thread-325172-1-1.html
http://www.eoeandroid.com/thread-325172-1-1.html
/**
* 设置list不能滚动 直接显示所有item
*/
@Override
public void onMeasure(int widthMeasureSpec, int heightMeasureSpec) {
int expandSpec = MeasureSpec.makeMeasureSpec(Integer.MAX_VALUE >> 2,
MeasureSpec.AT_MOST);
super.onMeasure(widthMeasureSpec, expandSpec);
}
ScrollView与ListView合用(正确计算Listview的高度)的问题解决
最近做项目中用到ScrollView和ListView一起使用的问题,显示的时候ListView不能完全正确的显示,查了好多资料终于成功解决:
首先,ListView不能直接用,要自定义一个,然后重写onMeasure()方法:
@Override
protected void onMeasure(int widthMeasureSpec, int heightMeasureSpec) {
int expandSpec = MeasureSpec.makeMeasureSpec(Integer.MAX_VALUE >> 2,
MeasureSpec.AT_MOST);
super.onMeasure(widthMeasureSpec, expandSpec);
}
第二步:写个计算listView每个Item的方法:
public void setListViewHeightBasedOnChildren(ListView listView) {
// 获取ListView对应的Adapter
ListAdapter listAdapter = listView.getAdapter();
if (listAdapter == null) {
return;
}
int totalHeight = 0;
for (int i = 0; i < listAdapter.getCount(); i++) { // listAdapter.getCount()返回数据项的数目
View listItem = listAdapter.getView(i, null, listView);
listItem.measure(0, 0); // 计算子项View 的宽高
totalHeight += listItem.getMeasuredHeight(); // 统计所有子项的总高度
}
ViewGroup.LayoutParams params = listView.getLayoutParams();
params.height = totalHeight
+ (listView.getDividerHeight() * (listAdapter.getCount() - 1));
// listView.getDividerHeight()获取子项间分隔符占用的高度
// params.height最后得到整个ListView完整显示需要的高度
listView.setLayoutParams(params);
}
第三步:listview添加适配器后设置高度即可:
listView.setAdapter(adapter);
new ListViewUtil().setListViewHeightBasedOnChildren(listView);
本人认为比较好的办法如下:
- import android.widget.ListView;
- /**
- * ScrollView中嵌入ListView,让ListView全显示出来
- * @author reyo
- *
- */
- public class MyListView extends ListView{
- public MyListView(android.content.Context context,android.util.AttributeSet attrs){
- super(context, attrs);
- }
- /**
- * 设置不滚动
- */
- public void onMeasure(int widthMeasureSpec, int heightMeasureSpec)
- {
- int expandSpec = MeasureSpec.makeMeasureSpec(Integer.MAX_VALUE >> 2,
- MeasureSpec.AT_MOST);
- super.onMeasure(widthMeasureSpec, expandSpec);
- }
- }
继承ListView,重写onMeasure即可。
同样,当ListView中嵌套一个GridView时,也需要重写一下GridView,否则只会显示一行GridView的数据。
- import android.widget.GridView;
- public class MyGridView extends GridView {
- public MyGridView(android.content.Context context,
- android.util.AttributeSet attrs) {
- super(context, attrs);
- }
- /**
- * 设置不滚动
- */
- public void onMeasure(int widthMeasureSpec, int heightMeasureSpec) {
- int expandSpec = MeasureSpec.makeMeasureSpec(Integer.MAX_VALUE >> 2,
- MeasureSpec.AT_MOST);
- super.onMeasure(widthMeasureSpec, expandSpec);
- }
- }
我们首先添加一个ColorStateList资源XML文件,XML文件保存在res/color/button_text.xml:
- <?xml version="1.0" encoding="utf-8"?>
- <selector xmlns:android="http://schemas.android.com/apk/res/android">
- <item android:state_pressed="true"
- android:color="#ffff0000"/> <!-- pressed -->
- <item android:state_focused="true"
- android:color="#ff0000ff"/> <!-- focused -->
- <item android:color="#ff000000"/> <!-- default -->
- </selector>
- Button btn=(Button)findViewById(R.id.btn);
- Resources resource=(Resources)getBaseContext().getResources();
- ColorStateList csl=(ColorStateList)resource.getColorStateList(R.color.button_text);
- if(csl!=null){
- btn.setTextColor(color_state_list);//设置按钮文字颜色
- }
或者也可以这样:
- XmlResourceParser xpp=Resources.getSystem().getXml(R.color.button_text);
- try {
- ColorStateList csl= ColorStateList.createFromXml(getResources(),xpp);
- btn.setTextColor(csl);
- } catch (Exception e) {
- // TODO: handle exception
- }
最后附上所有可能出现的状态:
- <?xml version="1.0" encoding="utf-8"?>
- <selector xmlns:android="http://schemas.android.com/apk/res/android" >
- <item
- android:color="hex_color"
- android:state_pressed=["true" | "false"]
- android:state_focused=["true" | "false"]
- android:state_selected=["true" | "false"]
- android:state_active=["true" | "false"]
- android:state_checkable=["true" | "false"]
- android:state_checked=["true" | "false"]
- android:state_enabled=["true" | "false"]
- android:state_window_focused=["true" | "false"] />
- </selector>

http://blog.csdn.net/hellogv/article/details/6264706
http://blog.csdn.net/hellogv/article/details/6264706
http://blog.csdn.net/hellogv/article/details/6264706
本文来自http://blog.csdn.net/hellogv/ ,引用必须注明出处!
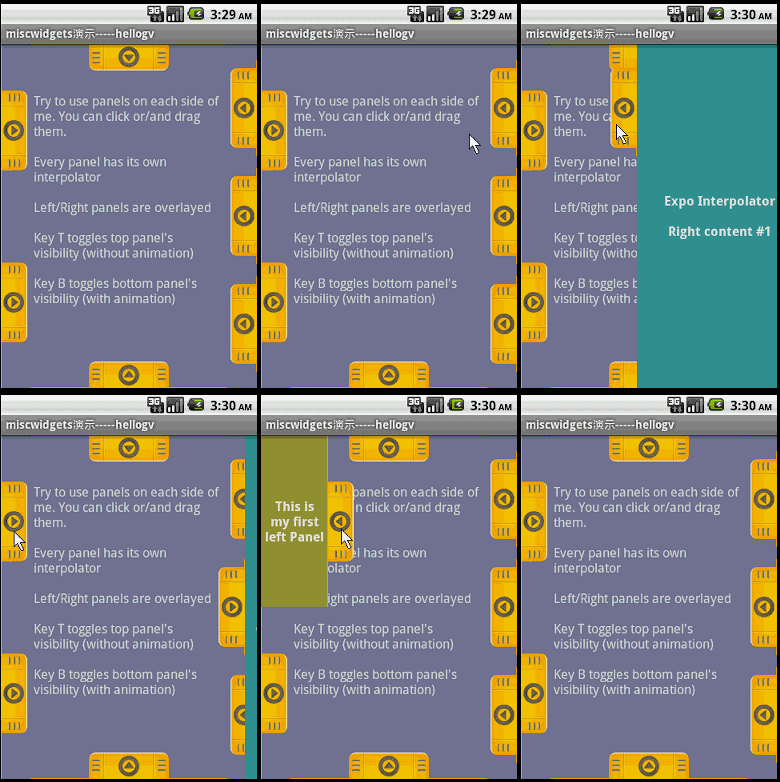
在android上要实现类似Launch的抽屉效果,大家一定首先会想起SlidingDrawer。SlidingDrawer是android官方控件之一,本文的主角不是它,而是民间的控件工具集合~~~android-misc-widgets。android-misc-widgets里面包含几个widget:Panel、SmoothButton、Switcher、VirtualKeyboard,还有一些动画特效,本文主要介绍抽屉容器Panel的用法。android-misc-widgets的google工程地址:-widgets/http://code.google.com/p/android-misc,工程代码中Panel的演示效果如下:

这个Panel控件可以轻易实现不同方向的抽屉效果,比SlidingDrawer有更强的扩展性!
在多次使用Panel的过程中,发现Panel有个bug,会间断性出现“闪烁”,也就是在onTouchListener里面的触发ACTION_DOWN后,抽屉瞬间弹出然后瞬间回收(版本日期为Feb 3, 2009)。把原Panel的OnTouchListener,即以下代码:
- OnTouchListener touchListener = new OnTouchListener() {
- int initX;
- int initY;
- boolean setInitialPosition;
- public boolean onTouch(View v, MotionEvent event) {
- if (mState == State.ANIMATING) {
- // we are animating
- return false;
- }
- / Log.d(TAG, "state: " + mState + " x: " + event.getX() + " y: " + event.getY());
- int action = event.getAction();
- if (action == MotionEvent.ACTION_DOWN) {
- if (mBringToFront) {
- bringToFront();
- }
- initX = 0;
- initY = 0;
- if (mContent.getVisibility() == GONE) {
- // since we may not know content dimensions we use factors here
- if (mOrientation == VERTICAL) {
- initY = mPosition == TOP? -1 : 1;
- } else {
- initX = mPosition == LEFT? -1 : 1;
- }
- }
- setInitialPosition = true;
- } else {
- if (setInitialPosition) {
- // now we know content dimensions, so we multiply factors...
- initX *= mContentWidth;
- initY *= mContentHeight;
- // ... and set initial panel's position
- mGestureListener.setScroll(initX, initY);
- setInitialPosition = false;
- // for offsetLocation we have to invert values
- initX = -initX;
- initY = -initY;
- }
- // offset every ACTION_MOVE & ACTION_UP event
- event.offsetLocation(initX, initY);
- }
- if (!mGestureDetector.onTouchEvent(event)) {
- if (action == MotionEvent.ACTION_UP) {
- // tup up after scrolling
- post(startAnimation);
- }
- }
- return false;
- }
- };
替换为:
- OnTouchListener touchListener = new OnTouchListener() {
- float touchX, touchY;
- public boolean onTouch(View v, MotionEvent event) {
- if (mState == State.ANIMATING) {
- // we are animating
- return false;
- }
- int action = event.getAction();
- if (action == MotionEvent.ACTION_DOWN) {
- if (mBringToFront) {
- bringToFront();
- }
- touchX = event.getX();
- touchY = event.getY();
- }
- if (!mGestureDetector.onTouchEvent(event)) {
- if (action == MotionEvent.ACTION_UP) {
- // tup up after scrolling
- int size = (int) (Math.abs(touchX - event.getX()) + Math
- .abs(touchY - event.getY()));
- if (size == mContentWidth || size == mContentHeight) {
- mState = State.ABOUT_TO_ANIMATE;
- //Log.e("size", String.valueOf(size));
- //Log.e(String.valueOf(mContentWidth),String.valueOf(mContentHeight));
- }
- post(startAnimation);
- }
- }
- return false;
- }
- };
即可修复这个bug,并且也同样实现了OnClickListener的功能,可以把原Panel的OnClickListener给删掉了!


 2787
2787

 被折叠的 条评论
为什么被折叠?


评论