


T0 参考代码
gitee地址:
python-pytest-demo![]() https://gitee.com/nicckco/study-python/tree/master/python-pytest-demo
https://gitee.com/nicckco/study-python/tree/master/python-pytest-demo
T1 Pytest 是什么
Pytest是一个基于python的测试框架,用于编写和执行测试代码。在REST服务的今天,pytest主要用于API测试,尽管我们可以用pytest来编写简单到复杂的测试,即我们可以编写代码来测试API、数据库、UI等。
T1.1 安装Pytest
pip install pytest如果报错,使用下列语句进行安装
pip install pytest -i http://pypi.douban.com/simple --trusted-host pypi.douban.comT2 Pytest Unit Test
T2.1 测试命令
pytestpytest 默认是检测带有test*开头的文件,类、函数。
- 针对文件:
默认是检测test*.py文件,如果不是这个开头,如demo1.py,则需要测试,则要在命令上加上文件名如:pytest demo1.py
- 针对类:默认是检测Test类,如class Test* ,如果不是则无法检测
- 针对函数:默认是检测函数名为:test*开头的,如果不是则无法检测
T2.2 测试用例
步骤:
1. 随便创建一个.py的文件,比如demo1.py
2. 创建以test开头的函数方法,如下列完整代码
3. 在当前demo.py的同级目录下运行cmd,执行:pytest demo1.py
import pytest
# 默认pytest 会运行以test_*开头的函数方法,
# 也就是说你的测试方法中带有test,就会被自动扫描测试
def test_01():
print("11111111111111")
assert 11 == 12
# 也可以不加下划线_,一样被扫描
def test03():
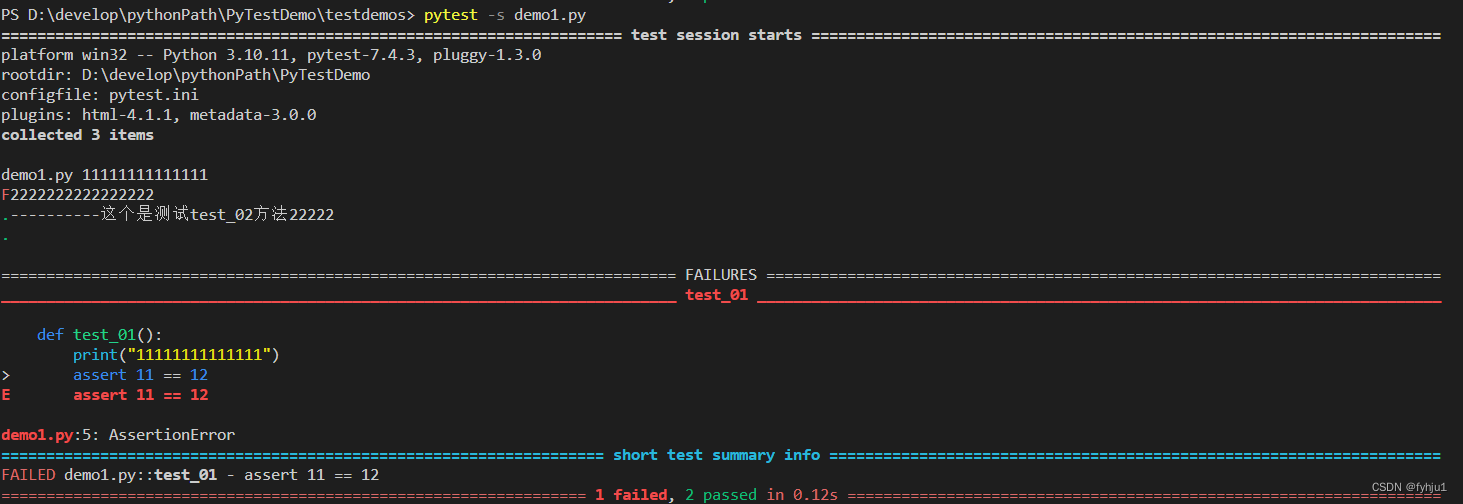
assert True运行结果如下:
 可以看到,这里test_01 测试失败,test03测试成功。
这里用到一个语法字段 asset 断言,简单来说,就是asset 条件,如果条件成功就pass ,不成功就抛出异常,对于默认成功的函数也可以不加asset
T2.3 测试类
步骤:
1. 在demo1.py 的基础下,创建一个以Test开通的class类,这里类的开头T要大写
2. 写入测试内容,下列为完整代码
3. pytest 测试 demo1.py,执行cmd,输入: pytest -s demo1.py
import pytest
def test_01():
print("11111111111111")
assert 11 == 12
def test03():
assert True
class Test_001:
# 这里需要注意, 测试类里面写入的测试方法,需要带有参数self
def test_02(self):
print("----------这个是测试test_02方法22222")
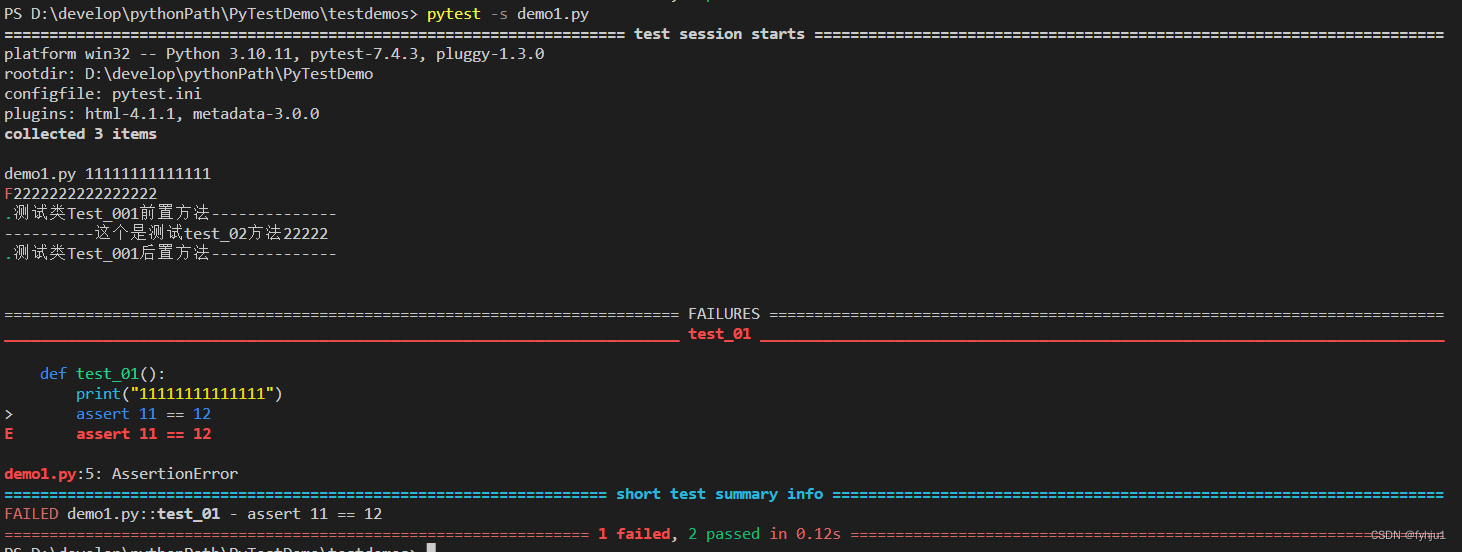
pass运行结果如下:
这里使用的运行代码为pytest -s demo1.py , 这样会将print日志也一并打印出来。
我们从日志中可以看到,先执行的是test_01方法,然后是test03,最后才是test02
但这里的执行顺序,是按照代码位置的执行顺序而定的,由于test01,test03在前面,所以先执行
T2.4 测试类-前置后置方法
比如说,我们有个接口,调用前,需要先获取服务器token,才能访问接下来的服务,那么我们有一个前置的方法要先执行获取token , 这里就需要一个统一的前置方法,他只执行一次,在使用完后就消费
这里用到一个注解:@classmethod , 定义类方法
setup_class : 测试类前置方法
teardown_class: 测试类后置方法
步骤:
1. 在demo1.py 的基础上面
2. 写入下列代码,下列为完整代码
3. pytest 测试 demo1.py,执行cmd,输入: pytest -s demo1.py
import  pytest

def test_01():
    print("11111111111111")
    assert 11 == 12

def test03():
    print("2222222222222222")
    assert True

class Test_001:
    def test_02(self):
        print("----------这个是测试test_02方法22222")
        pass

    @classmethod
    def setup_class(cls):
        print("测试类Test_001前置方法--------------")

    @classmethod
    def teardown_class(cls):
        print("测试类Test_001后置方法--------------")
        # print('测试类'+ cls.__name__ +'后置方法----------')
运行结果如下:
这里我们很清楚的看到,在进入test_001类以后,
先执行了setup_class 类前置方法,
然后再执行中间的类测试方法 test_02,
最后才执行teardown_class 类后置方法
而且,setup_class 和 teardown_class是不参与测试最终结果的,底部pass 2,failed 1 说明这两方法是不包含再测试报告结果的
T2.5 测试用例-前置后置方法
上面讲到了测试类在进入和执行完有前置和后置方法
这一小节,就是测试方法有前置方法(setup_method)和后置方法(teardown_method)
步骤:
1. 在demo1.py 的基础上
2. 写入下列完整代码
3. pytest 测试 demo1.py,执行cmd,输入: pytest -s demo1.py
import pytest
def test_01():
print("11111111111111")
assert 11 == 12
class Test_001:
def test_02(self):
print("执行测试用例test02")
pass
def test_04(self):
print("执行测试用例test04")
pass
@classmethod
def setup_class(cls):
print("===进入测试类-前置方法 setup_class--------------")
@classmethod
def teardown_class(cls):
print('====离开测试类-后置方法 teardown_class----------')
def setup_method(function):
print("=进入测试用例-前置方法 setup_method--------------")
def teardown_method(function):
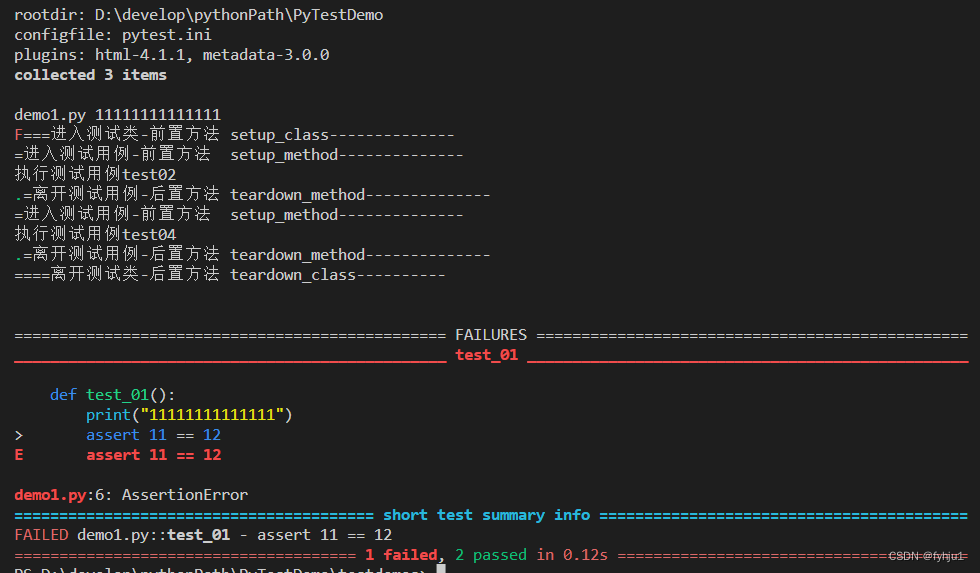
print("=离开测试用例-后置方法 teardown_method--------------")输出结果如下:
我们可以看到在进入和离开test02,test04时,都会分别执行setup_method 和teardown_class 两个函数
T3 PyTest-html生成测试报表
T3.1 安装 pytest-html
pip install pytest-html如果报错,使用下列语句进行安装
pip install pytest-html -i http://pypi.douban.com/simple --trusted-host pypi.douban.comT3.2 生成测试报表
生成报表使用语法: pytest --html = xxxx.html
这里以同目录下demo1.py为例,生成报表,写法为:
pytest -s --html=report.html demo1.py成功后,会生成一个report.html 文件 和一个携带样式的asset 文件夹
打开report,页面如下:
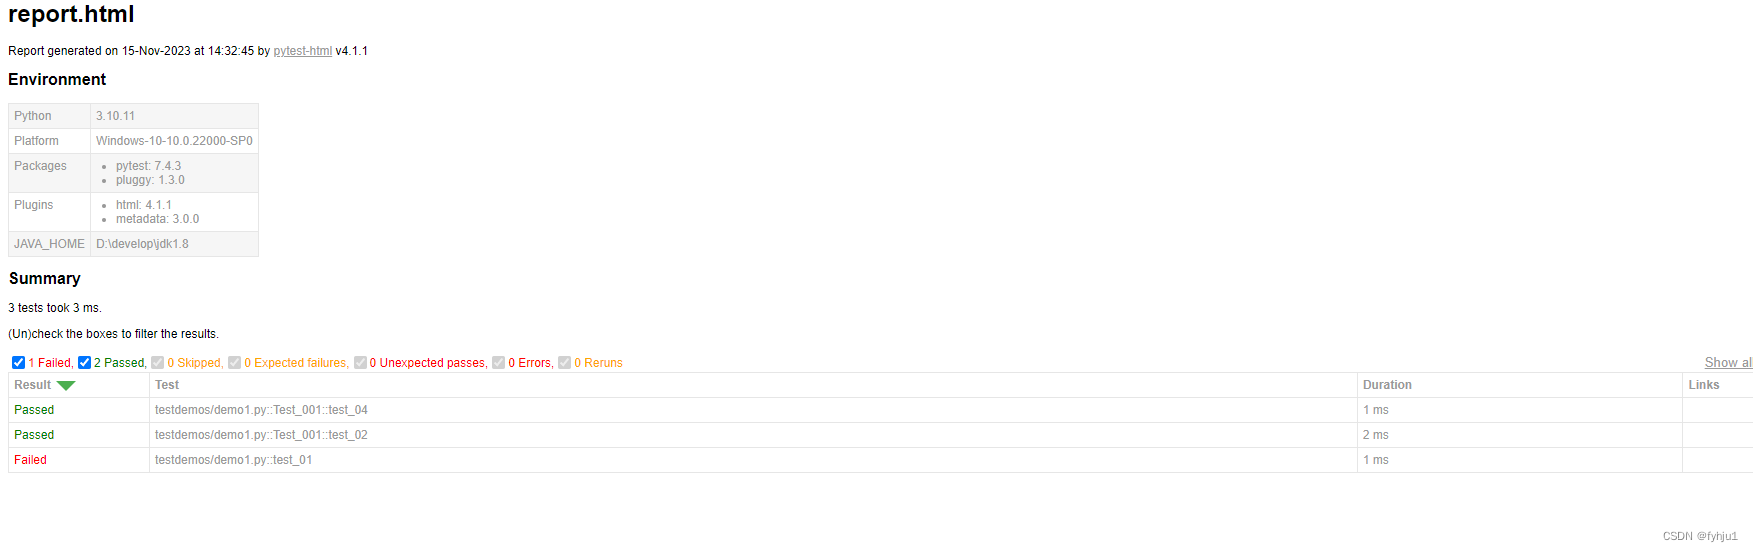
注: 这里 -s 是为了打印详细数据在控制台,可以不写
demo1.py 这里要写,pytest 默认是检测test开头的文件
T4 Pytest.main()
上面说明了pytest 编写测试用例的基本写法,以及pytest的相关命令,那么测试文件如何以面方法单独运行
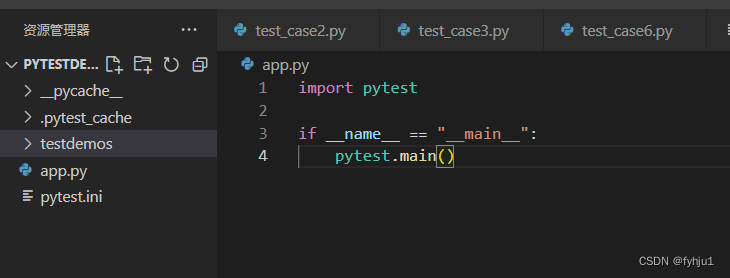
T4.1 主函数运行
前文说到,pytest 默认是检测test*开头的文件,main函数也是
步骤:
1. 新建test_case1.py 文件
2. 写入以下内容
3. 以mian函数运行该文件如下,或者用命令:python test_case1.py
import pytest

def test_001():
    assert 100 ==200

if __name__ == "__main__":
    pytest.main()
这里运行结果跟pytest 运行结果一样,就不展示了
T4.2 运行参数
| 参数 | 描述 | 案例 |
| -v | 输出调试信息。如:打印信息 | pytest.main([‘-v’,‘testcase/test_one.py’,‘testcase/test_two.py’]) |
| -s | 输出更详细的信息,如:文件名、用例名 | pytest.main([‘-vs’,‘testcase/test_one.py’,‘testcase/test_two.py’]) |
| -n | 多线程或分布式运行测试用例 | |
| -x | 只要有一个用例执行失败,就停止执行测试 | pytest.main([‘-vsx’,‘testcase/test_one.py’]) |
| --maxfail | 出现N个测试用例失败,就停止测试 | pytest.main([‘-vs’,‘-x=2’,‘testcase/test_one.py’] |
| --html=report.html | 生成测试报告 | pytest.main([‘-vs’,‘--html=./report.html’,‘testcase/test_one.py’]) |
| -m | 通过标记表达式执行 | |
| -k | 根据测试用例的部分字符串指定测试用例,可以使用and,or |
就如上面的命令,这些命令不仅仅可以卸载main函数里面,也可以带到pytest 命令上
如:使用pytest命令生成测试报告
pytest --html=report.htmlT4.3 pytest.init 配置文件
pytest的主配置文件,可以改变pytest的默认行为,有很多可配置的选项。
基本写法:(可自定义,更多写法自行百度)
#配置pytest命令行运行参数
[pytest]
# 空格分隔,可添加多个命令行参数 -所有参数均为插件包的参数配置测试搜索的路径
addopts=-vs --html=./report/report.html

testpaths=testdemos  # 当前目录下的scripts文件夹 -可自定义

# 配置测试搜索的文件名称
# 当前目录下的scripts文件夹下,以test开头,以.py结尾的所有文件 -可自定义
python_files=test*.py

# 测试文件夹下,测试类名称-可自定义
python_classes=Test_*

# 测试类下,测试用例名称-可自定义
python_functions=test_*
T4.4 框架搭建
新建项目PytestDemo,基于上面init的写法,我们自行编写几个测试文件,放入testdemos文件夹下(自定义,参考pytest.init),pytest.init可以copy上面的脚本,或自行修改
文件结构如下:
T5 pytest.fixture
fixture区别于unnitest的传统单元测试(setup/teardown)有显著改进:
1.有独立的命名,并通过声明它们从测试函数、模块、类或整个项目中的使用来激活。
2.按模块化的方式实现,每个fixture都可以互相调用。
3.fixture的范围从简单的单元测试到复杂的功能测试,可以对fixture配置参数,或者跨函数function,类class,模块module或整个测试session范围。
@pytest.fixture(scope="function")T5.1 fixture作为参数传递
fixture可以作为参数进行传递,也可以进行相互调用
- 在%testpaths%(如pytest.init配置的testdemos)路径下,新建test_fixture1.py,写入下列内容
import pytest

@pytest.fixture()
def fixture1():
    a = 'zhangsan'
    return a

@pytest.fixture()
def fixture2():
    return 'zhangsan','lisi'

@pytest.fixture()
def fixture3(fixture1):
    return fixture1,'wangwu'

def test_a(fixture1):
    assert fixture1 == 'zhangsan'
    print('fixture传入一条数据')

def test_b(fixture2):
    assert fixture2[0] == 'zhangsan'
    assert fixture2[1] == "lisi"
    print(str(fixture2))
    print('fixture传入一组数据')

def test_c(fixture1, fixture2):
    assert fixture2[0] == fixture1
    print('多个fixture作为参数传入')

def test_d(fixture3):
    print(str(fixture3))
    print('fixture相互传递')

if __name__ == "__main__":
    pytest.main(['-vs','testdemos/test_fixture1.py'])
T5.2 conftest.py
fixture可以放到单独的文件里,如果你希望多个文件共享fixture,可以在某个公共的路径创建一个conftest.py,将fixture放在其中。
- 在%testpaths%(如pytest.init配置的testdemos)路径下,新建conftest.py,写入下列内容
import pytest

# autouse=True 自动执行
@pytest.fixture(autouse=True)
def common_fixture():
    print("这个是第二级公用模块===second===")
按照T5.1,运行test_fixture1.py,如图显示,自动引用公共模块conftest.py的内容

T5.2 fixture作用范围
fixture有一个scope的参数指定范围。
scope=‘function’ 函数级别
scope=‘class’ 类级别
scope=‘module’ 模块级别
scope=‘session’ 会话级别
T5.2.1 函数(function)级别
如果不写参数,参数就是scope="function",它的作用范围是每个测试用例来之前运行一次,销毁代码在测试用例之后运行
- 在%testpaths%(如pytest.init配置的testdemos)路径下,新建test_fixture2.py,写入下列内容
import pytest

@pytest.fixture(scope="function")
def scope_function():
    print("\nthis is a scope function fixture")
    return "function"


class Test_Case:
    def test_1(self, scope_function):
        print("进入test1")
        name = 'function'
        assert scope_function == name

    def test_2(self, scope_function):
        print("进入test2")
        sex = 'function'

if __name__ == "__main__":
    pytest.main(['-vs', 'testdemos/test_fixture2.py'])
T5.2.2 类(class)级别
fixture为class级别的时候,如果一个class里面有多个用例,都调用了次fixture,那么此fixture只在此class里所有用例开始前执行一次。
- 在%testpaths%(如pytest.init配置的testdemos)路径下,新建test_fixture3.py,写入下列内容
import pytest


@pytest.fixture(scope="function")
def scope_function():
    print("\n进入 scope function")
    return "function"

@pytest.fixture(scope = 'class')
def scope_class():
    print("\n进入 Test class,只执行一次")
    return 'class'


class Test_Case:
    def test_one(self,scope_class,scope_function):
        print('进入test_one')
        assert scope_class == 'class'
        assert scope_function == "function"

    def test_two(self,scope_class,scope_function):
        print('进入test_two')
        assert scope_class == 'class'

if __name__ == "__main__":
    pytest.main(['-vs','testdemos/test_fixture3.py'])
T5.2.3 模块(module)级别
fixture为module时,在当前.py脚本里面所有用例开始前只执行一次。
- 在%testpaths%(如pytest.init配置的testdemos)路径下,新建test_fixture4.py,写入下列内容
import pytest


@pytest.fixture(scope="function")
def scope_function():
    print("进入 function scope")
    return "function"

@pytest.fixture(scope = 'class')
def scope_class():
    print("进入 class scope,只执行一次=======")
    print("")
    return 'class'

@pytest.fixture(scope = 'module')
def scope_module():
    print("\n进入module scope,在当前py文件下,只执行一次======")
    print("")
    return "module"


class Test_Case:
    def test_one(self,scope_class,scope_function,scope_module):
        print('进入test_one')
        assert scope_class == 'class'
        assert scope_function == "function"
        assert scope_module == "module"

    def test_two(self,scope_class,scope_function,scope_module):
        print('进入test_two')
        assert scope_class == 'class'

if __name__ == "__main__":
    pytest.main(['-vs','testdemos/test_fixture4.py'])
T5.2.4 会话(session)级别
fixture为session级别是可以跨.py模块调用的,也就是当我们有多个.py文件的用例的时候,如果多个用例只需调用一次fixture,那就可以设置为scope="session",并且写到conftest.py文件里。
- 在%testpaths%(如pytest.init配置的testdemos)路径下-> conftest.py
import pytest

@pytest.fixture(autouse=True)
def common_fixture():
    print("这个是第二级公用模块===second===")


@pytest.fixture(scope="session")
def scope_session():
    print("this is session scope fixture")
return 'session'- 在%testpaths%(如pytest.init配置的testdemos)路径下,新建test_fixture5.py,写入下列内容
import pytest


def test_one(scope_session):
    print("test one====")
    print(scope_session)

if __name__ == "__main__":
    pytest.main(['-vs','testdemos/test_fixture5.py'])
T5.3 fixture添加@autouse
自动开启自行fixture案列,默认为false
@pytest.fixture(autouse=True)
如:conftest.py
import pytest

@pytest.fixture(autouse=True)
def common_fixture():
    print("这个是第二级公用模块===second===")


@pytest.fixture(scope="session")
def scope_session():
    print("this is session scope fixture")
    return 'session'
这里面common_fixture会自动执行,不再需要作为参数进行传递。
T5.4 fixture重命名
一般fixture会作为参数进行传递,但是如果案例名太长,观看起来不太美观,这里可以通过name对fixture进行重命名
@pytest.fixture(name='xx')
- 在%testpaths%(如pytest.init配置的testdemos)路径下,新建test_fixture6.py,写入下列内容
import pytest


@pytest.fixture(name='short')
def this_is_so_long_function_fixture():
    return 'short'

def test_one(short):
    print("short == %s" %short)
    assert short == "short"


if __name__ == "__main__":
    pytest.main(['-vs', 'testdemos/test_fixture6.py'])
T5 pytest.mark
Pytest提供的mark标记,允许我们标记测试函数,测试类和整个模块。通过不同的标记实现不同的运行策略,如标记冒烟测试用例。
| 策略 | 作用 |
| skip | 无条件跳过测试用例 |
| skipif | 如果条件为真,则跳过测试用例 |
| xfail | 测试用例标记为预期失败 |
| parametrize | 参数化 |
| usefixtures | 使用夹具 |
| filterwarnings | 添加警告过滤器 |
T5.1 pytest.mark.skip
pytest.mark.skip - 无条件跳过测试用例
pytest.mark.skip(reason=None) 阐述:
| 字段 | 备注 |
| reason | str类型,默认值为None,可以添加跳过测试用例原因的描述信息 |
- 在%testpaths%(如pytest.init配置的testdemos)路径下,新建test_case.py文件,写入下列内容
import pytest

@pytest.mark.skip()
def test_one():
    pass

def test_two():
    pass


if __name__ == "__main__":
    pytest.main(['-s','testdemos/test_case2.py'])
T5.2 pytest.mark.skipif
pytest.mark.skipif - 如果条件为真,则跳过测试用例
pytest.mark.skipif(condition, reason=None)| 字段 | 备注 |
| condition | Ture or Flase ; True跳过测试案例,False不跳过;使用condition参数的时候,必须有参数reason,否则会报错ERROR。 |
| reason | str类型,默认值为None,可以添加跳过测试用例原因的描述信息。 |
- 在%testpaths%(如pytest.init配置的testdemos)路径下,新建test_case2.py文件,写入下列内容
import pytest

@pytest.mark.skipif( 4 > 3, reason = 'skipif跳过测试用例')
def test_three():
    print("进入test_three函数")
    pass

def test_two():
    print("进入test_two函数")
    pass

if __name__ == "__main__":
    pytest.main(['-s','testdemos/test_case2.py'])
T5.3 pytest.mark.xfail
pytest.mark.xfail - 将测试用例标记为预期失败
pytest.mark.xfail(condition=None, *, reason=None, raises=None, run=True, strict=False)阐述:
| 字段 | 备注 |
| condition | 条件,默认值为None,可以为True,False或者条件字符串; 条件为真,则标记起作用。 条件为假,则标记不起作用; 使用参数condition的时候,必须有参数reason,否则会报错ERROR。 |
| reason | str类型,默认值为None,可以添加预期失败原因的描述信息。 |
| raises | 异常类型,默认值为None,可以是单个异常,也可以是多个异常组成的元组; 如果测试用例执行失败,出现的异常类型在raises里,则不会抛出异常,测试用例标记为XFAIL; 如果测试用例执行失败,出现raises之外的异常,则测试用例标记为FAILED,并抛出异常信息。 |
| run | 布尔型,默认值为True;当run=False时候,直接将测试用例标记为XFAIL,不需要执行测试用例。 |
| strict | 默认值为False; 当strict=False时,如果用例执行失败,结果标记为XFAIL,表示符合预期的失败;如果用例执行成功,结果标记为XPASS,表示不符合预期的成功; 当strict=True时,如果用例执行成功,结果将标记为FAILED,而不再是XPASS了;可以在pytest.ini文件中配置:xfail_strict=true。 |
- 在%testpaths%(如pytest.init配置的testdemos)路径下,新建test_case3.py文件,写入下列内容
import pytest

@pytest.mark.xfail(reason="预计测试失败,结果测试成功1====1")
def test_one():
    assert  1 == 1

@pytest.mark.xfail(reason='预计测试失败,结果测试失败1====2')
def test_two():
    assert 2 == 1

def test_three():
    pytest.xfail(reason="预计测试失败,后面的不会执行")
    assert 22 == 22


@pytest.mark.xfail(condition= True,reason="预计测试成功,结果测试失败")
def test_four():
    print('1231231231231')
    assert 1==2

'''
    raises,异常类型参数,默认值为None,可以是单个异常,也可以是多个异常组成的元组;
    如果测试用例执行失败,出现的异常类型在raises里,则不会抛出异常,测试用例标记为XFAIL;
    如果测试用例执行失败,出现raises之外的异常,则测试用例标记为FAILED,并抛出异常信息。
'''
@pytest.mark.xfail(raises = ZeroDivisionError,reason="测试失败,但一场不匹配,抛出异常")
def test_five():
    assert 1 == 2


'''
    run,布尔型参数,默认值为True;
    当run=False时候,直接将测试用例标记为XFAIL,不需要执行测试用例。
'''
@pytest.mark.xfail(run = False)
def test_six():
    # 后面的代码不会执行
    print('run=========')


'''
    strict,关键字参数,默认值为False;
    当strict=False时,如果用例执行失败,结果标记为XFAIL,表示符合预期的失败;如果用例执行成功,结果标记为XPASS,表示不符合预期的成功;
    当strict=True时,如果用例执行成功,结果将标记为FAILED,而不再是XPASS了;
    可以在pytest.ini文件中配置:xfail_strict=true。
'''
@pytest.mark.xfail(strict=True)
def test_seven():
    assert 1 == 1


if __name__ == "__main__":
    pytest.main(['-vs','testdemos/test_case3.py'])
T5.4 pytest.mark.parametrize
pytest.mark.parametrize - 参数化
@pytest.mark.parametrize(argnames, argvalues, indirect=False, ids=None, scope=None, *, _param_mark=None)阐述:
| 字段 | 备注 |
| argnames | 参数名,以逗号分隔的字符串,表示一个或多个参数名称。或参数字符串组成的列表/元组。 |
| argvalues | 参数值,类型是一个可迭代对象,和参数名一一对应。 |
| indirect | 参数名称列表(参数名称的子集)或布尔值。 indirect一般与Pytest的fixture,request.param组合使用 当indrect =True时,argnames参数名是fixture夹具的函数名,argvalues则是给这个夹具函数传递的参数。 |
| ids | 标记参数化测试用例的执行名称,默认自动生成,多个参数名之间用"-"连接。 |
| scope | 参数范围 |
- 在%testpaths%(如pytest.init配置的testdemos)路径下,新建test_case4.py文件,写入下列内容
import pytest

'''
    一个参数,对应一个值列表
'''
@pytest.mark.parametrize("a", [12])
def test_one(a):
    print('一个参数===============')
    print('参数a的值为:',a)
    print('一个参数===============')


'''
    两个参数
'''
@pytest.mark.parametrize('a,b',[(12,13)])
def test_two(a,b):
    print('两个参数===============')
    print("a的参数为:%d,b的参数为:%d" %(a,b))
    print('两个参数===============')


'''
    两组参数
'''
@pytest.mark.parametrize("a,b,c",[(12,13,14),(13,14,15)])
def test_three(a,b,c):
    print('两组参数===============')
    print("a的参数为:%d,b的参数为:%d,c的参数为:%d" %(a,b,c))
    print('两组参数===============')


'''
    多组参数
'''
@pytest.mark.parametrize("a,b,c",[(12,13,14),(21,22,23),(33,34,35)])
def test_four(a,b,c):
    print('多组参数===============')
    print("a的参数为:%d,b的参数为:%d,c的参数为:%d" %(a,b,c))
    print('多组参数===============')


if __name__ == "__main__":
    pytest.main(['-vs','testdemos/test_case4.py'])
T5.5 pytest.mark.usefixtures
pytest.mark.usefixtures - 使用夹具
pytest.mark.usefixtures(*names)

# Parameters:args – The names of the fixture to use, as strings.
# 夹具名,字符串类型,可以有一个或多个夹具,通过*来解包将夹具名作为参数传给被标记的测试函数。- 在%testpaths%(如pytest.init配置的testdemos)路径下,新建test_case5.py文件,写入下列内容
import pytest

@pytest.fixture()
def fixtrue_one():
    print("this is fixtrue one")


@pytest.mark.usefixtures("fixtrue_one")
class Test_One:
    def test_two(self):
        pass

    def test_three(self):
        pass

if __name__ == "__main__":
    pytest.main(['-vs','testdemos/test_case5.py'])
T5.6 pytest.mark.filterwarnings
pytest.mark.filterwarnings - 添加警告过滤器
pytest.mark.filterwarnings(filter)阐述:
| 字段 | 涵义 |
| filter | str类型,一个由Python文档的警告过滤器部分中指定的元组内容(action, message, category, module, lineno)组成的警告规范字符串,用“:”分隔。可选字段可以省略。传递给筛选的模块名不是正则表达式转义的。 |
- 在%testpaths%(如pytest.init配置的testdemos)路径下,新建test_case6.py文件,写入下列内容
import pytest,warnings


def apiv1():
    warnings.warn(UserWarning('api v1'))
    return 1

def test_one():
    assert apiv1() == 1


'''
    警告过滤器filterwarnings装饰的测试函数test_two过滤掉了匹配到 "api v1" 开头的警告信息。
'''
@pytest.mark.filterwarnings("ignore:api v1")
def test_two():
    assert apiv1() == 1

if __name__ == "__main__":
    pytest.main(['-vs','testdemos/test_case6.py'])
还没写完,先不写了,每天写一点点,就这样先。。。。


 151
151


 被折叠的 条评论
为什么被折叠?
被折叠的 条评论
为什么被折叠?
 到【灌水乐园】发言


