


前言
本文全文翻译http://www.networkcomms.net/how-to-create-a-client-server-application-in-minutes/
Are you trying to develop a client server application but are coming up against all sorts of problems? We certainly did and that’s why we developed NetworkComms.Net. You can follow this quick tutorial to create a client server application in just several minutes.
译:你如果在开发一个客户服务器程序时会遇到各种各样的问题,但是用NetworkComms.Net,按下面的操作教程只要几分钟就完事了,这也是我们提供这个组件的原因:省力。
If you are looking for something a little more advanced please also see how to create a WPF client server chat application. Please also checkout our features section to find out just how powerful our network library is.
译:在"WPF client server chat application"这个例子中有更强大的功能,你会通过这个例子感受到我们的network library 是多么的powerful。
Before we get started ensure you have one of the NetworkComms.Net packages (if not please see our download page) and Visual Studio 2010 Express or later installed, which should come with .Net4 or later.
译:在我们开工之前,需要有NetworkComms.Net包和VS2010环境。没有这两个,请下载打造好。
1. Create Visual Studio Projects
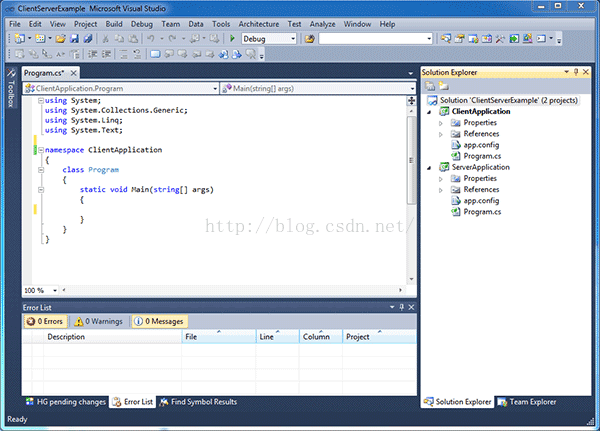
•Create a new visual studio solution named ‘ ClientServerExample ‘ containing a Visual C# ‘ Console Application ‘ project naming it ‘ ClientApplication ‘.
•Once created add a second Visual C# ‘ Console Application ‘ project naming it ‘ ServerApplication ‘.
•You should now have something that looks like this:
译:打开VS2010,创建一个空解决方案名字叫"ClientServerExample",然后为它添加一个名为"ClientApplication"的C#控制台应用程序。接着添加第二个名为"ServerApplication"的C#控制台应用程序。上述几步完成后,如下图所示。
2. Add NetworkComms.Net DLL To Projects
•The NetworkComms.Net download contains DLLs for all supported platforms but we are only interested in the Net40 > Release > Complete DLL. Copy this DLL to the same location as the solution we created in step 1.
•We now need to add project references to the NetworkComms.Net DLL we just downloaded. Right click on the ‘ ClientApplication ‘ project and select ‘ Add Reference… ‘. Within the window that opens select the Browse tab and select the DLL we just downloaded. Repeat this step for the ‘ ServerApplication ‘ project.
•If you expand the ‘ References ‘ folder within both projects you should see the NetworkComms.Net references you just added like this:
译: 第2步,将DLL加进到工程中
•将 Net40 > Release > Complete下的DLL文件拷到解决方案所在的目录
•右击 ‘ ClientApplication ‘ project and select ‘ Add Reference… ‘,在“浏览”tab页,找到DLL文件,完成添加引用。同样的对‘ ServerApplication ‘也这样操作。
3. Copy & Paste Client Source Code
•Copy and paste the following code into the ‘ ClientApplication ‘ project replacing ALL EXISTING code in the file ‘ Program.cs ‘. Note the highlighted line which is the only line required to actually send an object to the server.
译:将Client方案的Program.cs中的所有代码用下述代码替换。
using System;
using System.Collections.Generic;
using System.Linq;
using System.Text;
using NetworkCommsDotNet;

namespace ClientApplication
{
    class Program
    {
        static void Main(string[] args)
        {
            //Request server IP and port number
            Console.WriteLine("Please enter the server IP and port in the format 192.168.0.1:10000 and press return:");
            string serverInfo = Console.ReadLine();  //读取

            //Parse the necessary information out of the provided string
            string serverIP = serverInfo.Split(':').First();  //获得服务端的IP
            int serverPort = int.Parse(serverInfo.Split(':').Last());  //获得服务端程序的端口

            //Keep a loopcounter
            int loopCounter = 1;   //一个计数变量
            while (true)   //永远循环
            {
                //Write some information to the console window
                string messageToSend = "This is message #" + loopCounter;  //发送给服务端的信息
                Console.WriteLine("Sending message to server saying '" + messageToSend + "'");

                //Send the message in a single line
                NetworkComms.SendObject("Message", serverIP, serverPort, messageToSend);  //向IP为...端口为...的服务端程序发送messageToSend信息,请注意语句中的  "Message"

                //Check if user wants to go around the loop
                Console.WriteLine("\nPress q to quit or any other key to send another message.");
                if (Console.ReadKey(true).Key == ConsoleKey.Q) break;    //如果你按下的是q键,则这个死循环就跳出;按下的非q键,则向服务器发送一次信息。
                else loopCounter++;
            }

            //We have used comms so we make sure to call shutdown
            NetworkComms.Shutdown();
        }
    }
}
4. Copy & Paste Server Source Code
•Copy and paste the following code into the ‘ ServerApplication ‘ project replacing ALL EXISTING code in the file ‘ Program.cs ‘. Note the highlighted lines which is all that is required to setup the server.
using System;
using System.Collections.Generic;
using System.Linq;
using System.Text;
using NetworkCommsDotNet;
using NetworkCommsDotNet.Connections;
namespace ServerApplication
{
class Program
{
static void Main(string[] args)
{
//Trigger the method PrintIncomingMessage when a packet of type 'Message' is received
//We expect the incoming object to be a string which we state explicitly by using <string>
NetworkComms.AppendGlobalIncomingPacketHandler<string>("Message", PrintIncomingMessage);
//注意上句的Message,这个在客户端程序中也有这个单词,还要注意这个PrintIncomingMessage,这是一个线程处理函数,见下面,功能是获取连接者发来的信号,并处理。
//Start listening for incoming connections //开始监听
Connection.StartListening(ConnectionType.TCP, new System.Net.IPEndPoint(System.Net.IPAddress.Any, 0));
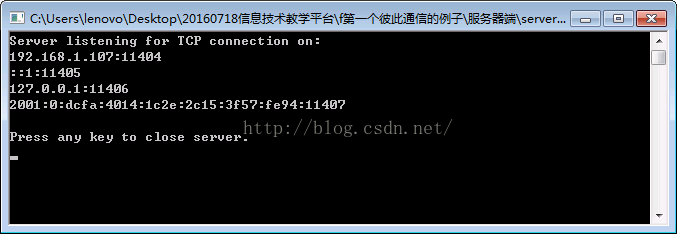
//Print out the IPs and ports we are now listening on //服务端程序将自己的所有的ip与端口输出显示出来,这些ip和端口,客户机程序要使用!
Console.WriteLine("Server listening for TCP connection on:");
foreach (System.Net.IPEndPoint localEndPoint in Connection.ExistingLocalListenEndPoints(ConnectionType.TCP))
Console.WriteLine("{0}:{1}", localEndPoint.Address, localEndPoint.Port);//显示的信息如下图2所示
//Let the user close the server //如果服务端程序在运行时,操作者按下了任意键,则服务端程序会并闭退出。
Console.WriteLine("\nPress any key to close server.");
Console.ReadKey(true);
//We have used NetworkComms so we should ensure that we correctly call shutdown
NetworkComms.Shutdown();
}
/// <summary>
/// Writes the provided message to the console window
/// </summary>
/// <param name="header">The packet header associated with the incoming message</param>
/// <param name="connection">The connection used by the incoming message</param>
/// <param name="message">The message to be printed to the console</param>
private static void PrintIncomingMessage(PacketHeader header, Connection connection, string message)
{
Console.WriteLine("\nA message was received from " + connection.ToString() + " which said '" + message + "'.");
//将某位客户机发来的信息显示出来。例如有3台客户机连到这个服务器,每一台发来的信息不一样,则都在这里处理
}
}
}
图2 服务端程序运行后,显示11404,11405,11406,11407这些端口


 2195
2195

 被折叠的 条评论
为什么被折叠?
被折叠的 条评论
为什么被折叠?
 到【灌水乐园】发言


